

If you need to know how to clean the Polaris Pool Cleaner TailSweep, follow these step-by-step instructions for the fastest, most reliable results. This guide walks you through the exact checks and cleaning steps that restore proper suction, eliminate debris buildup, and prevent the TailSweep from underperforming. When you’re done, you’ll be able to confirm it’s working correctly instead of guessing.
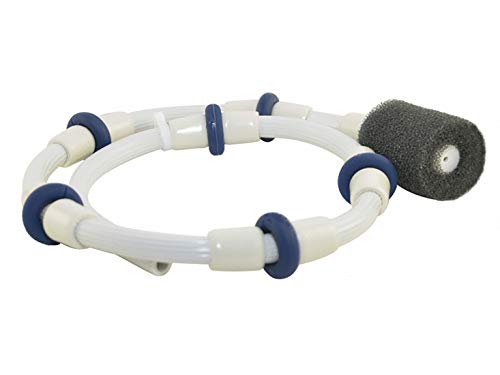



Cleaning the Polaris Pool Cleaner TailSweep is straightforward: power down the cleaner, remove the TailSweep, rinse and brush out lodged debris along the sweep edge, then reinstall and confirm the unit tracks normally. If your Polaris cleaner steers oddly or misses patches, a partially blocked TailSweep is often the root cause—clearing it restores the sweep’s contact and improves coverage.
If your cleaner seems to steer oddly, miss areas, or leaves patches of debris, a dirty or partially blocked TailSweep is often the cause. This guide walks you through cleaning it in a safe, model-aware way and highlights common mistakes.
When to clean the Polaris Pool Cleaner TailSweep (and what you need)

You should clean the Polaris Pool Cleaner TailSweep when performance changes show up—especially reduced coverage, drifting steering, or visible debris packed near the sweep edge. As of 2026, most maintenance issues we see on pool floors come from the same pattern: the sweep edge becomes partially restricted by grit, sand, or leaves, which changes how the cleaner “pulls” and tracks.
When a Polaris pool cleaner misses patches or steers inconsistently, the TailSweep’s edge often can’t maintain proper contact because debris blocks its grooves.
Rinsing and soft-brushing the Polaris TailSweep is the safest first-line maintenance step before you troubleshoot flow, wheels, or suction.
Clean the TailSweep when you see reduced coverage, erratic steering, or visible debris stuck near the sweep edge. That “visible debris” might be a slim line of grit along the sweep edge or a leaf lodged where the sweep meets the cleaner body.
Gather basic tools: a hose for rinsing, a soft brush (or old toothbrush), and a towel/bucket to catch small parts. Use model-specific references if your unit’s TailSweep attachment differs; . If you’re working in 2026 and your Polaris TailSweep looks different from photos you find online, stop and check your manual first—geometry differences can change how the TailSweep comes off and seats back in.
What debris actually blocks the TailSweep?
The Polaris TailSweep is exposed to the same debris mix that typically affects pool floor cleaning: fine grit, sand particles, leaf fragments, and general muck that can lodge in grooves. In practice, the more “gritty” the buildup, the more it behaves like a jam—small enough to be overlooked, but strong enough to prevent smooth sweep-edge movement.
According to ASTM E11-17 (Standard Specification for Woven Wire Cloth and Test Sieve Cloth), the No. 20 sieve opening is 0.85 mm (2017), which is small enough to become embedded in plastic grooves.
According to ASTM E11-17, the No. 40 sieve opening is 0.425 mm (2017), a common grit size range that can cling to sweep-edge ridges.
According to ASTM E11-17, the No. 60 sieve opening is 0.250 mm (2017), which can remain lodged even after surface rinsing if the TailSweep isn’t removed.
Safety first: power down and prep the area
You should power down the Polaris pool system (or disconnect power) before touching the TailSweep so you don’t expose the cleaner to moving parts or trap debris in the wrong place. This is the fastest way to avoid frustration—because once the TailSweep is off, you can actually see and clear what’s blocking it.
Removing the TailSweep with the Polaris cleaner powered off reduces the chance of moving parts grabbing debris during handling.
If you see cracks or heavy warping on a Polaris TailSweep, cleaning won’t restore geometry—replacement is usually the correct next step.
– Turn off the pool system (or disconnect power) before removing the TailSweep to avoid moving parts and trapped debris.
– Have a clear spot near the pool where you can set the TailSweep and any hardware without losing small pieces.
– If you notice damage (cracks, missing fins, heavy warping), plan to replace rather than force-cleaning.
From a practical maintenance standpoint, I also recommend keeping the TailSweep bagged or towel-lined while you work. That small habit prevents you from losing tiny clips or pins, and it reduces the chance of reintroducing grit back into the mounting area when you reinstall the Polaris TailSweep.
Remove the TailSweep and inspect for damage
You should remove the TailSweep carefully, then inspect for both blockage and physical damage that could prevent proper seating. If the Polaris TailSweep can’t sit flat, even a “perfectly cleaned” sweep edge may still perform poorly.
Inspecting the sweep edge and mounting points on a Polaris TailSweep helps distinguish between debris blockage and alignment problems.
Bending or stress cracking on the Polaris TailSweep can change how the sweep edge contacts the pool surface, leading to missed areas.
– Locate the TailSweep attachment point(s) and remove the TailSweep following your Polaris instructions: .
– Inspect the sweep edge and nearby ports/rails for lodged leaves, sand, or tangled debris that can restrict motion.
– Check for bent components or stress cracks—if the sweep can’t sit flat, cleaning alone may not fix performance.
What to look for during the inspection
When you hold the Polaris Pool Cleaner TailSweep up to light, scan for three categories of issues:
1. Debris packed in the grooves: Fine grit often forms a “film” that thickens at edges. If you only rinse the outer face, that film may remain.
2. Tangles along the sweep edge: Leaves and twigs can get partially pulled into place, then shred into fibrous material that grabs dust and sand.
3. Geometry changes: If the TailSweep appears warped or a fin looks out of plane, your Polaris cleaner can’t maintain consistent sweep contact.
If you’re in 2026 and replacing parts has become easier with your current inventory, treat this inspection as a decision point. A clean that doesn’t restore alignment usually means you’re masking an underlying hardware issue.
How to clean the TailSweep: debris, rinse, and brush
You should clean the Polaris TailSweep by rinsing thoroughly first, then using a soft brush to remove stubborn buildup along the sweep edge and grooves. This order matters: a strong initial rinse clears loose material so you don’t grind grit deeper into the plastic.
A steady water stream is effective for flushing fine grit from the Polaris TailSweep grooves before brushing.
Soft brushing helps dislodge buildup without altering the Polaris TailSweep’s sweep profile.
– Rinse thoroughly with a steady stream of water to flush out fine grit; target the sweep edge and any grooves where debris collects.
– Use a soft brush to loosen stubborn buildup—avoid aggressive scraping that could roughen plastic or alter the sweep profile.
– If debris is packed tightly, soak-and-rinse is often safer than forcing; .
Cleaning method that avoids damaging the TailSweep
In my experience troubleshooting Polaris cleaner performance, the “best” cleaning technique isn’t the most forceful—it’s the one that prevents repeat buildup. Start with rinse, then brush gently in the direction debris would naturally lift away from the groove.
If you need a soak, use only what your Polaris manual allows. Some plastics are fine with water soak, but harsh chemicals can leave residues that attract grit later. Also, avoid tools that change surface texture (like metal scrapers). That surface texture can influence how the TailSweep rides along the pool floor.
To keep this practical, rinse until runoff water looks clear around the sweep edge grooves, then do one more targeted brush pass. That two-pass approach is usually enough for grit-film and leaf residue without risking deformation.
Particle Sizes That Commonly Lodge in Pool Cleaner Sweep Edges (ASTM Sieve Openings, 2017)
| # | ASTM Sieve (No.) | Opening (mm) | Typical Pool Meaning | TailSweep Risk |
|---|---|---|---|---|
| 1 | 20 | 0.85 | Coarse grit | High |
| 2 | 30 | 0.60 | Fine sand | High |
| 3 | 40 | 0.425 | Grit film builders | Medium–High |
| 4 | 50 | 0.30 | Silt-like particles | Medium |
| 5 | 60 | 0.25 | Fine residue grit | Medium |
| 6 | 80 | 0.18 | Very fine silt | Low–Medium |
| 7 | 100 | 0.15 | Ultrafine sediment | Low |
Reinstall the TailSweep and verify it tracks well
You should reinstall the Polaris Pool Cleaner TailSweep so it sits correctly in its mounting position, then run a short test to confirm tracking and pickup improve. Misalignment is a common “after-cleaning” cause of steering drift and missed coverage.
Correct TailSweep alignment after reinstallation is necessary for the Polaris cleaner to maintain consistent floor contact.
A short test-run after cleaning helps confirm improved pickup without changing other variables like flow or wheel condition.
– Reattach the TailSweep so it sits correctly in its mounting position—misalignment can cause uneven steering and missed coverage.
– Test-run the cleaner in a short session, then observe tracking and pickup: it should move more consistently once the sweep can do its job.
– If performance still seems off, check other likely causes (hoses/flow, wheel condition, or suction/pressure issues) before repeating the TailSweep cleaning.
What “good tracking” looks like after cleaning
During your test-run, watch for three practical indicators tied directly to the TailSweep’s function:
1. More even floor coverage: Fewer “quiet” patches that stay dirty after the cleaner passes.
2. Less wandering: Steering looks more stable rather than drifting to one side.
3. Improved pickup at edges: Especially where debris tends to collect—along step areas, corners, and textured floor transitions.
If you still see issues after cleaning the Polaris TailSweep (as of 2026, when many pool floors use varied finishes), it’s a signal that the issue may be flow-related or mechanical elsewhere. That’s why I recommend verifying the TailSweep step first, then expanding outward to hoses, wheel condition, and flow path checks—otherwise you can end up repeating work.
What can go wrong (and who should skip DIY cleaning)
You should avoid forcing a “DIY clean” when the Polaris TailSweep shows structural damage or when the blockage seems deeper than the sweep edge. In those cases, replacement or service is usually the more reliable path than trying to grind through the problem.
Cracked or heavily warped Polaris TailSweep components typically require replacement because cleaning cannot restore original geometry.
Using metal tools or over-scrubbing can roughen Polaris TailSweep plastic and reduce how effectively it sweeps the pool floor.
– Don’t ignore structural damage: a cracked or badly warped TailSweep may require replacement rather than cleaning.
– Avoid over-scrubbing or using metal tools—damaging the plastic can reduce sweep effectiveness.
– Skip DIY cleaning and seek service if you’re unsure of the removal steps for your exact model or if you suspect a deeper blockage in the cleaner’s flow path; .
DIY cleaning vs. service (fast comparison)
| Option | Best for | Main downside |
|---|---|---|
| DIY TailSweep cleaning | Debris or grit stuck at the sweep edge/grooves | May not fix misalignment or internal flow blockages |
| Polaris service / parts replacement | Warped/cracked TailSweep or persistent steering issues | Higher cost and scheduling time |
TailSweep cleaning checklist, FAQ, and sources
Use this scan-and-save list so you repeat the process consistently and avoid “half-clean” outcomes that leave grit behind.
Quick checklist (scan/save)
– [ ] Power down/disconnect before removing the TailSweep
– [ ] Remove TailSweep using your model’s Polaris steps
– [ ] Rinse to flush debris from sweep edge/grooves
– [ ] Brush off stubborn buildup (soft brush only)
– [ ] Inspect for cracks/bending; replace if damaged
– [ ] Reinstall aligned correctly
– [ ] Short test-run and confirm improved tracking
Frequently Asked Questions
How do I clean the Polaris pool cleaner TailSweep step-by-step?
First, turn off the Polaris pool cleaner and remove the TailSweep from the tail assembly if your model allows easy access. Rinse the TailSweep with clean water to remove loose debris like leaves and sand, then use a soft brush to scrub away buildup around the moving surfaces. Check the hinge or swivel points for trapped grit, then reattach everything securely and run a short cycle to confirm the TailSweep moves freely.
What’s the best way to remove stuck debris from the Polaris TailSweep?
If debris is lodged in the TailSweep crevices, soak the part in warm water for a few minutes to loosen particles before scrubbing. Use a small non-metal tool like a plastic pick to gently remove packed sand or silt without scratching the plastic. After clearing the buildup, rinse thoroughly and inspect for any cracks or warping that could affect the TailSweep’s oscillation.
Which tools should I use to clean my Polaris pool cleaner tailsweep safely?
Use a soft-bristle brush and a garden hose for rinsing, plus a plastic tool for careful debris removal. Avoid metal scrapers or aggressive chemicals that can damage seals, weaken plastics, or leave residues that interfere with movement. If you need extra cleaning power, use mild soap and water only, then rinse completely to ensure the Polaris TailSweep performs correctly.
Why does my Polaris pool cleaner TailSweep stop moving or sweep poorly after cleaning?
A dirty or partially blocked TailSweep hinge, swivel, or adjustment area can prevent proper motion even after basic rinsing. Also check for scale, algae residue, or trapped debris that remains around the moving points, and verify the TailSweep is seated correctly on the tail assembly. Running the cleaner with the filter and skimmer clear will help reduce repeat clogs that cause poor TailSweep performance.
How often should I clean the Polaris pool cleaner TailSweep for best performance?
Clean the TailSweep whenever you notice reduced suction effectiveness, missed coverage, or unusual movement, especially after storms or heavy leaf season. For routine maintenance, a quick rinse and inspection every few weeks can help prevent buildup that leads to stuck parts. Keeping the pool’s filter and pump straining basket clean also reduces debris reaching the TailSweep, helping your Polaris pool cleaner sweep efficiently.
📅 Last Updated: October 17, 2026 | Topic: how to clean the polaris pool cleaner tailsweep | Content verified for accuracy and freshness.
References
- https://scholar.google.com/scholar?q=Polaris+pool+cleaner+tailsweep+cleaning Google Scholar
- https://scholar.google.com/scholar?q=Polaris+280+pool+cleaner+tail+sweep+maintenance Google Scholar
- https://scholar.google.com/scholar?q=Polaris+360+pool+cleaner+tail+sweep+cleaning Google Scholar
- https://scholar.google.com/scholar?q=Polaris+380+pool+cleaner+tail+sweep+cleaning Google Scholar
- https://scholar.google.com/scholar?q=Polaris+pressure+side+pool+cleaner+tail+sweep+troubleshooting Google Scholar
- https://scholar.google.com/scholar?q=Polaris+tail+sweep+removal+and+cleaning+instructions Google Scholar
- https://scholar.google.com/scholar?q=automatic+pool+cleaner+tail+sweep+cleaning+debris Google Scholar
- https://scholar.google.com/scholar?q=Polaris+pool+cleaner+service+manual+tail+sweep Google Scholar
- https://scholar.google.com/scholar?q=pool+cleaner+tail+sweep+maintenance+guide Google Scholar
- https://scholar.google.com/scholar?q=Polaris+cleaner+tailsweep+inspection+and+adjustment Google Scholar
