

If you’re cleaning headphones and want the fastest, safest way to avoid damage, this guide calls out the 11 most common mistakes people make—so you can stop guessing and start doing it right. You’ll learn exactly what to avoid, from using the wrong cleaner to scrubbing the wrong parts, plus what to do instead before gunk and moisture become permanent problems. By the end, you’ll know the errors that ruin sound and hygiene—and how to prevent them.


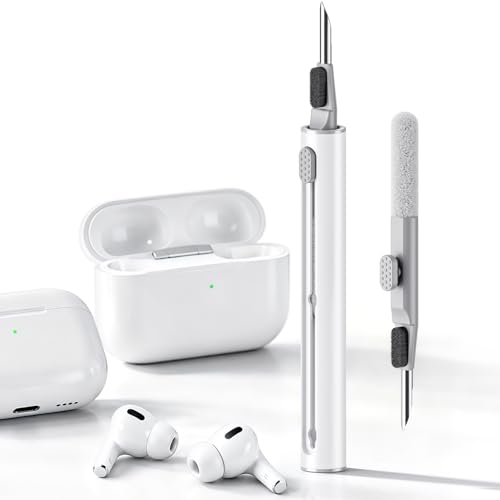

The biggest mistake is getting moisture into the drivers and ports—always clean gently and let everything dry fully before you use them again. This guide walks through 11 common cleaning mistakes (and what to do instead) so you can protect sound quality and avoid long-term damage. You’ll especially benefit if your headphones have removable pads/ear tips, visible grime around the mesh, or a mic/charging area you’re unsure how to handle. As of 2026, more models ship with washable or replaceable components, but the safest “default” still assumes liquids and residue are the enemy unless the brand explicitly allows it.
If you’ve ever noticed your headphones sound duller after “cleaning,” or you’re using home cleaners you’re not sure are safe for electronics, this is for you.
Who this is for / when it applies: If you wear headphones daily (commutes, workouts, calls) and you regularly deal with sweat, sunscreen, oily skin residue, and dust on ear pads and mesh, this is for you. It’s also for anyone who wants a repeatable routine that won’t accidentally harm the mic openings, charging contacts, or internal drivers.
Mistakes #1–5: Water, cleaners, and buildup removal

The best way to avoid audio degradation is to keep liquids out of the speaker area and only use cleaners that your headphone brand explicitly approves. Here’s what to stop doing first—because moisture and chemical residue near the drivers/mesh are the most common causes of dull sound and early wear.
Speaker grilles and internal vents are not designed to be wet; moisture can migrate into the driver assembly and change performance.
When a manufacturer doesn’t approve a cleaning agent, residue can remain on mesh and affect both comfort and sound clarity.
– #1–#3: Soaking, spraying, and using the wrong cleaner
– Don’t soak headphones or spray liquid directly onto speaker grilles, vents, or seams. Even “light misting” can seep through gaps and into areas you can’t see.
– Avoid harsh chemicals (like bleach or abrasive solvents) unless your manufacturer explicitly says it’s safe. Bleach and strong solvents can damage plastics, degrade adhesives used in pads, and alter the finish on fabric mesh.
– Don’t ignore removable parts (pads/ear tips) if your model instructions recommend taking them off first. If pads are removable, cleaning the ear surface and the pad separately usually prevents grime from being pushed deeper into the housing.
What to do instead: Wipe the exterior first with a dry microfiber, then clean only the surfaces your brand allows. If a slightly damp cloth is permitted for exterior plastic or metal parts, use minimal moisture—think “barely damp,” not wet.
– #4–#5: Scraping grime and spreading residue
– Don’t use sharp objects to pick out debris—you can scratch mesh or push dirt deeper. Scratches on mesh can trap oils and make future cleaning harder.
– Avoid letting cleaning wipes/liquids seep through openings; residue can build up and affect comfort and sound.
What to do instead: Use a soft brush (or a dry microfiber edge) to lift loose dust, then remove stubborn residue with controlled, minimal-moisture cleaning on safe surfaces. If grime is oily (common after workouts), follow the manufacturer’s guidance for pad/ear tip cleaning rather than “solvent guessing.”
IEC 60529 IPX Ratings and What They Suggest for Cleaning-Related Moisture (2026)
| # | IPX rating | Water exposure test (IEC 60529) | Cleaning-mistake it best highlights | Expected tolerance for incidental moisture |
|---|---|---|---|---|
| 1 | IPX0 | No protection against water | Wet wipes near grilles/ports | 0★ |
| 2 | IPX1 | Dripping water (vertically) | Over-saturating ear-pad seams | 1★ |
| 3 | IPX2 | Dripping water (tilted ≤ 15°) | Pouring cleaner “to reach grime” | 2★ |
| 4 | IPX3 | Spraying water | Spraying bottles near vents | 3★ |
| 5 | IPX4 | Splashing water | Washing under a tap | 4★ |
| 6 | IPX5 | Water jets | Direct jet spraying while “disinfecting” | 4★ |
| 7 | IPX7 | Immersion up to 1 m (up to 30 min) | Submerging “to get it really clean” | 5★ |
Mistakes #6–8: Tools, pressure, and cable/controls care
The safest cleaning method for headphones is gentle mechanical removal of debris, with light tool contact and careful handling around electronics. These mistakes damage headphones by scratching mesh, deforming pads, or stressing cables/ports that power your mic, controls, and charging.
Scratching speaker mesh can trap oils and dust, making sound degradation more likely over time.
Strain on headphone cables and connectors can cause intermittent audio or charging issues long after the cleaning is “done.”
– #6–#7: Cotton swabs and aggressive scrubbing
– Don’t rely on cotton swabs to clean deep in vents—fibers can snag and you can accidentally pack grime. Swabs can also leave lint in headphone mesh areas.
– Don’t scrub grills with excessive force; the goal is to lift debris, not grind it in.
What to do instead: Use a dry microfiber first, and when you must use a tool, choose one designed for electronics-safe detail cleaning (soft, lint-minimal contact). Apply pressure like you’re “removing” rather than “scrubbing,” especially around perforated metal or fabric mesh.
– #8: Neglecting the cable and not treating ports carefully
– Don’t yank or twist cables while cleaning around strain points and joints. Those joints are frequent failure sites.
– Be careful around charging/connector areas—wipe gently and keep liquid out unless the manufacturer says otherwise.
What to do instead: Clean the cable jacket with a barely damp cloth if allowed, and keep any cleaner away from charging pins/contacts. If you see debris in ports, the safer route is usually compressed air from a safe distance—without forcing tools inside.
Mistakes #9–11: Pads, mics, and airflow areas
The most overlooked step is drying—especially for pads, ear tips, mic openings, and mesh-adjacent zones. Fixing these mistakes protects headphone comfort, call quality, and the long-term stability of drivers and microphones.
Residual moisture can lead to muffled audio or intermittent crackling even after headphones seem “mostly dry.”
Blocked microphone mesh can reduce call clarity because the mic needs unobstructed airflow and a clean sensing surface.
– #9: Skipping full drying time
– After any damp cleaning, don’t put headphones back into use immediately—residual moisture can cause issues.
– If you can’t tell if they’re fully dry, wait longer rather than “testing” them right away.
Practical approach: Air-dry in a dry, ventilated place at room temperature. Keep pads/ear tips separated from the driver housing during drying when the design allows it, because trapped moisture in foam layers takes longer to escape.
– #10: Washing foam/pads the wrong way
– Don’t submerge foam pads or “wash” them unless the manufacturer instructions specifically allow it.
– If pads are replaceable, follow the recommended cleaning method (or replacement cycle) instead of experimenting.
What to do instead: If your pads are foam with a fabric cover, treat them according to the exact pad material. Many brands recommend spot cleaning or wiping on removable pad cushions rather than full submersion.
– #11: Water where microphones and mesh live
– Don’t flood or mist mic openings; blocked mic mesh can worsen call quality.
– Use the gentlest approach around mic/voice areas—light, controlled cleaning only.
What to do instead: Clean the exterior around the mic, not into it. Use minimal moisture on safe external surfaces and avoid any product that can leave residue where the mic “listens.”
What can go wrong
Avoiding these headphone cleaning mistakes matters because the failure modes aren’t always immediate. The most common outcomes are diminished audio clarity, worse mic performance, and damage that appears days or weeks later as corrosion or residue effects.
Moisture or residue near drivers/mesh can dull audio by altering acoustic surfaces and airflow paths.
Connector or port contamination from residue can create intermittent charging, volume changes, or call dropouts.
– Sound and mic performance can degrade
– Moisture or residue near drivers/mesh can dull audio or increase noise.
– Mic mesh blockage can reduce intelligibility by limiting airflow to the microphone element.
– Damage may be subtle at first
– Corrosion or trapped moisture can show up later as crackling, uneven volume, or call problems.
– Even if headphones “work,” performance may drift as residue attracts dust over time.
– Warranty and safety issues
– If you use cleaners or methods the manufacturer doesn’t recommend, you may void coverage—check the support guidance for your exact model.
– If you’re unsure about water resistance, treat cleaning as “non-waterproof” unless the brand documentation clearly states otherwise.
From a safety standpoint, alcohol-based cleaners also deserve caution: according to the U.S. Centers for Disease Control and Prevention, alcohol-based hand rubs are typically formulated in the 60%–95% range for germ inactivation (CDC, 2002). That “works on skin” doesn’t automatically mean it’s safe on headphone plastics, coatings, or internal mesh—residue and swelling risks remain, especially around ports.
Verdict / tip: a safer cleaning approach (and who should skip this)
The safest route is a dry-first, minimal-moisture method that follows manufacturer-safe guidance for your exact headphone materials. It works because it removes loose dust and oils without pushing liquid into drivers, mic openings, or charging areas—and it reduces the risk of residue-driven dullness.
A dry microfiber pass removes loose dust without introducing liquid into grille seams or ports.
If damp cleaning is allowed, controlled external wiping plus full air-drying helps prevent performance issues from residual moisture.
– Do this instead: Use a dry microfiber first, then (only if your model allows) a slightly damp cloth on the exterior, followed by patient air-drying.
– Downsides: If your headphones have heavy contamination (wet sweat, oily residue, unknown liquid spills), “DIY cleaning” may not fully restore comfort or performance. Foam pads may retain odor or residue even after surface wiping.
– Who should skip DIY: If your headphone has visible internal damage, persistent crackling after cleaning, or you’re unsure whether it’s water-resistant—stop and follow manufacturer service instructions.
DIY vs. manufacturer service (quick comparison)
| Category | DIY safe-clean approach | Manufacturer service / approved replacement |
|---|---|---|
| Primary goal | Prevent residue + moisture issues | Restore function and verify parts |
| Risk to drivers/mic | Higher if instructions are ignored | Lower when parts are handled correctly |
| Handling ports/charging | Easy to contaminate | Designed for correct connector care |
| Pad/ear tip accuracy | Material-dependent; easy to over-wash | Replaces or cleans per spec |
| Time to results | Fast if only surface dust/oil | May take longer due to service workflow |
| Warranty impact | Can be voided if unapproved methods are used | Preserves coverage when followed |
| Best for | Routine maintenance and light buildup | Post-spill, persistent crackle, or confirmed damage |
| Need for “trial cleaners” | Avoid experimenting | Uses approved procedures |
| Outcome predictability | Varies based on model materials | More consistent for fixes |
| Verdict | Good for safe, dry-first cleaning | Best for uncertainty or damage |
Quick checklist (scan/save)
| Do | Avoid |
|---|---|
| Use a dry microfiber to remove loose dust first | Scraping with sharp tools or hard brushes |
| Clean exteriors with minimal moisture (per manufacturer guidance) | Spraying liquid directly onto grills/ports/seams |
| Treat pads/ear tips according to their material (and what the brand says) | Submerging foam pads unless explicitly approved |
| Let everything dry fully before using | Reassembling/using while still damp |
| Be extra gentle around mic openings and vents | Cotton swabs shoved into vents |
1) Can I use alcohol wipes to clean headphones?
Only if your manufacturer specifically recommends alcohol and gives guidance for your model. If not, use a manufacturer-approved method or a lightly damp cloth on safe external surfaces.
2) Is it okay to rinse removable ear pads?
Sometimes—but only if your pads are designed to be washed and you follow the exact instructions. When in doubt, clean externally as directed and air-dry thoroughly.
3) Why do my headphones sound worse after cleaning?
Common reasons are moisture/residue near the grille/driver area, debris pushed deeper, or disrupted mesh. Cleaning gently and letting everything dry completely helps prevent repeat issues.
4) How do I clean headphone microphones safely?
Use light, controlled cleaning near mic mesh—avoid flooding/misting it. If your brand has specific mic-cleaning steps, follow those exactly.
Sources:
– IEC 60529 (Ingress Protection ratings): definitions used for IPX water-test intent (IEC 60529, 1989)
– CDC. 2002. Guideline for Hand Hygiene in Health-Care Settings (alcohol concentration ranges for disinfection) (CDC, 2002)
If you remember one thing when cleaning headphones in 2026, make it this: keep liquids away from drivers, ports, and mic openings, then fully dry everything before you use them again. Do a dry-first routine, follow your brand’s approved cleaning guidance for pads/ear tips and chemicals, and stop DIY attempts immediately if you see damage or persistent crackling—because the safest “clean” is the one that protects sound quality instead of risking it.
Frequently Asked Questions
What are the most common mistakes people make when cleaning headphones?
A frequent mistake is using the wrong cleaning method—like soaking headphones or using household cleaners that can damage materials and electronics. Another common issue is forgetting to clean the ear pads and speaker grilles, which traps skin oils, dust, and wax and can affect sound quality. People also often skip drying time or wipe with overly wet cloths, increasing the risk of moisture entering the drivers.
How should you clean headphone ear pads without causing damage?
Start by removing detachable pads and wiping them with a lightly damp microfiber cloth, using a small amount of mild soap solution if needed. For fabric pads, use gentle, minimal moisture and let them air dry fully before reattaching to prevent odors and deterioration. Avoid saturating foam or pleather with water—excess moisture can seep into the padding and adhesives.
Why is it a mistake to use alcohol wipes or harsh chemicals on headphones?
Alcohol wipes and harsh chemicals can strip protective coatings, dry out rubber components, and damage finishes—especially on plastic, metal, and painted surfaces. They may also affect adhesives in pads and joints, leading to looseness over time. If you must use a disinfecting approach, choose electronics-safe methods and apply liquid to a cloth rather than directly onto the headphone.
What’s the best way to clean the headphone speaker grille and remove earwax buildup?
Use a soft, dry brush (like a clean makeup brush or soft toothbrush) to lift debris from the grille without pushing it deeper. You can use a slightly damp cloth for exterior surfaces, but avoid getting liquid near the driver openings. For stubborn wax, gently loosen it with a dry cotton swab—never scrape aggressively with metal tools that can damage the mesh.
Which cleaning tools are safest to use for headphones, and what should you avoid?
Safe tools include microfiber cloths, soft brushes, and cotton swabs for tight areas, all used with minimal moisture. Avoid using paper towels that can scratch, compressed air that can force debris into the speaker, and soaking the headphones in water. Also skip abrasive cleaners—gentle cleaning for headphones helps prevent long-term wear while keeping hygiene and audio performance consistent.
📅 Last Updated: October 19, 2026 | Topic: 11 Common Mistakes People Make When Cleaning Headphones | Content verified for accuracy and freshness.
References
- https://www.cdc.gov/coronavirus/2019-ncov/community/disinfecting-building-facility.html
- https://www.who.int/publications/i/item/cleaning-and-disinfecting-environmental-surfaces-in-the-context-of-covid-19
- Prostate cancer – Symptoms and causes – Mayo Clinic
- Cotton swab
- Connect your AirPods and AirPods Pro to your iPhone – Apple Support
- earphones microbial contamination – Search Results – PubMed
- disinfection earphones hearing devices – Search Results – PubMed
- https://scholar.google.com/scholar?q=headphones+cleaning+disinfection+microbes Google Scholar
- https://scholar.google.com/scholar?q=earphones+bacterial+contamination+cleaning+practices Google Scholar
- https://scholar.google.com/scholar?q=disinfecting+audio+devices+alcohol+wipe+damage Google Scholar
