Deep Cleaning Checklist for Printer
To deep clean your printer, start by unplugging it and removing cartridges and paper. Use a soft cloth and gentle cleaner for the exterior and a dry cloth or compressed air for the paper tray. Clean cartridge contacts carefully with isopropyl alcohol, and blow out dust inside using compressed air. Avoid liquids on internal parts but lubricate moving components sparingly. After reassembling, run a test print to check quality. For a thorough guide on every step, you might want to explore further details.
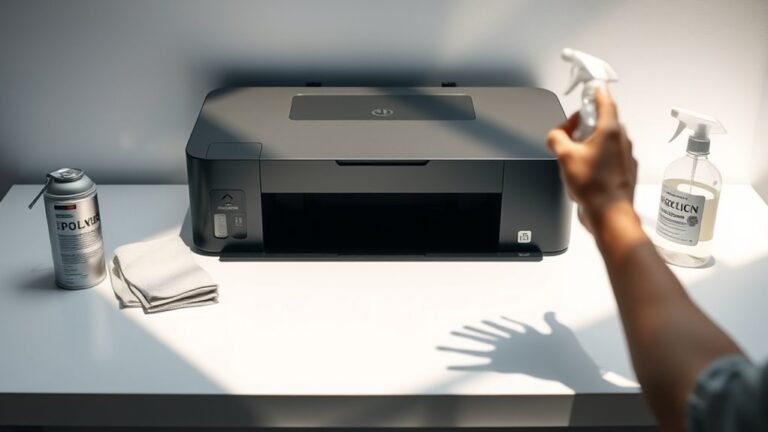
Preparing Your Printer for Deep Cleaning

Before you begin deep cleaning your printer, make certain it’s turned off and unplugged to avoid any electrical hazards. Taking this simple step guarantees your safety and protects your device. Next, gather all necessary cleaning supplies—microfiber cloths, isopropyl alcohol, cotton swabs, and compressed air are essentials for effective printer maintenance. Having these ready lets you work efficiently without interruptions. Also, remove ink cartridges and any paper inside the printer to prevent damage and make cleaning easier. By preparing your workspace and tools beforehand, you set yourself up for a smooth, thorough cleaning process. Keeping your printer in top shape with regular maintenance not only frees you from unexpected breakdowns but also extends its lifespan, giving you the freedom to print whenever you need.
Cleaning the Exterior and Paper Tray
Dust and grime can quickly build up on your printer’s exterior and paper tray, affecting its appearance and function. To keep your device looking sharp and working smoothly, start by unplugging it. Use a soft, lint-free cloth lightly dampened with water or a gentle cleaner to wipe down all exterior surfaces. Avoid harsh chemicals that might damage the finish. Next, slide out the paper tray and remove any dust or debris using a dry cloth or compressed air. Make certain the tray is completely dry before reinserting it to prevent paper jams. Regularly cleaning these parts not only extends your printer’s life but also guarantees your prints come out clean and crisp every time. Taking these simple steps gives you control over your printer’s upkeep.
Removing and Cleaning Printer Cartridges

Once you’ve cleaned the exterior and paper tray, it’s important to turn your attention to the printer cartridges. Proper care here guarantees smooth printing and keeps ink residue from causing clogs or smudges. To remove and clean your cartridges effectively, follow these steps:
- Power off your printer and open the cartridge access door. Gently remove each cartridge without forcing it, preserving cartridge alignment.
- Use a lint-free cloth dampened with distilled water or isopropyl alcohol to wipe the cartridge contacts and nozzles, removing any ink residue.
- Let cartridges dry completely before reinserting them, guaranteeing they fit securely in their slots to maintain proper alignment.
Regular cartridge maintenance frees you from print errors and extends your printer’s lifespan.
Cleaning the Printer’s Internal Components
Although cleaning the exterior and cartridges is essential, you shouldn’t overlook the printer’s internal components. Dust and debris can build up inside, causing jams or poor print quality. Start by carefully opening your printer and using a soft brush or compressed air for internal dusting. Avoid using liquids inside, as moisture can damage delicate parts. Once dust-free, check for moving parts that might need printer lubrication to keep everything running smoothly. Apply a small amount of recommended lubricant sparingly to gears or rollers, but don’t overdo it—that can attract more dust. Regular internal cleaning frees you from unexpected breakdowns and keeps your printer performing at its best, so you stay in control and worry-free.
Final Checks and Maintenance Tips

After you’ve cleaned the internal components and applied lubricant where needed, it’s time to perform final checks to verify everything’s in proper order. Start with a final ink inspection to confirm cartridges are properly seated and ink levels are adequate. Then, check for any leftover debris or smudges inside the printer that might affect print quality. Finally, run a test print to affirm smooth operation and crisp output.
Here’s a quick routine maintenance checklist to keep your printer running freely:
- Inspect and replace ink cartridges as needed during your final ink inspection.
- Clean printer rollers and paper feed mechanisms regularly.
- Schedule routine maintenance every few months to prevent buildup and mechanical issues.
Following these tips gives you freedom from unexpected printer problems and keeps your device reliable.
Frequently Asked Questions
How Often Should I Deep Clean My Printer?
You should deep clean your printer based on how often you use it and the printing environment. Generally, following printer maintenance tips, a cleaning frequency of every three to six months works well to keep things running smoothly. If you notice print quality issues or frequent jams, don’t wait—clean it sooner. Staying on top of this gives you the freedom to print without interruption or frustration, keeping your device in great shape.
Can Deep Cleaning Fix Print Quality Issues?
Imagine you’re back in the days of the telegraph, trying to get a clear message through—print quality issues feel just as frustrating now. But don’t worry, you can often fix these problems by using proper cleaning techniques. Deep cleaning helps remove clogged nozzles and dried ink, freeing your printer to deliver crisp, clear pages. So, if you want your prints to look sharp and professional, a thorough cleaning is your ticket to freedom from smudges and streaks.
What Supplies Do I Need for Deep Cleaning?
You’ll want a few essential cleaning supplies to keep your printer in top shape and enjoy hassle-free printer maintenance. Grab some lint-free cloths, cotton swabs, and isopropyl alcohol for wiping down surfaces and cleaning small parts. Don’t forget a soft brush to remove dust from hard-to-reach spots. Having these supplies on hand lets you take control, ensuring your printer runs smoothly without relying on costly repairs or replacements.
Is It Safe to Use Alcohol-Based Cleaners Inside the Printer?
Think of your printer as a delicate garden—using harsh chemicals like alcohol-based cleaners inside it can burn the tender leaves instead of nurturing them. For safe printer maintenance tips, steer clear of alcohol cleaners inside the machine; they might damage sensitive components. Instead, choose alcohol cleaner alternatives like specialized printer cleaning solutions or gentle, lint-free cloths with distilled water. This way, you protect your printer’s freedom to perform without risking harm.
Can Deep Cleaning Prevent Paper Jams?
You bet deep cleaning can help prevent paper jams by keeping your printer’s paper handling components in top shape. When you regularly clear out dust, debris, and ink buildup, you’re reducing the chances of paper getting stuck or misfed. Along with other maintenance tips like checking rollers and aligning trays, deep cleaning gives you the freedom to print smoothly without frustrating interruptions. Taking a little time now saves you bigger headaches later.