
Step-By-Step Guide to Cleaning Grout
Start by gathering cleaning supplies like a stiff brush, microfiber cloth, gloves, and a spray bottle. Mix a cleaning solution—baking soda paste or diluted vinegar—testing it on a small spot first. Apply the solution to grout lines, let it sit briefly, then scrub firmly with your brush. Rinse with clean water and wipe with a damp cloth. After drying, seal the grout to prevent future stains. Follow these steps carefully, and you’ll uncover expert tips for even better results.
Gather Your Cleaning Supplies

Before you begin cleaning grout, gather a few essential supplies to guarantee the process goes smoothly. Start with the best cleaning tools: a stiff-bristled brush, preferably nylon, designed to reach grout lines without damaging tiles. You’ll also want a microfiber cloth for wiping down surfaces and a spray bottle for applying solutions evenly. Gloves are vital to protect your skin from harsh chemicals, and a bucket can hold your cleaning mixture. These items form the foundation of effective grout cleaning techniques, ensuring you work efficiently and safely. Having everything prepared not only saves time but also helps you maintain control throughout the process, giving you the freedom to restore your grout to its original brightness with confidence.
Prepare a Cleaning Solution
With your cleaning supplies ready, the next step is to prepare a solution that effectively tackles grout stains without harming your tiles. Start by selecting appropriate cleaning agents; common choices include baking soda, vinegar, or commercial grout cleaners. For a homemade mix, combine baking soda and water at a ratio of 3:1 to form a paste. If using vinegar, dilute it with water at a 1:1 ratio to avoid damaging sensitive surfaces. Always test your solution on a small, inconspicuous area first. Precise solution ratios guarantee the mixture’s strength is balanced—strong enough to clean, but gentle enough to protect your grout. Mixing your solution methodically gives you control, allowing you to clean thoroughly while maintaining your freedom to choose what’s best for your home.
Apply the Solution and Scrub the Grout
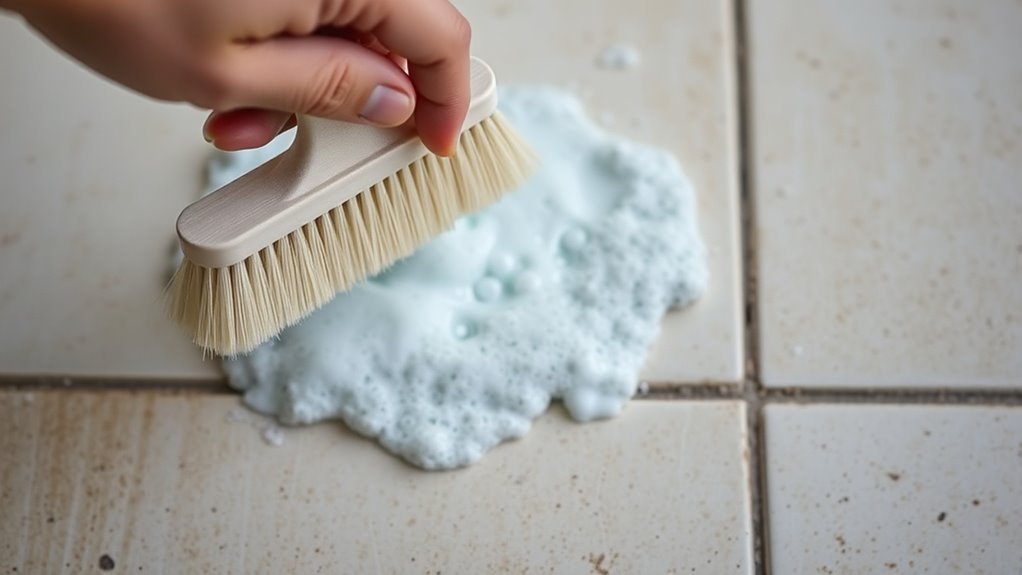
Start by applying your prepared cleaning solution directly onto the grout lines, ensuring even coverage. Let it sit briefly to loosen dirt and stains. Next, select appropriate cleaning tools; a stiff-bristled brush or a specialized grout brush works best for effective scrubbing. Use firm, controlled scrubbing techniques, moving in circular or back-and-forth motions to target grime without damaging the grout. Focus on one section at a time, maintaining consistent pressure to maximize cleaning efficiency. Avoid abrasive tools that could erode grout lines. Remember, your goal is to break down buildup while preserving the integrity of the grout. By mastering these scrubbing techniques with the right cleaning tools, you’ll achieve a thorough clean, setting the stage for a pristine, refreshed surface.
Rinse and Wipe the Area
Once you’ve thoroughly scrubbed the grout, rinse the area using clean water to remove any remaining cleaning solution and loosened dirt. Proper rinse techniques guarantee no residue is left to attract more grime. Use a spray bottle or a sponge soaked in water for controlled rinsing. After rinsing, apply effective wipe methods to dry the surface and prevent streaks.
Thoroughly rinse and wipe grout to remove residue and prevent streaks, ensuring a bright, clean finish.
Here’s how to proceed:
- Use a clean, damp microfiber cloth for wiping to trap leftover dirt.
- Change rinse water frequently to avoid reapplying dirt.
- Wipe in one direction to keep streaks minimal.
- Allow grout to air dry briefly after wiping for complete moisture removal.
These steps help restore your grout’s brightness while maintaining your freedom to enjoy a fresh, clean space.
Prevent Future Grout Stains

Although thorough cleaning restores grout’s appearance, preventing future stains is key to maintaining its condition over time. To protect your grout effectively, apply grout sealing after it’s completely dry. This sealant acts as a barrier, repelling moisture and dirt that cause discoloration. Choose a high-quality grout sealer suited for your tile type to guarantee ideal stain prevention. Reapply the sealer every six to twelve months, depending on wear and exposure. Additionally, promptly clean spills and avoid abrasive cleaners that can damage the seal. By incorporating grout sealing into your maintenance routine, you’ll preserve grout’s original look and extend its lifespan. This proactive approach frees you from frequent deep cleanings, keeping your grout pristine with minimal effort and safeguarding your investment.
Frequently Asked Questions
Can Grout Be Cleaned With a Steam Cleaner?
Did you know steam cleaners can remove up to 99.9% of germs? When it comes to grout cleaning techniques, using a steam cleaner is highly effective. You’ll find steam cleaner effectiveness impressive because it penetrates deep into grout lines, loosening dirt and mold without harsh chemicals. If you want an eco-friendly, efficient method, a steam cleaner gives you freedom from scrubbing while ensuring your grout looks fresh and sanitized.
How Often Should Grout Be Professionally Sealed?
You should plan your grout sealing frequency around every 1 to 3 years, depending on traffic and exposure. Keeping grout sealed prevents stains and damage, making maintenance easier. For grout maintenance tips, regularly clean grout lines with gentle solutions and avoid harsh chemicals. Staying on top of sealing gives you the freedom to enjoy your floors without constant worry about dirt or moisture ruining the grout’s integrity.
What Types of Grout Are Easiest to Maintain?
If you want grout that’s easiest to maintain, epoxy grout is your best bet. It’s highly resistant to stains, moisture, and mildew, so you won’t have to worry about frequent cleaning. For maintenance tips, simply wipe epoxy grout regularly with a mild cleaner and avoid harsh chemicals. This lets you enjoy a clean, durable surface with minimal effort, giving you more freedom to focus on what matters most.
Is It Safe to Use Bleach on Colored Grout?
Think of your colored grout as a delicate painting—bleach can easily fade its vibrancy, so it’s best to avoid using it directly. Instead, opt for bleach alternatives like hydrogen peroxide or baking soda mixtures to protect grout colors while cleaning effectively. You’ll maintain the freedom to keep your tiles bright without risking discoloration, ensuring your grout stays as lively and fresh as the day it was installed.
Can Mold Grow in Grout, and How to Remove It?
Yes, mold can grow in grout since it’s porous and holds moisture. To prevent mold, you should keep grout dry and clean regularly, ensuring good ventilation. You might also consider grout alternatives like epoxy grout, which resists mold better. For removing existing mold, use a mixture of vinegar and baking soda or a commercial mold cleaner. These steps help you maintain a fresh, mold-free space without compromising your freedom to choose effective solutions.


