
How to Clean Wood Upholstery
To clean wood upholstery, start by identifying its finish—whether lacquer, varnish, or polyurethane—since this affects what cleaners you can use. Dust gently with a microfiber cloth or vacuum with a brush attachment, then clean with a mild soap solution like diluted dish soap to avoid damaging the wood. Dry thoroughly to prevent warping, and polish carefully using beeswax or lemon oil for protection and shine. Follow simple maintenance steps to keep it looking beautiful and lasting longer. You’ll find helpful tips to keep your wood in top shape.
Understanding Different Types of Wood Finishes
Before you begin cleaning wood upholstery, it’s important to understand the type of finish on your wood. Knowing your wood finishes helps you choose the right cleaning approach, so you don’t damage the surface. Finish types like lacquer, varnish, shellac, and polyurethane all respond differently to cleaning methods. For example, lacquer finishes are delicate and can be damaged by harsh chemicals, while polyurethane is more durable and water-resistant. Shellac, made from natural resins, needs gentle care to avoid dulling. Identifying the finish type gives you freedom to clean confidently without guesswork. So, take a moment to inspect your wood—this small step makes your cleaning process safer and more effective, preserving your upholstery’s beauty for years to come.
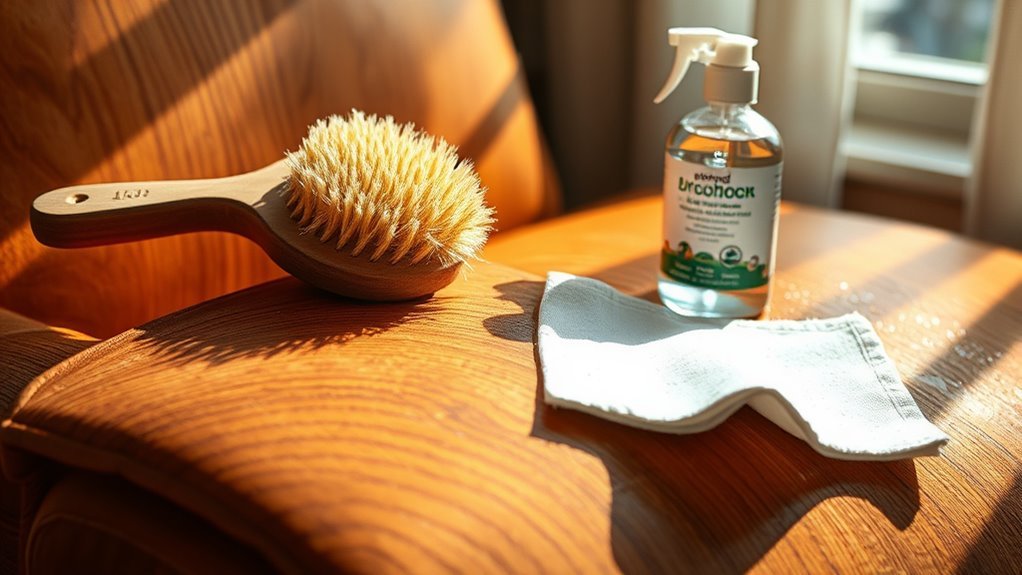
Gathering the Right Cleaning Supplies
Knowing your wood finish sets the stage for picking the right cleaning supplies. When you gather quality cleaning tools, you’re empowering yourself to maintain your wood upholstery’s beauty while enjoying the freedom of doing it yourself. Focus on gentle, effective items that respect your wood’s character.
Here’s a quick guide to essential wood care supplies:
| Cleaning Tool | Purpose |
|---|---|
| Soft microfiber cloth | Dusting and wiping gently |
| Mild wood cleaner | Removing dirt without damage |
| Soft-bristle brush | Cleaning crevices and seams |
With these tools in hand, you’ll avoid harsh chemicals and abrasive materials that can harm your finish. Being equipped means you’re ready to give your wood upholstery the care it deserves, keeping it fresh and inviting for years to come.
Preparing the Wood Upholstery for Cleaning
To get your wood upholstery ready for cleaning, start by removing any loose dust and debris with a soft microfiber cloth. Next, perform a thorough upholstery inspection to spot any tears, stains, or fragile areas that might need special care. Don’t rush this step—it’s your chance to identify problems before they worsen. Then, carry out a wood condition assessment to check for cracks, scratches, or signs of wear. Understanding your wood’s current state guarantees you choose the right cleaning method and avoid damage. Taking these steps not only protects your furniture but also gives you the freedom to clean confidently and efficiently. Preparing your wood upholstery this way sets the foundation for a smooth, rewarding cleaning process.
Dusting and Removing Loose Dirt
Once you’ve prepared your wood upholstery, the next step is dusting and removing loose dirt to prevent scratches during deeper cleaning. Start by choosing effective dusting techniques—use a soft microfiber cloth or a feather duster to gently lift dirt without grinding it into the wood. Avoid harsh brushes that can damage the finish. Pay special attention to crevices and carved areas where loose dirt tends to accumulate. You can also use a vacuum with a brush attachment for stubborn dust in tight spots. Taking these steps guarantees your wood stays scratch-free and ready for the next phase of cleaning. By mastering dusting techniques, you’re protecting your freedom to enjoy beautiful, well-maintained wood upholstery without the hassle of damage or extra repairs.
Cleaning With Mild Soap Solutions
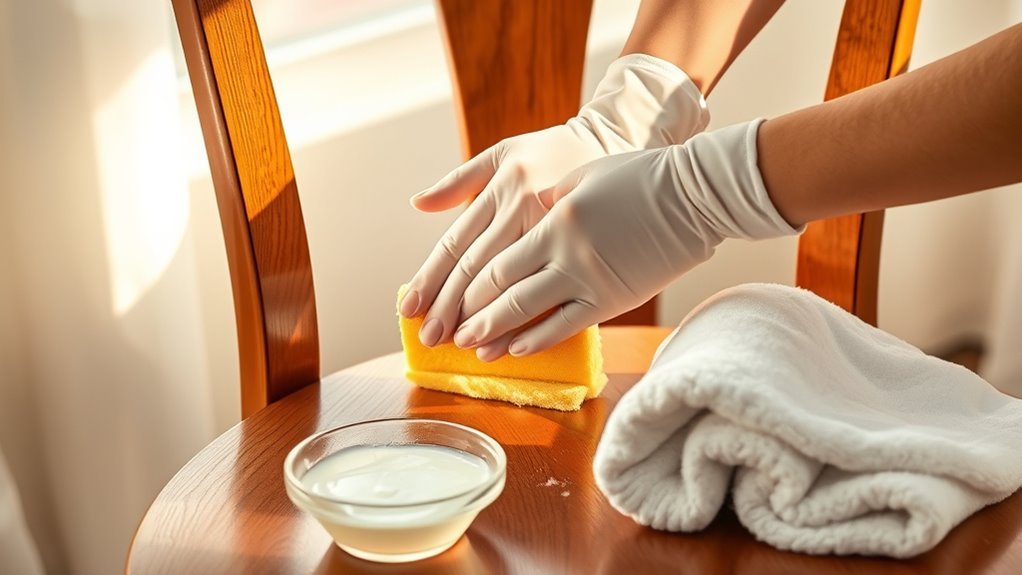
Although dusting removes loose dirt, deeper cleaning with a mild soap solution is essential to tackle grime and oils that build up over time. Using mild soap benefits your wood upholstery by gently lifting dirt without stripping its natural finish. Here are simple soap solution recipes you can try for a safe, effective clean:
| Soap Type | Water Ratio | Use Case |
|---|---|---|
| Dish Soap | 1 tsp per cup | Everyday cleaning |
| Castile Soap | 2 tsp per cup | Sensitive finishes |
| Baby Shampoo | 1 tsp per cup | Extra gentle maintenance |
| Liquid Soap Bar | 1 tbsp per 2 cups | Heavy grime |
Mix the solution lightly, dip a soft cloth, wring well, and wipe your wood upholstery. This keeps surfaces fresh, protected, and free to enjoy.
Dealing With Stains and Spots
When stains and spots appear on your wood upholstery, the first step is to identify what caused them. You’ll then want to use the right techniques to remove these blemishes effectively without damaging the wood. Finally, learning how to prevent future spots can keep your furniture looking fresh longer.
Identifying Common Stains
How can you tell which stain you’re dealing with on your wood upholstery? First, observe the color and texture. Water stains often appear as cloudy or white rings, caused by moisture trapped under the finish. These usually come from spilled drinks or damp cloths left too long. Heat damage, on the other hand, tends to show up as white or pale marks, often from hot cups or plates placed directly on the wood. It can slightly raise the wood grain or dull the finish. Other common stains include ink or dye, which leave dark spots, and oil-based stains that feel sticky or look darker. Recognizing these differences helps you approach cleaning confidently, preserving your freedom to maintain your wood upholstery’s beauty without guesswork.
Effective Stain Removal
Since every stain type requires a different approach, you’ll want to tailor your cleaning method to the specific mark on your wood upholstery. For water-based stains, gently blot with a damp cloth to lift the spot without spreading it. Oil-based stains call for a mild detergent or a specialized wood cleaner—avoid harsh chemicals that can damage the finish. Ink or dye stains might need rubbing alcohol applied carefully with a cotton swab. Always test removal techniques in an inconspicuous area first to guarantee you don’t harm the wood. Remember, quick action gives you more freedom to restore your upholstery effortlessly. By understanding stain types and applying suitable removal techniques, you maintain your wood’s natural beauty while keeping your space fresh and inviting.
Preventing Future Spots
To keep your wood upholstery looking pristine, adopting a few simple habits can prevent future stains from setting in. Spot prevention starts with quick action—clean spills immediately before they soak in. Develop maintenance routines like dusting regularly and using protective finishes to create a barrier against dirt and moisture. Avoid eating or drinking near your wood pieces to reduce risk. You might also consider applying fabric or wood-safe sealants that repel stains and simplify cleaning. Consistent care keeps your upholstery free and clear of unwanted marks, so you can enjoy its natural beauty without hassle. By committing to these easy habits, you’ll maintain freedom from stubborn spots and extend the life of your cherished wood upholstery.
Drying and Polishing the Wood Surface
Once you’ve removed stains, it’s essential to dry the wood thoroughly to prevent damage. You’ll want to use a soft cloth for drying and then apply the right polishing technique to restore shine. Let’s explore how to dry and polish your wood upholstery effectively.
Effective Wood Drying
A properly dried wood surface is key to achieving a flawless finish when cleaning wood upholstery. You want to guarantee that wood moisture is minimized to prevent warping or damage. Start by wiping the surface with a soft, dry cloth to absorb excess dampness. Then, let the wood air dry naturally in a well-ventilated space away from direct sunlight or heat, which can cause cracking. Avoid using hairdryers or heaters as aggressive drying techniques may harm the wood’s integrity. Patience is your ally here; allowing the wood to dry slowly maintains its strength and beauty. Once moisture is gone, the wood’s surface is ready for the next steps. Mastering these drying techniques guarantees your wood upholstery stays resilient and looks stunning for years to come.
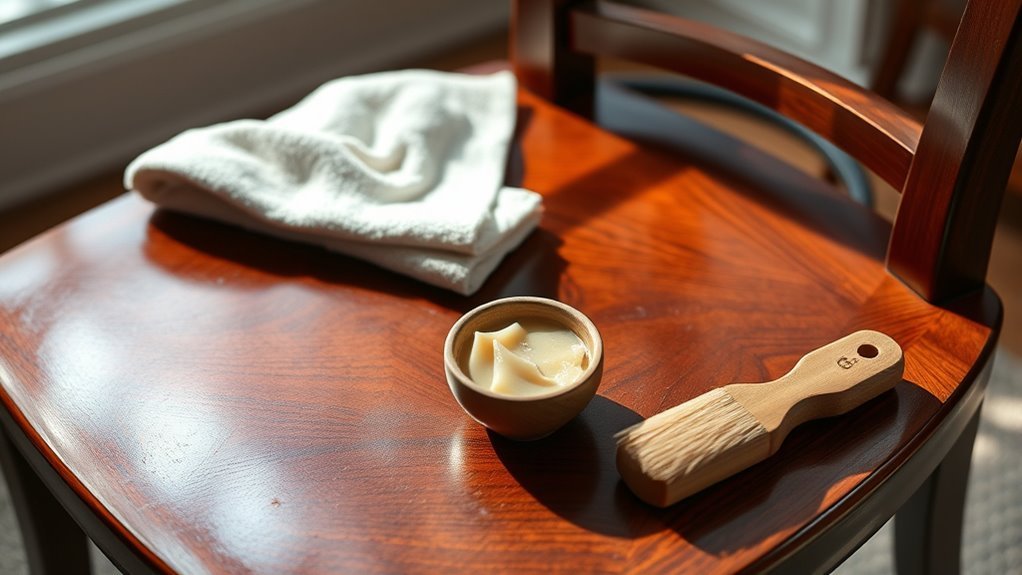
Polishing Techniques and Tips
Although drying the wood thoroughly is essential, polishing is what truly brings out its natural shine and protects the surface. To keep your wood upholstery looking fresh, you’ll want to choose the right polishing products and master simple polishing techniques. Here’s a quick guide to get you started:
| Polishing Product | Technique | Tip |
|---|---|---|
| Beeswax | Apply with soft cloth | Use circular motions |
| Lemon Oil | Rub gently | Avoid over-saturating |
| Commercial Wood Polish | Spray lightly, wipe off | Test on hidden area first |
| Microfiber Cloth | Buff after polishing | Enhances shine and removes dust |
Stick to these steps, and your wood will stay radiant and protected, giving you the freedom to enjoy its natural beauty without worry.
Preventative Care and Maintenance Tips
Keeping your wood upholstery looking its best starts with simple preventative care and regular maintenance. By adopting effective preventive measures, you’ll extend the life and beauty of your furniture without feeling tied down to constant repairs. Here are four maintenance routines to set you free from worry:
Simple care and regular maintenance keep your wood upholstery beautiful without the hassle of constant repairs.
- Dust regularly with a soft cloth to prevent buildup that can scratch surfaces.
- Avoid direct sunlight, which fades wood and weakens finishes over time.
- Use coasters and pads under items to prevent stains and dents.
- Apply a protective wax or polish every few months to maintain moisture and shine.
Stick to these steps, and you’ll enjoy your wood upholstery’s natural charm while embracing the freedom of easy upkeep.
Frequently Asked Questions
Can Wood Upholstery Be Cleaned With Vinegar or Natural Cleaners?
You might wonder about vinegar effectiveness when cleaning wood upholstery. Vinegar can be a natural cleaner option because it’s gentle and non-toxic, but you’ll want to dilute it with water to avoid damaging the wood finish. If you’re seeking freedom from harsh chemicals, natural cleaner options like diluted vinegar or mild soap work well. Just test a small spot first to make sure it doesn’t harm the surface, then clean confidently.
How Often Should Professional Cleaning Be Done on Wood Upholstery?
You might wonder if professional cleaning frequency really matters for wood upholstery. It does—getting pros to clean it every 12 to 18 months keeps your furniture looking fresh and prolongs its life. Along with regular dusting and gentle spot cleaning, these upholstery maintenance tips give you freedom from constant worry about wear and tear. So, don’t delay—schedule that professional touch to enjoy your wood pieces without hassle.
Is It Safe to Use Steam Cleaners on Wood Upholstery?
You might wonder if steam cleaning effectiveness extends to wood upholstery maintenance. While steam cleaners are great for many surfaces, you should be cautious with wood upholstery. Excess moisture and heat can damage the finish or warp the wood. Instead, stick to gentle cleaning methods to keep your wood looking fresh and free. This way, you maintain your freedom to enjoy beautiful, well-preserved furniture without risking damage.
What Are the Signs That Wood Upholstery Needs Refinishing?
You’ll know it’s time for refinishing when scratches assessment reveals deep marks that don’t fade with cleaning. Also, watch for discoloration indicators like dullness, uneven color, or water stains. If the wood feels rough or looks worn out, it’s calling for a fresh finish. Don’t hesitate—refinishing frees your furniture from aging and brings back that vibrant, natural beauty you love.
Can Pets Damage Wood Upholstery Finishes, and How to Prevent It?
Yes, pets can damage wood upholstery finishes through scratches, chewing, or even oils from their fur. To protect your furniture, take pet precautions like trimming their nails, providing plenty of toys, and using protective covers or finishes. You don’t have to limit your pet’s freedom—just focus on damage prevention by setting boundaries and reinforcing good behavior. That way, both your pets and wood upholstery can coexist happily without hassle.


