
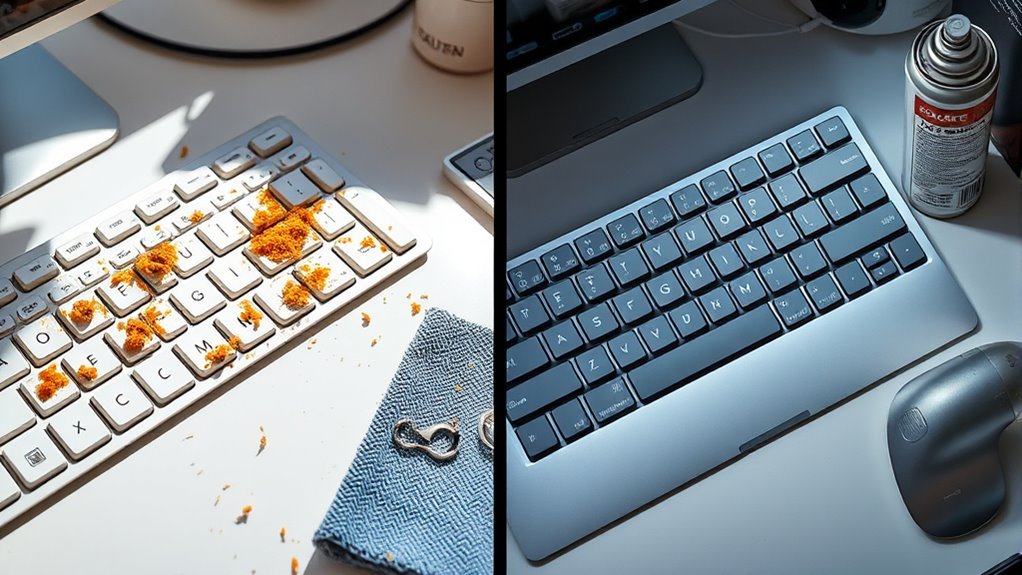
Cleaning Tips Before and After Keyboard
Before and after using your keyboard, make sure to power it off and disconnect it to avoid accidental inputs. Start by shaking out loose debris, then use compressed air to clear dust between keys. Wipe the surface with a soft microfiber cloth, and for a deeper clean, apply isopropyl alcohol with cotton swabs. Dry thoroughly before reassembling. Establishing this routine keeps your keyboard hygienic and prolongs its lifespan. Keep following for detailed steps to optimize your cleaning process.
Gather the Necessary Cleaning Supplies

Before you begin cleaning your keyboard, you’ll need to gather a few essential supplies to guarantee an effective and safe process. Start with basic cleaning supplies such as a soft microfiber cloth to avoid scratching surfaces. Have a can of compressed air ready to blow away dust and debris lodged between keys. Isopropyl alcohol (70% or higher) is an essential material for disinfecting and removing grime without damaging the keyboard. Cotton swabs work well for reaching tight spaces. Optionally, use a small, soft-bristled brush to loosen dirt. Avoid harsh chemicals or abrasive tools. By assembling these cleaning supplies beforehand, you confirm a controlled, thorough cleaning experience that preserves your keyboard’s longevity and functionality. This preparation lets you clean efficiently and confidently without interruption or risk.
Power Off and Disconnect Your Keyboard
Before you start cleaning, make certain your keyboard is completely powered off to prevent any accidental inputs or damage. If it’s a wired keyboard, unplug it from your computer and any other connected devices. For wireless keyboards, remove the batteries or turn off the power switch to guarantee full disconnection.
Ensure Complete Power Shutdown
Although it might seem simple, ensuring your keyboard is completely powered off and disconnected is an essential first step in cleaning. Proper power management prevents accidental keystrokes and potential damage during the cleaning process. Start by shutting down your device or putting it to sleep, then confirm the keyboard’s status has shifted to off. Taking these safety precautions minimizes the risk of electrical short circuits or data loss. If your keyboard has an on/off switch, toggle it to off before proceeding. This methodical shutdown guarantees that no power is flowing through the device, giving you the freedom to clean confidently and thoroughly. Prioritizing complete power shutdown is key to maintaining your keyboard’s longevity and ensuring your safety throughout the cleaning.
Unplug From All Devices
Two critical steps follow powering down your keyboard: unplugging it from all devices and disconnecting any wireless connections. First, carefully remove the USB or other cables connecting your keyboard to your computer or peripherals. This prevents accidental power surges or damage during cleaning, ensuring keyboard safety. If your keyboard uses Bluetooth or another wireless technology, navigate to your device’s settings and disconnect or turn off the keyboard’s wireless connection. Confirm your keyboard is fully disconnected to avoid unexpected input or interference. Ensuring proper device compatibility before reconnecting your keyboard after cleaning helps maintain seamless functionality. Taking these deliberate steps not only protects your hardware but also gives you the freedom to clean thoroughly without worry or damage to your devices.
Remove Loose Debris and Dust
Since keyboards accumulate dust and loose debris quickly, it’s essential to remove these particles regularly to maintain peak performance. For effective keyboard maintenance, you should establish a cleaning frequency that fits your usage. Removing loose debris not only improves typing comfort but also extends your keyboard’s lifespan.
| Cleaning Frequency | Recommended Action |
|---|---|
| Daily | Shake gently upside down |
| Weekly | Wipe surface with cloth |
| Monthly | Use soft brush to clear |
Start by turning your keyboard upside down and gently shaking it to dislodge crumbs and dust. Follow up with a soft, dry cloth to wipe the surface. This method is simple, quick, and preserves your keyboard’s freedom from buildup without risking damage.
Clean Between the Keys With Compressed Air
Using compressed air is an effective way to remove debris lodged between your keyboard keys without disassembling it. You’ll want to hold the can upright and spray in short bursts to avoid moisture buildup. Always keep the nozzle a few inches away to prevent damage to the keyboard components.
Benefits of Compressed Air
Although it might seem simple, cleaning between your keyboard keys with compressed air is one of the most effective ways to remove dust, crumbs, and debris without disassembling your device. The compressed air benefits lie in its ability to reach tight spaces that a cloth or brush can’t. This method prevents moisture damage and keeps your keyboard free from particles that can affect key responsiveness. Using compressed air also saves time, allowing you to maintain your device’s hygiene effortlessly. It’s a practical solution that supports keyboard cleaning routines by minimizing buildup, prolonging your keyboard’s lifespan, and reducing allergic reactions from dust accumulation. By choosing compressed air, you gain a quick, safe, and thorough cleaning option that maintains your keyboard’s performance and your freedom to type comfortably.
How to Use Safely
Before you start cleaning, make certain you have a can of compressed air designed specifically for electronics. Proper cleaning tool selection is essential for keyboard safety precautions; avoid using household air dusters that may contain harmful chemicals or excessive pressure. Hold the can upright to prevent liquid propellant from spraying onto your keyboard, which can cause damage. Use short bursts of air to dislodge debris from between the keys, keeping the nozzle about an inch away to protect delicate components. Avoid tilting or shaking the can during use. Always work in a well-ventilated area and unplug your keyboard or turn off your device before starting. Following these steps guarantees you clean effectively while maintaining your keyboard’s longevity and preserving your freedom to use it safely.
Wipe the Surface With a Microfiber Cloth

When you want to remove dust and smudges from your keyboard without causing damage, wiping the surface with a microfiber cloth is an effective method. Microfiber benefits include its gentle fibers that trap dirt and oils without scratching, ensuring surface protection for your device. Start by turning off your keyboard or unplugging it to avoid accidental inputs. Use a dry microfiber cloth, applying light pressure as you move systematically over the keys and surrounding areas. For stubborn spots, slightly dampen the cloth with water, but avoid excess moisture. This method maintains your keyboard’s integrity while efficiently clearing debris. By incorporating microfiber cloths into your routine, you gain a reliable, safe way to keep your keyboard clean and extend its lifespan without compromising its finish.
Use Isopropyl Alcohol for Deep Cleaning
Since surface wiping can only remove loose dirt and oils, using isopropyl alcohol is essential for a deeper clean. This powerful solvent offers several isopropyl alcohol benefits, making it ideal for deep cleaning techniques on your keyboard.
Follow these steps:
- Dampen a lint-free cloth or cotton swab with 70% isopropyl alcohol—avoid soaking to prevent damage.
- Gently clean between and around the keys to dissolve stubborn grime and sanitize surfaces.
- Allow the alcohol to evaporate completely before using the keyboard again, ensuring no moisture remains.
Dry and Reassemble Your Keyboard
Although the cleaning process is nearly complete, you need to confirm your keyboard is thoroughly dry before reassembling it. Any residual moisture can damage internal components or cause corrosion. Allow your keyboard to air dry for several hours in a well-ventilated area, or use a soft, lint-free cloth to carefully absorb moisture. Once dry, apply proper keyboard reassembly techniques by aligning the keycaps with their switches and pressing them gently but firmly into place. For mechanical keyboard maintenance, verify each key is securely seated to avoid future issues. Take your time reattaching the keys in their correct order to maintain functionality and comfort. Following these steps will help preserve your keyboard’s longevity and keep it operating smoothly, giving you the freedom to type confidently without interruption.
Establish a Regular Cleaning Routine
Ensuring your keyboard is fully dry and correctly reassembled sets the stage for consistent upkeep. To maintain freedom from dirt and grime, establish a regular cleaning routine tailored to your usage. Consider these steps:
Keep your keyboard dry and properly assembled, then commit to a regular cleaning routine for lasting cleanliness.
- Define your cleaning frequency based on how often you use your keyboard—weekly for heavy use, biweekly for moderate.
- Set routine reminders on your phone or calendar to prompt timely cleaning sessions, preventing buildup.
- Use quick daily wipes with a microfiber cloth to minimize dust accumulation between deep cleans.
Frequently Asked Questions
Can I Use Vinegar Instead of Isopropyl Alcohol for Cleaning?
Think of cleaning as a gentle rain washing away dirt; vinegar can be a rejuvenating alternative to isopropyl alcohol, offering natural antibacterial benefits and being eco-friendly. While vinegar benefits include its affordability and non-toxicity, it’s less effective at disinfecting electronics compared to isopropyl alcohol. If you want cleaning alternatives that preserve your device without harsh chemicals, dilute vinegar carefully, but avoid excess moisture to maintain your freedom from damage and keep things spotless.
How Often Should I Replace My Keyboard Entirely?
You should consider replacing your keyboard every 3 to 5 years, depending on usage and keyboard lifespan. Pay close attention to replacement signs like unresponsive keys, persistent sticky keys, or physical damage. If your keyboard hinders your productivity or comfort, it’s time to upgrade. Regular maintenance extends lifespan, but once performance drops noticeably, replacing it guarantees you stay efficient and enjoy a seamless typing experience without frustration.
Are There Specific Keyboards That Are Easier to Clean?
Mechanical keyboards, with their individual switch housings, contrast membrane keyboards, which have a single rubber sheet beneath keys. You’ll find membrane keyboards easier to clean because you can often wipe them down without disassembly, unlike mechanical ones that require removing keycaps for thorough cleaning. If you want freedom from complex maintenance, membrane keyboards are simpler. However, mechanical keyboards offer better tactile feedback, so balance your cleaning ease with your typing preferences.
Can Cleaning Damage the Electronic Components Inside the Keyboard?
You might worry that cleaning techniques could harm your keyboard’s electronic components, but if you’re careful, it won’t. Avoid using excessive moisture or harsh chemicals, which can seep inside and cause damage. Instead, use gentle tools like compressed air and microfiber cloths to protect components. By applying these precise methods, you maintain your keyboard’s functionality while keeping it clean, giving you the freedom to enjoy your device without worry.
What Should I Do if Liquid Spills on My Keyboard?
Imagine your keyboard as a delicate garden—one wrong drop can flood the roots. If liquid spills on your keyboard, act fast: immediately unplug it to cut power, then carefully turn it upside down to drain. Use a soft cloth to blot excess liquid, avoiding rubbing. Let it dry completely, ideally 24-48 hours, before reconnecting. Regular keyboard maintenance and spill prevention, like using keyboard covers, can save you from future mishaps and keep your freedom flowing.


