
Removing Allergens From Keyboard Effectively
You can slash allergy symptoms by regularly cleaning your keyboard to remove dust, skin cells, and pet dander trapped between keys. Use compressed air to blow out debris, a soft brush for tight spaces, and a lightly dampened microfiber cloth with a mild cleaner or 70% isopropyl alcohol for disinfecting. Avoid harsh chemicals and keep your keyboard unplugged during cleaning. If you want to master upkeep and prolong your keyboard’s life, there’s plenty more to discover.
Understanding Common Keyboard Allergens

Dust, skin cells, and pet dander are some of the most common allergens lurking in your keyboard. These allergen sources easily settle into crevices between keys, especially if your keyboard materials attract static or hold moisture. Understanding what causes these irritants helps you take control of your environment and breathe easier. Your keyboard’s plastic or rubber components can trap these particles, making them hard to see but easy to inhale. If you want freedom from sneezing fits or itchy eyes, recognizing how these allergens collect is essential. By knowing where dust and dander hide, you can better protect yourself and maintain a cleaner, healthier workspace that supports your well-being and independence from allergy discomfort.
Tools Needed for Effective Keyboard Cleaning
To clean your keyboard effectively, you’ll need a few essential tools and the right cleaning agents. It’s also important to use protective equipment to keep yourself safe from allergens and chemicals. Let’s go over what you’ll need to get started.
Essential Cleaning Tools
Having the right tools makes cleaning your keyboard much easier and more effective. To keep allergens at bay and enjoy freedom from irritants, you’ll want essential cleaning materials like a soft microfiber cloth, a small brush, and compressed air. These help you reach tight spaces and remove dust without damaging your device. Incorporate these tools into your regular maintenance routines to prevent buildup and maintain a fresh, allergen-free workspace. Avoid harsh implements that can scratch or dislodge keys. With just a few simple items, you can confidently tackle keyboard cleaning whenever needed, ensuring your environment stays clean and comfortable without hassle or restrictions. Equip yourself wisely, and you’ll gain both cleanliness and peace of mind.
Recommended Cleaning Agents
A few carefully chosen cleaning agents can make all the difference when you’re tackling allergens on your keyboard. To keep things safe and effective, opt for eco friendly cleaners that won’t leave harmful residues or damage your device. These cleaners break down dust, oils, and allergens without harsh chemicals, letting you clean freely and responsibly. Alcohol wipes are another must-have—they’re great for quickly disinfecting surfaces and evaporate fast, so your keyboard dries almost instantly. Just make sure the wipes contain around 70% isopropyl alcohol to guarantee effectiveness. Avoid using overly wet cloths or cleaners with ammonia, as they can harm your keyboard’s components. With the right agents, you’ll keep your workspace allergen-free and enjoy the freedom of a clean, healthy setup.
Protective Equipment Use
Choosing the right cleaning agents is only part of the equation when removing allergens from your keyboard. To truly protect yourself and maintain freedom from irritants, you’ll want to gear up properly. Slip on protective gloves to shield your hands from harsh chemicals and allergen residues that might linger. Safety goggles are just as crucial—they keep your eyes safe from accidental splashes or dust dislodged during cleaning. These simple tools empower you to clean confidently, without worry. Don’t skip them; they’re your frontline defense against exposure. By using protective gloves and safety goggles, you guarantee your allergen removal routine is both effective and safe, allowing you to enjoy a cleaner keyboard and breathe easier without sacrificing your well-being or independence.
Preparing Your Keyboard for Cleaning
Before you start cleaning your keyboard, it’s important to prepare it properly to prevent damage and guarantee effective allergen removal. Familiarize yourself with keyboard disassembly techniques to carefully remove keycaps if needed. Use safe cleaning methods to avoid harming electronic components or finishes. Unplug your keyboard or remove batteries to confirm safety. Have the right tools handy, like a keycap puller and soft brushes.
| Step | Tool Needed | Tip |
|---|---|---|
| Disconnect Keyboard | None | Always unplug before cleaning |
| Remove Keycaps | Keycap puller | Gently pry to avoid damage |
| Clear Surface Dust | Soft brush | Brush away loose debris gently |
| Prepare Cleaning | Microfiber cloth | Use cloth dampened with mild solution |
This prep confirms a thorough, damage-free allergen removal.
Using Compressed Air to Remove Dust and Debris
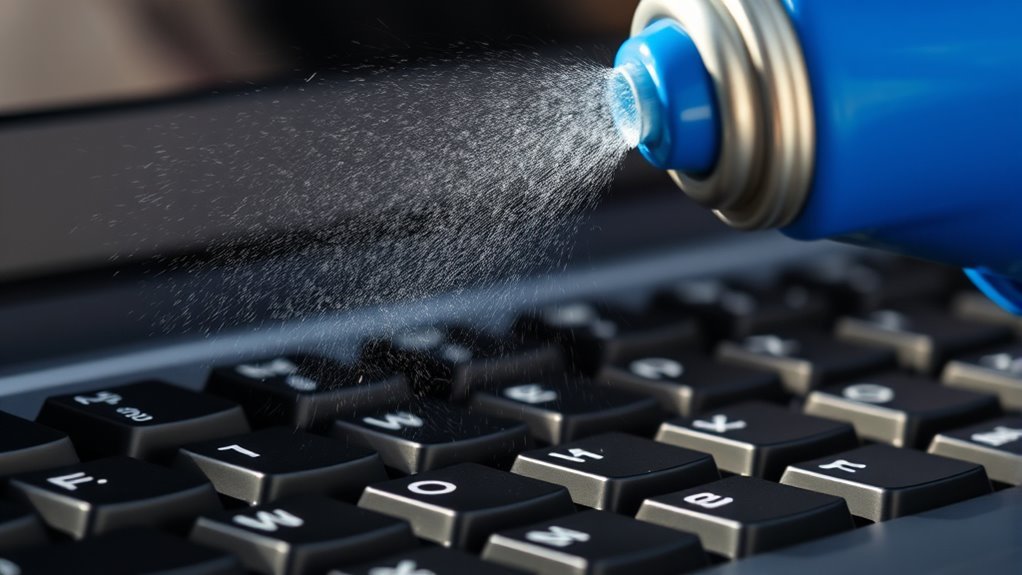
When using compressed air, you’ll want to choose the right nozzle to target tight spaces without causing damage. Make sure the air pressure isn’t too strong, or you could accidentally blow debris further inside your keyboard. Using the correct nozzle and pressure helps effectively remove dust and allergens without harming your device.
Choosing the Right Nozzle
Selecting the right nozzle for your compressed air can make a big difference in how effectively you remove dust and debris from your keyboard. Different nozzle types offer varied airflow patterns, helping you reach tight spaces or cover broader areas. Nozzle materials also matter—metal nozzles are durable but less flexible, while plastic ones provide gentler airflow and reduce the risk of damage.
Here’s a quick guide:
| Nozzle Type | Best For |
|---|---|
| Narrow Tip | Targeting tight spaces |
| Brush Nozzle | Dislodging stubborn debris |
| Wide Fan | Covering large surface |
Choosing the right combination lets you clean freely without worry—keeping allergens out and your keyboard spotless.
Proper Air Pressure Usage
Although compressed air is a powerful tool for cleaning your keyboard, using the right air pressure is crucial to avoid damaging delicate components. You want enough force to dislodge dust and allergens without sending parts flying or pushing debris deeper. To maintain proper pressure and air flow:
- Hold the can upright to keep the airflow consistent and prevent liquid propellant from escaping.
- Use short bursts instead of a continuous stream to control pressure and avoid moisture buildup.
- Keep a safe distance—around 1 to 2 inches—to guarantee the air pressure is strong but not overwhelming.
- Avoid spraying directly under keycaps unless you’re ready to clean them separately.
Cleaning Between Keys With Soft Brushes
Anyone looking to remove allergens from their keyboard will find that soft brushes are an excellent tool for reaching those tight spaces between keys. Using soft bristle brushes lets you gently sweep away dust, crumbs, and other debris without damaging your keyboard. This is especially useful for keycap cleaning, where dirt often hides in the narrow gaps. You don’t need harsh chemicals—just a soft brush can loosen and lift allergens, freeing your keyboard from buildup. Make sure to brush in multiple directions to get every nook and cranny. This simple step gives you control over your cleaning routine and keeps your keyboard fresh, all while avoiding aggressive methods that risk harm. Embrace the freedom to maintain a cleaner, healthier workspace with this easy technique.
Disinfecting Your Keyboard Safely

Once you’ve loosened and removed dust and debris with a soft brush, the next step is to disinfect your keyboard without causing damage. You want to keep your freedom to use your device safely, so choose safe disinfectants compatible with your keyboard materials. Here’s how you can do it:
- Lightly dampen a microfiber cloth with a safe disinfectant like 70% isopropyl alcohol.
- Avoid spraying liquids directly onto the keyboard to protect internal components.
- Gently wipe all surfaces, focusing on frequently touched keys.
- Let the keyboard air dry completely before reconnecting or powering it on.
Tips for Deep Cleaning Mechanical Keyboards
Because mechanical keyboards have removable keycaps and intricate components, deep cleaning them requires a bit more care and attention than standard keyboards. Start by gently performing keycap removal with a proper tool to avoid damage. Soak the keycaps in warm, soapy water and let them dry completely. While they’re drying, focus on switch cleaning—use compressed air to blow out dust and allergens trapped inside the switches. For stubborn grime, a soft brush or cotton swab dipped in isopropyl alcohol works wonders without harming the electronics. Take your time; the freedom to customize your keyboard means maintaining it well. After everything’s dry, reassemble your keyboard carefully. This thorough approach guarantees your mechanical keyboard stays allergen-free and in peak condition, giving you the liberty to enjoy every keystroke.
Preventative Measures to Keep Allergens at Bay
Although deep cleaning is essential, taking preventative measures can greatly reduce allergen buildup on your keyboard. You can enjoy a freer, cleaner workspace by adopting simple habits. Here’s how:
Prevent allergen buildup on your keyboard with simple, regular habits for a cleaner workspace.
- Use keyboard covers to shield keys from dust and debris.
- Schedule regular dusting with a soft brush or compressed air to keep particles at bay.
- Wash your hands before using the keyboard to minimize transferring allergens.
- Keep food and drinks away from your workstation to avoid crumbs and spills.
Frequency Recommendations for Keyboard Maintenance
Maintaining a clean keyboard goes beyond preventive habits; knowing how often to clean it is just as important. Your cleaning frequency should match your usage and environment to keep allergens at bay. Staying on top of this helps you enjoy freedom from sneezing fits and irritation.
| Usage Level | Cleaning Frequency | Reason |
|---|---|---|
| Light (home use) | Weekly | Minimal dust and allergen buildup |
| Moderate (office) | Twice a week | Higher exposure to particles |
| Heavy (shared) | Daily | Frequent contact increases allergens |
| Allergy-prone | Daily | Reduces allergen triggers |
| Pet owners | Daily | Pet dander accumulates quickly |
Frequently Asked Questions
Can Allergies Worsen From Using Shared Keyboards?
Yes, allergies can worsen from using shared keyboards since they often harbor dust, pollen, and other allergens common in shared spaces. If you’re sensitive, these allergens can trigger symptoms, making allergy management essential. You’ll want to clean keyboards regularly or use covers to minimize exposure. Taking these steps helps you stay comfortable and free from sneezing fits, allowing you to enjoy your space without allergy-related interruptions.
Are Certain Keyboard Materials Less Allergenic?
Imagine breaking free from invisible chains—some keyboard materials truly help with that. You’ll find that silicone and PBT plastics have fewer allergenic properties compared to cheaper ABS plastics or metal keys, which can harbor dust and irritants. Choosing the right keyboard materials means you’re reclaiming your comfort and freedom from sneezing fits. So, it’s worth seeking out options designed to minimize allergens and keep your workspace a refreshing atmosphere.
Does Keyboard Cleaning Affect Warranty Coverage?
You’ll want to carefully check your keyboard’s warranty policies before diving into cleaning methods. Some manufacturers might void your warranty if you use harsh chemicals or disassemble the device. However, gentle cleaning with approved solutions or tools usually keeps your warranty intact. Don’t let restrictive policies limit your freedom to maintain your keyboard—just stick to recommended cleaning methods, and you’ll keep both your device and warranty in good shape.
Can Keyboard Allergens Trigger Skin Reactions?
You might think a keyboard is just a harmless tool, but imagine it as a secret villain causing nonstop skin irritation! Yes, allergen exposure from dust, pet dander, or pollen trapped in your keyboard can trigger uncomfortable skin reactions. If you want freedom from itching and redness, you’ve got to recognize that your keyboard’s grime could be the culprit. Taking control means cleaning it regularly to keep those allergens—and skin irritation—at bay.
Is Ultrasonic Cleaning Safe for Keyboards?
You might wonder if ultrasonic cleaning is safe for keyboards. Generally, ultrasonic cleaning is effective for keyboard maintenance because it removes dirt and grime without harsh scrubbing. However, you should remove electronic components first, as exposure to water can damage circuits. If you’re careful, ultrasonic cleaning can prolong your keyboard’s life and keep it fresh, giving you more freedom to enjoy a clean, responsive device without worrying about wear or damage.


