Removing Coffee Machine Stains From Keyboard
If coffee spills on your keyboard, unplug it and turn it upside down to stop liquid spread. Carefully remove keycaps with a keycap puller, then wipe the surface with a damp microfiber cloth and mild soap. Use 70% isopropyl alcohol on stubborn stains, avoiding harsh chemicals. Let everything dry fully before reassembling. To protect your keyboard and handle tough stains properly, you’ll find helpful tips on cleaning techniques, drying, and when to seek expert repair.
Identifying the Type of Keyboard

Before you start cleaning, you’ll need to identify the type of keyboard you have, as different keyboards require different cleaning methods. Mechanical keyboards feature individual switches beneath each key, providing tactile feedback and durability. You can usually tell by the distinct clicking sound and the height of the keys. Membrane keyboards, on the other hand, have a softer feel and quieter keys, relying on pressure pads beneath a flexible membrane. Knowing this difference is essential because mechanical keyboards allow you to remove keycaps for deeper cleaning, while membrane keyboards are more sensitive to moisture and require gentler methods. Identifying your keyboard type lets you choose the best cleaning approach, giving you freedom to maintain your device without risking damage.
Initial Steps to Take After a Spill
One of the most important things you should do immediately after spilling coffee on your keyboard is to disconnect it from your computer or power source. This immediate response is vital for preventing electrical damage and ensuring your safety. Next, gently turn the keyboard upside down to stop the liquid from seeping deeper. Avoid shaking it aggressively, as this can spread the spill further. Use a clean, absorbent cloth or paper towel to blot the surface—don’t rub, as that can push the stain and liquid into the keys. Quick and efficient spill management at this stage increases your chances of saving the keyboard. Acting calmly but swiftly helps you maintain control, setting the stage for successful cleaning and stain removal in the next steps. After blotting, it is important to let the keyboard air dry in a dry, airy spot to prevent further damage and avoid using heat sources, as advised in immediate spill response.
Tools and Materials Needed for Cleaning
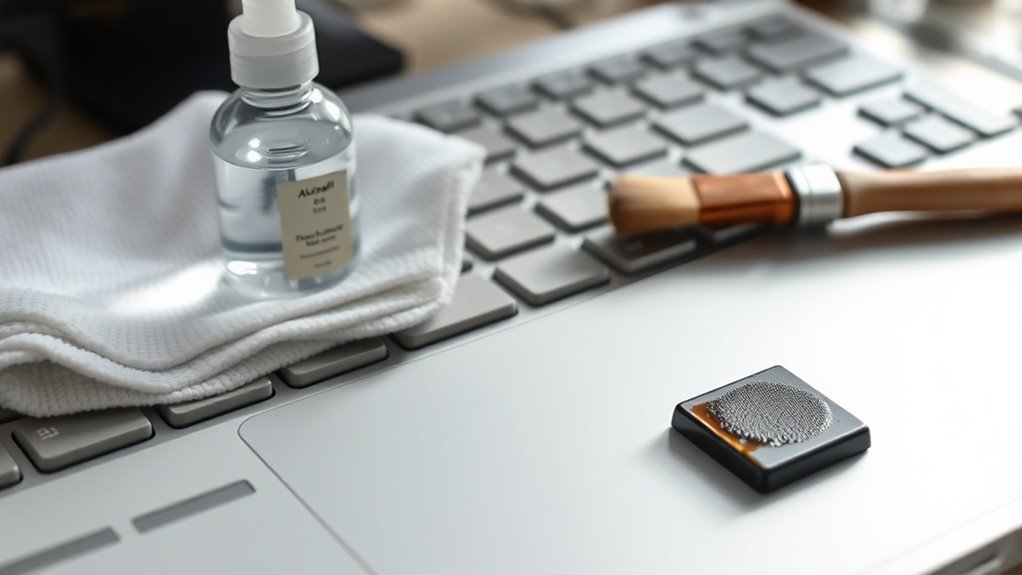
You’ll need a few essential cleaning supplies like isopropyl alcohol, cotton swabs, and microfiber cloths to tackle coffee stains effectively. Don’t forget to wear protective gloves to avoid skin irritation from cleaning agents. Having these tools ready will make the cleaning process smoother and safer. Using microfiber cloths helps prevent streaks and protects the surface while cleaning.
Essential Cleaning Supplies
Although coffee stains on your keyboard can be stubborn, having the right cleaning supplies makes the process much easier. Start with gentle, non-abrasive cleaning solutions like isopropyl alcohol or a mild detergent diluted in water. These will break down the stains without damaging your keys. Use microfiber cloths or cotton swabs to apply the solution precisely and avoid excess moisture. Paper towels and compressed air help remove debris before and after cleaning. While you’ll learn more about protective equipment later, keep in mind you’ll need gloves to protect your hands from prolonged exposure to cleaning solutions. Having all these supplies on hand lets you clean confidently and efficiently, freeing your keyboard from stubborn coffee stains without risking damage or mess. Keep it simple, stay prepared, and you’ll get the job done right.
Protective Gear Choices
Since cleaning coffee stains involves chemicals and delicate electronics, wearing the right protective gear is vital to keep yourself safe and your keyboard intact. Start with gloves selection: choose nitrile gloves for chemical resistance and a snug fit that allows precise movements. Avoid latex if you have allergies. For mask options, a simple cloth mask is usually enough, but if you’re using stronger cleaning agents, consider a disposable surgical mask or a respirator to avoid inhaling fumes. Protective eyewear isn’t typically necessary but can add an extra safety layer if splashes are likely. By selecting the right gloves and mask, you protect your skin and lungs without restricting your freedom to clean thoroughly and confidently. This gear guarantees you stay safe while restoring your keyboard’s pristine condition.
How to Safely Remove Keycaps
You’ll need a keycap puller or a small flat tool to safely remove the keycaps without damaging them. Start by gently inserting the tool under the keycap and pulling straight up with even pressure. Follow these steps carefully to avoid bending or breaking the keys during removal.
Tools Needed
Before you start removing keycaps, it’s important to gather the right tools to avoid damaging your keyboard. You’ll need a keycap puller, which safely grips each keycap without scratching or bending. Avoid makeshift tools like knives or screwdrivers, as they can harm delicate keyboard materials. A soft brush and microfiber cloth will help with cleaning techniques once the keycaps are off. If your keyboard has different materials—like plastic or metal switches—make sure your tools suit those surfaces to prevent damage. Having a small container for loose keycaps keeps things organized and frees you from losing parts. With these tools ready, you’ll confidently proceed, preserving your keyboard’s integrity while effectively tackling coffee stains.
Step-by-Step Removal
Start by selecting one keycap to remove at a time to prevent confusion or damage. Use a keycap puller or gently pry the keycap with your fingers, applying even pressure. Avoid forcing it off, as this can break the switches beneath. Once removed, set the keycap aside in an organized manner to keep track of your keyboard layout. This careful step is essential for effective cleaning techniques and guarantees you can reassemble your keyboard without issues. After removal, clean the exposed area and keycaps separately, using appropriate solutions to tackle coffee stains. Practicing this method not only addresses the current spill but also supports spill prevention by maintaining your keyboard’s functionality and hygiene. Stay patient and methodical for the best results.
Cleaning the Keyboard Surface
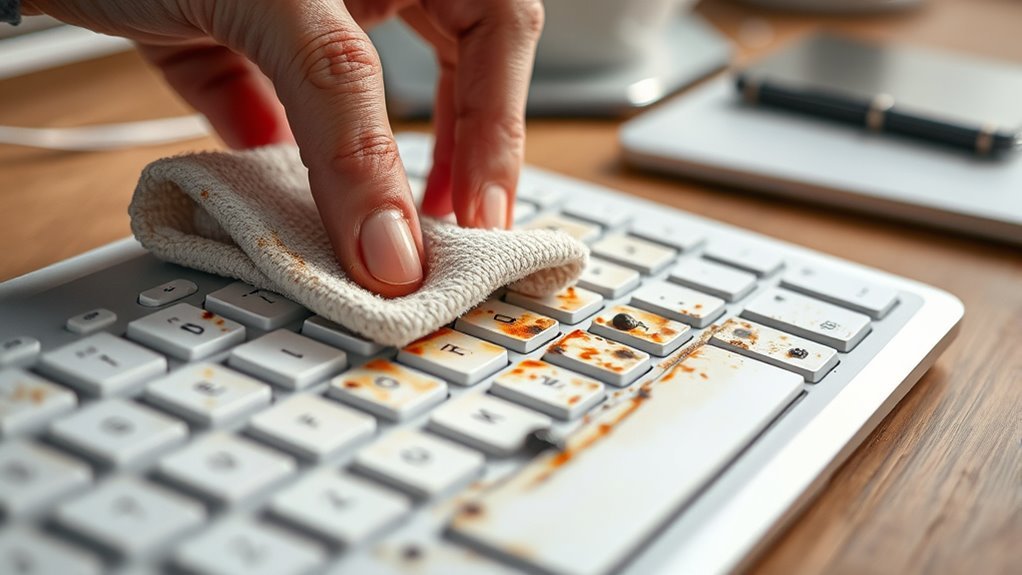
Begin by turning off your keyboard or disconnecting it from your computer to prevent accidental inputs. Grab a soft, lint-free cloth slightly dampened with a mixture of water and a small amount of mild dish soap. Gently wipe the keyboard surface, focusing on coffee stains without letting moisture seep between keys. Avoid harsh chemicals that could damage your keyboard’s finish. For better results, use keyboard maintenance tips like cleaning regularly to prevent stains from setting in. After wiping, use a dry cloth to remove any leftover moisture. These stain prevention techniques not only keep your keyboard looking fresh but also extend its lifespan. Remember, consistent care guarantees freedom from stubborn stains and maintains your keyboard’s smooth functionality. Be sure to allow your keyboard to dry completely before reconnecting it to avoid moisture damage.
Dealing With Sticky Keys
If your keys feel sticky after a coffee spill, you’ll need to clean under them to restore smooth typing. First, carefully pry off the affected keys using a small flat tool or your fingernail, being gentle to avoid damage. Once removed, check for any sticky residue left on the keyboard base and key mechanisms. Use a soft, damp cloth or a cotton swab dipped in water to gently wipe away the residue. Avoid soaking the components to prevent further damage. After cleaning, let everything dry completely before reattaching the keys. This process helps maintain key functionality and prevents sticking in the future. Taking these steps gives you the freedom to type effortlessly again without being hindered by coffee stains or sticky keys. For more thorough cleaning, consider using soft brushes to remove any remaining debris from tight spaces.
Using Isopropyl Alcohol for Deep Cleaning
One effective way to tackle stubborn coffee stains and sticky residue on your keyboard is by using isopropyl alcohol for deep cleaning. The isopropyl benefits include quick evaporation and strong degreasing power, making it ideal for electronic components. To clean, dip a cotton swab lightly in alcohol and gently scrub affected areas. Regular cleaning is important since keyboards, like remote controls, can harbor bacteria such as Staphylococcus aureus that contribute to infections.
| Step | Purpose | Tip |
|---|---|---|
| Apply | Dissolve sticky residue | Use 70% isopropyl alcohol |
| Scrub gently | Lift stains without damage | Avoid soaking keyboard |
| Wipe off | Remove loosened debris | Use microfiber cloth |
These cleaning techniques guarantee a thorough, safe cleanse without risking moisture damage, giving you freedom from stubborn coffee stains.
Drying and Reassembling the Keyboard
After you’ve thoroughly cleaned the keyboard with isopropyl alcohol, the next step is to ascertain it’s completely dry before reassembling. Use drying techniques like air drying at room temperature or gently patting with a lint-free cloth. Avoid using heat sources, as they can damage components. Let the keyboard sit for at least an hour to ensure all moisture evaporates.
When it comes to reassembling, align the keys carefully to their original positions. Use reassembling tips such as snapping keys back with gentle pressure and testing each key’s function as you go. Take your time to avoid breaking any small clips or connectors. Once reassembled, connect the keyboard and confirm everything works perfectly. Proper drying and careful reassembly will restore your keyboard’s freedom and functionality.
Regular cleaning supports a healthier, more productive space, which makes careful maintenance especially important.
Preventive Measures to Avoid Future Stains
Although accidents happen, taking a few simple precautions can help you keep your keyboard free from coffee stains in the future. Adopting keyboard maintenance tips and spill proof solutions lets you enjoy your freedom without worrying about damage.
| Preventive Action | Benefit | Tips for Implementation |
|---|---|---|
| Use a spill-proof cover | Protects from liquid | Choose flexible, easy-clean covers |
| Keep drinks away | Reduces spill risk | Use designated drink areas |
| Regular cleaning | Maintains functionality | Wipe keyboard weekly |
| Quick response | Minimizes damage | Address spills immediately |
| Use keyboard trays | Adds workspace buffer | Elevate keyboard from drinks |
Following these steps guarantees your keyboard stays clean and functional, letting you focus on what matters most. Regular cleaning using gentle cleaning techniques ensures that dirt and stains do not accumulate and cause long-term damage.
When to Seek Professional Repair Services
If your keyboard shows signs of severe damage like unresponsive keys or sticky residue you can’t clean, it’s time to contemplate professional repair. You’ll want to choose a reliable expert with good reviews and experience in electronics. Acting quickly can prevent further issues and save you money in the long run.
Identifying Severe Damage
Severe damage from coffee spills on your keyboard can be tricky to fix on your own. You should look out for clear liquid damage indicators and keyboard functionality issues that signal professional help is needed. Here’s what to watch for:
- Persistent sticky or unresponsive keys after cleaning attempts
- Visible corrosion or discoloration on circuit components
- Keyboard not powering on or erratic behavior
- Liquid trapped beneath keys causing irregular inputs
If you notice any of these signs, it’s best to stop further DIY attempts. Acting quickly to identify severe damage helps prevent permanent harm and data loss. Knowing when to seek professional repair services keeps your freedom intact by ensuring your device gets the care it truly needs.
Choosing Reliable Repair Experts
How do you find a repair expert you can trust when your keyboard’s been damaged by a coffee spill? Start by looking for repair services with strong reviews and verified credentials. Expert technicians who specialize in electronics or keyboards will have the skills needed to assess and fix the damage properly. Avoid general repair shops that lack specific experience, as improper handling can worsen the issue. When contacting repair services, ask about their process, turnaround time, and warranty terms. Choose experts who communicate clearly and offer transparent pricing. Remember, seeking professional help early can save you time and money while restoring your keyboard’s functionality. Don’t hesitate to rely on expert technicians when the damage is beyond simple cleaning—your freedom from frustration depends on it.
Frequently Asked Questions
Can Coffee Stains Cause Permanent Damage to Electronic Components?
Yes, coffee stains can cause permanent damage to electronic components. The coffee residue effects include corrosion and short circuits, which can compromise electronic component durability. If you spill coffee on your device, it’s essential to clean it quickly and thoroughly. Don’t let sticky residue sit, as it can degrade contacts and circuits over time. Taking prompt action helps you maintain your device’s freedom to function reliably.
Is It Safe to Use Household Cleaners on My Keyboard?
Cleaning your keyboard is like tending a delicate garden—using harsh chemicals can wither its life. For keyboard maintenance tips, stick to safe cleaning products like isopropyl alcohol (70% or less), mild soap, and water. Avoid household cleaners with bleach or ammonia, as they might damage keys or circuitry. Always power off your device first, use a soft cloth or cotton swab, and keep liquids minimal to guarantee your keyboard stays functional and free to serve you well.
How Long Should I Wait Before Using the Keyboard After Cleaning?
After cleaning your keyboard, you should wait at least an hour before using it to guarantee it’s fully dry. Employ effective drying techniques like air drying in a warm, ventilated area or using a soft cloth to speed up moisture evaporation. Proper keyboard maintenance includes avoiding moisture buildup and regular cleaning to keep it functioning freely. Being patient with drying helps prevent damage and keeps your keyboard working smoothly.
Can I Use Compressed Air to Dry My Keyboard?
You can definitely use compressed air as part of your keyboard maintenance routine, especially after liquid spills. It helps blow out moisture from hard-to-reach spots, speeding up drying. Just hold the can upright and spray short bursts to avoid condensation. Remember, compressed air alone won’t fully dry your keyboard, so combine it with gentle drying methods. This keeps your keyboard safe and lets you get back to typing freely in no time.
Are Wireless Keyboards More Resistant to Liquid Damage?
When it comes to wireless keyboards, you could say they have a bit more “freedom from entanglement,” but they’re not completely immune to liquid mishaps. Their wireless advantages mean no direct cable entry points, reducing some vulnerabilities. However, proper keyboard maintenance is still key—you should avoid spills altogether. So, while wireless models might offer a slight edge in liquid resistance, you’ll want to keep them dry and cared for to guarantee lasting freedom.