Removing Garage Stains From Walls
You can remove garage wall stains by first identifying the type—like grease, oil, rust, or mold—and preparing the surface by clearing dust and testing cleaners. Use mild soap and water for light dirt, absorb fresh oil stains with baking soda or cat litter, and treat rust with vinegar or commercial removers. For mold, scrub with diluted bleach and guarantee ventilation. Regular maintenance and prevention can keep walls clean. If you want to tackle every stain effectively, there’s more to explore.
Identifying Common Garage Wall Stains

What kinds of stains are you likely to find on your garage walls? Common culprits include paint spills, which often occur during DIY projects or touch-ups. These can leave uneven patches and splatters that disrupt your wall’s appearance. Tire marks are another frequent issue, especially near the garage entrance where vehicles come in and out. These dark streaks and smudges result from rubber contact and can be stubborn to remove. Other typical stains might include grease, oil drips, or dirt, but focusing on paint spills and tire marks helps you target the most visually disruptive blemishes first. Recognizing these stains clearly sets the stage for effective cleaning. By identifying what you’re up against, you gain the freedom to restore your garage walls efficiently and confidently.
Preparing the Wall Surface for Cleaning
Before you start cleaning, make sure to remove any dust or debris from the wall surface. Test your cleaning solution on a small, hidden area to avoid damage. Also, protect nearby floors and objects to keep your workspace safe and clean.
Clear Wall Debris
Start by removing any loose debris, dust, or cobwebs from the garage walls using a broom or a vacuum with a brush attachment. This initial debris removal step guarantees you’re not just pushing dirt around but preparing the surface properly. Pay close attention to corners and edges where dust tends to accumulate. Proper wall maintenance begins here—clean walls allow cleaning solutions to work more effectively and prevent grime from embedding deeper. After clearing loose particles, inspect the walls for any stubborn spots or peeling paint that might need attention before cleaning. Taking these methodical steps frees you from repeated cleaning attempts and sets the stage for a more thorough stain removal process, ultimately giving you a cleaner, more enjoyable garage space.
Test Cleaning Solutions
One simple test can save you from damaging your garage walls when trying new cleaning solutions. Before applying any cleaning products broadly, perform a small stain testing in an inconspicuous area. Dab a little of the cleaner onto the wall and wait a few minutes to see if it causes discoloration, peeling, or any surface damage. This step guarantees the product is safe for your wall material and avoids unnecessary harm. Be methodical: test each product separately if you plan to try multiple options. Stain testing lets you confidently proceed without risking your wall’s integrity. Taking this precaution grants you the freedom to clean effectively while protecting your garage walls from unintended damage. Once satisfied with the test, you’re ready to tackle the stains properly.
Protect Surrounding Areas
After confirming your cleaning solution won’t harm the wall, take steps to shield the surrounding areas. Protecting nearby surfaces guarantees your cleaning process stays mess-free and efficient. Start by installing wall barriers where stains meet unpainted or delicate sections. Use protective coverings to guard the floor and any items stored close to the wall. This preparation helps you focus on stain removal without worrying about accidental damage.
- Lay down drop cloths or plastic sheets on the floor
- Apply painter’s tape along edges to secure wall barriers
- Cover nearby shelves or tools with protective coverings
- Create physical barriers around electrical outlets or switches
Using Soap and Water for Light Stains
Although soap and water might seem basic, they’re often effective for removing light stains from garage walls. Start by choosing a mild soap type, like dish soap or a gentle all-purpose cleaner, to avoid damaging the paint or drywall. Use warm water, as the right water temperature helps break down dirt and grime without being too harsh. Mix the soap and warm water in a bucket, then dip a soft sponge or cloth into the solution. Gently scrub the stained area in circular motions, applying light pressure to avoid abrasion. Afterward, rinse the wall with clean water to remove soap residue and dry it with a clean towel. This method preserves your freedom to maintain your space simply and efficiently.
Removing Oil Stains With Absorbent Materials

Three common absorbent materials you can use to tackle oil stains on garage walls are baking soda, cat litter, and sawdust. These oil absorbents work by drawing the oil out of the porous wall surface, aiding in stain prevention and easier cleanup. Here’s how to use them effectively:
Baking soda, cat litter, and sawdust absorb oil stains, pulling oil from garage walls for easy cleanup.
- Sprinkle a generous layer over the fresh oil stain.
- Let it sit for several hours or overnight to absorb the oil.
- Sweep or vacuum up the absorbent material thoroughly.
- Repeat if any stain remains, ensuring full absorption.
Using these natural oil absorbents helps you control stains before they set, maintaining your garage walls’ cleanliness. This method avoids harsh chemicals, giving you freedom to keep your space tidy without damaging surfaces.
Cleaning Grease Marks With Degreasers
When grease marks appear on your garage walls, using a degreaser is often the most efficient way to break down and remove the stubborn residue. Start by selecting the right degreaser type—choose between citrus-based, solvent-based, or enzyme-based formulas depending on the severity of the stain and your wall material. For application techniques, apply the degreaser directly onto the mark using a spray bottle or sponge. Let it sit for 5 to 10 minutes to penetrate the grease. Then, scrub gently with a soft brush or cloth to avoid damaging the surface. Finally, rinse the area thoroughly with clean water and dry it to prevent streaks. Following these steps gives you control and freedom to maintain a clean, stain-free garage wall efficiently.
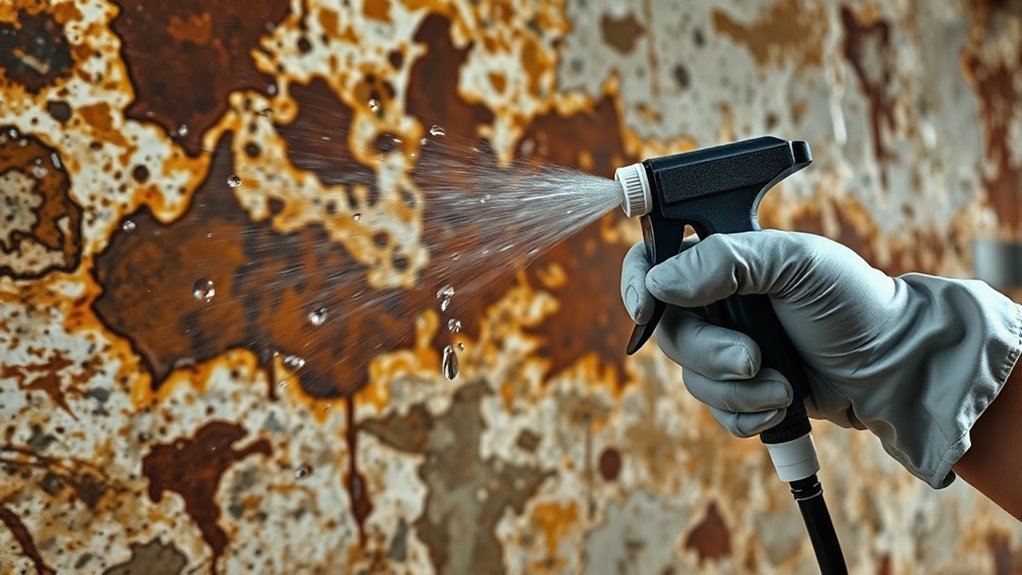
Tackling Rust Stains on Garage Walls
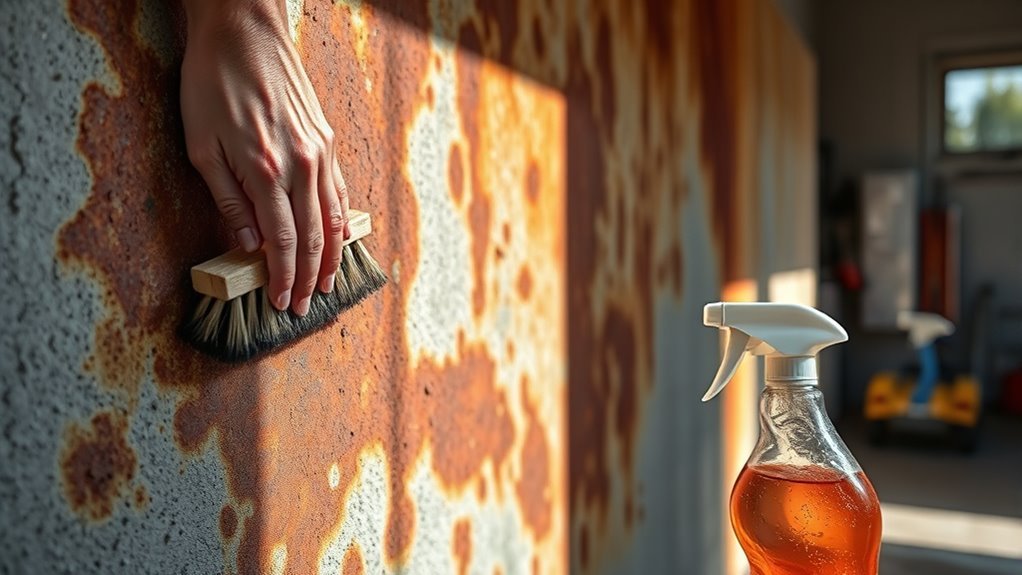
To tackle rust stains on your garage walls, start by pinpointing where the rust is coming from, like metal tools or water exposure. Use effective removal methods such as vinegar or commercial rust removers to clean the affected areas. Finally, take steps to prevent future rust stains by controlling moisture and protecting metal surfaces.
Identifying Rust Stain Sources
Although rust stains can be stubborn, identifying their sources is the first step toward effective removal. Knowing where rust originates helps you target the problem without unnecessary effort. Start by identifying metals in your garage that are prone to rusting. Common rust sources include:
- Old tools or equipment left damp
- Metal shelving units exposed to moisture
- Rusty pipes or plumbing fixtures
- Fasteners like nails, screws, or brackets
Check these areas carefully, as rust often forms when metal surfaces are exposed to water and oxygen. By pinpointing rust sources, you can prevent further stains and prepare for proper cleaning. This methodical approach saves you time and protects your garage walls from ongoing damage. Identifying metals and their condition is key to managing rust effectively.
Effective Rust Removal Methods
Once you’ve pinpointed the sources of rust in your garage, you can focus on removing the stains effectively. Start with a rust treatment solution—commercial rust removers or a homemade mix of lemon juice and baking soda work well. Apply the solution directly to the stain, letting it sit for 10-15 minutes to break down iron deposits. Then, scrub gently with a brush or sponge to lift the rust without damaging the wall surface. Rinse thoroughly with water and dry the area completely. For stubborn stains, repeat the process or use a mild abrasive pad carefully. This method helps you regain clean walls while setting a solid foundation for stain prevention practices later. Taking these steps guarantees your garage walls look fresh and rust-free, giving you the freedom to maintain a tidy space.
Preventing Future Rust Stains
While removing rust stains is essential, preventing them from reappearing saves you time and effort in the long run. You can take simple yet effective steps to protect your garage walls from future rust issues. Focus on moisture control first, as damp conditions accelerate rust formation. Apply rust resistant coatings to metal surfaces and nearby areas to create a durable barrier against corrosion. Consider these strategies:
- Confirm proper ventilation to reduce humidity buildup.
- Fix leaks promptly to prevent water exposure.
- Use rust resistant coatings on metal fixtures and supports.
- Regularly inspect and maintain surfaces for early signs of rust.
Eliminating Mold and Mildew Growth
Because garages often have limited ventilation and high humidity, mold and mildew can quickly develop on walls, creating unsightly stains and potential health risks. To tackle this, start with mold prevention by improving airflow—use fans or open doors when possible. Next, address existing growth with effective mildew treatment. Wear gloves and a mask, then scrub affected areas with a commercial mildew remover or a diluted bleach solution. Rinse thoroughly and dry the walls completely to prevent recurrence. Regularly inspect your garage for damp spots and fix leaks promptly. Keeping humidity low and surfaces dry is key to maintaining a mold-free environment. By following these steps, you’ll protect your garage walls while enjoying a healthier, cleaner space free from stubborn mold and mildew stains.
Employing Homemade Cleaning Solutions
Three simple ingredients—vinegar, baking soda, and lemon juice—can tackle many common garage wall stains effectively. Using natural ingredients not only cleans well but also offers eco friendly solutions, keeping your space safe and fresh. Here’s how you can use them:
- Mix equal parts vinegar and water in a spray bottle to dissolve grease and grime.
- Sprinkle baking soda on stains, then spray with vinegar; let fizz before scrubbing gently.
- Apply lemon juice directly to rust or mineral deposits; let it sit, then rinse.
- Combine baking soda and lemon juice into a paste for tougher marks; scrub and wipe clean.
These homemade cleaning solutions empower you to maintain your garage walls without harsh chemicals, preserving both your freedom and the environment.
Tips for Preventing Future Stains on Garage Walls
To keep your garage walls looking clean longer, you’ll want to adopt habits that minimize stain buildup. Preventive measures and regular wall maintenance are key to freedom from constant cleaning. By addressing common causes early, you reduce long-term damage and upkeep.
| Preventive Measures | Benefits | Wall Maintenance Tips |
|---|---|---|
| Use sealant coatings | Resists stains | Clean spills immediately |
| Install splash guards | Protects high-risk areas | Inspect walls monthly |
| Keep garage ventilated | Reduces moisture buildup | Repaint as needed |
| Store chemicals sealed | Prevents leaks | Use non-abrasive cleaning |
| Use floor mats | Catches drips and dirt | Maintain proper drainage |
Stick to these steps, and you’ll enjoy cleaner garage walls with less hassle.
Frequently Asked Questions
Can Garage Wall Stains Damage the Structural Integrity of the Wall?
You might wonder if garage wall stains can harm your wall’s structure. Generally, stains alone won’t damage structural integrity, but they can signal moisture or chemical issues that might. For stain prevention, keeping your garage clean and dry is key. Regular wall maintenance helps you spot problems early, preventing costly repairs. By staying proactive, you maintain your freedom from unexpected damage and keep your walls strong and reliable.
Are There Any Eco-Friendly Commercial Products for Removing Garage Stains?
Sure, you can select sustainable solutions! Several eco-friendly, biodegradable cleaners are commercially available, offering natural alternatives that effectively eliminate grime without harsh chemicals. These products prioritize planet protection, ensuring you clean confidently while conserving resources. When choosing, check labels for non-toxic ingredients and certifications. By opting for green goods, you not only maintain your space but also promote a healthier environment, granting you the freedom to clean responsibly and refresh your surroundings safely.
How Often Should Garage Walls Be Cleaned to Prevent Tough Stains?
You should clean your garage walls every few months as part of regular maintenance to keep stains from setting in. This routine helps with stain prevention by removing dirt, oil, and other residues before they become tough to tackle. If you use your garage heavily or notice spills, increase cleaning frequency. Staying consistent means less scrubbing later, giving you more freedom to focus on what matters without stubborn stains holding you back.
Is It Safe to Use Bleach on Painted Garage Walls?
You can use bleach on painted walls, but it’s risky—it might discolor or damage the paint. Instead, consider bleach alternatives like vinegar or baking soda solutions, which are gentler and safer for painted wall care. Always test a small area first and rinse thoroughly. Protect your freedom to maintain your space without worry by choosing methods that preserve your walls’ finish while keeping them clean and fresh.
Can Pressure Washing Damage Garage Wall Surfaces?
You might wonder if pressure washing can damage your garage wall surfaces. The truth is, it can—especially if you use improper pressure washing techniques or if your walls are made of delicate materials like stucco or soft wood. To avoid damage, adjust the pressure to fit the wall surface materials and keep the nozzle at a safe distance. When done right, pressure washing gives you a clean finish without harm.