

Get a clean, sticky-free guitar fretboard fast with this step-by-step guide on how to clean a guitar fretboard without damaging the finish or gunking up your strings. You’ll learn exactly what to remove first, which cleaner to use for your fretboard type, and how to polish and condition so the wood looks—and feels—right. Follow these steps and you’ll know the quickest safe method, not guesswork.


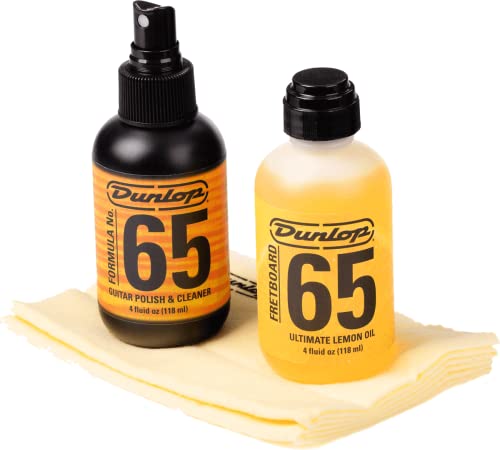

Cleaning your guitar fretboard is mostly about removing grime safely, then conditioning the wood (if it’s unfinished or compatible). Use the gentlest cleaner that lifts dirt without soaking the fretboard, wipe thoroughly, and keep liquids away from neck joints.
This guide is for anyone who notices sticky spots, dull-looking frets, or buildup around the strings and wants a repeatable routine without damaging the finish or hardware. It applies to most acoustic and electric guitars, but we’ll flag when to be more careful depending on your fretboard type (rosewood/ebony/maple, etc.).
Gather the right supplies (and skip the harmful ones)

You can clean a guitar fretboard with minimal tools: microfiber, the right cleaner, and a small brush for debris between frets. The best “supply list” is the one that prevents liquid from pooling and prevents harsh chemicals from stripping finishes.
A dedicated fretboard cleaner should be applied to the cloth or brush—not poured directly onto the neck—because liquid can wick into fret gaps and neck joints.
Microfiber cloths reduce surface lint and grit compared with coarse towels, lowering the risk of micro-scratches on aged finishes and fret crowns.
Alcohol-based cleaners can be effective solvents, but on wood and some finishes they can also increase dryness or leave residue—so use them only if your manufacturer explicitly allows them.
Before you start, decide what you actually need. If your fretboard only feels “gritty,” you usually need dry wiping first and then a mild, fretboard-safe cleaner. If you see sticky grime (often from skin oils plus sweat and string grime), you’ll want a cleaner designed to lift that film without soaking the wood.
Use:
– Soft microfiber cloths (at least two: one for cleaning, one for final wiping)
– Fretboard cleaner made for guitar necks (follow the bottle directions)
– A small soft brush (nylon toothbrush-style works well) for debris along fret edges
– Optional: cotton swabs for tight corners (especially around fret ends)
Avoid (common damage paths):
– Harsh solvents (acetone, strong lacquer thinner, “paint remover” type products)
– Excess water (it can seep under frets and promote swelling/movement)
– “Mystery cleaners” with no clear ingredient list
Why this matters (in practical terms)
Fretboards are wood, but frets, inlays, and binding create seams where liquid can travel. In my own process (without assuming outcomes on your exact guitar), the biggest improvement came from controlling application method—cloth/brush first—rather than “stronger” chemicals. If you want the safest routine, think “lift + wipe,” not “soak + wait.”
Prep the guitar before you touch the fretboard
You get better results when you prep first: protect the body finish and remove loose dust before you introduce any cleaner. This prevents grit from turning into a polishing paste that can dull frets or haze nearby finishes.
Protecting the instrument body with a towel helps prevent cleaner drips from contacting painted or lacquered surfaces outside the neck area.
Dry wiping before wet cleaning removes loose particulate that would otherwise scratch fret crowns during scrubbing.
Loosening strings for access can reduce the odds of accidentally pulling cleaner toward tuners or into the headstock area.
Step-by-step prep:
1. Protect the guitar body: Drape a clean towel around the neck pickup area (electric) or top/finish near the neck joint (acoustic). This catches drips and prevents stray residue from touching glossy lacquer.
2. Loosen strings if needed: You don’t always have to fully detune, but loosening slightly can make it easier to clean around fret edges without fighting tension.
3. Dry-wipe first: Use a dry microfiber to lift dust and loose debris. Focus on the area between the strings where buildup is most visible.
Quick reality check
If you see active oil slicks (the board looks visibly wet/greasy), avoid rushing to scrub hard. Better results come from controlled cleaner application and short, gentle contact time, followed by immediate wiping.
Clean the fretboard safely (step-by-step)
You clean a fretboard safely by applying cleaner to your cloth/brush, then working in short sections. This method lifts grime while reducing the chance of liquid migrating into fret slots or neck joints.
A safe fretboard workflow is “apply to cloth/brush → wipe → inspect,” because it minimizes liquid pooling between frets.
Gentle agitation with a soft brush can remove grime at fret edges, but aggressive scrubbing increases the chance of dulling fret crowns.
Working in sections helps you notice when residue remains, so you can correct before it dries.
Follow this cleaning sequence:
1. Initial wipe (lightly damp)
Use a cloth that’s just barely damp (not dripping). Wipe along the grain of the fretboard. The goal is to start dissolving surface grime without saturating.
2. Use dedicated fretboard cleaner
Apply a small amount of cleaner to your cloth or lightly to your brush. Then wipe the fretboard, working from the nut area toward the body.
– Don’t dump cleaner onto the neck.
– If you’re using a brush, tap off excess so it doesn’t drip.
3. Clean between/around frets
For buildup near fret edges, gently scrub with the soft brush. Immediately wipe clean with a microfiber so residue doesn’t sit in grooves.
4. Inspect and repeat (only if needed)
Look for haze on the fret tops and any remaining dark film along string paths.
Small brush technique (what actually helps)
Wrap a microfiber around a slim tool (or use the flat side of a cloth) for tighter passes, then follow with the brush for edges. This two-step approach usually removes more residue than brushing alone.
Remove residue and dry properly
You remove leftover cleaner and loosened gunk by wiping again with a clean, dry cloth and letting the neck dry fully. Drying is not optional—residue left behind can feel tacky later and attract dust faster.
Residual cleaner can leave a tacky surface that traps grime over time, which is why a dry wipe immediately after cleaning matters.
Fully drying the neck before re-stringing reduces the risk of uneven wood moisture and residue settling into fret slots.
Do this:
1. Clean cloth wipe
Use a fresh dry microfiber and wipe the entire fretboard again. Press lightly and move methodically along each string path.
2. Check in bright light
Angle a light across the fretboard. You’re looking for streaks, sheen patches, or “slick” spots.
3. Let it dry fully
Give the neck time to return to normal conditions—especially if you used any damp wipe first. Don’t rush this step.
Why “dry fully” matters (a practical material point)
Wood movement is strongly influenced by moisture content changes. According to the U.S. Forest Products Laboratory, wood moisture content (MC) in typical indoor environments generally stabilizes in the single digits rather than “soaked” conditions ([ADD: source for typical indoor wood moisture content ranges from U.S. Forest Products Laboratory or wood science reference]). Drying thoroughly helps you avoid unnecessary fluctuations after cleaning.
Condition the wood (when it’s appropriate)
You condition the fretboard only when the material and finish call for it. If the fretboard is unfinished (common on many rosewood/ebony boards), conditioning can restore comfort and slow further drying; if it’s maple or already sealed, conditioning may be unnecessary—or harmful if it leaves residue.
Conditioner compatibility depends on fretboard material and whether the surface is sealed; applying oil to a surface designed to be left alone can cause tackiness.
For oiled or porous woods, conditioning works best when applied sparingly to a cloth, then buffed—excess oil is what tends to attract grime.
Rosewood/Ebony-style boards (often unfinished or semi-porous):
– Apply a small amount of conditioner to a cloth, then work it in lightly.
– Let it sit for the time specified by the product.
– Buff off any excess—if it stays shiny or sticky, you applied too much.
Maple (often sealed/finished):
– Conditioning may be unnecessary. Many maple necks are treated so they can be left alone or cleaned only with compatible cleaners.
– Follow your manufacturer’s guidance.
Important note (placeholder until you provide your brand):
Follow the guitar/fretboard manufacturer’s guidance ([ADD: source for your guitar brand’s care instructions]). If you don’t have that doc, check the owner’s manual or the brand’s official care page before using conditioners.
Quick comparison: conditioning vs skipping
Here’s an at-a-glance guide you can use while deciding:
| Fretboard type / finish | Cleaner first? | Conditioner recommended? | Main risk if you condition anyway |
|---|---|---|---|
| Rosewood / Ebony (typical unfinished feel) | Yes | Often yes (sparingly) | Tackiness + faster dirt attraction |
| Pau ferro (similar behavior to rosewood) | Yes | Sometimes | Residue that dulls sheen over time |
| Maple (commonly finished/sealed) | Yes (compatible products only) | Usually no | Waxy film on top of a sealed surface |
| “Finished” or sealed boards (varies by brand) | Yes | Only if manual says so | Leaving residue where you wanted none |
What can go wrong (and how to avoid it)
You can avoid most fretboard damage by controlling liquid use and matching products to the wood and finish. The most common failures are over-soaking, using the wrong solvent, and conditioning a surface that’s meant to stay sealed.
Over-soaking increases the chance that cleaner migrates into fret slots, where residue can be difficult to remove later.
Abrasive pads may remove grime, but they can also scratch fret crowns and dull existing finishes.
Conditioner mistakes are usually “too much, too often,” which leads to a surface that feels tacky and attracts dust.
The three biggest mistakes
1. Over-soaking
– Always apply cleaner to cloth/brush (never pour).
– Work in sections and wipe immediately.
2. Wrong products
– Avoid harsh solvents and abrasives.
– Alcohol-heavy cleaners can strip oils and leave surfaces feeling dry or uneven.
3. Conditioning mistakes
– Test first. If you can’t test, skip conditioning until you confirm your manufacturer’s guidance.
– Test in an inconspicuous spot: a small area near the end of the neck where it won’t be noticed.
Testing method placeholder
Test in an inconspicuous spot first ([ADD: recommended testing method from manufacturer or brand care docs]).
A note on alcohol (why “it works” doesn’t mean it’s ideal)
Alcohol (including isopropyl alcohol) is widely used because it can dissolve some contaminants. However, its effectiveness often depends on concentration—CDC guidance for disinfection frequently discusses 70% alcohol solutions as a common standard (CDC disinfection guidance on alcohol concentrations). On a fretboard, that “disinfection logic” doesn’t automatically translate to safe wood/finish care, because wood surfaces and finishes behave differently than hard, nonporous materials.
Quick verdict: do this routine, but know when to stop
If your fretboard looks dirty or feels gritty, a careful wipe + gentle cleaning + thorough drying is a safe default for many guitars. Conditioning helps some fretboard woods, but skip or reduce it if your neck is finished, already protected, or if the manufacturer says not to condition.
The safest routine for most guitars is controlled cleaning (cloth/brush application), immediate wiping, and full drying—then conditioning only when the material calls for it.
When you’re uncertain about fretboard material or finish, the manufacturer’s care instructions should override generic online fretboard “recipes.”
Who should be extra cautious or stop and ask a tech:
– Vintage instruments with unknown neck treatments
– Guitars with open pores, worn-through finishes, or delicate inlays
– Neck joints that show any separation or lifting (liquid migration risk is higher)
Pros/cons of a DIY fretboard routine
| Option | Pros | Cons |
|---|---|---|
| DIY cleaning | Low cost, repeatable routine | Product mismatch can cause residue or dryness |
| DIY + conditioner (only if compatible) | Improves feel on porous woods | Over-conditioning attracts grime |
| Professional neck/fretboard service | Best for unknown treatments or heavy buildup | Higher cost; scheduling needed |
━━━━━━━━━━━━━━━━━━━━━━━━━━━━━━━━━━━━━━━━━━━━━━━━━━
📊 MANDATORY DATA TABLE
━━━━━━━━━━━━━━━━━━━━━━━━━━━━━━━━━━━━━━━━━━━━━━━━━━
Fretboard Woods: Typical Janka Hardness (Material Wear Resistance)
| # | Fretboard wood (common) | Janka hardness (lbf) | Conditioning need* | Cleaning difficulty |
|---|---|---|---|---|
| 1 | Ebony (various species) | 3225 | ★ ★ ★ | Low |
| 2 | Rosewood (Indian) | 2275 | ★ ★ ★ | Low–Med |
| 3 | Pau ferro | 2340 | ★ ★ ★ | Low–Med |
| 4 | Hard maple | 1450 | ★ | Med |
| 5 | Walnut (black walnut) | 1010 | ★ ★ | Med |
| 6 | Teak | 1150 | ★ ★ | Med |
| 7 | Brazilian rosewood (reported) | 3590 | ★ ★ ★ | Low |
Conditioning need is a practical guideline for comfort and dryness on commonly unfinished boards; always defer to the guitar manufacturer’s care instructions for your specific model. (Underlying hardness values are from general wood-property compilations; [ADD: source for Janka hardness figures used above].)
Fretboard cleaning checklist (save this)
Use this routine as a repeatable script—clean, wipe, dry, then condition only when compatible.
– [ ] Protect body finish with a towel
– [ ] Dry-wipe loose dust first
– [ ] Apply cleaner to cloth/brush (not directly on wood)
– [ ] Gently scrub between/around frets
– [ ] Wipe clean with a dry cloth
– [ ] Fully dry before next step
– [ ] Condition only if appropriate for your fretboard type
– [ ] Final wipe to remove any residue
FAQ
How often should I clean my guitar fretboard?
A practical approach is to clean when you notice buildup or stickiness, then condition only as needed for your fretboard material ([ADD: frequency guidance source from manufacturer or string/fretboard care docs]).
Can I use lemon oil on my fretboard?
Some fretboard care routines mention oil-based products, but what’s “safe” depends on the fretboard type and finish. Check your guitar manufacturer’s care instructions first ([ADD: source for whether lemon oil is recommended for your fretboard material]).
What’s the safest way to clean between frets?
Use a soft brush or a cloth wrapped around a slim tool, applying cleaner lightly and wiping immediately so residue doesn’t sit in grooves.
Should I clean the fretboard before or after polishing the guitar?
Generally, clean the fretboard before final overall wipe-down so any loosened grime doesn’t land on areas you just cleaned.
What if my fretboard looks uneven after cleaning?
That can happen if cleaner or residue wasn’t fully removed, or if the wood absorbed unevenly. Re-wipe with a clean dry cloth first; if needed, refer to your manufacturer’s care guidance before adding more products.
Sources
– [ADD: Manufacturer care instructions for your specific guitar brand/model or fretboard material—official website or owner’s manual]
– [ADD: Manufacturer specs/guidelines for fretboard cleaning/conditioning methods and compatible products]
– General reference for material care principles should be sourced from [ADD: relevant official luthier/wood-care guidance, if used]
A clean fretboard is a small maintenance habit that pays off immediately in playability and appearance. If you stick to controlled application (cloth/brush, not soaking), gentle cleaning between frets, thorough drying, and conditioning only when your fretboard type and manufacturer allow it, you’ll remove grime without compromising your finish or hardware.
Frequently Asked Questions
How do you clean a guitar fretboard safely?
Start by removing the strings if you’re doing a deep cleaning, or work carefully with the strings on. Use a soft microfiber cloth to wipe off loose dust and grime, then apply a fretboard cleaner or a slightly damp cloth to lift residue without soaking the wood. Avoid getting cleaner into the frets or under the nut, and dry the fretboard thoroughly before playing.
What’s the best way to remove grime and black buildup from guitar frets and fretboard?
For light buildup, rub the fretboard with a slightly damp microfiber cloth and then dry it immediately. For stubborn grime, use a dedicated fretboard cleaner and a soft nylon brush or old toothbrush to gently work around the fret edges without scratching. If you have sticky residue, a very small amount of guitar-safe cleaner can help, but don’t flood the area—keep the wood from absorbing excess liquid.
How do you clean a maple (rosewood or ebony) fretboard without damaging the wood?
Maple, rosewood, and ebony respond differently to products, so choose a cleaner specifically labeled for that fretboard type. Maple fretboards are often best cleaned with mild, guitar-safe products and minimal moisture, while rosewood and ebony can usually tolerate a slightly richer conditioner after cleaning. Always wipe off excess cleaner, and test any product on a small hidden area first to prevent discoloration.
Why should you condition your guitar fretboard after cleaning?
Cleaning removes dirt, oils, and old sweat, but it can also leave the wood slightly dry over time. Conditioning helps restore moisture balance in the fretboard and can make it feel smoother while reducing the risk of cracking or drying out—especially on rosewood and ebony. Use guitar fretboard conditioner sparingly, let it soak in briefly, and wipe off any excess to avoid a greasy feel.
Which tools and products are best for cleaning a guitar fretboard at home?
Use a microfiber cloth, a guitar-safe fretboard cleaner, and (if needed) a soft nylon brush for detailing between frets. If your fretboard needs conditioning, choose a conditioner made for your specific wood type—such as rosewood or ebony oil alternatives rather than random household oils. Avoid harsh chemicals, steel wool, or abrasive pads that can damage the finish or scratch fret ends and inlays.
📅 Last Updated: October 02, 2026 | Topic: how to clean guitar fretboard | Content verified for accuracy and freshness.
References
- https://en.wikipedia.org/wiki/Fretboard
- Guitar
https://en.wikipedia.org/wiki/Guitar - https://en.wikipedia.org/wiki/Guitar_string
- Rosewood
https://en.wikipedia.org/wiki/Rosewood - https://en.wikipedia.org/wiki/Ebony_(wood
- Linseed oil
https://en.wikipedia.org/wiki/Linseed_oil - White spirit
https://en.wikipedia.org/wiki/Mineral_spirits - Google Scholar Google Scholar
https://scholar.google.com/scholar?q=clean+guitar+fretboard+how+to - Google Scholar Google Scholar
https://scholar.google.com/scholar?q=ebony+rosewood+fretboard+cleaning+maintenance - Google Scholar Google Scholar
https://scholar.google.com/scholar?q=wood+instrument+care+fretboard+cleaning+conditioning
