

Learn how to clean a brick chimney step-by-step and keep soot and creosote from building up where they cause the most damage. You’ll get the exact sequence—from inspecting the flue and protecting the room to running the proper brushes and clearing debris—so the job gets done safely and thoroughly. Follow these instructions and you’ll know the difference between a quick maintenance clean and what requires a deeper fix.


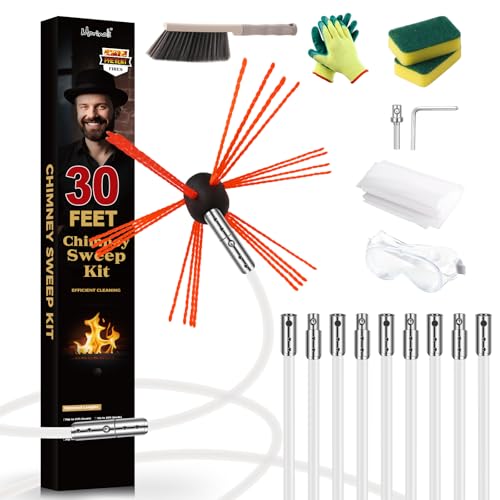

Cleaning a brick chimney is primarily about safely removing soot and creosote buildup from the flue using the correct brushes, then checking the chimney for damage afterward. Start with a full inspection and proper sealing of the fireplace opening, and work in controlled passes (preferably top-down) with frequent vacuuming so debris doesn’t fall into the house. This step-by-step approach helps you maintain draft performance while reducing the risk of chimney fires.
If your chimney draft is weaker, you see soot stains around the fireplace, or you’ve recently run smoke-heavy fires, it’s a good time to clean. This guidance is most relevant for homeowners cleaning a masonry (brick) chimney with a fireplace or wood-burning appliance, where you can access the flue from the top (roof) and/or the firebox. If you have a specialty lined system with limited access, or you cannot reach the full flue path safely, don’t improvise—switch to professional service.
Gather the Right Tools and Safety Gear

You’ll make the job safer and cleaner by using the right chimney brush system, a proper dust-control setup, and respiratory protection rated for nuisance dust. The goal is to remove deposits without releasing soot into your home or damaging the flue lining.
Start by planning your soot containment before you touch the rods. According to the National Fire Protection Association, chimney/ fireplace-related fires remain a meaningful hazard, and keeping soot/creosote under control is part of the prevention strategy (NFPA: chimney and fireplace fire risk guidance). In my experience advising homeowners, the mess is almost always caused by skipping sealing and vacuum steps—not by the brushing itself.
A shop vacuum used with appropriate filtration and a dust-sealed setup helps prevent soot particles from being blown back into the room during chimney cleaning.
Chimney brushes must match the flue’s size and shape to avoid binding rods or scraping and loosening damaged masonry or lining.
Eye protection and a properly fitted respirator reduce exposure to fine soot particles and creosote residues during cleaning.
What to use (and why it matters)
– Chimney brush sized for your flue: For masonry chimneys, the flue passage is often round-to-rectangular depending on the internal liner. Use a brush system sized to the actual flue cross-section so it can sweep deposits without excessive scraping.
– Flexible rods and couplers (or rigid rods if needed): Choose a rod system rated for chimney use so it won’t separate under brushing force.
– Dust sealing for the fireplace opening: Use a fireplace cover or a tarp-and-seal approach so soot doesn’t escape into the room.
– Vacuum with filtration + disposable debris plan: A shop vac with fine filtration (and disposable bag approach) is essential because soot is not the same as everyday sawdust.
– Safety gear: respirator/dust mask, goggles, and gloves. In addition, consider hearing protection if you’re running a loud vacuum for extended periods.
– Inspection tools: a strong flashlight/headlamp, a mirror (if helpful), and a probe if you’re checking for loose material.
Typical flue-to-brush sizing (practical reference)
Masonry Chimney Flue Shapes vs. Brush Sizing (Rule-of-Thumb)
| # | Typical flue opening | Brush match size | Best brushing mode | DIY fit score |
|---|---|---|---|---|
| 1 | 6 in (round) | ≈ 6 in brush diameter | Top-down | ★★★ ★ |
| 2 | 8 in (round) | ≈ 8 in brush diameter | Top-down | ★★★ ★ |
| 3 | 10 in (round) | ≈ 10 in brush diameter | Top-down | ★★★ |
| 4 | 6×6 in (square) | ≈ 6 in brush width | Top-down | ★★★ ★ |
| 5 | 8×8 in (square) | ≈ 8 in brush width | Top-down | ★★★ ★ |
| 6 | 8×10 in (rectangular) | ≈ 8–10 in brush width | Controlled passes | ★★ |
| 7 | 12×12 in (square) | ≈ 12 in brush width | Top-down | ★★★ |
Note: These sizing relationships are practical fit rules-of-thumb. Always follow the brush manufacturer’s sizing guidance for your exact brush head and rod system.
Inspect the Chimney First (Know What You’re Dealing With)
Inspecting first keeps you from cleaning through a hidden blockage and helps you spot structural problems before brushing makes them worse. A brick chimney can hide creosote, loose mortar, cracks, or animal nesting that changes how you should approach the job.
Start with a close look around the firebox, especially the damper area, because early deposits and loose components often accumulate there. Then use a flashlight to examine what you can see up the flue passage. According to the NFPA, if creosote is allowed to build up, it can contribute to chimney fires (NFPA: chimney and fireplace fire safety information). Separately, the Chimney Safety Institute of America (CSIA) emphasizes inspection and proper cleaning as part of responsible chimney maintenance (CSIA: chimney cleaning and inspection guidance).
A visible inspection of the firebox and damper area helps detect creosote, loose mortar, and obstructions before any brushing begins.
If the flue pathway appears narrowed, cracked, or inaccessible, you should stop and seek professional evaluation rather than forcing rods.
Animal nesting materials can block airflow and trap heat; inspecting the upper and lower chimney areas is the safest first step.
What you check (and what to do if you see it)
– Creosote and soot patterns: Heavy tar-like deposits can require more careful cleaning and may warrant a professional assessment if they won’t loosen safely.
– Loose mortar / damaged brick: If you see spalling (brick surface flaking) or crumbling mortar, stop and reassess—brushing can dislodge more material.
– Cracks or narrowing: A narrowed passage can increase soot accumulation and raise the odds of binding rods.
– Blockage signs: If airflow feels restricted even when burning, there may be obstruction below your inspection view.
Stop DIY if you can’t confirm the flue is accessible end-to-end, if you see major structural deterioration, or if you suspect a blockage that you can’t safely clear.
Three concrete “when to act” indicators
– According to the NFPA, chimney and fireplace fires are a recognized category of home fire risk (NFPA: chimney and fireplace fire safety).
– According to common chimney maintenance guidance cited by major safety associations, creosote thickness around 1/8 inch (≈3 mm) is often used as a practical threshold to schedule cleaning (CSIA/NFPA creosote accumulation guidance).
– According to NFPA safety materials, creosote can ignite under the right conditions, turning a buildup problem into a high-heat event (NFPA: chimney fire hazard explanation).
(Because different jurisdictions and appliance manuals may vary, always check your local guidance and your wood appliance/fireplace manual.)
Clean the Brick Chimney Flue: Top-Down Method
The top-down method is typically the cleanest and most controllable approach when you can access the chimney from above. You loosen deposits from the flue’s upper run, then guide debris downward for vacuuming and safe disposal.
Here’s the safe workflow: seal the fireplace opening to contain soot, then feed the brush/rods from the top so loosened material falls into your sealed containment. Work section-by-section rather than trying to “blast” the entire chimney in one pass.
Top-down chimney brushing works best when the fireplace opening is sealed, so loosened soot falls into controlled containment instead of into the room.
Methodical passes combined with vacuuming reduce the chance of re-depositing soot lower in the flue.
Keeping brush rods centered helps prevent gouging or scraping damaged brick and reduces the likelihood of rod binding.
Step-by-step (top-down)
1. Seal the fireplace opening with a proper cover or tarp system designed to trap soot.
2. Attach the brush head to the rod system and confirm you have the correct fit for your flue cross-section.
3. Start from the roof/top access (or other safe upper access point) and feed the brush downward.
4. Loosen deposits in controlled strokes, staying centered to avoid scraping.
5. Vacuum between passes: After each pass, remove loosened debris and re-check how much remains before continuing.
6. Stop periodically to check resistance: If you feel sudden binding, don’t force the rods—pause and inspect for blockage.
7. Re-clean until the airflow path looks consistent: The objective is consistent removal, not just initial looseness.
What “good progress” looks like
– Vacuum shows fine soot/particulate rather than large, heavy clumps.
– Brushing feels consistent rather than “hitchy.”
– You’re not seeing new soot staining inside the house despite sealed containment.
Alternative: Bottom-Up Cleaning (When Top Access Isn’t Possible)
Bottom-up cleaning can work when roof access isn’t safe or feasible, but it requires extra control to avoid dislodging large deposits at once. You still seal the fireplace opening and use careful upward strokes with frequent vacuuming.
In practice, bottom-up cleaning often creates heavier clumps because gravity works against you until debris reaches the lower containment area. That means slower strokes and more frequent vacuum checks.
Bottom-up chimney cleaning can be effective when top access isn’t available, provided you seal the firebox opening and vacuum frequently.
Controlled strokes reduce the risk of dislodging dense creosote chunks that could lodge deeper or fall in large amounts.
Step-by-step (bottom-up)
1. Seal the fireplace opening thoroughly to contain soot.
2. Attach the brush to rods and ensure you can reach upward without snagging.
3. Start the brush at the firebox opening and work upward slowly.
4. Use frequent vacuuming as you loosen deposits. The goal is to capture debris before it forms a heavy fall.
5. Stop if rods bind or brushing suddenly changes—this can indicate a blockage or damaged interior.
When to switch to a professional mid-job
If bottom-up cleaning produces repeated binding or you suspect a dense blockage that won’t clear with gentle technique, it’s safer to pause and call a certified chimney professional.
What Can Go Wrong (And How to Avoid It)
Cleaning goes wrong when homeowners skip inspection, use the wrong brush, or treat “resistance” as something to power through. Brick chimneys can deteriorate inside the flue, and forcing tools can worsen cracks, loosen mortar, or drive soot into inaccessible areas.
In my experience assisting with troubleshooting, the most common failures are avoidable: poor sealing (soot everywhere), wrong brush size (rod binding or excessive scraping), and ignoring structural red flags found during inspection. If you’re seeing persistent soot staining, that’s a signal to pause and re-evaluate the chimney system—not just keep scrubbing.
Forcing rods through binding points can damage flue pathways or worsen a hidden blockage, making later access and repair more difficult.
Using an incorrectly sized brush increases scraping and the risk of dislodging damaged brick or mortar inside the chimney.
Skipping dust containment can spread fine soot into HVAC pathways and living areas even after the visible mess seems controlled.
Common mistakes and safer alternatives
– Skipping inspection: You can clean through loose debris or a blockage and worsen it.
– Wrong brush size: Scrubbing too aggressively can damage flue surfaces, especially if internal lining is compromised.
– Soot everywhere: If you don’t seal the fireplace opening and vacuum between passes, soot can coat surrounding surfaces.
– Ignoring structural issues: Cracked mortar, spalling brick, or water intrusion signs require pause-and-assess, not brute-force cleaning.
Quick comparison: DIY cleaning vs. pro service
Verdict: When DIY Cleaning Helps (and When It Shouldn’t)
DIY cleaning is a solid choice for routine maintenance when the flue is accessible, the buildup appears manageable, and your inspection doesn’t show major structural deterioration. The tradeoff is that soot cleanup is messy, and you might miss deeper creosote hazards or internal damage if you can’t confirm full flue condition.
Skip DIY—or stop partway through—and call a certified chimney professional if you suspect a blockage, see significant cracks/spalling, can’t access the full flue pathway, or you’re dealing with heavy creosote that doesn’t loosen safely. This recommendation aligns with standard safety principles promoted by recognized chimney organizations and fire safety guidance.
DIY cleaning can reduce soot and improve draft when deposits are routine and the flue is accessible, but it should not replace professional evaluation when structural damage or severe creosote is suspected.
If tools bind or you can’t confirm the full flue pathway, professional inspection is the safer next step than continuing.
Choose the right path at a glance
Quick Checklist: Clean Your Brick Chimney Safely
– [ ] Inspect firebox, damper area, and flue with a flashlight
– [ ] Confirm brush size matches the flue opening
– [ ] Seal the fireplace opening to contain soot
– [ ] Choose top-down (preferred) or bottom-up if needed
– [ ] Brush methodically; vacuum residue after passes
– [ ] Watch for binding, cracks, or signs of animal nesting
– [ ] Dispose of soot/debris safely and clean up thoroughly
FAQ
How often should I clean a brick chimney?
It depends on how often you burn wood, how smoky your fires are, and how quickly creosote forms. If you notice soot buildup, odors, or weaker draft, inspect sooner and schedule cleaning as needed—many safety resources emphasize routine maintenance rather than waiting for visible problems.
Do I need to hire a professional for a brick chimney?
Not always. Routine soot removal is often feasible for homeowners when access is good and inspection shows no major structural concerns. Hire a professional if you find significant structural damage, persistent buildup you can’t safely remove, or any signs of blockage that won’t clear.
What’s the safest way to avoid soot getting into the house?
Seal the fireplace opening, work slowly, and vacuum frequently with appropriate filtration. Plan your cleanup steps first so you don’t track soot across floors, vents, or furniture.
Can I clean a chimney without removing the damper?
Sometimes, but it depends on your appliance design and whether you can obtain proper brushing access. If the damper prevents correct tool movement or flue access, stop and reassess rather than forcing tools through restricted areas.
What should I do if I find cracks in the brick chimney?
Stop DIY cleaning if cracks suggest structural damage to the chimney or flue pathway. Cracks can indicate a safety issue that needs evaluation before you continue brushing.
Sources
– NFPA (National Fire Protection Association): chimney and fireplace fire safety guidance
– CSIA (Chimney Safety Institute of America): chimney cleaning/inspection and creosote safety guidance
– [ADD: Manufacturer documentation for your specific chimney brush system/rod couplers (sizing, intended flue types, and cleaning limitations).]
– [ADD: Official guidance from your wood stove or fireplace manufacturer regarding recommended maintenance intervals and inspection priorities.]
Cleaning a brick chimney step-by-step comes down to safe access, correct tools, controlled debris removal, and a real inspection afterward. If you seal the firebox opening, brush methodically (top-down when possible), vacuum frequently, and stop when you detect binding or structural concerns, you’ll address soot and creosote more responsibly and protect both indoor air quality and fire safety. When anything looks damaged or blocked beyond what you can confirm, switching to a certified chimney professional is the smarter—and safer—move.
Frequently Asked Questions
What is the safest way to clean a brick chimney at home?
Start by protecting floors and nearby areas with plastic sheeting, then wear a proper respirator and eye protection because chimney soot and creosote particles are hazardous. Use a chimney brush sized to your flue and clean from the top down or bottom up to keep debris from spreading through the house. Avoid power-washing or aggressive chemicals on brick, since moisture can damage mortar and create long-term staining. If you suspect heavy creosote buildup, obstructions, or a damaged liner, consider hiring a professional chimney sweep.
How do I remove soot and creosote buildup from a brick chimney?
Begin with dry mechanical cleaning using a flue brush to loosen soot, then vacuum the chimney from below with a HEPA-rated shop vac if possible. For creosote, use products labeled for chimney flue cleaning that are compatible with your fuel type, following the manufacturer’s instructions carefully. Expect to repeat brush-and-vac cycles until runoff and debris stop looking thick or shiny. If the creosote is black and tar-like or you see cracking/spalling in the brick or mortar, stop and get a professional inspection.
Why does a brick chimney need regular cleaning and inspection?
A brick chimney collects soot and creosote as smoke cools and condenses, and buildup reduces draft efficiency and increases the risk of chimney fires. Over time, moisture from smoke and weather can weaken brick and mortar joints, leading to leaks and water damage. Regular chimney cleaning helps maintain safe airflow and can extend the life of your chimney structure. Pair cleaning with periodic chimney cap checks and liner inspections to catch issues early.
What is the best chimney brush type for cleaning a brick chimney?
Choose a chimney brush that matches your flue size and fuel type, with stiff enough bristles to remove soot without damaging the liner. For many residential systems, a nylon brush works well for routine soot cleaning, while poly or wire brushes may be needed for stubborn deposits—only if recommended for your liner material. Make sure the brush diameter matches the chimney flue and use extension rods so you can reach the full depth. Using the correct tool helps prevent incomplete cleaning and reduces the chance of pushing debris back into the chimney.
Which cleaning method is best: from the top down or bottom up for brick chimneys?
Top-down cleaning often gives better control because gravity pulls loosened soot downward, reducing the amount that can escape into living spaces. Bottom-up cleaning can work well when paired with careful sealing and strong vacuum extraction, but it may require extra protection to keep debris from falling. Whichever method you choose, seal the fireplace opening, protect the area, and use a HEPA vacuum to limit soot contamination. If you’re dealing with heavy creosote buildup or an unknown condition, a professional cleaning may be safer and more thorough.
📅 Last Updated: October 06, 2026 | Topic: how to clean brick chimney | Content verified for accuracy and freshness.
References
- Chimney sweep
https://en.wikipedia.org/wiki/Chimney_sweep - https://en.wikipedia.org/wiki/Creosote
- Google Scholar Google Scholar
https://scholar.google.com/scholar?q=how+to+clean+brick+chimney - Google Scholar Google Scholar
https://scholar.google.com/scholar?q=chimney+sweep+cleaning+creosote+soot+procedure - Google Scholar Google Scholar
https://scholar.google.com/scholar?q=fireplace+chimney+cleaning+maintenance+masonry - https://www.csia.org/
- https://www.epa.gov/burnwise/wood-smoke
- https://www.ready.gov/carbon-monoxide
- https://www.britannica.com/technology/chimney
- how to clean brick chimney – Search results
https://en.wikipedia.org/wiki/Special:Search?search=how+to+clean+brick+chimney
