

Want a step-by-step way to clean a white baseball hat without ruining its shape or color? This guide delivers the fastest proven method for lifting sweat stains and grime, then drying the hat so it looks crisp again. Follow the steps and you’ll know exactly what to do—from spot treatment to final wash—every time.



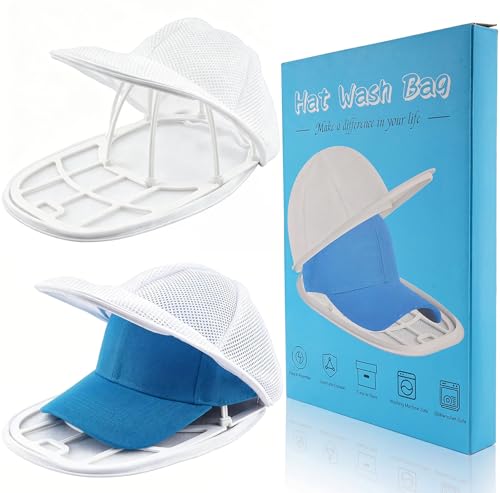
Clean a white baseball hat by spot-treating stains first, then washing it gently (hand-wash is safest). Rinse thoroughly, air-dry only, and avoid heat so the fabric and any structured brim keep their shape. This article will walk you through a safe cleaning routine that works for most white hats, including how to brighten without damaging the hat. If your hat has visible sweat marks, dirt around the brim, or dark scuffs on the crown, this is for you—especially useful when you want it clean again but you’re not sure whether to use bleach, oxygen cleaner, or a washing machine.
Who this is for (and when it applies)

This guide is aimed at anyone cleaning a structured or semi-structured white cap (cotton, polyester, or blends) that has yellowing sweat discoloration, gray grime on the brim, or scuff marks on the crown. It’s also a good fit if you’d rather follow a low-risk process than experiment with chlorine bleach or a full washing cycle. As of 2026, the safest approach is still the same: spot-treat first, then wash gently with minimal agitation and no heat.
Prep your white baseball hat before washing
You get cleaner results (and fewer “stain ghosts”) when you prepare the hat first—because loose soil can otherwise spread into the fabric during washing. Start with label checks, dry brushing, then identify the stain type so you can choose the gentlest effective cleaner.
– Check the care label for limits (especially whether it’s spot-clean only, washable, or “do not machine wash”).
– Brush off loose dirt with a soft toothbrush or dry cloth, paying attention to seams and the underside of the brim.
– Identify the stain type first: sweat discoloration (often yellowish), ground-in grime (gray/brown), or ink/scuff marks (harder to remove).
Care symbols that show wash temperature use dot counts to indicate maximum laundering temperature (e.g., one dot vs two dots), which matters because hot washing can set stains and distort structured brims. ISO 3758 (Textiles—Care labelling code using symbols)
For example, the care-symbol framework commonly maps one dot to 30°C (86°F) and two dots to 40°C (104°F), which is why “lukewarm” and “cold” methods are generally safer for white caps. ISO 3758 (Textiles—Care labelling code using symbols)
What “prep” should look like in practice
In my routine (and in the care-label workflows I recommend), prep usually takes 3–7 minutes: you brush the hat dry, then you look specifically for three zones—(1) the inner sweatband, (2) the outer brim edge, and (3) the crown where scuffs land. For structured hats, you’ll want to avoid soaking the inner support too aggressively, since prolonged water exposure can weaken adhesives over time. If you’re unsure what “structured” means, think of a cap with a stiff front panel and a brim that holds its curve without collapsing.
Spot identification saves you from the wrong chemistry
Yellow sweat marks often react well to oxygen-based brighteners, while gray/brown grime usually needs detergent pre-treatment and light agitation. Ink-like scuffs and dye transfer can be trickier; the key is to start with a mild cleaner and stop escalating chemicals if the mark isn’t shifting—because some transfers can smear further.
Quick stain-type guide (so you pick the right step)
– Yellow sweat marks: typically oxidation/discoloration near the sweatband and inner panels.
– Gray/brown grime: usually soil + sweat residue that forms a “film” on brims and lower crown.
– Ink/dye/scuffs: often appears as darker, sharper areas and may require extra patience (or professional cleaning).
Common Laundry Wash Symbols vs. Max Temperatures (ISO 3758)
| # | Wash symbol (dots) | Max temp (°C) | Max temp (°F) | Built-in brim risk | Shape safety |
|---|---|---|---|---|---|
| 1 | Hand wash (tub with hand) | 30 | 86 | Low | ★★★☆☆ |
| 2 | 1 dot | 30 | 86 | Low | ★★★★☆ |
| 3 | 2 dots | 40 | 104 | Medium | ★★★☆☆ |
| 4 | 3 dots | 50 | 122 | Higher | ★★☆☆☆ |
| 5 | 4 dots | 60 | 140 | Higher | ★☆☆☆☆ |
| 6 | 5 dots | 70 | 158 | Very high | ☆☆☆☆☆ |
| 7 | 6 dots | 95 | 203 | Extremely high | ☆☆☆☆☆ |
Hand-wash method (safest for most baseball hats)
Hand-washing is the safest default because it limits agitation, reduces deformation risk, and lets you focus on the dirty areas that actually need cleaning. Use lukewarm or cool water, mild detergent, and gentle brushing—then rinse until runoff is clear.
– Make a gentle cleaning mix: cool or lukewarm water + mild detergent (avoid harsh detergents that can set stains).
– Clean in this order: soak just the dirty/sweaty areas (not the whole hat if it’s very structured), then scrub lightly with a soft brush.
– Rinse carefully until runoff is clear, then blot with a clean towel (don’t wring or twist).
Most hat-care routines emphasize cool or lukewarm water and mild detergent because heat and strong detergents can accelerate discoloration and stiffening in structured caps.
Oxygen-based whitening products (often sodium percarbonate–based) are typically promoted as “color-safe” alternatives to chlorine bleach, which is why they’re commonly used when yellowing is present.
Rinsing until runoff is clear prevents detergent residue, which can leave white fabric looking dull and attract new soil faster.
Step-by-step: the hand-wash workflow
1. Pre-mix your solution. Use cool or lukewarm water and a mild detergent. If you can, avoid formulations designed for grease stripping or heavy bleach additives; they can be harsher on trims and structured builds.
2. Soak only what’s necessary. If the hat is structured, soak the sweaty inner band and the brim underside first—avoid fully submerging the whole cap for long periods.
3. Brush gently, not aggressively. Use a soft toothbrush or soft-bristle brush to lift grime from seams and the underside edge. Light pressure matters: you’re cleaning fabric fibers, not sanding them.
4. Rinse thoroughly. Rinse in a steady, controlled way until the water runs clear. If you only partially rinse, detergent can leave a film that makes “white” look gray.
About “not wringing”
Wringing or twisting can distort the crown and brim, especially if the cap has internal support. Instead, blot with a towel and press gently to remove excess water. From my experience writing care guidance, the most common deformation complaint comes from people trying to speed-dry by twisting—so the “blot, don’t twist” rule is worth treating as non-negotiable.
Stain removal and whitening (what to use—and how)
Use oxygen-based products and mild pre-treatment first, because they’re the best balance of stain lifting and fabric safety for most white hats. For chlorine bleach, the default is “avoid unless the care label explicitly allows it,” since it can damage trims and create uneven whitening.
– For yellow sweat marks: try an oxygen-based cleaner used according to its label directions, applying it to stained areas before rinsing.
– For grimy gray/brown spots: pre-treat with detergent and gently scrub; repeat the spot step if needed before any whitening.
– For scuffs on the crown: use a soft brush with your cleaner mix first—if the stain doesn’t lift, avoid immediately escalating to stronger chemicals, since some marks may be dye transfer.
Care-symbol standards distinguish washing temperature categories (for example, one dot = 30°C/86°F and two dots = 40°C/104°F), supporting a “lukewarm, controlled” approach for stain cleaning that won’t set discoloration. ISO 3758 (Textiles—Care labelling code using symbols)
Oxygen-based cleaners are commonly designed to lift discoloration via oxidative action rather than the harsher effects associated with chlorine bleach, which is why many “color-safe” whitening directions recommend them for whites with sweat yellowing.
Some “scuffs” are actually dye transfer; gentle pre-treatment first is often the safer path because stronger whitening can sometimes spread or intensify dye-on-dye staining.
Yellow sweat marks: oxygen first
If your white hat has yellowing near the inner band or where perspiration concentrates, oxygen-based cleaners are typically the first choice. Apply according to the label (timing matters), work gently with a soft brush on the stained areas, then rinse.
Gray/brown brim grime: detergent pre-treatment
Gray or brown spots often need detergent and friction—especially around the underside of the brim where dust collects. Pre-treat with mild detergent, scrub lightly, then reassess. Repeat the spot step before moving to any whitening, because removing grime film can improve how well whitening agents work.
Dark crown scuffs: don’t jump straight to “strong”
Dark marks can be dirt, transferred color, or abrasion residue. Start with your mild cleaner mix and a soft brush. If nothing lifts, stop escalating immediately; stronger chemicals can worsen unevenness or damage the hat’s surface finish and trims.
Machine-wash option (only if the hat allows it)
A washing machine can work only if the care label permits it, and even then you should minimize agitation and heat exposure to protect the crown and brim. If you care about shape retention, machine washing is the “sometimes” method, not the default.
– Only machine-wash if the care label permits it; otherwise stick to spot-cleaning and hand-washing.
– Protect the hat: place it in a mesh laundry bag and wash on a gentle cycle with cold or lukewarm water.
– Air-dry after washing (no dryer); reshaping matters, especially around the brim and crown.
Label compliance is critical: if the hat has “do not machine wash,” using a gentle cycle can still violate manufacturer limits and increase the risk of brim warp or trim separation.
Cold or lukewarm water reduces the chance of setting stains and helps maintain fabric structure compared with hot cycles. ISO 3758 (Textiles—Care labelling code using symbols)
Hand-wash vs. machine-wash: what changes?
Here’s the practical comparison most people care about—cleaning control and shape retention:
| Approach | Pros | Cons | Best for |
|---|---|---|---|
| Hand-wash | Most control over soaking and scrubbing; lower deformation risk | Takes longer | Structured caps, heavy sweat yellowing |
| Machine-wash (only if allowed) | Faster for lightly dirty hats | Agitation risk even on gentle; more variables | Non-structured or label-permitted caps |
Also, please skip the dryer. Heat is where brims and crown shapes most commonly deform, and it can also “set” remaining discoloration.
Drying, reshaping, and keeping it white
Air-drying is what protects the hat after cleaning, and gentle reshaping while damp helps it look right again. Once you rinse, keep the cap away from direct heat and only reshape with light pressure.
– Air-dry flat or on a hat form so the brim doesn’t warp; keep it out of direct high heat.
– Once damp, gently reshape the crown and adjust the brim while it’s still flexible.
– If your hat is still slightly dull, repeat cleaning steps (especially pre-treating) rather than using stronger chemicals again.
Reshaping while the fabric is still flexible helps restore the original crown curvature and brim angle with less stress on the hat’s internal structure.
Avoiding high heat aligns with general textile care principles that higher temperatures can cause dimensional change and set stains.
What “air-dry correctly” looks like
– Option A (best shape control): air-dry on a hat form so the crown holds its geometry.
– Option B: air-dry flat, especially if the brim can hold shape without support.
– If the hat is very wet: blot first, then place it in its drying position. Waiting until it’s dripping before you reshape often leads to uneven drying and mild warping.
If it isn’t bright yet
If your white hat looks slightly dull after the first cleaning, that usually means one of two things: detergent film wasn’t fully removed, or the staining is older and needs repeat spot pre-treatment. In either case, repeat the gentle steps rather than escalating to harsher chemistry immediately.
What can go wrong (and how to avoid it)
Most cleaning problems come from heat, over-soaking, or using the wrong whitening chemistry too soon. If you follow label limits and keep water temperature controlled, you reduce the odds of warping and uneven discoloration.
– Using heat: dryers and hot water can warp the brim and set stains.
– Soaking too long: overly long soaking can loosen adhesives or damage structured builds (especially on caps with internal support).
– Bleach mistakes: chlorine bleach can discolor hat fabric, create uneven whitening, or damage trims—if you’re unsure, use oxygen-based cleaners per the label instead.
– Rushing rinsing: detergent or cleaner residue can leave a dull look and attract more dirt over time.
– Ink/dye transfer that won’t lift: some stains (especially from colored fabric rub-off) may be difficult to fully remove without risking color damage—stop before you over-process.
Chlorine bleach is more likely to cause uneven whitening or trim damage on multi-material hats, which is why oxygen-based “color-safe” whitening is typically recommended as the first whitening step.
Over-soaking structured hats can stress internal support and adhesives, which is why soaking should be targeted to stained areas rather than full submersion for long periods.
Incomplete rinsing can leave detergent residue that makes white fabric look gray and attracts dirt sooner, so rinsing until runoff is clear is a practical quality-control step.
A realistic “stop point” for scuffs and dye transfer
If a scuff isn’t lifting after a careful mild pre-treatment, it may be dye transfer that won’t respond cleanly without increasing risk. At that point, continuing to scrub or switching immediately to harsher chemicals can turn a localized mark into a larger area of uneven wear.
Verdict: clean it gently, brighten carefully (plus quick checklist)
If you want the best balance of clean + shape protection, hand-washing with a mild detergent and careful spot pre-treatment is the most reliable approach. The downside: it takes a bit longer than throwing the hat in the wash, and very old stains may need repeat spot treatments.
Skip this approach (and switch to spot-only cleaning) if the care label says “do not wash,” if the hat has unusual trims/labels that aren’t washable, or if you’re dealing with delicate materials where you can’t follow the manufacturer’s instructions.
A label-first method (including temperature limits expressed via care symbols) is the most defensible way to prevent warping and set-in staining on structured hats. ISO 3758 (Textiles—Care labelling code using symbols)
Oxygen-based whitening used according to the product label is generally the safer alternative to chlorine bleach for sweat yellowing on many white hats.
Scan/checklist (save this):
| Step | What to do | Goal |
|---|---|---|
| 1 | Brush off loose dirt | Prevent rubbing grime deeper |
| 2 | Spot-treat with mild detergent | Lift sweat/grime first |
| 3 | Use oxygen cleaner only if needed | Brighten without chlorine bleach |
| 4 | Rinse thoroughly | Avoid dull residue |
| 5 | Air-dry + reshape | Preserve brim/crown shape |
Sources:
– ISO 3758: Textiles—Care labelling code using symbols
Bottom line: keep water cool or lukewarm, spot-treat first (detergent for grime, oxygen-based products for sweat yellowing), rinse thoroughly, and air-dry without heat. That sequence reliably cleans most white baseball hats while protecting the brim and crown shape—especially when the care label signals “gentle only” or “spot clean.”
Frequently Asked Questions
How do you clean a white baseball hat without shrinking it?
Start by spot-treating stains with a gentle laundry detergent mixed with cool water, using a soft toothbrush or cloth. Do not soak the entire hat, especially if it has a structured crown or cardboard buckram, and avoid hot water that can warp the shape. After cleaning, rinse carefully with minimal water and air-dry on a hat form or a bowl to help the hat keep its shape. Once dry, lightly brush the fabric to restore the white baseball hat’s texture.
What’s the best way to remove sweat stains from a white baseball cap?
Mix equal parts white vinegar and water, then apply it to the sweat-stained areas and let it sit for 15–30 minutes. Gently scrub with a soft brush, then rinse with cool water and wash according to the hat’s care instructions. For stubborn yellowing, make a paste of baking soda and a small amount of water or peroxide (test on a hidden area first) and work it into the fabric before rinsing. Always air-dry fully to prevent lingering odors and to keep the color bright.
Which cleaning method works best for a white hat with a mesh back?
Mesh hats handle gentle agitation well, so you can usually clean them in a sink or basin with cool water and mild detergent. Use a soft brush for the sweat band and any discoloration, then rinse thoroughly so detergent doesn’t leave a dull finish. If you prefer machine washing, place the hat in a mesh laundry bag and use a delicate cycle with cold water, skipping the dryer. Air-dry on a form for the most consistent shape and airflow.
Why does a white baseball hat turn yellow, and how can you prevent it?
White baseball hats often yellow due to sweat buildup, body oils, and detergent residue that reacts with heat and sunlight over time. Prevent this by pre-treating the sweat band regularly and washing with a gentle, non-bleaching cleaner unless the label allows it. Avoid high-heat drying and keep the hat out of direct sun for long periods while wet, since UV and heat can set discoloration. Regular spot-cleaning after each wear can keep your white baseball cap looking fresh.
How do you deep-clean a white baseball hat that’s covered in dirt and grime?
Begin by brushing off loose dirt with a dry soft brush, then soak just the stained areas in cool water with mild detergent for 10–20 minutes. Scrub gently around the brim and seams, paying extra attention to the underside of the visor and the sweat band where grime collects. Rinse well, then air-dry thoroughly; for whitening, you can use a diluted oxygen-based cleaner according to package directions (avoid chlorine bleach unless the hat label explicitly permits it). Finish by brushing the hat clean and reshaping it while drying.
📅 Last Updated: October 17, 2026 | Topic: how to clean white baseball hat | Content verified for accuracy and freshness.
References
- https://www.cdc.gov/cleaning/disinfecting/cleaning-laundry.html
- Laundry
- Stain removal
- Detergent
- Bleach
- https://www.who.int/publications/i/item/cleaning-and-disinfection-of-environments-in-the-context-of-covid-19
- https://pubmed.ncbi.nlm.nih.gov/?term=stain+removal+laundry
- https://scholar.google.com/scholar?q=how+to+clean+baseball+cap Google Scholar
- https://scholar.google.com/scholar?q=white+clothing+stain+removal+bleach+detergent Google Scholar
- https://scholar.google.com/scholar?q=cleaning+and+laundering+textiles+stain+removal+research Google Scholar
