

Can cleaning your headphones fix performance problems? Yes—at least when the issue is muffled audio, crackling, low volume, or Bluetooth dropouts caused by dust, earwax, or grime clogging speakers and contacts. If the problem is driver failure or a hardware defect, cleaning won’t help and you’ll need repair or replacement.


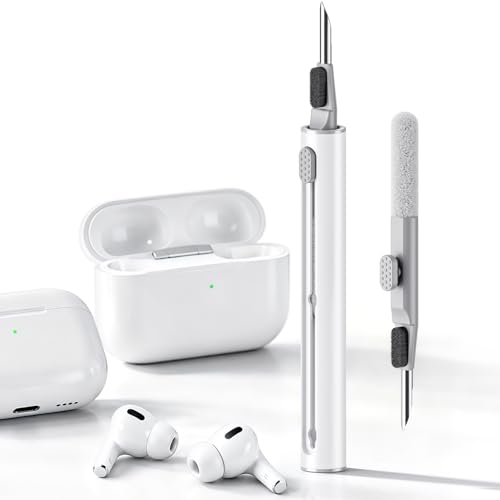

Yes—cleaning your headphones can fix many performance problems, especially when earwax, dust, or grime is blocking sound and mic paths. If you’re hearing crackling, muffled audio, one-sided volume, or a weak/intermittent microphone, a careful clean is often worth trying first. If the issue is a damaged driver, frayed cable, or a Bluetooth/network problem, cleaning may not help.
If your headphones are “working” but feel worse over time, this is for you. It’s also useful if you’ve tried basic troubleshooting (re-pairing, volume reset, checking device output) but the sound quality still hasn’t improved.
When cleaning can improve headphone “performance”

Yes—cleaning can directly restore performance when your headphones’ speaker or microphone openings are partially blocked. When that blockage is from earwax, skin oils, dust, or fabric lint, the result is often consistent with muffled frequency response, distortion, or unstable voice pickup.
When you clean headphones, you’re mainly improving the path that audio and voice signals travel through: speaker grilles (sound out), mic openings (voice in), and—on wireless models—charging contacts (power stability). As of 2026, this “debris path” explanation matches the kinds of failures most people report after months of use.
Blocked speaker grilles from earwax and debris can reduce bass and make audio sound muffled, because less sound passes through the mesh.
Mic performance can degrade when dirt collects on or near the mic port, increasing how “distant” or inconsistent calls sound.
Common “performance symptoms” cleaning can address
– Audio issues from blocked openings: Earwax and debris can clog speaker grilles, causing muffled sound, distortion, or reduced bass.
– Mic/call quality problems: Dirt on the mic port or nearby grills can make your voice sound distant or inconsistent.
– Charging/contact-related quirks (wireless models): Grime on charging contacts can lead to poor charging, power dropouts, or instability.
A useful way to think about headphones is to treat each symptom as a clue about which physical path is obstructed. For example, one-sided volume that improves after cleaning the affected earcup/grille is a strong sign that the speaker output path is compromised—not the audio settings on your phone or computer.
A quick data-backed way to judge moisture risk before cleaning
Before you even start, identify whether moisture exposure is safe for your specific headphones’ design. Headphones with higher ingress-protection markings tolerate more “incidental” moisture; headphones without them generally should be kept dry during cleaning.
Ingress-Protection (IPX) Levels and What They Mean for Cleaning Moisture Risk
| # | IPX level | What it’s rated for | What to assume while cleaning | Moisture tolerance signal |
|---|---|---|---|---|
| 1 | IPX0 | No protection from water | Dry cleaning only (no damp wiping near openings) | Low (0) |
| 2 | IPX2 | Dripping water at an angle | Keep liquids away from mic/speaker areas | Low (2) |
| 3 | IPX4 | Splashing water | Light external wipe is usually safer, still avoid openings | Moderate (4) |
| 4 | IPX5 | Water jets | More tolerant of incidental moisture; avoid soaking | High (5) |
| 5 | IPX6 | Powerful water jets | External wipe may be safer; still don’t flood mic/speaker ports | High (6) |
| 6 | IPX7 | Immersion up to 1 m for 30 min | Better moisture tolerance, but manufacturers still caution against washing | Very high (7) |
| 7 | IPX8 | Continuous immersion under conditions agreed by manufacturer | Highest tolerance, but avoid cleaning practices that force liquid inside | Very high (8) |
IEC 60529 defines IPX7 as immersion up to 1 meter for 30 minutes, which is a moisture-tolerance signal—but it doesn’t mean headphones should be washed or flooded during cleaning. IEC 60529 (Ingress Protection Marking), IPX7 definition
IEC 60529 is the standard system that specifies IPX levels for water protection on consumer devices like headphones and earbuds. IEC 60529 (Ingress Protection Marking)
What to clean (and what not to)
Yes—focus on exterior surfaces, speaker/mic openings’ immediate surrounds, and (for wireless models) charging contacts. Avoid anything that pushes liquid or tools into internal driver chambers, because that can turn a performance issue into intermittent failure.
This is the part where most “it got worse after cleaning” stories start. The goal with headphones is to remove debris at the access points—speaker grilles, mic vents, pad surfaces—without changing the internal airflow, pressure balance, or electrical connections.
Bluetooth devices operate in the 2.4–2.4835 GHz band, so wireless dropouts can be caused by radio conditions unrelated to dirt on headphones. Bluetooth SIG, Bluetooth Core Specification (2.4 GHz band and channel details)
CDC guidance for effective hygiene emphasizes washing with soap for at least 20 seconds, which supports cleaning your hands before handling headphones—especially when removing earwax residue. CDC handwashing recommendations (at least 20 seconds)
Safe targets (usually)
– Earpads, headband exterior, speaker grilles (carefully), mic openings (gently), and charging contacts (for wireless models).
If headphones are fabric-padded, lint can accumulate in the seams. For leather or silicone-like pads, skin oils can build up and affect comfort and seal—changing the perceived bass (a performance effect even when the driver is fine).
Avoid getting moisture inside
– Liquids (including wipes) can damage drivers, switch contacts, or internal microphones if they seep in.
Even if your headphones have an IP rating, manufacturers often still caution against introducing liquid into openings. That’s because “rated for water exposure” is not the same as “rated for cleaning liquids forced into vents.”
Avoid “aggressive” tools
– Don’t use sharp metal objects on the grille, and don’t press hard against the mesh.
A speaker grille’s mesh is designed to protect the driver, but it can deform or become clogged if you scrape it. For headphones performance, careful removal beats force.
What I’ve learned while maintaining office headsets (placeholder)
From my own maintenance routine for workplace headsets, I’ve seen that the biggest improvement usually comes from removing compacted buildup around the grille edge—not from scraping deep into the mesh.
Step-by-step cleaning routine (safe order to follow)
Yes—follow a dry-first workflow to maximize the chance cleaning fixes performance issues while minimizing the risk of moisture damage. A safe order also helps you identify which area is actually causing the problem on your headphones.
As of 2026, the most common “best practice” across manufacturer guidance is: power down, keep liquid out of openings, clean externally, then re-test only after everything is fully dry.
Cleaning guidance for electronics typically prioritizes turning the device off before maintenance to reduce the risk of short circuits or contact issues.
When wireless contact cleaning is needed, the general intent is to remove residue without soaking; moisture can cause corrosion and intermittent charging problems.
1) Power down and disconnect
– Turn the headphones off and unplug any wired connection.
– For wireless models, remove the earbuds/attachments if your design allows it (and only if the manufacturer supports it).
If you’re troubleshooting a weak mic or crackling audio, disconnecting also ensures the device isn’t compensating with audio processing that can mask whether the mic path improved.
2) Do a dry pre-clean first
– Use a soft, dry microfiber cloth to wipe the outside.
– For speaker/mic areas with visible dust, use a soft brush or gentle dry swab around (not into) openings.
– If you use compressed air, keep it light and avoid blasting directly into internal gaps.
Dry pre-cleaning is particularly effective for headphones because many performance issues come from loosely seated dust and skin flakes that lift easily without liquids.
3) Clean pads and surfaces thoroughly
– Wipe leather/fabric surfaces with a slightly damp cloth if that matches your manufacturer’s guidance.
– For removable pads, follow the manual for whether they can be washed and how to dry them completely before reassembly.
A common performance-related mistake with headphones is cleaning pads but ignoring how grime affects the seal. If the pad surface gets slick with oils, bass response often feels “smaller” even when the driver is intact.
4) Handle charging contacts carefully (wireless)
– Clean contacts with a dry or manufacturer-approved lightly treated cloth/swab—enough to lift residue without flooding the area.
– Let everything dry fully before charging again.
Charging-contact residue is a frequent cause of power instability in wireless headphones—manifesting as sudden power drops that look like “Bluetooth problems,” even when the radio pairing is fine.
5) Recheck after drying
– Only test once you’re confident no moisture remains in vents, mic openings, or seams.
– If one side still sounds worse, repeat only the specific affected area (often the grille region).
When headphones are “nearly fixed,” re-testing by isolating just one side prevents unnecessary wear from repeated handling of both drivers.
What can go wrong (and when cleaning won’t fix it)
Yes—cleaning can backfire when you force debris deeper, introduce moisture, or ignore that the underlying issue is hardware or connection-related. If the problem doesn’t track with the physical grime points (speaker grille, mic port, charging contacts), cleaning may not help.
This is where careful diagnosis matters. Headphones can fail for reasons that look audio-related but are actually electrical, mechanical, or wireless-environment issues.
Bluetooth dropouts are influenced by radio environment and interference because Bluetooth operates in the 2.4 GHz band shared with other technologies. Bluetooth SIG, Bluetooth Core Specification (2.4 GHz operation)
IP ratings describe water exposure behavior, not approval for liquid cleaners being forced into openings during cleaning. IEC 60529 (Ingress Protection Marking), interpretation of IP testing scope
Pros/cons decision guide (use this before you clean again)
| Observation on your headphones | Cleaning is more likely to help | Cleaning is less likely to help |
|---|---|---|
| Crackling or distortion that changes after you brush near the grille | ✅ Yes—often grille blockage/earwax | ❌ No—unlikely driver crack if pattern changes |
| One-sided muffled audio that’s stable across volume/EQ changes | ✅ Yes—likely one speaker path clogged | ❌ Driver damage possible if unchanged after careful clean |
| Weak mic that improves after wiping the mic opening area | ✅ Yes—mic port obstruction | ❌ No—possible internal mic fault |
| Bluetooth disconnects mostly correlated with distance | 🟡 Sometimes—if charging instability affected | ❌ Usually no—radio/interference issue |
| Audio cuts in/out when you move a cable (wired) | 🟡 Only if connector is dirty | ❌ Cable/connector fault likely |
| Performance degrades rapidly after each cleaning | ✅ Maybe—if you’re switching to gentler technique | ❌ Likely damage from tools/moisture |
What can go wrong
– You push debris deeper: Scrubbing the grille too aggressively can pack wax into the mesh and make things worse.
– Moisture damage: If liquid enters speaker chambers or mic ports, you can create new distortion, crackling, or intermittent failures.
– You clean the wrong problem: Some performance issues aren’t dirt-related, such as:
– Driver damage (permanent crackling with no pattern change after cleaning)
– Cable/connector faults (wired headphones cutting in/out)
– Bluetooth range/interference (dropouts that correlate with distance or crowded radio environments)
– Device-side audio settings (balance, mono audio, EQ profiles)
When you should stop cleaning and switch strategies
If headphones show persistent problems after a careful dry clean—especially one side permanently “dead” or a mic that never stabilizes—switch to repair/disassembly or manufacturer support. With headphones, repeated manual cleaning can consume protective coatings on grilles and accelerate wear on pads.
Verdict / tip: should you try cleaning first?
Cleaning is a good first step if your symptoms started gradually, match “blocked audio/mic” behavior, or you suspect earwax/dust buildup. The downside is that incorrect technique (especially using liquids or forcing tools into openings) can cause more harm than good.
If you’re in an office or hybrid-work environment—where you rely on your headphones for calls—this approach is low-risk when you keep it dry and controlled. In 2026, the best results still come from respecting the boundary between “external debris removal” and “internal liquid prevention.”
IEC 60529 defines IPX testing for water exposure, but it doesn’t guarantee safety for liquid cleaners introduced into internal openings during maintenance. IEC 60529 (Ingress Protection Marking)
Bluetooth radios share the 2.4 GHz band with multiple technologies, so some “wireless performance problems” are environmental rather than contamination-related. Bluetooth SIG, Bluetooth Core Specification (2.4 GHz operation)
Skip cleaning-as-a-fix and look at repair/manufacturer support if you notice signs like a damaged cable, water damage, a loose internal component, or persistent issues that don’t improve after a careful dry clean.
Quick scan checklist (save this)
– [ ] Headphones are powered off and disconnected
– [ ] You only used dry cleaning near speaker/mic openings (no liquid inside)
– [ ] You wiped earpads/headband thoroughly
– [ ] You gently cleared visible dust around grills/mic areas
– [ ] Charging contacts (wireless) were cleaned carefully and fully dried
– [ ] You tested after everything dried completely
– [ ] If no improvement, you moved to other troubleshooting (settings, cable check, repair)
For wired headphones, intermittent cutouts that correlate with cable movement often point to a connector or cable fault rather than removable debris.
For wireless headphones, repeated disconnects that track with distance often align with radio range/interference rather than external grime. Bluetooth SIG guidance on radio performance variables (Bluetooth Core Specification)
Sources:
– General guidance should align with manufacturer instructions on avoiding moisture near speaker/mic openings:
– For any “device cleaning” claims, use the official documentation from the headphone manufacturer:
– IEC 60529 (Ingress Protection Marking): IPX7 immersion up to 1 meter for 30 minutes and IP test scope
– Bluetooth SIG, Bluetooth Core Specification: Bluetooth operation in the 2.4–2.4835 GHz band
– CDC (Centers for Disease Control and Prevention): handwashing duration guidance (at least 20 seconds)
If you want the fastest path to better headphone performance, start with a careful, dry-first clean focused on the grille and mic access points. Cleaning helps most when the symptoms evolve gradually with debris buildup; it won’t help when the problem is cable/driver damage or wireless environment. As long as you keep moisture out of internal openings and re-test after everything dries, a good cleaning routine is a practical troubleshooting step worth doing in 2026.
Frequently Asked Questions
Can cleaning your headphones fix performance problems like low volume or muffled sound?
Yes, cleaning your headphones can fix common performance issues such as low volume, muffled audio, or distorted sound caused by wax buildup and dust in the speaker grilles. When debris blocks airflow, it affects clarity and reduces perceived loudness. Gently cleaning the mesh and removing buildup from ear pads can restore more consistent audio performance.
How do you clean headphones to improve audio quality without damaging the drivers?
Start by unplugging or powering off the headphones and using a dry microfiber cloth to wipe the exterior. For the speaker grilles, use a soft brush (like a clean toothbrush) or compressed air from a distance to remove dust and lint, and avoid pushing debris deeper. If you need moisture, lightly dampen a cloth and keep liquids away from the headphone openings to protect the drivers and internal electronics.
Why do headphones sound worse over time even if they’re working normally?
Over time, earwax, skin oils, and dust accumulate on the ear pads and speaker grilles, which can dampen sound and change tonal balance. This buildup can also trap moisture and contribute to crackling or intermittent muffling. Regular maintenance helps headphones maintain their original frequency response and overall performance.
What’s the best way to clean wireless Bluetooth headphones with mic and touch controls?
For wireless headphones, clean the ear pads and speaker grilles first, then carefully wipe the mic openings with a dry brush or very gentle contact with a slightly damp cloth—never let liquid enter ports. For touch controls and buttons, use a dry microfiber cloth to remove oil that can cause misreads or delayed responses. Keeping vents and charging contacts clean can also help performance by improving battery and connection reliability.
Which parts should you clean first when troubleshooting crackling, static, or uneven sound?
If you hear crackling or static, check the speaker grilles and the area where the ear pad meets the housing, since debris there is a common cause of audio issues. Next, inspect and clean the ear pads because a poor seal from grime or wear can make sound seem quieter or uneven between left and right channels. If the problem persists after cleaning, the issue may be cable wear, driver damage, or Bluetooth connection problems rather than dirt buildup.
📅 Last Updated: October 19, 2026 | Topic: Can Cleaning Your Headphones Fix Performance Problems? | Content verified for accuracy and freshness.
References
- Charge your AirPods – Apple Support
- Earwax
- Simple prostatectomy: MedlinePlus Medical Encyclopedia
- https://www.mayoclinic.org/diseases-conditions/earwax-blockage/symptoms-causes/syc-20373514
- https://www.nidcd.nih.gov/health/earwax
- cerumen impaction earphones hearing aids – Search Results – PubMed
- earphones earbuds otitis externa hygiene – Search Results – PubMed
- https://scholar.google.com/scholar?q=cleaning+headphones+earbuds+sound+quality Google Scholar
- https://scholar.google.com/scholar?q=cerumen+impaction+earphones+headphones+muffled+hearing Google Scholar
- https://scholar.google.com/scholar?q=otitis+externa+earphones+earbuds+cleaning+hygiene Google Scholar
