

You can remove scratches from a wooden TV unit safely, and the best method is a simple step-by-step process that matches the scratch depth—light surface marks vs. deeper gouges. This guide walks you through cleaning, choosing the right repair material (wood filler, stain, or scratch repair pen), and finishing so the damage blends with the existing finish. Follow these steps and your TV stand looks polished again without risking further scratches.



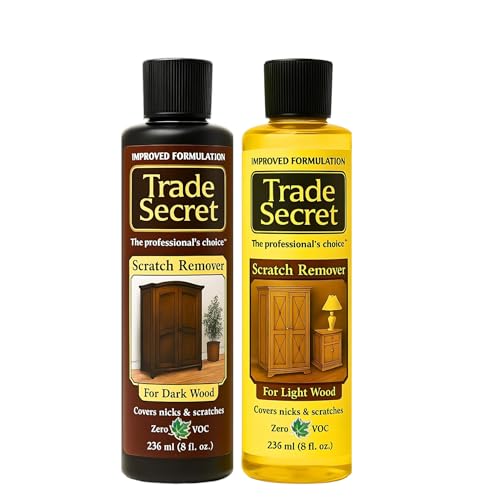
Most scratches on a sealed wooden TV unit can be improved by cleaning first, then using the minimum abrasion needed (polish for scuffs, filler/wood touch-up for grooves), and finally protecting with a clear finish that matches the existing sheen. The key is to choose your repair level based on scratch depth and finish type—because polishing over a deep gouge (or using the wrong clear coat) is what creates the “halo” look.
Scratches on a wooden TV unit usually come out by cleaning first, then lightly sanding and using a color-matched wood touch-up (and finish) for the specific scratch depth. For shallow surface marks, you can often fix them with conditioning/wood polish; for deeper scratches, you’ll need filler or a touch-up product followed by a clear topcoat. This guide walks you through choosing the right approach so the repair blends with the existing finish.
If your TV unit has a sealed finish (lacquer, varnish, or polyurethane) or a stained/painted surface, the “best” method depends on how deep the scratch is and whether the wood fibers are actually exposed. We’ll also flag when a DIY repair will likely look mismatched and when it’s smarter to stop and get help.
If you’re dealing with scuffed feet, moving-day marks, or a visible groove around the TV console, this step-by-step guide is for you—especially if your unit has a clear sealed topcoat (common on mid-range and higher-end furniture). Use it when you want a “blended and improved” result without re-finishing the entire piece.
Assess the scratch (so you don’t make it worse)

If you identify scratch depth correctly, you’ll avoid the two most common failures: polishing that can’t fill a groove, and sanding that spreads damage. The fastest way to get there is a fingertip/nail check combined with a careful look at how the finish reflects light.
In my experience (from the repair routines I’ve used on finished wood surfaces), the assessment step matters more than the product you pick—because a mis-read scratch depth makes every subsequent step harder. If you’re unsure, take 5 minutes to clean and test in a hidden corner before you commit to sanding or filler.
A scratch that visibly catches a fingernail usually indicates a cut deep enough that polish alone won’t level it; you typically need filler or a touch-up system instead.
Sealed finishes (lacquer, varnish, polyurethane) rely on a clear topcoat layer; when that layer is breached, repairs often require a clear protection step to restore sheen continuity.
ASTM D523 defines how gloss is measured using specified measurement angles (commonly 20°, 60°, and 85°), which is why sheen mismatches become obvious after spot repairs.
Check depth: nail test and surface feel
Run a fingertip gently across the scratch. If your nail catches, plan on a deeper repair: the goal is to restore a flat plane, not just hide discoloration. If your skin glides smoothly but the surface looks dull or slightly lighter, you’re likely dealing with a surface scuff where cleaning plus conditioning can go a long way.
Identify finish type: sheen behavior after cleaning
Clean the area first with a mild wood-safe cleaner and let it fully dry. Then compare sheen on the scratched zone versus nearby areas under your normal viewing light (often TV lighting plus overhead room lights). A cloudy “patch” often signals that the clear coat has been abraded; a lighter/darker color change can indicate that stain is disturbed or veneer is compromised.
Clean before deciding
Dust and embedded grime can mimic a scratch line. If you don’t remove debris first, you’ll sand or fill a contaminant ridge, leaving a permanently rough “track.” For best results, use a microfiber cloth and avoid harsh solvents unless your finish manufacturer explicitly allows them.
What you’ll need (and what to choose by scratch type)
The right tools prevent further finish damage and make your repair blend more naturally. Your kit should match scratch severity: clean/condition/polish for surface scuffs, and filler/touch-up + clear protection for deeper grooves.
If your unit is finished with lacquer, varnish, or polyurethane, treat the clear coat as the “skin” that determines the final visual match. That means your materials must be compatible with that skin—especially for sheen (matte vs satin vs gloss).
Wood-safe cleaners and microfiber cloths help remove grit that can act like sandpaper during later polishing or wiping steps.
Finish repair products are designed for specific surface conditions (finished wood vs raw lumber), so choosing an “intended for finished wood” conditioner or scratch remover reduces mismatch risk.
When you blend color using filler or a touch-up marker, you need a topcoat step to protect the repaired surface and visually unify gloss and texture.
For cleaning
– Microfiber cloths (lint-free)
– Mild wood-safe cleaner or the cleaner recommended by your TV unit’s finish manufacturer
Avoid harsh solvents (alcohol, acetone, strong degreasers) unless the manufacturer says they won’t harm the finish.
For surface-level fixes (scuffs)
– Wood polish or conditioner designed for finished wood
– A scratch-mark eraser designed for sealed surfaces (not raw, unsealed lumber)
Choose products labeled for finished wood and for the sheen level you see (matte/satin/gloss), because wiping a high-sheen product into a matte area is a fast path to “spot repair visibility.”
For deeper scratches
– Color-matched wood filler (for wider grooves or missing material)
– Alternatively, a wood touch-up marker/pen (for narrow lines)
– A matching clear finish for protection:
– Wax for some satin/matte repairs, or
– Clear coat/topcoat designed to match the existing sheen
Fix shallow scratches and scuffs
For shallow surface marks, cleaning and conditioning/polishing is usually the best first move. The goal is to restore clarity and sheen without enlarging the damaged area.
These scuffs are often “finish-level” damage: the stain layer may still be intact, and the clear coat is just dull or slightly scratched. That’s why polishing can work—so long as you don’t sand unless the scratch is raised.
If a scratch does not catch a fingernail and remains level, polishing and conditioning are more likely to blend the finish than sanding.
Testing repair products on a hidden area first helps confirm both color and sheen compatibility before you treat a visible TV stand surface.
Using fine abrasives too aggressively on a scuff can create a larger, duller “patch,” making the repair more noticeable than the original.
Clean and dry completely
Wipe the area thoroughly, then let it dry fully. If your unit is near media consoles, check around the scratch for oil/grease residue from hands and remote controls—those residues can stop polish from bonding evenly.
Test your polish/conditioner
Apply a small amount to a hidden spot (inside the cabinet or under an edge). Let it sit briefly per product directions, wipe off, and compare the sheen to the surrounding wood.
Apply the conditioner/polish with light pressure
Use a clean microfiber cloth. Work in small circles, then buff along the grain. For scuffs, repeated gentle passes beat one aggressive application.
Level only raised edges (if needed)
If, after cleaning and polishing, the line still reads as a raised ridge, you can lightly level only the high spot with very fine abrasion. The moment the surface feels even, stop. Then re-clean and re-polish to restore the blended sheen.
Repair deeper scratches (filler + color match)
For grooves that catch a nail, you typically need a two-part repair: (1) rebuild the surface with filler/touch-up, then (2) protect and unify the finish with a matching clear coat. Trying to skip the fill step is what produces a sunken, shadowy line.
Deeper repairs are more technical because you’re aligning three things: surface level, color/stain, and gloss. The order matters—color before clear.
Color-matched wood fillers are designed to rebuild material volume; if the scratch is a trough, filler or comparable touch-up media is usually required to restore a flush surface.
Applying filler in thin layers helps control final color and reduces shrinkage-related dips that can appear after curing.
Clear coat repairs must match the existing sheen level (matte vs satin vs gloss) to prevent a visible halo, a phenomenon driven by gloss differences described under ASTM D523.
Clean, then prepare carefully
Clean the scratch channel so filler can adhere. Avoid aggressive sanding that widens the damaged spot—on veneer or thin surfaces, “helping” too much can make the repair bigger than the original scratch.
Fill in thin layers (or use a marker for narrow grooves)
– With filler: Apply thin layers, let cure per directions, and stop short of final level so you can refine.
– With a touch-up marker/pen: For narrow scratches, you can sometimes achieve better control than filler. Build color gradually rather than over-saturating one pass.
Cure, then smooth to a level feel
Once cured, smooth carefully until the surface no longer “dips.” Stop as soon as the scratch line disappears to touch. Re-clean the area and assess under normal viewing light—spot repairs often look best when you blend outward rather than chasing perfection in a single point.
Match stain/color and protect the finish
Color blending is only half the job—finish protection (wax or clear topcoat) is what makes the repair survive daily use and look consistent. If you match color without matching sheen, you’ll often see the patch the moment the TV turns on.
Different clear coats behave differently (especially with light reflection). So treat sheen matching like a measurable target, not an afterthought.
Spot repairs frequently fail due to sheen mismatch; clear coat (or wax) selection should align with the unit’s existing finish type and gloss level.
Finish “flashing” (uneven gloss) typically happens when application thickness or product type differs from the surrounding area.
Wood stain and touch-up products change appearance after curing; you should re-evaluate once the repair has fully dried per product guidance.
Work in a staged approach: color first, then clear protection
If your TV unit is stained/varnished, it’s usually safest to:
1) rebuild or fill the scratch,
2) match the color/stain area,
3) apply a clear protection layer to unify the surface.
Apply clear protection in thin, consistent layers
Whether you use wax or a clear topcoat, apply thin layers and keep application method consistent across the repaired zone. After drying/cure, buff lightly if the product instructions call for it.
Check from normal viewing distance
Stand back where you typically watch TV. Repairs tend to look most natural when the blend is gradual—slightly under-restoring and feathering outward often reads better than making one spot perfectly identical to the rest.
Sheen level and how visible scratch repairs tend to be (sealed furniture finishes)
| # | Sheen type | Typical gloss reading @60° (GU) | Common TV-unit topcoats | Repair blend difficulty |
|---|---|---|---|---|
| 1 | Ultra-matte | 0–5 | Matte oil varnish / matte polyurethane | ★★★★☆ |
| 2 | Matte | 5–15 | Matte lacquer / matte varnish | ★★★☆☆ |
| 3 | Eggshell | 15–35 | Eggshell polyurethane / satin varnish | ★★★☆☆ |
| 4 | Satin | 35–55 | Satin lacquer / satin polyurethane | ★★☆☆☆ |
| 5 | Semi-gloss | 55–75 | Semi-gloss varnish / semi-gloss topcoat | ★☆☆☆☆ |
| 6 | Gloss | 75–90 | Gloss lacquer / high-gloss polyurethane | ★☆☆☆☆ |
| 7 | High-gloss | 90–100 | High-gloss clear coat (spray-applied) | ☆☆☆☆☆ |
What can go wrong (and when to pause)
DIY scratch removal often works, but it can fail in predictable ways—usually because you repair the wrong “layer.” If you see spreading dullness, persistent low spots, or sheen halos, pause before you escalate the damage.
If your TV unit has veneer that’s thin or decorative, “fixing” a scratch by sanding too far can reveal a different texture beneath. That’s when professional refinishing becomes more cost-effective than repeated touch-up cycles.
Over-sanding can expand a scuff into a larger, duller area, making the final patch more noticeable than the original scratch.
Wood filler and touch-up markers can appear color-matched in daylight but diverge under TV lighting because color perception changes with illumination.
Using the wrong clear protection product (wax on a glossy clear coat, or a high-gloss clear coat on matte) can create a visible halo due to sheen mismatch.
Common failure modes
– More sanding spreads the damage: leveling too far widens the dull zone and makes color blending harder.
– Color mismatch shows up under real lighting: TV lighting exaggerates warm/cool differences in stains and fillers.
– Sheen halo forms: wax vs clear coat (or gloss vs matte) can reflect light differently even when color looks close.
– Veneer/finish loss limits blending: if you’ve removed veneer or exposed raw wood extensively, you can end up chasing a moving target.
When to stop and get help
If the scratch has removed veneer, exposed raw wood extensively, or the unit is antique/valuable, a seamless blend may be impossible with spot repair. Professional refinishing (often involving stripping, sanding, and re-applying finish) typically produces more uniform results than repeated touch-ups.
| Approach | Pros | Cons / risks |
|---|---|---|
| DIY spot repair | Low cost, fast turnaround, good results on sealed, small-to-medium scuffs | Halo risk, color/sheen mismatch, difficult blending on high-gloss surfaces |
| Professional refinishing | More uniform finish across the panel, better for veneer loss or large areas | Higher cost, longer downtime, finish choice may require waiting for cure time |
Verdict/tip: DIY is worth it for small scuffs and moderate scratches on sealed, non-valuable TV units—especially when you accept a “blended and improved” finish rather than an invisible one. Skip this approach if you have deep gouging, large missing finish/veneer, or you can’t confidently match the existing sheen; in those cases, professional refinishing usually looks better and can cost less than repeated patch attempts.
Quick checklist (scan and save)
| Scratch situation | What to do first | Best next step | Finish step |
|---|---|---|---|
| Light scuff, no nail catch | Clean + dry | Polish/conditioner for finished wood | Light re-buff to restore sheen |
| Shallow scratch in a small spot | Clean, then test on hidden area | Very gentle smoothing (minimal sanding) | Clear coat/wax only if sheen needs it |
| Scratch catches nail / visible groove | Clean thoroughly | Color-matched filler/marker in thin layers | Sand smooth + protect with matching clear finish |
| Color mismatch / halo shows | Stop and reassess lighting | Blend outward instead of overfilling | Re-apply clear in thin, consistent layers |
Frequently Asked Questions
How can I remove light scratches from a wooden TV unit without damaging the finish?
Start by cleaning the area with a soft microfiber cloth and a mild wood-safe cleaner to remove dust and grime. For light surface scratches, rub the scratch gently with a matching wood scratch repair marker or a small amount of wood polish, then buff in the direction of the grain. Finish by applying a thin layer of furniture wax or wood conditioner to blend the repair and protect the surrounding surface.
What’s the best way to fix deeper gouges in a wooden TV stand or cabinet?
For deeper gouges, clean the damaged area first and let it dry completely. Use a wood filler that matches the TV unit’s tone, applying it with a putty knife and slightly overfilling the scratch. Once dry, sand lightly with fine-grit sandpaper (such as 220–320 grit), then stain (if needed) and seal with a clear protective topcoat or furniture polish.
Why do scratches on wood look worse after polishing, and how do I prevent that?
Scratches can look darker because they trap dust and absorb light differently, and some polishes highlight uneven surfaces instead of leveling them. Always clean first, then test any product on a hidden spot to ensure it doesn’t emphasize the scratch. After fixing the scratch, apply a matching protective finish (wax, oil, or clear coat) to help the surface reflect light evenly across the whole TV unit.
Which products should I use to remove scratches from a wooden TV unit—wax, polish, or scratch repair kits?
For superficial marks, a wood scratch repair kit, touch-up marker, or quality wood polish is usually enough to disguise the damage. For medium scratches, choose a color-matched repair product plus fine-grit sanding to smooth the area before sealing. For deeper gouges, use wood filler and a matching stain or marker, then apply a clear topcoat or wax to protect the repaired section.
How do I match the color when repairing scratches on a wood TV unit?
Matching the wood tone is key to making scratches disappear, so compare the scratch area to the surrounding finish in natural light. Use a tinted wood stain pen, repair marker, or blending wax in small layers until the color matches, allowing each layer to dry or set. If the TV unit has a clear coat or lacquer, finish with a thin application of matching wax or clear sealer to ensure the repaired scratch blends seamlessly with the rest of the wooden TV unit.
📅 Last Updated: October 26, 2026 | Topic: How to Remove Scratches From a Wooden TV Unit | Content verified for accuracy and freshness.
References
- Wood finishing
- Wood finishing
- Wood putty
- Sandpaper
- Varnish
- Lacquer
- https://en.wikipedia.org/wiki/Furniture_refinishing
- https://scholar.google.com/scholar?q=remove+scratches+from+wooden+furniture+repair Google Scholar
- https://scholar.google.com/scholar?q=wood+finish+scratch+repair+sanding+filling+polishing Google Scholar
- https://scholar.google.com/scholar?q=furniture+refinishing+scratch+repair+varnish+polyurethane Google Scholar
