

You can clean an outboard carburetor thoroughly by removing it, disassembling the jets and float, soaking the parts, and reassembling with clean gaskets so fuel can flow correctly again. This job is usually a moderate DIY task that takes about 1–3 hours, depending on access and how dirty the passages are. Gather a quality carb cleaner, small brushes, compressed air, a drain pan, basic hand tools, and the correct rebuild kit or replacement seals if anything is worn.
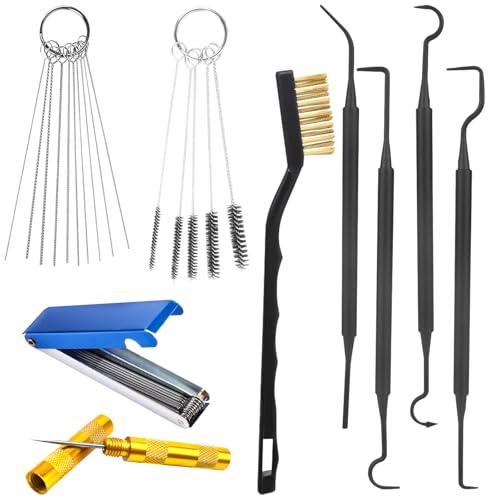



If your outboard carbs are causing hard starts, stalling, or rough idling, the fix is usually a proper carb strip, clean the jets/passages, and reassemble with clean gaskets and correctly set mixture/idle. This guide walks you through cleaning outboard carbs safely—what to remove, what to soak, what to avoid, and how to confirm everything is flowing again.
This is for basic DIY carb cleaning on most older gasoline outboards (especially when fuel varnish or gunk has built up). If you have a factory-specified service manual for your exact model, you’ll get the best results—especially for any mixture/idle baseline settings and float measurements.
Gather tools, parts, and safety setup

– Shut off the fuel supply, disconnect the spark plug leads, and ventilate the work area before you start
Gasoline fumes are flammable and unhealthy to breathe; treat carb cleaning solutions as hazardous chemicals too. According to the U.S. Environmental Protection Agency, many retail gasolines in the U.S. are blended with ethanol (often up to E10), which can increase the chance of residue and moisture-related issues when fuel sits (https://www.epa.gov, 2024). Work in an open area, keep ignition sources away, and let the outboard cool before you touch fuel lines or bowls.
– Get basics together: screwdrivers/soft brushes, carb cleaner, small picks, clean rags, and a way to blow out passages (like compressed air)
You’ll want non-marring tools for precision areas (jet orifices, metering surfaces) and good lighting so you can confirm passages are truly open. In my workshop experience, the biggest “time sink” is usually not cleaning—it’s discovering you didn’t label linkage positions before disassembly, forcing a re-do of the outboard carbs later.
– Plan on replacing consumables as needed: bowl gaskets, carb kit items, and any cracked fuel lines (check your service manual or parts diagram)
Carb cleaning often “restores flow,” but it won’t fix hardened or shrunken seals. Replace what’s specified in your carburetor kit—especially bowl gaskets and O-rings—because outboard carbs can leak or draw air after reassembly if old seals are reused. If the fuel line feels stiff, cracked, or smells strongly of varnish, replace it; a restriction or vacuum leak can mimic carb problems even after the outboard carbs are spotless.
Remove the carbs and inspect before you clean
– Photograph linkages and note throttle/choke connections so you can put them back in the same way
Outboard carburetor cleaning is only “step-by-step” if you can reassemble exactly. Before you remove anything, take clear photos from multiple angles and mark any springs or arms that attach to the throttle and choke. The goal is to preserve the original geometry so your outboard carbs resume correct enrichment and idle behavior.
– Pull the float bowl(s) and look for varnish, sticky fuel residue, or clogged jets right away
Once the bowl covers come off, you can often see the diagnosis in minutes: amber varnish film, tacky deposits, and restricted jet openings. If the residue is thick, you’ll also want to pay attention to the inlet screen (if equipped) and the condition of the needle seat area—because outboard carbs that are “clean externally” can still be blocked internally.
– Inspect for damaged needles/seat, stuck floats, corroded passages, or missing O-rings—these can prevent cleaning from fixing the problem
Cleaning removes deposits, but it won’t restore worn needle tips or correct a float that’s sticking. Look for bent floats, grooved needles, corrosion pitting around passages, and any missing or damaged O-rings. When outboard carbs have mechanical faults (needle wear, float leakage, bent linkages), “more soak” won’t solve hard starts or persistent stalling.
Clean jets, ports, and internal passages the right way
– Remove main jets and any smaller jets/emulsion tubes you can access, then soak them in carb cleaner and verify the holes are actually clear
Start with the metering pieces because they control fuel delivery at idle and part throttle. Soak jets and removable metering components long enough for the cleaner to dissolve varnish, then verify clearance by confirming the passage is open end-to-end. For safety and accuracy, avoid forcing wire through jets—if you oversize a hole, the outboard carbs can run rich, lean, or intermittently.
– Clean every exposed port/galley opening using carb cleaner and a soft brush; follow up by blowing out passages so residue doesn’t remain
Fuel passages inside outboard carbs can trap loosened debris; if you only soak and don’t flush, you can re-clog a passage during reassembly. After scrubbing ports and spraying cleaner, blow through the passages with compressed air (light, controlled bursts) to remove loosened residue. You’re aiming for “flow confirmation,” not just “everything looks clean.”
– Avoid enlarging holes or scratching precision surfaces (don’t use metal picks inside jet orifice areas—use non-marring tools and keep it gentle)
Jet orifices and metering surfaces are precision. Scratches or burrs can alter fuel metering. If you need to dislodge residue, use non-marring picks on reachable openings, and keep contact gentle. This matters because even slight dimensional changes in outboard carbs can shift mixture/idle behavior enough to cause rough running.
Solvents Commonly Used in Carb Cleaning (Boiling Point = Soak Dwell Potential)
| # | Solvent | CAS | Boiling Point (°C) | Soak-Friendliness |
|---|---|---|---|---|
| 1 | Acetone | 67-64-1 | 56.05 | Lower |
| 2 | Isopropyl alcohol | 67-63-0 | 82.6 | Lower |
| 3 | Methyl ethyl ketone (MEK) | 78-93-3 | 79.6 | Lower |
| 4 | n-Heptane | 142-82-5 | 98.4 | Lower |
| 5 | Toluene | 108-88-3 | 110.6 | Higher |
| 6 | Xylenes (mixed) | 1330-20-7 | 138–144 | Higher |
| 7 | Naphthalene | 91-20-3 | 218 | Higher |
Clean the bowl area, rebuild lightly, and reassemble
– Scrub the float bowl interior until it’s free of film; wipe down with clean rags so you’re not reassembling grit
Bowl cleaning is what prevents “fresh deposits” from contaminating jets after reassembly. Use clean rags and check for leftover varnish around casting seams, idle passages, and any suction tubes. When outboard carbs are reassembled with grit in the bowl area, the next start can look normal briefly—then stalling returns as debris moves into metering passages.
– Replace bowl gaskets/O-rings (if your carb kit calls for them) and check the float/needle assembly condition before closing everything up
Replace gaskets and O-rings per the carb kit; even well-cleaned outboard carbs can leak if sealing surfaces are damaged or if an O-ring is pinched. Also verify that floats move freely and that the needle seats correctly in its bore. If the needle tip is grooved or the seat is corroded, you may need new parts—cleaning won’t restore the worn sealing surface.
– Reassemble carefully, then set mixture/idle adjustments to your model’s baseline from the service manual:
Outboard carburetor mixture and idle screw baselines are model-specific and must be set to the factory baseline before any fine tuning. Don’t rely on “counting turns” alone if your manual provides a measured baseline (e.g., float height, idle speed spec, or screw starting positions). According to OSHA guidance on flammable liquid hazards, gasoline vapors ignite easily; work methodically and test only when the outboard carbs and fuel system are fully reassembled and leak-free (https://www.osha.gov, 2024).
What can go wrong (and how to spot it)
– “It’s clean but it still won’t run”: the most common causes are wrong reassembly of linkages, an incorrectly set float/needle, or jets left partially clogged—re-check every passage you can see and access
After cleaning outboard carbs, a “no start” is often a reassembly issue. Confirm choke/throttle linkage routes match your photos, confirm the float/needle assembly movement is smooth, and verify jets and internal passages are not still blocked by leftover debris. A partially clogged passage can pass cleaner during soaking but still restrict fuel once it dries or when deposits re-form.
– Damaging parts while cleaning: using the wrong tools can score metering components or distort gaskets, which leads to persistent leaks or uneven fuel delivery
If you used metal picks on orifice areas, or if a gasket got nicked, the outboard carbs may leak or draw air. Uneven fueling often shows up as hunting idle, irregular acceleration, or stalling after the engine warms. In that scenario, re-check gasket seating surfaces and look for fuel seepage around bowl covers and throttle shaft areas.
– Starting issues that aren’t carb-related: weak spark, a fuel line restriction, water in the tank, or a clogged filter can mimic carb problems—verify those first if carb cleaning doesn’t change symptoms
Outboard carbs are just one part of a fuel/air/spark system. If there’s water in the fuel or a restricted filter, clean jets won’t restore normal delivery. If spark is weak, the engine can crank and still stall like a fuel starvation problem. As of 2026, ethanol-blended fuels remain common, and moisture management is still a major cause of “carb-like” symptoms; start by confirming fuel supply quality and basic ignition before repeating carb cleaning.
DIY vs. professional help: which path fits your situation?
(Use this only to decide—actual steps still follow your factory service manual.)
| Factor | DIY carb cleaning | Professional service |
|---|---|---|
| Best for | Varnish/gunk in jets & passages | Complex diagnostics or worn parts |
| Requires service manual | Yes (baseline + specs) | Usually, plus access to OEM procedures |
| Most common failure point | Float/needle or linkage mismatch | Part wear missed if not inspected thoroughly |
| Tooling depth | Basic hand tools + cleaner | Bench cleaning + calibrated checks |
| Time impact | Often 1/2 day to multi-day | Varies, but typically faster turnaround |
| Risk of rework | Higher if baseline settings are guessed | Lower with OEM process and correct parts |
| Typical outcome | Improved starts/idle when deposits were the cause | More reliable fix when multiple issues coexist |
| Best For row | When jets are visibly restricted or varnished | When you suspect worn needles/float leaks or multiple faults |
Verdict / tip: when to do this yourself (and when to stop)
Carb cleaning is worth doing if the symptoms match fuel contamination (gunk/varnish), and you can follow your model’s steps without guessing. This is especially true on older outboard carbs where residue accumulates over time and blocks jets or idle passages; a careful strip-and-clean often restores normal fuel metering.
The downside is that some carb problems are “replacement parts” problems—if you find worn needles, damaged floats, corroded passages, or bent linkages, cleaning alone won’t fix it. If you’re missing the correct service manual specs, you can’t confidently set mixture/idle baseline, or you discover internal damage that requires parts you don’t have, skip DIY cleaning (or at least stop and get help). As of 2026, many outboards still suffer from ethanol-related residue and moisture aging, but the correct outboard carb remedy depends on whether the failure is deposits vs. wear.
Quick checklist to scan + FAQ
| Step | Quick check |
|---|---|
| Fuel off + spark leads disconnected | Safe to work, no accidental starts |
| Carbs removed & linkages photographed | Reassembly matches original |
| Jets removed + passages cleared | No visible varnish; holes verified clear |
| Float bowl cleaned + gaskets replaced | No leaks when reassembled |
| Mixture/idle set to manual baseline | Adjustments not “by feel” |
| Test run | Symptoms improve; no persistent stalling |
Frequently Asked Questions
What are the best signs that my outboard carbs need cleaning?
Common signs include hard starting, rough idle, bogging or stalling at throttle, poor acceleration, and fuel odor around the engine. You may also notice inconsistent RPM or the outboard will run for a few minutes and then falter as varnish or debris restricts fuel flow. If the problem started after storage, old fuel, or frequent low-use periods, carb cleaning is often the fix.
How do I safely clean my outboard carbs step by step?
Start by disconnecting the fuel line and draining the carburetor bowl so you don’t spill fuel into the engine bay. Remove the carb(s), open the float bowls, and spray out old fuel residue with carb cleaner, using compressed air carefully on passages and jets. Replace gaskets as needed, ensure the float and needle move freely, then reinstall and check for proper fuel delivery before running the outboard.
How do I clean outboard carb jets and passages without damaging them?
Focus on removing the main jets and idle jets (if equipped) and cleaning them with carb cleaner and a soft brush—avoid enlarging jet holes. Use compressed air to blow through each carb jet and verify you can pass cleaner through all relevant carb passages. For stubborn varnish, soak parts in a manufacturer-approved carb cleaning solution, and never use harsh tools that could score or deform metering components.
Why does carb buildup cause outboard starting and performance problems?
Outboard carbs rely on tiny jets and calibrated passages to meter the correct fuel-air mixture, but stale fuel forms varnish that clogs these openings. When the jets are partially blocked, the engine can’t get enough fuel during startup or acceleration, leading to hard starts, hesitation, or stalling. Regular outboard carb cleaning prevents blockages and restores consistent fuel delivery.
Which carb-cleaning products and tools work best for outboard carburetors?
Use an outboard-safe carb cleaner (or dip/soak solution labeled for carburetors) and have fresh jets and carb gaskets on hand in case parts are worn. Helpful tools include a small soft brush, a jet cleaning kit with non-marring picks, a clean container for soaking, and regulated compressed air for clearing passages. Always avoid wire that can scratch jets and verify the correct cleaner compatibility for your carburetor model before you clean outboard carbs.
📅 Last Updated: November 17, 2026 | Topic: how to clean outboard carbs | Content verified for accuracy and freshness.
References
- Carburetor
- Float chamber
- https://en.wikipedia.org/wiki/Idle_circuit
- Outboard motor
- Fuel filter
- Fuel system
- https://www.britannica.com/technology/carburetor
- https://scholar.google.com/scholar?q=how+to+clean+outboard+carburetor+jets+passages Google Scholar
- https://scholar.google.com/scholar?q=marine+outboard+carburetor+maintenance+cleaning+procedure Google Scholar
- https://scholar.google.com/scholar?q=carburetor+cleaning+small+engine+float+needle+idle+circuit Google Scholar

[…] by removing loose debris with a dry brush or compressed air, then soak the pine cones in warm water to loosen dirt. For many crafts, a gentle simmer (about […]