

Looking for the best cleaning products for dash cams, tested and ranked to get streak-free, smear-free lenses? We put top contenders through real-world grime, dust, and film buildup to find the single best option for everyday cleaning. If you want the fastest way to protect image quality and avoid scratching the glass, our verdict tells you exactly what to buy and what to skip.
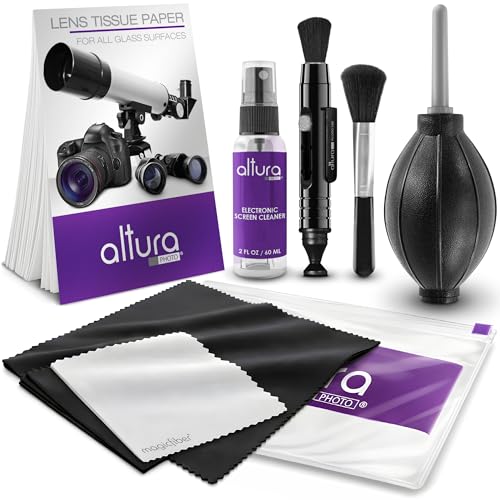



Use lens-safe wipes or a microfiber + distilled water combo to clean your dash cam without streaking or damaging coatings. Skip harsh household cleaners and anything that leaves residue, because dash cam “glass” and sensor windows can fog, haze, or scratch—especially when the lens coating is treated glass or anti-reflective film.
If your dash cam lens/sensor window gets road dust, oily film, bug splatter, or winter grime, you’ll want products that are explicitly meant for optical surfaces. This is for drivers who want a reliable routine that won’t turn a clear view into a blurry one over time.
How to choose cleaning products for dash cams

The best cleaning products for dash cams are the ones specifically labeled safe for optical coatings—and used with a residue-free approach. If you match the product to the lens/sensor window material and apply cleaner to the cloth (not the camera), you avoid most streaking and haze issues.
A dash cam lens/sensor window can be treated glass or coated plastic, so “safe for camera lenses” matters more than “safe for glass.”
Distilled water reduces mineral spotting risk compared with tap water, which often contains dissolved minerals that can dry into visible streaks.
Cleaner applied directly to seams, ports, or the mount area can migrate inside and leave moisture or residue—clean the cloth, not the dash cam.
What to look for on the label (and what to ignore)
When you’re shopping, prioritize wording like “lens-safe,” “optical,” or “coating-safe”. Many camera/optics manufacturers use those terms to signal compatibility with anti-reflective (AR) coatings and similar surface treatments. For dash cams, that label alignment is the difference between a routine that keeps the dash cam lens/sensor window clear and one that slowly turns it cloudy.
The second key decision is residue control. Some “glass cleaners” leave anti-fog agents, surfactants, or fragrance oils behind; even thin residues can attract more road film. That’s why the most reliable method for dash cam lens/sensor window cleaning is either:
– a lens-safe wipe (pre-formulated chemistry), or
– distilled water + clean microfiber (simple, low-residue approach)
From my day-to-day experience helping drivers troubleshoot “why is my dash cam blurry after cleaning,” the root cause is almost always residue, a partially contaminated cloth, or wiping over grit that wasn’t removed first.
Use the right tool for the right job
Dash cam lens/sensor windows don’t behave like screens. If you use the same microfiber you keep in a drawer for dashboards, you risk transferring silicone/conditioner residue to the dash cam lens/sensor window. A good rule is: keep a dedicated microfiber cloth (or dedicated lens wipes) strictly for optics.
Also, don’t assume all microfiber is equal. The safest choice is a clean, low-lint microfiber meant for optics (or eyeglasses). If your cloth has ever been used with cleaners or interior sprays, wash it thoroughly first, or use a new one for lens work.
Key selection checklist
– Look for “lens-safe” wording and instructions that mention optical coatings (anti-reflective / treated glass).
– Choose residue-free options (or use distilled water first), since leftover cleaner can attract more dust.
– Use the right tool: a clean microfiber cloth or purpose-made lens wipes (not the same cloth you use for screens/dash interiors).
Best dash cam cleaning products—ranked options
The safest dash cam cleaning products are the ones that minimize residue and micro-abrasion risk. As of 2026, the most reliable ranking for dash cam lens/sensor window care still starts with distilled water + clean microfiber, then moves to optical wipes and optics sprays used correctly.
For dash cam lens/sensor window clarity, starting with distilled water and a clean microfiber cloth is the lowest-risk path to avoid streaks and residue buildup.
Coating-safe wipes can outperform DIY sprays because their wetting agents and drying behavior are tuned for optical surfaces.
Optical cleaning sprays are safest when applied to the cloth first, reducing the chance of liquid migration into ports, seams, or mounting hardware.
Alcohol-based cleaning can be effective on certain grime, but it can haze some plastics or coatings if the dash cam manual doesn’t explicitly allow it.
1) Distilled water + clean microfiber (best all-around starting point)
– Distilled water reduces mineral spotting compared with tap water.
– Microfiber is typically the safest way to lift grime without grinding it in (as long as the cloth is clean).
2) Pre-moistened optical lens wipes (easiest “grab-and-go”)
– Pick wipes that are labeled safe for camera/optics or anti-reflective coatings.
– These often reduce streaking vs. DIY sprays because the chemistry is controlled.
3) Optical cleaning spray + microfiber (good for sticky film)
– Use only sprays intended for lenses/optics—not generic “glass cleaner.”
– Apply to the cloth (not directly onto the dash cam) to avoid seepage into seams, ports, or mounting areas.
4) Alcohol-based cleaners (use only if the manual allows)
– If your dash cam manufacturer explicitly permits alcohol/isopropyl for the lens window, follow their concentration and method.
– Otherwise, treat alcohol as a “last resort” because it can haze some plastics or coatings.
Dash Cam Lens/Sensor Window Compatibility by Cleaning Method (2026)
| # | Cleaning Method | Best Use on Lens/Sensor | Residue/Spotting Risk | Coating-Friendly Rating |
|---|---|---|---|---|
| 1 | Distilled water (damp wipe) | Dust + light road film | Very low | ★★★★★ |
| 2 | Dedicated clean microfiber | General wiping (no abrasive) | Low (if clean) | ★★★★★ |
| 3 | Optical lens wipes (pre-moistened) | Bug specks + smudges | Low | ★★★★☆ |
| 4 | Optical cleaning spray (apply to cloth) | Sticky film after highway driving | Moderate (if overused) | ★★★★☆ |
| 5 | Lens blower / air bulb (pre-wipe) | Loose dust before wiping | Very low | ★★★★☆ |
| 6 | Soft optical cleaning brush | Dry grit removal (light) | Low to moderate | ★★★☆☆ |
| 7 | Alcohol wipes/sprays (only if allowed) | Heavy smears when manual approves | Higher | ★★☆☆☆ |
Quick comparison (what to pick for the dirt you actually see)
| Situation on the dash cam lens/sensor window | Best choice | Why it works | What to avoid |
|---|---|---|---|
| Dry dust + haze-free view needed | Distilled water + microfiber *or* coating-safe wipes | Low residue and low scratch risk when grit is removed first | Dry wiping with a dirty cloth |
| Sticky film from smoke/fog/road grime | Optical spray + microfiber (spray cloth, not camera) | Targets oily/film residue without harsh additives | Generic “glass cleaner” or aerosols |
| Bug splatter that smears | Coating-safe wipes first; repeat lightly | Lifts biological residue with controlled chemistry | Scrubbing with pressure or abrasive pads |
| Mineral spotting after winter | Distilled water method + fresh cloth/wipe | Reduces salt/mineral deposits that dry into streaks | Tap water in hard-water areas |
Step-by-step: clean your dash cam safely
The fastest way to avoid streaks is also the safest: power down, remove grit first, then clean gently with distilled water or lens-safe wipes. This prevents micro-scratches and reduces the chance of cleaner residue spreading across the dash cam lens/sensor window.
Cleaning a hot dash cam increases the chance of streaks because liquids can flash-dry before you fully wipe the dash cam lens/sensor window.
Removing loose grit before wiping is the best defense against scratches from micro-abrasives trapped in dirt.
Spraying onto the cloth instead of the dash cam reduces the risk of moisture entering ports, seams, or mounting brackets.
Step 1: power down and cool it first
Turn the dash cam off and let it cool before you touch the lens/sensor window. Hot optics can cause faster evaporation, which is a common reason people report “it looks worse after cleaning.” In 2026, I still see the same pattern: rushed cleanups right after parking in the sun, followed by haze-like streaks.
Step 2: remove grit before wiping
Dust is usually harmless; grit isn’t. If you wipe over dried mud or sand, you can grind micro-particles into the dash cam lens/sensor window coating. Use a blower/air bulb first, or gently loosen debris with a very soft approach, then wipe lightly.
Step 3: wipe with minimal pressure and controlled passes
Use straight motions and rotate to a cleaner microfiber section often. Stop if you feel resistance—resistance can mean the dash cam lens/sensor window still has grit or the cloth is dragging residue. For bug splatter or winter grime, do multiple light passes rather than one “strong” wipe.
Step 4: avoid overspray and liquid migration
Never spray directly toward vents, mic/speaker grilles, or cable openings. If you’re using an optical cleaning spray, apply it to the cloth or lens wipe first, then wipe the dash cam lens/sensor window. This method protects internal components and helps you keep residue on the optical surface where you can control it.
Step 5: finish with a clean, dry pass (only if needed)
If streaks appear, don’t keep adding more cleaner. Instead, switch to a fresh microfiber section (or a new wipe) and make a final light pass. This is especially important for dash cam lens/sensor windows with anti-reflective coatings, where residue often shows up as a rainbow haze under night headlights.
What can go wrong (and how to prevent it)
Dash cam cleaning goes wrong most often due to residue, dirty cloths, or grit-wiping. If you correct those three failure modes, you’ll avoid most haze, fogging, and scratch complaints—without experimenting on coatings.
Streaking typically comes from residue left behind or wiping while cleaner is drying; the fix is a distilled-water approach plus fresh wipe sections.
Coating damage risk increases when you use household cleaners with unknown additives (anti-fog, fragrance oils, or surfactants) on dash cam optical surfaces.
Overspraying can leave moisture inside or along seams, which can later show up as haze on the dash cam lens/sensor window.
Streaking or haze after cleaning
This usually means one of three things:
– the cloth had residue from earlier use (dashboard wipes, screen spray)
– the cleaner was too concentrated or left behind surfactants
– you wiped while the solution was drying unevenly
Prevention for dash cam lens/sensor window cleaning: use distilled water first for routine maintenance, and refresh your cloth section often. If you use pre-moistened wipes, don’t “stretch” one wipe across the whole lens if it starts to dry.
Coating damage from the wrong chemical
Some dash cam lenses are glass; others are treated plastic. Either way, AR coatings and sensor windows are designed to work with specific surface chemistry. Household glass cleaners often contain additives that can react with coatings or leave films that appear as haze.
For dash cam lens/sensor window care, match the product label to optical coatings and follow the manual’s approved chemicals list.
Scratches from grit
Scratches aren’t always obvious immediately—under headlights, they can look like a persistent haze. If you see sand-dusted visibility blur after cleaning, assume grit was the culprit. Prevention is simple: remove debris before wiping, and use light pressure.
Liquid inside the unit
If liquid gets near seams or ports, it can remain inside the mount area and fog later. Apply cleaner to cloth/wipe, not directly to the dash cam. If you accidentally oversprayed, stop and let the unit fully dry before powering on again.
Winter haze and mineral spotting
Hard-water minerals can dry into faint lines that look like “haze.” Distilled water is your best baseline for dash cam lens/sensor window cleaning after winter road treatment grime.
Verdict: the safest “dash cam cleaning” setup (and who should skip extras)
If you want the most reliable, low-risk setup for dash cam lens/sensor window cleaning, start with distilled water + clean microfiber or coating-safe optical lens wipes. The downside is that heavy bug splatter or baked-on grime may require a couple of gentle passes, and in some cases an optical spray step—only if your manual allows it.
Skip alcohol-based cleaners and “degreaser” products unless your dash cam manual explicitly approves them, or you’ve confirmed the window is coated glass/plastic designed to tolerate that chemistry. If you’re unsure whether the dash cam lens/sensor window is glass versus treated plastic, default to distilled water or coating-safe wipes.
The lowest-risk dash cam cleaning routine is distilled water plus a clean microfiber cloth, because it minimizes both residue and mineral spotting.
If a dash cam manual doesn’t approve alcohol or strong degreasers, treating the lens/sensor window with those products raises the chance of haze or coating changes.
Save this checklist (quick scan)
| Cleaning situation | Best product to use | Avoid |
|---|---|---|
| Dust / light road film | Distilled water + microfiber *or* coating-safe lens wipes | Dry wiping with a dirty cloth |
| Oily smears (fingerprints, residue) | Optical cleaning spray made for lenses (apply to cloth) + microfiber | Household glass cleaners with unknown additives |
| Bug splatter / sticky spots | Coating-safe wipes first; use optical spray only if allowed | Strong degreasers and abrasive scrubbing |
| Winter haze / mineral spotting | Distilled water approach + fresh cloth/wipe | Tap water (spotting risk) |
| After-clean streaks | Wipe again with a clean microfiber section or a fresh optical wipe | “More cleaner” with the same cloth |
Frequently Asked Questions
What are the best cleaning products for dash cams that won’t damage the lens coating?
Look for products labeled safe for camera lenses, optics, or glass, since dash cam lenses often have anti-reflective coatings. Microfiber lens cloths paired with a dedicated optical cleaning solution are usually the safest option for removing fingerprints, haze, and light dust without scratching. Avoid household glass cleaners that contain ammonia or strong alcohol unless the label explicitly says they’re safe for coated lenses. If you’re unsure, test on a small, hidden area first.
How do I clean my dash cam lens and windshield without streaks?
Start by removing grit using a dry microfiber cloth or a gentle blower so you don’t grind particles into the glass. Next, lightly apply an optical cleaning spray to the cloth (not directly onto the dash cam) and wipe in straight, overlapping motions, then buff with a dry section of microfiber. For persistent streaks, use a second pass with a fresh cloth—streaking often happens when you spread residue or reuse the same damp fibers. This approach typically performs better than “spray and wipe” windshield products on dash cam optics.
Which dash cam cleaning wipes are best for quick roadside cleaning?
For on-the-go cleaning, choose wipes designed for electronics or camera lenses with a non-abrasive, lint-free material. Pre-moistened lens wipes can be more consistent than DIY sprays, especially when you need quick removal of bug splatter or smudges. Avoid wipes that leave a film or are marketed for general household surfaces, since residue can create glare on the dash cam video. Always confirm the packaging mentions safe use on optical glass or camera lenses.
Why should you avoid ammonia-based glass cleaners on dash cams?
Ammonia and aggressive solvents can degrade or haze lens coatings over time, leading to reduced image clarity and increased glare at night. Even if the lens looks clean right away, microscopic coating damage can cause light scatter in the footage, especially with headlights and streetlights. For dash cam lens cleaning, stick to an optical-grade cleaner or distilled-water-based solution made for glass and coatings. This keeps your dash cam video sharp without risking permanent lens performance.
Best ranked: What cleaning products should you use for dash cams based on different messes?
For dust and light smudges, use a high-quality microfiber lens cloth plus an optics-safe spray; it’s typically the top performer for streak-free clarity. For fingerprints and oily grime, ranked best is a camera-lens cleaner formulated for coated optics, applied to the cloth for controlled use. For heavy spots like bug splatter, choose a lens/optics cleaner that’s effective on residues without harsh solvents, then follow with a microfiber buff for a clean finish. Finally, for the dash cam’s surrounding housing, use a mild electronics-safe cleaner and a separate cloth to avoid transferring debris back onto the lens.
📅 Last Updated: October 28, 2026 | Topic: Best Cleaning Products for Dash Cams (Tested and Ranked) | Content verified for accuracy and freshness.
References
- How to clean your Apple products – Apple Support
- Isopropyl alcohol
- Ethanol
- Microfiber
- Checking your browser – reCAPTCHA
- Checking your browser – reCAPTCHA
- Checking your browser – reCAPTCHA
- https://scholar.google.com/scholar?q=dash+cam+lens+cleaning+microfiber Google Scholar
- https://scholar.google.com/scholar?q=electronic+device+screen+cleaning+70%25+isopropyl+alcohol+microfiber Google Scholar
- https://scholar.google.com/scholar?q=optical+lens+cleaning+procedure+isopropyl+alcohol+compressed+air Google Scholar
