

If you’re trying to clear the check engine light, the fastest reliable path is to fix the underlying fault—not to reset the code and hope it disappears. Start by reading the trouble codes with an OBD-II scanner, then test and repair the most likely causes based on what’s stored. Once the repair is confirmed, clear the codes and drive through the drive-cycle conditions so the light stays off.
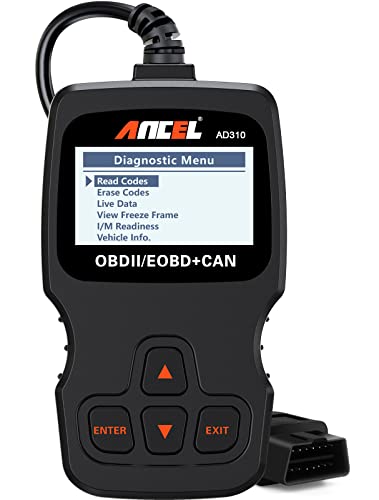

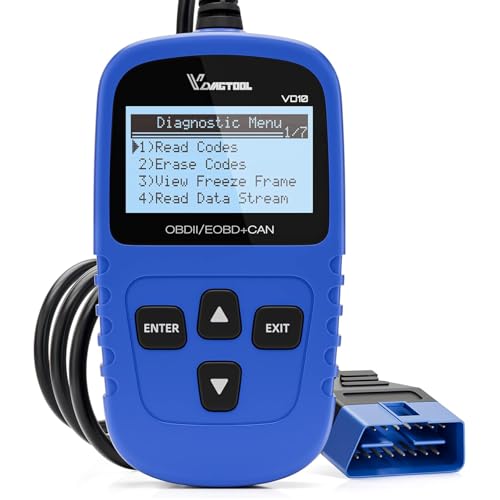

Clearing the check engine light (often called the “MIL” or malfunction indicator lamp) usually just removes a stored diagnostic trouble code (DTC)—so the light typically comes back unless you fix the underlying fault. If you’ve already fixed the cause and your engine feels normal, you can clear the codes with an OBD-II scanner (SAE/OBD “Mode 04”) or by driving until the vehicle finishes its monitor “drive cycle.”
If your dashboard light came on after poor fuel, a loose gas cap, or a recent repair, this guide will help you clear it safely and understand when a reset is (and isn’t) enough. It’s written for everyday drivers with common OBD-II access (scanner) and basic troubleshooting comfort.
What “clearing” the check engine light really means

Clearing the check engine light means erasing the code stored in the car’s ECU (engine control unit), not magically repairing the underlying problem. In 2026, the most reliable approach is: confirm what triggered the check engine light, address the cause, then clear and verify that the light does not return.
According to SAE J1979, diagnostic trouble code clearing is performed via “Mode 04,” which requests the ECU to erase stored emission-related DTCs.
According to SAE J1979, “Mode 03” is used to read stored DTCs, while “Mode 07” is commonly used to read pending DTCs.
A check engine light will typically re-illuminate when the ECU re-detects an active fault that sets a DTC again (even after you clear codes).
– The light is triggered by an onboard diagnostic trouble code (DTC); clearing the light only removes the stored code.
In plain terms: the ECU remembers faults in “stored” memory. When you clear codes, you’re telling the ECU to forget that record.
– If the problem still exists, the ECU will re-detect it and turn the light back on.
This is why “resetting” alone is rarely a final fix for a check engine light.
– A “drive cycle” may be needed for the system to run tests and determine whether the repair was successful.
Many vehicles require the readiness monitors to complete before the ECU confirms “the fault condition no longer exists.” As of 2026, OBD-II readiness is still a major reason a cleared check engine light returns (or stays on) even when you’ve done the basic fix.
Key terms that matter when you’re clearing the check engine light
When people say “clear,” there are three different states that can confuse drivers:
1. Stored DTCs (readable immediately with an OBD-II scanner): clearing removes these records.
2. Pending DTCs: the ECU saw something borderline or intermittent—clearing may remove the pending record, but it can come back quickly if the issue is still happening.
3. Readiness monitors: the ECU still needs to run specific tests (like EVAP leak checks or catalyst efficiency checks) under the right conditions.
In 2026, the practical takeaway is straightforward: clearing the check engine light is a verification step, not a diagnosis by itself.
Step-by-step: clear the light with an OBD-II scan tool
Clearing the check engine light with an OBD-II scanner is the fastest controlled method—assuming you’ve already addressed the cause. If you clear first and don’t read anything, you lose critical evidence that helps you confirm what triggered the check engine light.
According to SAE J1979, Mode 03 reads stored DTCs and Mode 04 clears them—this is the standard behavior most OBD-II scanners implement.
According to SAE J1962, the OBD-II diagnostic link connector uses a 16-pin DLC configuration.
If a check engine light returns immediately after clearing, it usually indicates the ECU still sees an active fault condition.
– Plug the OBD-II scanner into the vehicle’s port (usually under the dash on the driver’s side), then follow the scanner prompts to read codes.
If the scanner won’t connect, don’t keep cycling randomly—verify ignition state (some scanners require ignition ON, engine OFF). Also check for a secure OBD-II port connection.
– Use the scanner option to clear/reset codes, then observe whether the light returns after starting and during normal driving.
After clearing, start the car normally. Watch for a re-illuminated check engine light during idle and again once you’re driving under typical conditions (not just a 30-second test).
– If the light comes back immediately, you likely haven’t fixed the root cause—stop trying to reset and proceed to diagnosis.
Repeated clearing when the fault is still active usually turns the check engine light into a moving target instead of a fixable problem.
What to do *before* you click “Clear”
Before you clear the check engine light, do this sequence:
1. Read DTCs first (write them down exactly).
2. Identify which subsystem the code points to (misfire, EVAP, oxygen sensor, catalyst, boost control, etc.).
3. Fix the cause (or tighten/replace the suspected part).
4. Clear codes only after you’ve made that repair.
From my side, the most important “hands-on” detail is remembering that the check engine light is evidence. If you clear it without capturing the code and conditions, you may lose the fastest path to the right fix—.
Quick reference: which OBD-II modes do what
SAE OBD-II Diagnostic “Modes” Most Used When Clearing the Check Engine Light
| # | Diagnostic mode (SAE) | What you request | Common scanner output | Clears DTCs? |
|---|---|---|---|---|
| 1 | 01 | Current data (PIDs) | Sensor/parameter readings (e.g., O2 trims) | 0 |
| 2 | 02 | Freeze frame | Engine/vehicle conditions at fault time | 0 |
| 3 | 03 | Stored DTCs | Active/confirmed past emissions-related codes | 0 |
| 4 | 04 | Clear DTCs | Erases stored emission-related codes | 1 |
| 5 | 05 | Oxygen sensor monitor results | Last test results related to O2 monitoring | 0 |
| 6 | 06 | On-board monitor test results | Emission monitor test outcomes | 0 |
| 7 | 07 | Pending DTCs | Codes not yet confirmed as stored | 0 |
In 2026, many scanners label these modes behind a simpler interface (Read Codes / Clear Codes). But understanding that clearing is “Mode 04” helps you avoid accidental misuse of the check engine light reset function.
Step-by-step: reset after simple causes (like the gas cap)
If the check engine light came on after a gas cap incident, a reset is often successful—but only if the EVAP (evaporative emissions) system is genuinely sealed correctly. Start with the physical fix first, then verify with codes.
A loose or improperly sealed fuel filler cap can trigger an EVAP-related DTC and illuminate the check engine light.
After a repair, the ECU may require completing relevant readiness monitors before the system declares the EVAP fault “not present.”
If the check engine light does not extinguish after you fix the gas cap, the ECU has either stored a code that still applies or detected a different condition.
– Tighten the gas cap until it clicks firmly, then start the car and check whether the light stays on.
Don’t just “snug” it—cap designs are built to seal at a specific tension and latch point.
– If the light doesn’t turn off, use an OBD-II scanner to confirm the code and decide whether clearing is appropriate.
At this stage, clearing is a verification step: you want to ensure the fault is no longer setting.
– Avoid repeated resets: if you keep clearing without addressing the cause, you’ll lose the information needed to find what’s wrong.
If you clear the check engine light and the same EVAP-related DTC comes right back, the issue is still present (cap, gasket, EVAP line, purge/vent components, or sensor logic).
What “success” looks like after fixing the gas cap
A good outcome usually includes three things:
1. The code doesn’t reappear quickly after clearing.
2. The engine runs normally (no hesitation, no fuel smell increase).
3. Readiness monitors complete over the next few trips (varies by vehicle and driving conditions).
If your check engine light is still on the next day even after a correct gas-cap seal, use the scanner again and treat it like a system-level issue—not a “reset problem.”
What can go wrong (and when you should stop)
Clearing the check engine light can be counterproductive when it masks a serious drivability or emissions problem. If the light is flashing, or the car feels unsafe, skip resets and get the vehicle checked immediately.
A flashing check engine light is commonly used to warn of misfire severe enough to risk catalytic converter damage.
Clearing codes can remove clues needed to diagnose intermittent faults, especially if the same DTC returns with different freeze-frame conditions.
Some OBD-II systems won’t fully update “monitor ready” status until specific operating conditions are met.
– Flashing check engine light: indicates a more severe issue (often misfires). Clearing it can hide symptoms while damage continues.
Misfire-related damage can escalate quickly—so treat flashing as an “act now” indicator, not a “reset and wait” scenario.
– Resetting before you know the code: you may erase clues that help you (or a mechanic) determine the fix.
This is especially true for intermittent failures where freeze-frame data and pending codes provide the pattern.
– Expecting the light to stay out instantly: some systems require specific operating conditions for monitors to complete; the light may stay on until then.
In 2026, most scanners still show readiness status, and that’s often the missing piece behind “I cleared it, but it’s still on.”
Clear vs. diagnose: a practical decision table
| Situation | Clear/reset may be appropriate | Skip clearing—diagnose first |
|---|---|---|
| Check engine light behavior | Steady light after you fix a simple cause | Flashing light |
| Engine feel | Normal idle, no severe vibration or stalling | Rough running, reduced power, or overheating |
| Code visibility | You recorded DTC(s) before clearing | You cleared without reading codes first |
| Time-to-return | Light stays off during typical short drives | Light returns immediately with the same DTC |
| Fuel system symptoms | Only cap-related issue suspected | Major fuel odor or repeated EVAP-type codes |
| Safety concerns | No smoke, no dashboard warnings beyond MIL | Any warning indicating unsafe conditions |
This is the “real world” filter for the check engine light: when conditions look unsafe or codes keep returning quickly, resetting becomes the wrong priority.
Verdict: when to clear the light yourself (and when not to)
Clearing the check engine light yourself is reasonable when you’ve confirmed the likely cause (like a gas cap fix) and the light is steady—not flashing. Don’t DIY-reset if you suspect misfire, overheating, severe drivability issues, or if the light returns immediately after clearing.
According to SAE J1979, “clear DTCs” removes stored emissions-related codes but does not repair the underlying condition the ECU is monitoring.
Clearing a steady check engine light can be a legitimate final verification step after you’ve performed a repair.
If the check engine light returns quickly with new or the same DTC, the fault still exists and diagnosis is needed.
– Clear/reset is reasonable if you’ve confirmed the cause (e.g., gas cap issue) or completed a repair, and your light is not flashing.
The key is confirmation: you want the ECU to stop detecting the condition, not just forget it existed.
– Skip DIY clearing and go to diagnosis if you have rough running, reduced power, overheating, major fuel odor, or the light returns immediately with new codes.
Those symptoms suggest active problems where continued driving (even briefly) may worsen damage or create safety risks.
– Downsides: resetting can delay correct diagnosis if the underlying fault still exists—so treat “clearing” as the final step, not the first.
If the check engine light comes back, your next best action is to read the code again and interpret it in context (including freeze-frame data when available).
Who should skip DIY clearing this year (2026)?
If you’re not comfortable interpreting DTC meanings, or you can’t reliably read codes before clearing, it’s safer to diagnose first. Clearing the check engine light in those cases can remove the very data you need to make an accurate repair plan.
If you want, share your vehicle year/make/model and the exact DTC(s) and I’ll help you interpret what the check engine light is likely pointing to—without encouraging guesswork.
Quick checklist (scan, fix, reset)
This five-step checklist is the safest way to clear the check engine light without losing diagnostic evidence. In 2026, most scanners can follow this workflow quickly, but the order matters.
The safest workflow is to record DTCs before clearing, because code clearing removes stored information used for diagnosis.
A steady check engine light after a confirmed fix is a better DIY candidate than a flashing light.
– Read codes first (don’t clear blindly)
– Fix the underlying cause
– Clear codes using an OBD-II scanner (or after a confirmed simple fix)
– Drive normally and watch whether the light returns
– If it reappears quickly or is flashing, stop resetting and get it checked
Sources
– OBD-II general operation and scan tool code clearing:
– Gas cap / evaporative system behavior:
– Manufacturer-specific drive-cycle / readiness monitor guidance:
Clearing the check engine light works best when you treat it as the final verification step after fixing the cause—tighten the gas cap correctly, complete the repair, then clear codes with an OBD-II scanner and watch for reappearance. If the light is flashing or the car feels unsafe, don’t try to “reset your way out”—get it checked immediately.
Frequently Asked Questions
How do you clear the check engine light without a code reader?
You generally can’t safely “clear” the check engine light without first addressing the cause, because many OBD-II systems will turn the light back on after a drive cycle if the underlying fault remains. If you don’t have a scanner, check your gas cap for proper sealing, look for obvious issues like loose intake hoses, and avoid resetting repeatedly. When the problem is fixed, the light often turns off on its own after several drive cycles, especially for minor events like temporary sensor glitches.
How do you clear the check engine light using an OBD-II scanner?
Plug an OBD-II code reader or scan tool into the car’s diagnostic port (usually under the dashboard) and retrieve stored trouble codes. Use the tool’s “Clear/Erase” option to reset the check engine light, but only after you’ve addressed the likely problem. If you clear codes without fixing the issue, the check engine light may return after the vehicle runs its readiness tests (often within one or more drive cycles).
Why does the check engine light come back even after clearing the codes?
The check engine light is triggered by a fault condition stored as a diagnostic trouble code (DTC). Clearing codes removes the stored record, but if the problem still exists (for example, a failing oxygen sensor, misfire, or EVAP leak), the PCM will detect it again and re-illuminate the light. Many vehicles also require a certain number of drive cycles to confirm the repair and turn the light off permanently.
What’s the best way to clear a check engine light for a loose gas cap or EVAP leak?
If you suspect the check engine light is related to the EVAP system, start by removing and reseating the gas cap until it clicks securely. Make sure the cap is the correct type for your vehicle and check for cracks or damage, since a worn gas cap can keep the light on. After reseating or replacing the cap, clear the code if you have a scanner, then drive normally so the system can complete its EVAP readiness checks.
Which “quick reset” methods are safe, and which should you avoid when trying to clear a check engine light?
Safe methods include fixing simple causes (like a loose gas cap), clearing codes with an OBD-II scanner after repairs, or letting the light reset automatically after the issue is resolved. Avoid risky “battery reset” approaches like disconnecting the battery for long periods, since they can erase learned driving parameters, radio presets, and readiness monitors, and may delay proper diagnostics. If the light is flashing or the car is running poorly, don’t clear it—get the vehicle checked promptly to prevent damage.
📅 Last Updated: October 18, 2026 | Topic: how do you clear the check engine light | Content verified for accuracy and freshness.
References
- Check engine light
- Check engine light
- On-board diagnostics
- https://en.wikipedia.org/wiki/Diagnostic_trouble_code
- On-board diagnostics
- https://en.wikipedia.org/wiki/Readiness_monitor
- https://en.wikipedia.org/wiki/Drive_cycle
- https://scholar.google.com/scholar?q=clear+check+engine+light+reset+OBD-II Google Scholar
- https://scholar.google.com/scholar?q=malfunction+indicator+lamp+MIL+reset+procedure+OBD-II Google Scholar
- https://scholar.google.com/scholar?q=OBD-II+diagnostic+trouble+code+clearing+and+emissions+readiness+monitors Google Scholar
