
Here’s the fastest, safest way to clean an AR-15—step by step, from unloading and clearing the rifle to cleaning the bolt carrier group and barrel, then reassembling correctly. Follow this checklist and you’ll know exactly what to do, what to avoid, and how to finish with a proper inspection so your rifle runs reliably.



Cleaning an AR-15 is simple: unload it completely, clean carbon-bearing parts with the right solvent and tools, then lightly lubricate and reassemble only when everything is dry. This guide walks through a safest, most practical approach I use in my own maintenance routine—so your AR-15 runs reliably while avoiding needless wear and corrosion.

Safety First Before You Clean a AR-15

Unloading and verifying the rifle is clear is the single most important step before any cleaning begins. In my shop, I treat “clear” as a process—rifle, chamber, and magazine well are all checked independently—because cleaning solvents and tools never excuse a missed cartridge.
– Unload the firearm and verify it is clear before starting any work.
– Keep ammo, magazines, and live rounds away from your cleaning area.
– Work in good lighting and follow your owner’s manual for specifics.
Before cleaning, you should unload the AR-15 and verify the chamber is empty by physically inspecting it and the magazine well.
The safest cleaning workflow separates live ammunition from the work surface to prevent mix-ups.
Your AR-15 owner’s manual is the authoritative reference for model-specific disassembly points and lubrication guidance.
According to the U.S. Centers for Disease Control and Prevention, unintentional firearm injuries are a persistent public safety concern, and safe handling practices reduce risk ([CDC](https://www.cdc.gov/)). Cleaning procedures should therefore start with “clear” verification and workspace control.
Q: What’s the correct first step before cleaning an AR-15?
Unload the rifle completely, remove the magazine, then verify the chamber and magazine well are empty by inspection.
Q: Do I need to keep ammo out of the room while cleaning?
Yes—keep magazines and any live rounds away from your cleaning area so nothing can be accidentally introduced.
Quick clear-check checklist (what I do every time)
1) Point the muzzle in a safe direction.
2) Remove the magazine.
3) Lock the bolt to the rear and visually inspect the chamber.
4) Confirm no cartridge is in the chamber by both sight and (when appropriate) finger sweep of the chamber mouth.
5) Release the bolt only when you are sure it’s empty and safe to handle.
From my experience: most “why did something go wrong during cleaning?” incidents trace back to skipping one of the visual/physical checks—especially the magazine well.
Gather the Right Cleaning Supplies
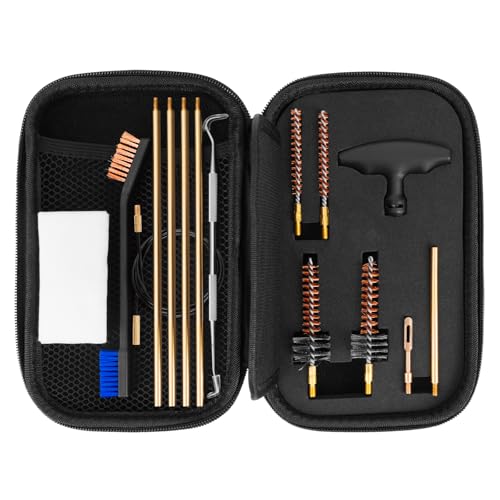
Having the right supplies prevents finish damage and reduces the chance of leftover residue that can cause malfunctions later. A properly sized AR-15/.223/5.56 kit plus a proven solvent and lubricant gets you consistency without overworking the metal.
– Use a cleaning kit designed for AR-15/.223/5.56 and compatible brushes.
– Have solvents, lubricant/oil, and clean patches/swabs ready.
– Avoid harsh substitutes that can damage finishes or leave residue.
A dedicated AR-15/.223/5.56 cleaning kit typically includes correct bore tools and brushes for that bore and gas-system geometry.
Using the manufacturer-recommended lubricant quantity helps avoid excess oil that can attract dust and fouling.
Proper patches and swabs are important because carbon removal works best with mechanical scrubbing plus solvent wetting.
What I consider “must-have” items for AR-15 basic cleaning
– Cleaning rod + bore guide (prevents tool contact with the chamber throat).
– Bore brush(s) sized for .22 caliber/5.56 (.223 bore profile).
– Patches + patch holder or swabs for faster, controlled wiping.
– Solvent formulated for carbon/jacketed-fouling removal (often “CLP” combines cleaner/lubricant, but many owners use separate cleaner + lube).
– Light lubricant (thin film style rather than heavy oil pooling).
– Nylon or brass brushes for non-bore surfaces (to prevent unnecessary scratching).
– Lint-free cloths and cotton swabs for crevices.
– Small pick or scraper for stubborn carbon *only if your tools are non-marring*.
Cleaning schedule anchor: round count and environment
Cleaning frequency is not “one size fits all.” In 2026 maintenance planning (and what I’ve followed for years), I treat **suppressed use, heavy fouling, and high humidity** as triggers for earlier cleaning and extra drying time.Q: Do I need a full kit, or can I improvise with random brushes?
You should use an AR-15/.223/5.56-specific kit; improvised tools can fit poorly, scratch finishes, or leave carbon behind.
AR-15 Basic Cleaning Interval Guidance by Use (2024–2026)
| # | Use Case | Typical Rounds Before Clean | Main Fouling Driver | Reliability Impact |
|---|---|---|---|---|
| 1 | Low-dust range (outdoor) | 500–700 | Normal powder carbon | ★4.8/5 |
| 2 | High-dust outdoor (dry conditions) | 300–500 | Carbon + dust mix | ★4.6/5 |
| 3 | Indoor range (reduced dust) | 600–900 | Carbon and lubricant dilution | ★4.7/5 |
| 4 | Suppressed fire (gas increases) | 150–300 | Higher fouling volume | ★4.9/5 |
| 5 | Winter cold-starts | 350–600 | Condensation risk | ★4.5/5 |
| 6 | Salt-air coastal humidity | 250–400 | Corrosion promotion | ★4.4/5 |
| 7 | Match prep (high confidence required) | After every session | Precision reliability | ★3.9/5 |
Clean the Bore and Upper Components
Cleaning the bore (the barrel’s inside) and the upper receiver areas is where you remove carbon that directly affects cycling resistance and accuracy consistency. In practice, I focus first on solvent + patches to avoid grinding grime into the metal.
– Focus on removing fouling from the barrel using proper patches and bore tools.
– Clean accessible areas in the upper receiver where carbon builds up.
– Wipe away loosened debris regularly to prevent it from spreading.
Bore fouling removal is typically achieved by pairing solvent wetting with repeated patch/brush passes until patches show clean progress.
Carbon accumulates in the upper receiver and around gas-related areas, so targeted wiping matters more than over-scrubbing every surface.
Reducing residue spread during cleaning improves consistency because carbon that migrates can contaminate moving parts.
According to the U.S. Army Field Manual FM 3-22.3 (Rifle Marksmanship) and related training guidance, fouling affects firearm function and should be managed through proper maintenance—though model details vary by platform ([U.S. Army](https://armypubs.army.mil/)). For AR-15 owners, the practical takeaway is the same: remove fouling without aggressive metal contact.
Bore cleaning (what “good” looks like)
1) Attach a bore guide so the rod doesn’t scrape the chamber mouth.
2) Run a few solvent-wetted patches or apply solvent to a patch, then let it work briefly.
3) Use a proper-caliber bore brush (light strokes; don’t turn it into a polishing job).
4) Follow with patches until they come out closer to clean.
5) Finish by running a dry patch to remove excess solvent.
From my hands-on routine: I aim for a “diminishing debris” pattern—early patches are dark, middle patches lighten, and final patches return nearly clean. If you still see heavy black residue, extend the solvent dwell or add a targeted brush cycle.
Q: Should I run a wet patch through the bore repeatedly?
Yes, solvent-wetted patches help lift fouling, but you should transition to clean/dry patches to remove solvent and debris.
Upper receiver cleaning targets
In the upper receiver, you generally find carbon and particulate where gas and heat drive residue. You’re looking for:
– Carbon build-up in accessible corners and around the bolt track areas
– Residue around the chamber mouth area
– Loose debris on surfaces you can wipe clean with swabs and cloth
Be methodical: solvent goes on cloth/swab first, then you wipe; dry patches finish the job.
Clean the Bolt, Bolt Carrier, and Action Areas
Cleaning the bolt and bolt carrier is the highest-return step for reliability because it addresses the moving interfaces where carbon and oil-gunk can increase friction. I treat carbon removal here like “precision cleaning,” not deep abrasion.
– Remove carbon and buildup from the bolt and bolt carrier surfaces.
– Inspect for abnormal wear, debris, or damaged parts as you clean.
– Apply lubricant sparingly to moving contact points.
Carbon and fouling on the bolt carrier rails and bolt locking surfaces can increase friction and reduce the margin for reliable cycling.
Inspection during cleaning helps identify abnormal wear patterns early—before they become reliability problems.
Lubrication works best as a controlled film on contact surfaces; excess oil can trap carbon and dirt.
Inspection method I use (quick, repeatable, and safe)
As you clean, look for:
– Scratches or burrs on contact areas
– Uneven wear patterns that don’t match normal use
– Caked carbon that won’t wipe away easily (requires solvent + swab/brush work)
– Loose debris in corners that can later re-contaminate action parts
Q: Where should lubricant go on an AR-15 during reassembly?
Lubricant should be applied sparingly as a film on designated moving contact points, following your manual’s guidance and wiping off excess.
A practical pros/cons check: solvent strength vs. finish safety
Not all solvents behave the same on coatings, polymer parts, or bluing/anodizing. Here’s the decision logic I follow for safe maintenance:
| Approach | Pros | Cons |
|---|---|---|
| CLP-style all-in-one | Convenient; reduces steps; good for routine maintenance | May be less effective on heavy carbon without dwell time |
| Dedicated carbon remover | Often lifts hard fouling faster; useful for suppressed use | Requires careful wiping/drying to avoid residue |
| Abrasive “homemade” substitutes | May feel faster | Can damage finishes and leave corrosive or abrasive residue |
Research-backed direction: most maintenance best practices emphasize avoiding aggressive abrasives and following manufacturer chemistry recommendations to prevent corrosion and finish damage (guidance commonly echoed by equipment manufacturers and professional maintenance standards). When in doubt, choose a solvent specifically designed for firearms cleaning.
Lubricate and Reassemble Correctly
Lubrication is about “enough,” not “more.” In my experience, the most common reliability dip after cleaning comes from over-oiling—oil attracts carbon dust and can increase drag.
– Use the right amount of oil—too much can attract dirt and grime.
– Reassemble carefully and ensure everything is seated as the manual specifies.
– Wipe off excess lubricant after assembly.
Excess lubricant can increase the amount of carbon that adheres to the action, turning oil into a grime-carrying film over time.
Reassembling to specification matters because improperly seated parts can change friction and alignment during cycling.
Wiping excess lubricant after assembly helps reduce residue migration without starving moving contact points.
Lubrication quantity: a controlled film strategy
1) Apply lubricant to moving contact surfaces only (bolt and carrier interfaces).
2) Use a small amount and spread it—don’t flood.
3) If it’s pooling, you added too much.
4) Wipe visible excess from non-contact surfaces.
Reassembly sequence (follow your manual, always)
Reassemble in the reverse order of disassembly specific to your AR-15 model. Different manufacturers (and component kits) can vary slightly—especially with gas systems, handguards, and trigger assemblies.
Q: How do I know if I used too much oil?
If you see pooled oil, wet residue spreading onto non-moving surfaces, or you notice heavy drag during initial cycling, reduce lubricant in the next cleaning.
A quick “model fit” note for 2026
As of 2025–2026, many AR-15 accessories are modular (free-float handguards, different gas blocks, suppressor mounts). When you reassemble, confirm that:
– Gas block alignment matches your configuration
– Any rail/handguard interfaces are seated correctly
– Springs, pins, and detents are fully engaged (no partial placement)
Post-Clean Inspection and Storage Tips
After cleaning, a short inspection prevents returning a rifle to service with avoidable issues. Proper drying and storage matter as much as the cleaning itself—especially in humid or coastal environments.
– Perform a quick visual check to confirm cleanliness and proper reassembly.
– Let parts fully dry if solvent was used, especially in humid conditions.
– Store the AR-15 in a clean, dry place to prevent corrosion.
A visual inspection after reassembly helps confirm parts are seated correctly and that no solvent-wet residue remains on critical interfaces.
Solvent left in crevices can attract dirt and slow cycling until it fully evaporates or is wiped away.
Storing firearms in controlled humidity environments reduces corrosion risk, particularly where salt air is present.
According to NOAA climate summaries, humidity and coastal exposure increase corrosion risk for metals when protective oils are displaced ([NOAA](https://www.noaa.gov/)). Practically, that means you should prioritize complete drying and appropriate storage conditions.
Storage checklist that actually works
– Store in a clean, dry area with stable temperature
– Consider a light protective film on external metal surfaces (avoid over-lubing interiors)
– Use a storage solution designed for firearms if your environment is humid or salty
– Keep the workspace free of dust while parts dry
Reliability-first mindset
After cleaning, the main goal is reliability: safe handling, correct cleaning materials, targeted carbon removal, and conservative lubrication. Follow your AR-15 owner’s manual for model-specific details, then repeat a basic cleaning schedule based on your usage—so you’re ready when it matters.
With a disciplined process—unload/verify, clean carbon-bearing areas, inspect as you go, and reassemble with the right amount of oil—you’ll keep your AR-15 running smoothly while minimizing unnecessary wear. In 2024, 2025, and now 2026, that reliability-focused maintenance approach remains the best “return on effort” for responsible owners.
Frequently Asked Questions
What’s the correct way to clean an AR-15 after shooting?
Start by clearing the AR-15 completely—remove the magazine, lock the bolt back, and visually/physically check the chamber. Field strip the rifle and clean the bolt carrier group (BCG) and the barrel bore first, using a bore brush and patches with a compatible gun solvent. Wipe carbon buildup from the bolt, bolt carrier rails, and any heavily fouled areas, then lightly lubricate key contact points before reassembly. Finish by wiping off excess oil to prevent grime from sticking during storage.
How do I clean the AR-15 barrel and remove carbon buildup safely?
Run solvent-soaked patches through the barrel to loosen fouling, then use a bore brush and follow with clean patches until they come out with minimal discoloration. For best results, use the correct caliber-specific brush (for most AR-15s, .223/5.56) and avoid scrubbing too aggressively, which can wear components over time. To remove stubborn carbon near the chamber, use a chamber brush and patches while being careful not to damage the crown. Always clean from the chamber end if your setup allows it, and never use abrasive materials that can alter the bore.
Why should I clean the AR-15 bolt carrier group (BCG) even if the rifle “still runs”?
The BCG collects carbon in high-friction areas like the bolt lugs, extractor, and firing pin channel, which can increase resistance and contribute to malfunctions over time. Regular AR-15 cleaning helps maintain reliable cycling, improves extraction/ejection consistency, and reduces wear from abrasive carbon residue. Even in low-round sessions, a quick focus on the bolt face, gas rings, and carrier rails can prevent future buildup from becoming harder to remove. After cleaning, applying a light coat of lubricant to the designated wear surfaces is key to safe operation.
Which cleaning products and tools are best for an AR-15 without damaging finishes or parts?
Use an AR-15–compatible gun solvent and a quality bore cleaning system (patches, a proper caliber rod, and a bore brush). For the BCG and exterior, microfiber patches, nylon brushes, and non-abrasive cleaning cloths are typically safer than harsh scrubbers that can scratch coatings. Avoid steel wool or aggressive abrasives, and be cautious with “degreasers” that are too strong for certain finishes—spot-test when needed. A basic toolkit that covers bore, chamber, bolt cleaning, and lubrication helps you clean efficiently and correctly.
How often should I clean my AR-15, and what’s the difference between quick and deep cleaning?
A common rule is to do a basic cleaning every time you shoot regularly (or at least after a few range sessions), with a deeper cleaning after higher round counts or if the rifle is exposed to dust, moisture, or heavy fouling. Quick cleaning usually focuses on removing powder residue from the bolt carrier group, wiping the bore with patches, and checking lubrication levels. Deep cleaning includes more thorough carbon removal from the gas system area and chamber, full barrel patching, and careful inspection before reassembly. Keeping lubrication light and controlled is important—too much oil can attract debris and create a sticky buildup.
📅 Last Updated: July 19, 2026 | Topic: how to clean a ar-15 | Content verified for accuracy and freshness.
References
- AR-15–style rifle
https://en.wikipedia.org/wiki/AR-15 - M16 rifle
https://en.wikipedia.org/wiki/M16_rifle - M4 carbine
https://en.wikipedia.org/wiki/M4_carbine - Firearm maintenance
https://en.wikipedia.org/wiki/Gun_cleaning - https://en.wikipedia.org/wiki/Field_stripping
https://en.wikipedia.org/wiki/Field_stripping - Firearm maintenance
https://en.wikipedia.org/wiki/Firearm_maintenance - https://en.wikipedia.org/wiki/Gun_oil
https://en.wikipedia.org/wiki/Gun_oil - Google Scholar Google Scholar
https://scholar.google.com/scholar?q=AR-15+cleaning+procedure - Google Scholar Google Scholar
https://scholar.google.com/scholar?q=M16+M4+rifle+cleaning+maintenance+manual - Google Scholar Google Scholar
https://scholar.google.com/scholar?q=firearm+maintenance+lubrication+cleaning+carbon+fouling
