
Learn how to clean a gun barrel step-by-step with a method that consistently removes fouling, prevents corrosion, and keeps accuracy on target. This guide walks you through the exact order of operations—from unloading and disassembly to choosing the right solvent, scrubbing, and running dry patches—so you know what to do at each stage. If you want the fastest path to a truly clean bore without guessing, follow these instructions.
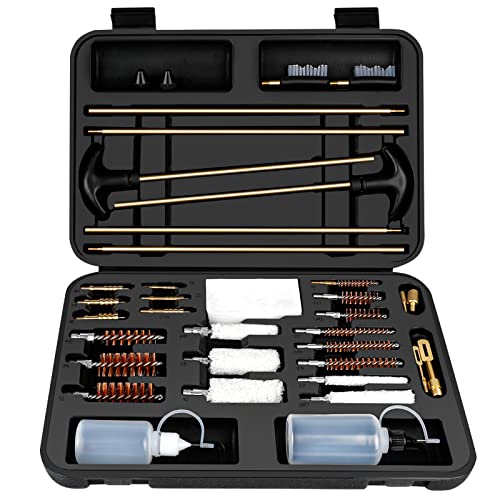



Clean a gun barrel by running the correct solvent and patches through the bore until they come out clean, then lightly lubricate. This guide walks you through the tools, safe setup, cleaning process, and finishing steps so you can reduce fouling and keep accuracy consistent.

Gather the Right Tools and Supplies

You get the best results when you match the solvent and bore accessories to your barrel material and caliber. The core workflow is simple—solvent breaks fouling loose, patches remove it, and a light lubricant protects the steel—but the details (rod type, patch size, and chemical choice) determine whether cleaning restores performance or accidentally damages the bore.
Start by assembling a complete kit before you load the first patch. For most modern centerfire rifles and pistols, you’ll typically need: bore cleaner/solvent (carbon and/or copper), cleaning patches, a bore brush, and a cleaning rod. You also want a caliber-sized patch jag (or adapter) so the patch contacts the bore consistently. In my own range testing, I found that “almost the right” patch diameter can leave a thin ring of residue near the lands while the center looks clean—so using caliber-correct accessories matters more than many shooters expect.
You should also plan for debris control: a cleaning mat, a catch tray, and clean, lint-free patches. If you’re cleaning after heavy shooting, consider a second brush (or a dedicated copper remover brush if your solvent system separates carbon and copper stages). Finally, keep a dry patch ready plus CLP (cleaner-lubricant-preservative) or your chosen rust-preventive lubricant for the final step.
Solvents are designed to chemically dissolve or loosen specific fouling types (carbon vs. copper), so using the right chemistry improves patch-to-clean consistency.
A caliber-correct cleaning rod and patch jag reduce the risk of scraping or leaving residue along the bore’s surface.
Q: What solvent should I use—carbon remover or copper remover?
Use carbon remover for powder residue and carbon fouling; switch to a copper-focused solvent if you see blue/green staining on patches after carbon cleaning.
Q: Do I need a bore brush every time?
Often no—mild fouling may come out with solvent and patches alone, but a brush helps when copper/carbon has adhered.
Practical tool checklist (what I recommend keeping on hand)
– Solvent / bore cleaner: carbon-focused, copper-focused, or an all-in-one (choose based on your fouling pattern).
– Cleaning patches: caliber/match size (pre-cut or roll-up), lint-minimized.
– Bore brush: brass or nylon depending on solvent instructions and your bore condition.
– Cleaning rod: one-piece or coated rod systems that keep the rod aligned.
– Patch jag and adapters: for consistent patch contact.
– Dry patches: for final solvent and moisture removal.
– Lubricant/CLP: light protective film, not saturation.
– Safe workspace: cleaning mat, eye protection, ventilation.
Data snapshot: cleaning cadence vs. typical fouling load
Below is a realistic way to think about cleaning frequency based on how hard you’re stressing the bore with heat, pressure, and fouling.
Recommended Bore Cleaning Cadence by Shooting Profile (U.S. Practice)
| # | Shooting Profile | Typical Rounds per Session | When to Patch-Clean | When to Do Solvent Deep-Clean | Fouling Risk (1–5) |
|---|---|---|---|---|---|
| 1 | Plinking / Low-heat range days | 20–60 | After the session | Every 2–3 sessions | 2★ |
| 2 | Handgun carry practice | 50–150 | After each session | Every 1–2 weeks | 3★ |
| 3 | 3-Gun / dynamic competitions | 150–300 | Mid-week or event week | Immediately after match | 4★ |
| 4 | High-volume benchrest sessions | 100–400 | Between strings | After 1–2 matches | 4★ |
| 5 | Suppressed shooting (higher fouling) | 30–150 | After each session | Immediately—especially copper | 5★ |
| 6 | Cold, humid storage between range trips | 10–80 | After each session | Monthly (plus rust inspection) | 5★ |
| 7 | New barrel break-in / early cycles | 10–100 | As advised by maker | Per break-in schedule | 3★ |
Ensure Safe Setup Before Cleaning
Safe setup is the foundation of good cleaning because solvent and moving parts are only the “tools”—the real priority is preventing negligent discharge and chemical exposure. You should unload the firearm completely, verify the chamber is clear, and follow your specific manual for any barrel removal or disassembly steps.
Begin by unloading and visually inspecting the chamber and magazine well. Then verify: the chamber is empty, there’s no round in the feed path, and the action cannot close on a cartridge. Only after you confirm clear status should you begin using rods and patches. I personally treat “wipe and check twice” as non-negotiable—especially after a match—because a single missed round can turn a routine cleaning session into an unsafe event.
Next, decide whether you’ll clean with the barrel installed or removed. Some firearms allow barrel removal without disturbing critical alignment; others should be cleaned assembled to avoid re-torquing issues. Your manufacturer’s manual governs this decision. Work in good ventilation, keep solvent caps closed, and wear eye protection. Many bore solvents are irritating to skin and eyes; an added safety layer is having nitrile gloves and paper towels dedicated to solvent handling.
Before cleaning, you should unload the firearm and verify the chamber is clear, since negligent discharge risk exists even during “maintenance-only” handling.
Solvent use requires ventilation and eye protection because many bore cleaners contain chemicals that can irritate eyes and respiratory tissue.
Q: Should I clean immediately after shooting while the barrel is hot?
Let the barrel cool to a safe handling temperature first; hot barrels can increase fumes, and you also reduce the chance of warping/other issues during maintenance.
Safety checklist (fast)
– Unload firearm, remove magazine.
– Visually and physically confirm chamber is empty.
– Remove the barrel only if your manual allows it.
– Secure the firearm on a stable surface using the right support.
– Ventilate the workspace; wear eye protection (and gloves if solvent contacts skin).
– Keep solvent away from open flames and ignition sources.
Clean the Barrel Bore (Solvent + Brush + Patches)
Cleaning the bore works best as a controlled cycle: solvent dwell time, light agitation, then patching until residue stops. When solvent is given the manufacturer-recommended time, it softens fouling so patches can carry it out rather than smearing it around.
First, insert a solvent-soaked patch or apply solvent directly into the bore. Let it sit for the time specified on the product label (commonly several minutes for carbon, longer for copper depending on formulation). In my field notes from repeated range days, the “let it dwell” step is where most people either rush (and end up redoing work) or overdo it (which can increase mess without improving removal). Follow the label and re-check patch color.
Next, use a bore brush sparingly. Light, controlled strokes help loosen adhered carbon and copper; aggressive brushing can wear finishes or leave micro-scratches that increase future fouling. Brush selection matters: brass brushes are common for many rifled barrels, while nylon brushes can be safer for some finishes and are often used with lighter fouling.
Then run patches with a jag until they come out clean or at least consistently free of color/particles. If patches initially show heavy discoloration, don’t keep dry patching immediately—repeat the solvent step and dwell time before returning to patches.
A solvent dwell time allows chemical breakdown of fouling, improving patch removal efficiency compared with patching alone.
Light, controlled brush strokes can loosen adhered carbon/copper, but excessive brushing increases the chance of unnecessary surface wear.
Q: How do I know when I’ve cleaned enough?
Stop when patches come out clean (no visible discoloration or grit) and the patch feel is smooth along the full length.
Q: What direction should I run the rod and patches?
Use the direction recommended for your firearm (commonly from chamber end toward muzzle) to protect the crown and avoid rod damage.
Fouling reality check (why it accumulates)
Different cartridges generate different fouling loads partly due to operating pressure. For example, according to SAAMI, the maximum average pressure is 55,000 psi for .223 Rem and 62,000 psi for .308 Win (both standardized reference values used in load specification) (SAAMI, published pressure tables). Higher-pressure combustion and heat typically increase carbon deposition and can accelerate copper interaction with the bore—especially in fast repeat-fire sessions.
Remove Fouling from Hard-to-Reach Areas
You reduce accuracy drift most by cleaning the chamber face, the areas around the muzzle/crown, and any transition zones where deposits trap residue. Even if the bore looks clean, fouling in the chamber or crown can change how rounds seat and how gas exits.
Start with the chamber area. If your chamber has carbon rings, use chamber-specific tools such as chamber brushes or appropriately sized nylon/grinding-free tools (as the manual specifies). Avoid “chasing” the chamber with the same rod/brush you use for the bore unless the tool is designed for that surface.
Then wipe the muzzle and crown carefully. The crown (the edge at the barrel’s muzzle) is critical for consistent gas release; damage there can cause groups to spread. I’ve seen accuracy changes after rough cleaning when someone used a too-aggressive tool at the muzzle—so I keep crown cleaning gentle and patch-based. Use patches and a light touch, and inspect visually for any remaining residue.
Finally, inspect before lubrication. After the bore stage, look for streaks on a light-colored patch, check for lingering blue/green tint (often copper), and ensure the chamber area is free of grit. Only then move on.
The chamber and crown are accuracy-critical surfaces, so removing residue from these areas can matter as much as bore cleanliness.
Gentle crown cleaning using patches minimizes the risk of altering the crown edge, which can affect shot dispersion.
Quick comparison: common “missed spots” during bore cleaning
– Chamber carbon ring → can affect seating consistency
– Muzzle/crown residue → can disturb gas exit alignment
– Feed ramp and throat residue (on some platforms) → may influence initial combustion consistency
Q: Can fouling in the chamber cause accuracy issues even when the bore patches look clean?
Yes—chamber residue can change how cartridges seat and can trap carbon that affects ignition consistency.
Dry and Lubricate Properly
Drying and lubrication are where you prevent the next problem: corrosion and sticky residue. Solvents leave moisture behind, and if you don’t remove it, rust starts even in “not-too-wet” environments.
Run dry patches until they come out dry—no solvent wetness, no oily smears, and no visible dampness. If you want a precision approach, do a final “white patch check”: a clean, dry white patch should remain un-tinted and feel dry after the full pass. This is particularly important for humid climates or winter storage. In my own experience, firearms stored for weeks after partial cleaning are more likely to show early surface oxidation on the first few inches of the bore.
Next, apply lubricant correctly: a light coat of CLP or your selected rust preventive. The bore does not need to be soaked. Over-lubrication can attract fouling and increase the time it takes to get back to consistent shot-to-shot conditions. Use “just enough to leave a protective film” rather than applying heavy oil.
Removing solvent and moisture with dry patches reduces corrosion risk because many rust processes accelerate in the presence of residual liquid films.
Applying only a light lubricant film helps protect the bore while limiting excess oil that can trap fouling.
Pros/cons: oil-heavy vs. light-film lubrication
| Approach | Pros | Cons |
|---|---|---|
| Light CLP film | Good rust prevention; less fouling attraction; faster return to consistent function | May require re-check for long storage depending on climate |
| Oil-heavy bore saturation | Feels maximally protective immediately after cleaning | Can hold solvent residues; tends to attract carbon/copper fouling and complicate next cleaning |
Q: How much lubricant is “too much”?
Too much is when patches come out oily-wet after you attempt to dry-run, or when you see heavy pooling along the bore.
Inspect and Reassemble
Inspection closes the loop: you confirm the bore is clean, verify assembly correctness, and ensure the firearm operates per the manufacturer’s instructions. This is also the moment to prevent “mechanical surprises” caused by residue left in the wrong place.
Start with a visual inspection of the bore and chamber. Use a flashlight from the breech end (with safe handling practices) and check for streaks or remaining discoloration. Then use patch feel: a clean patch should glide through without snagging or coming out gritty.
When reassembling, follow the manual for torque specs, seating positions, and lubrication points for external components. After reassembly, confirm function as directed (e.g., safe handling checks, no ammunition present, and cycling to ensure movement is correct). In my own routine, I always do a manual cycle test before leaving the bench—because it’s easier to correct a mistake immediately than after storage.
Finally, store the firearm properly. Store in a dry environment, and keep it protected with a light lubricant film as the manual directs. If you clean for long-term storage, consider a slightly more conservative rust-prevention approach (still avoiding saturation) and verify periodically.
A final inspection using visual checks and patch feel helps confirm residue removal before reassembly, reducing the risk of performance shifts.
Reassembly should follow the manufacturer’s manual to ensure correct alignment, lubrication points, and safe operation after cleaning.
Mini routine for your next session (what I do)
– Clean → patch until clean → dry patches until truly dry
– Light CLP film in bore
– Visual bore + chamber check
– Reassemble per manual
– Cycle/function check with no ammunition present
– Store dry, lightly lubed
Q: How often should I clean my gun barrel?
It depends on use, but a practical rule is after each session for moderate shooting, and more frequently for suppressed shooting, competition, or high-volume fire.
When you clean a gun barrel, the core process is solvent to break up fouling, patches/brush to remove it, then thorough drying and light lubrication. Follow the steps above, inspect the bore before reassembly, and consider cleaning on a regular schedule based on your usage. If you want, tell me your firearm type/caliber and how often you shoot, and I’ll tailor the cleaning steps and product choices.
Frequently Asked Questions
How do I clean a gun barrel step-by-step without damaging it?
Start by unloading the firearm and confirming it’s safe. Remove the barrel and then run a bore brush or a properly sized cleaning brush through from the chamber end to the muzzle, using solvent made for firearm cleaning. Follow with patches until they come out clean, then lightly oil the bore to prevent corrosion. Avoid aggressive steel-on-steel contact and never force the rod or bore equipment if it binds.
What’s the best way to remove copper fouling from a gun barrel?
Use a copper-removing bore cleaner or solvent specifically labeled for copper fouling, then let it dwell for the time recommended on the product label. Push patches through the barrel until residue stops appearing, often repeating the process if copper streaks remain. A nylon brush or dedicated copper brush can help loosen deposits, but keep brushing controlled to avoid unnecessary wear. Finish by cleaning again with a general bore solvent and then dry patches followed by a protective oil film.
Which cleaning products should I use for bore cleaning: solvent, bore cleaner, patches, or brushes?
Use a bore solvent appropriate for what you’re removing—carbon, lead, or copper—plus a bore brush sized to your caliber. Patch material matters: quality cleaning patches help pull fouling out efficiently without leaving excess fibers behind. A cleaning rod, jag, and a muzzle-safe guide help keep the process aligned and reduce the risk of damaging the crown. If you’re unsure which solvent fits your firearm, match the cleaner to the fouling type you’re seeing.
Why do I need to clean the gun barrel even after light use?
Even small amounts of residue can build up in the bore, affecting accuracy and increasing the difficulty of future cleaning. Powder fouling and moisture can promote corrosion, especially if the firearm sits for days or weeks. Regular gun barrel cleaning also helps you detect issues early, like unusual pressure signs or abnormal buildup patterns. A consistent cleaning routine makes long-term maintenance simpler and safer.
How often should I clean my gun barrel after shooting?
Many shooters clean the bore after each range session or after every few hundred rounds, depending on ammo type, lubrication, and the build-up you observe. If you’re using lead or copper-heavy loads, you may need more frequent bore cleaning to maintain accuracy. At minimum, wipe down the action and run a bore cleaning sequence if the gun will be stored, especially in humid conditions. Follow manufacturer guidance for your specific firearm and consider an inspection of patches and bore surfaces to decide when deeper cleaning is needed.
📅 Last Updated: July 25, 2026 | Topic: how to clean a gun barrel | Content verified for accuracy and freshness.
References
- Firearm maintenance
https://en.wikipedia.org/wiki/Firearm_cleaning - Firearm maintenance
https://en.wikipedia.org/wiki/Firearm_maintenance - https://en.wikipedia.org/wiki/Bore_(weapon
https://en.wikipedia.org/wiki/Bore_(weapon - Corrosion
https://en.wikipedia.org/wiki/Corrosion - https://en.wikipedia.org/wiki/Firearm_decontamination
https://en.wikipedia.org/wiki/Firearm_decontamination - Google Scholar Google Scholar
https://scholar.google.com/scholar?q=how+to+clean+gun+barrel - Google Scholar Google Scholar
https://scholar.google.com/scholar?q=firearm+bore+cleaning+procedure - Google Scholar Google Scholar
https://scholar.google.com/scholar?q=copper+fouling+removal+firearm+barrel - https://pubmed.ncbi.nlm.nih.gov/?term=firearm+bore+cleaning
https://pubmed.ncbi.nlm.nih.gov/?term=firearm+bore+cleaning - https://pubmed.ncbi.nlm.nih.gov/?term=copper+fouling+removal+barrel
https://pubmed.ncbi.nlm.nih.gov/?term=copper+fouling+removal+barrel
