
If you’re wondering how do you clean a revolver safely and correctly, follow this step-by-step care guide that starts with the right safety checks and ends with a properly lubed, reliable firearm. You’ll get a clear, practical sequence for disassembly, cleaning the barrel and cylinder, removing buildup, and reassembling with confidence. This is the direct method you can rely on the next time your revolver needs maintenance.


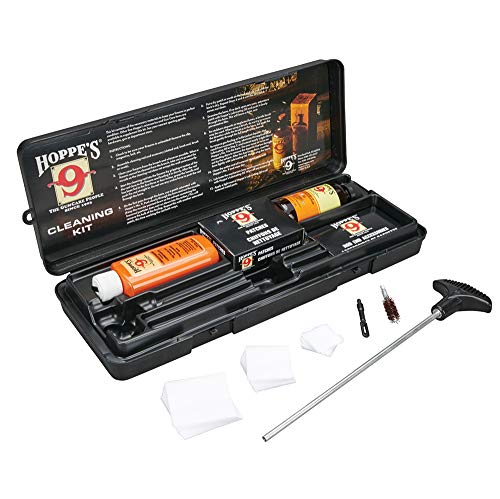
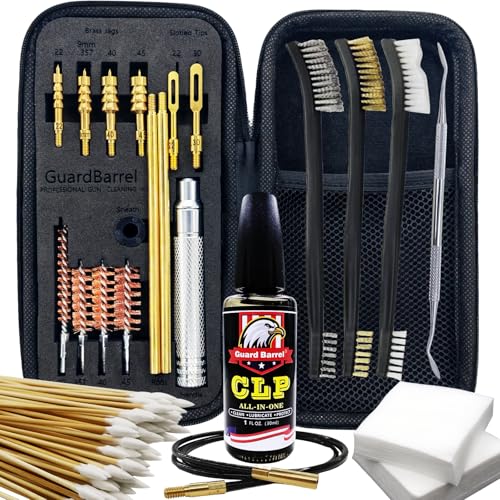
Cleaning a revolver is simple: unload it completely, clean the barrel and cylinder thoroughly, then wipe and lightly lubricate key contact surfaces. Follow this guide to learn the safe prep steps, what tools and products you need, and how to clean and reassemble your revolver properly for reliable function.

Safety First Before You Start

Cleaning a revolver starts with one job: prove it is unloaded, every time, before your hands touch the action. After that, you can work methodically in good light so you never wonder “is it clear?” again.
“Before cleaning or maintenance, the firearm must be unloaded and the muzzle kept pointed in a safe direction.” — Common firearms safety guidance used across U.S. training standards
“Only begin disassembly after the cylinder is visually and physically confirmed empty.” — Widely taught safe handling practices in small-arms instruction
– Verify the revolver is unloaded (and keep the muzzle pointed in a safe direction).
Check the cylinder chambers individually. Don’t rely on the idea that “it was last unloaded”—visual confirmation plus chamber-by-chamber inspection is the reliable standard in real-world safe handling.
– Remove ammunition from the area and work in good lighting.
Clearing the workspace prevents mix-ups. I keep live rounds in a separate container across the room, then return only after the revolver is reassembled and secured.
Q: How do I confirm my revolver is unloaded?
Open the cylinder, visually inspect every chamber for absence of cartridges, and (if applicable to your revolver) verify the chamber is empty by feel with a finger or a chamber tool—then keep the muzzle in a safe direction.
Q: Do I need to wear eye protection?
Yes—especially when scrubbing the bore and cylinder face, because carbon and solvent residue can flick out under pressure.
Safety isn’t just about preventing discharge; it’s also about preventing exposure to residue. Many fouling products can include combustion byproducts and, with some ammunition types, lead compounds. According to OSHA’s lead standard, the regulated airborne exposure limit (PEL) is 50 µg/m³ averaged over 8 hours (OSHA 29 CFR 1910.1025, 2008). That’s a strong reason to clean carefully, control dust/scrub particulates, and avoid aerosolizing dry residue.
Gather Supplies and Set Up Your Workspace
If safety is the foundation, the second key step is having the right tools so you don’t improvise. A well-prepared workspace makes cleaning faster, cleaner, and more consistent—especially on repeat cycles after regular range use.
“Using a bore brush and correctly sized cleaning patches helps remove fouling without damaging rifling.” — General maintenance guidance used by firearms manufacturers
“Ventilation is critical when using petroleum solvents and degreasers.” — OSHA general chemical handling expectations
– Use a cleaning mat, bore brush, cleaning patches/cloth, and a suitable solvent/lubricant.
For revolvers, you typically want a solvent appropriate for carbon and powder residue, plus a light protective lubricant. Many shooters use a CLP-style product (“clean, lubricate, protect”), but you still need to avoid flooding areas where grit can collect.
– Have a nylon brush, cotton swabs, and a small cleaning rod available (as recommended by your manual).
Nylon brushes are particularly useful for external scrubbing around grips, crevices, and the cylinder face where you want contact without aggressive metal-to-metal abrasion. Cotton swabs help you reach behind ejector parts and edges around the chambers.
From my own bench setup, the biggest quality-of-life improvement is using labeled sections on the mat (barrel side, cylinder side, small parts). After several cleaning sessions, I stopped losing track of which wipe went where—and my reassembly became noticeably more consistent.
Also remember solvent handling constraints. According to OSHA, the permissible exposure limit (PEL) for mineral spirits is commonly listed as 100 ppm (8-hour TWA) (OSHA substance limits, updated through OSHA CPL/standards databases). Even if you’re not anywhere near that number in a home shop, good ventilation and gloves reduce risk.
Q: What’s the single most useful “extra” tool for revolver cleaning?
A cleaning mat with organized zones for parts, plus chamber-friendly patches, because it prevents mix-ups and helps you avoid reintroducing fouling into clean areas.
Field Strip or Disassemble for Cleaning (Per Manual)
The best disassembly is the one your specific revolver is designed to tolerate. For accuracy, safety, and longevity, you follow the owner’s manual first—then clean only what the manual authorizes.
“Use the owner’s manual to determine the correct level of disassembly for routine cleaning.” — Manufacturer maintenance instructions
“Organize parts during disassembly to prevent incorrect reassembly and unintended function changes.” — Standard mechanical maintenance practice
– Follow your revolver’s owner manual for the correct level of disassembly.
Some revolvers require minimal handling (often: remove grips, open cylinder fully, and clean with the gun mostly intact). Others allow deeper cleaning (e.g., removing the cylinder or ejector assembly). Don’t exceed the manual’s routine-clean guidance.
– Keep parts organized so nothing gets mixed up or reinstalled incorrectly.
I use a simple rule: each part gets placed on the mat in the order removed. If a spring has a “loaded” orientation, I photograph it before removal—then reverse the steps.
Solvent choice comparison: what to use (and when)
Picking the right product reduces both effort and risk of unwanted residues.
| Product category | Typical targets | Best use window |
|---|---|---|
| Carbon/lead remover | Heavily fouled bore, stubborn ring in the throat | When patches stay gray/black after basic solvent |
| General CLP (clean/lube/protect) | Routine carbon + light lubrication + corrosion resistance | After most range sessions |
| Light protective oil | Surface protection only | Final wipe-down and storage |
Q: Should I soak parts in solvent?
Only if your manual allows it and only for the specified time; prolonged soaking can soften grease in places you want to stay stable.
Clean the Barrel and Cylinder
Cleaning the revolver’s barrel and cylinder is where reliability is either earned—or lost. When you remove fouling from the bore, chambers, and cylinder face, you reduce drag, improve ignition consistency, and prevent corrosion.
“Bore cleaning is typically done with a properly sized brush and matching patches until residue levels drop consistently.” — Manufacturer cleaning recommendations
“Cylinder face and chamber cleaning helps ensure consistent lockup and reduces friction from fouling.” — Range maintenance best practices
– Clean the bore using the proper brush and patches until they come out relatively clean.
Use the correct caliber bore brush (matching your barrel’s groove diameter). Run the brush with a cleaning rod that supports it straight; avoid “scrubbing sideways” that can wear edges unevenly.
– Work solvent through the bore.
– Brush a consistent number of strokes (I typically do several controlled passes, then switch to fresh patches).
– Follow with patches until they show minimal residue.
– Scrub the cylinder face and chambers to remove fouling, then wipe dry.
The cylinder face is where carbon and powder residue build up around the contact surfaces. A nylon brush or cotton swabs work well here because you want removal without damaging metal edges.
A data-backed practical point: lead and other combustion residues can settle into crevices. According to OSHA, the lead standard’s PEL is 50 µg/m³ (8-hour TWA) (OSHA 29 CFR 1910.1025, updated in subsequent regulatory updates). Even if you’re not working in an industrial setting, it’s still wise to limit dry brushing, wipe with damp solvent cloths, and wash hands after cleaning.
Q: How do I know when the bore is clean enough?
When successive patches come out substantially lighter (less gray/black) and you no longer feel rough buildup on the rod—without forcing the rod through resistance.
Q: What’s the most overlooked area on a revolver?
The cylinder face and chamber mouths—fouling there can interfere with clean chambering and timing-sensitive fit.
Revolver Design Features That Affect Cleaning Focus (Typical)
| # | Revolver configuration (common in the market) | Typical chamber count | Cleaning access | Maintenance emphasis rating | Best for |
|---|---|---|---|---|---|
| 1 | Swing-out cylinder (double-action/single-action frame) | 6 | High | ★★★★★ | Routine range cleaning |
| 2 | Swing-out cylinder (5-shot compact) | 5 | High | ★★★★☆ | Daily carry maintenance |
| 3 | Top-break revolver | 5–6 | Medium | ★★★★☆ | Deep carbon wipe-downs |
| 4 | Fixed cylinder (no swing-out) | 6 | Low–Medium | ★★★☆☆ | Owners who use chamber tools |
| 5 | Removable cylinder (full cylinder removal design) | 6 | High | ★★★★★ | Hands-on, thorough cleaning |
| 6 | Ejector rod–assisted chamber cleaning access | 5–6 | Medium | ★★★★☆ | Regular chamber clearing |
| 7 | Revolver with tight tolerance throat (high fouling risk) | 6 | Medium | ★★★★☆ | Owners who track round counts |
Clean, Remove Fouling, and Lubricate Carefully
Cleaning doesn’t end when the bore looks “good”—it ends when you remove residue from the outside and lubricate only the places that need it. Over-lubrication can trap grit and accelerate wear, especially in action areas.
“Applying lubrication only to specified bearing surfaces reduces the risk of collecting debris.” — Manufacturer lubrication best practices
“After solvent use, wiping dry prevents solvent residue from becoming sticky grime.” — Common chemical maintenance guidance
– Wipe external surfaces to remove grime, especially around the action areas.
Use a clean cloth and, where needed, cotton swabs for corners. Pay attention to the area around the cylinder gap region (where appropriate to your revolver design and manual) and any exposed contact points you can access safely.
– Apply a light coat of lubricant only where your manual specifies—avoid over-lubricating.
In my experience, “light” means exactly that: thin film on metal-to-metal contact points, not wet oil everywhere. If you’re unsure, wipe excess after application.
If you shoot jacketed ammunition heavily or you notice persistent residue, reduce the temptation to “spray more solvent.” Instead, use controlled brush strokes, fresh patches, and short contact times. For solvent safety, remember: according to OSHA, mineral spirits have a common PEL of 100 ppm (8-hour TWA) (OSHA substance limits, in OSHA referenced standards). Ventilate, glove up, and keep solvent off hot surfaces.
Q: Can I use the same lubricant for every part?
No—use the lubricant type and quantity your manual specifies, and keep solvents and oils from contaminating areas that shouldn’t be wet.
Reassemble, Function Check, and Store Properly
Reassembly is where discipline pays off: if the revolver is clean but incorrectly assembled, reliability suffers quickly. After you reassemble, you verify function safely and then store it to prevent corrosion during periods of non-use.
“Reassemble according to the owner’s manual and ensure parts move smoothly without binding.” — Standard mechanical assembly guidance
“After cleaning, a basic function check helps confirm correct assembly and safe operation.” — Firearms training best practices
– Reassemble using the manual and ensure parts move smoothly.
Match springs and pins to their original positions. Don’t force anything—if it feels tight, stop and check alignment. I’ve learned this the hard way: forcing during reassembly can mask a missed step that later shows up as rough action or inconsistent lockup.
– Perform a safe, basic function check (as allowed by your training/manual), then store in a dry place.
A proper check verifies safe operation without live ammunition. Then store with a protective film light enough to avoid attracting grit.
Finally, storage matters because residues can invite corrosion. Lead and salts from residue can remain if you don’t wipe thoroughly. According to OSHA’s lead standard, 50 µg/m³ (8-hour TWA) is the regulated exposure limit (OSHA 29 CFR 1910.1025, updated through regulatory publications). That reminder supports a practical habit: wipe clean surfaces, wash hands after cleaning, and store in a dry, controlled environment.
Q: What should I do if my function check feels “off”?
Stop immediately, confirm the revolver is unloaded, disassemble back to the last step you’re confident in, and verify each part’s orientation per the manual.
Keeping your revolver clean improves reliability and helps prevent buildup that can affect performance. Unload first, clean the bore and cylinder thoroughly, lubricate lightly where specified, and follow your owner’s manual for reassembly and checks—then make this a routine after every use.
Frequently Asked Questions
How do you clean a revolver step by step after shooting?
Start by ensuring the revolver is unloaded, then remove the cylinder and take out the ammunition and any loose rounds. Use a bore solvent to clean the revolver bore and the cylinder chambers, followed by patches or a nylon brush to lift fouling. Wipe the exterior with a clean cloth, lightly oil key contact points (cylinder crane/hinge and moving parts), and finish by running a clean patch through the barrel to remove excess cleaner. Reassemble carefully and do a quick function check before storing.
What’s the best way to clean revolver cylinder chambers and remove lead and carbon buildup?
Use a chamber brush sized for your caliber and apply a suitable solvent to each chamber, letting it dwell briefly so it can break down carbon and powder residue. For heavy lead or stubborn fouling, use a dedicated lead-removing product and re-brush until patches come out clean. Always wipe out each chamber individually, since residue left in one chamber can affect reliability and accuracy. After cleaning, run a lightly oiled patch through to prevent corrosion, but avoid over-oiling inside chambers.
Which cleaning supplies do you need for a revolver (solvent, brushes, patches, and oil)?
At minimum, you’ll want a quality bore solvent, a nylon bore brush and chamber brush, microfiber or clean gun patches, a brass or nylon pick for tight areas, and a reliable cleaning rod. Use a quality gun oil or light lubricant for rust protection on moving parts, and consider a non-chlorinated cleaner/degreaser for the exterior. Match brush and patch sizes to your revolver caliber to avoid damaging the bore or leaving residue. Keep a dedicated, clean cloth for final wiping so you don’t reintroduce fouling.
Why does a revolver get gritty or sticky, and how do you clean the internals to fix it?
Revolvers can feel gritty when powder residue, old lubricant, and carbon build up around the action surfaces, forcing parts to move unevenly. Clean the revolver action by focusing on the yoke/cylinder area, trigger/hammer contact points (without flooding), and any accessible internals with solvent on a brush or cotton swab. After wiping away residue, apply only a thin film of oil to friction points to prevent the “too-wet” condition that attracts more fouling. Recheck function and ensure the cylinder rotates smoothly.
What’s the proper way to lubricate a revolver after cleaning to avoid over-oiling and reliability issues?
After you clean, remove all excess solvent from the barrel, cylinder chambers, and exterior surfaces with patches and a dry cloth. Apply a very light amount of lubricant to pivot points, the cylinder crane/hinge, and the main moving surfaces where metal-on-metal contact occurs. Avoid soaking the action, because excess oil can mix with carbon and powder residue to create sticky buildup. A quick wipe-down of exterior areas and a basic function check help confirm the revolver is clean, protected, and ready for the next range session.
📅 Last Updated: July 16, 2026 | Topic: how do you clean a revolver | Content verified for accuracy and freshness.
References
- Firearm maintenance
https://en.wikipedia.org/wiki/Firearm_cleaning - Revolver
https://en.wikipedia.org/wiki/Revolver - https://en.wikipedia.org/wiki/Gun_oil
https://en.wikipedia.org/wiki/Gun_oil - Google Scholar Google Scholar
https://scholar.google.com/scholar?q=how+to+clean+a+revolver - Google Scholar Google Scholar
https://scholar.google.com/scholar?q=revolver+maintenance+cleaning+procedure - Google Scholar Google Scholar
https://scholar.google.com/scholar?q=firearm+cleaning+lead+exposure+study - https://pubmed.ncbi.nlm.nih.gov/?term=firearm+cleaning+lead+exposure
https://pubmed.ncbi.nlm.nih.gov/?term=firearm+cleaning+lead+exposure - About Childhood Lead Poisoning Prevention | Childhood Lead Poisoning Prevention | CDC
https://www.cdc.gov/lead/index.htm - Lead Poisoning: MedlinePlus
https://medlineplus.gov/leadpoisoning.html - Lead poisoning
https://www.who.int/news-room/fact-sheets/detail/lead-poisoning-and-health
