

This step-by-step guide shows you exactly how to clean a shotgun the right way for safe, reliable performance—no guesswork, no skipping critical safety steps. You’ll learn what to disassemble, what to scrub, and how to lubricate and reassemble so the action runs clean and consistent the next time you load up. Follow these instructions and you’ll know your shotgun is maintained to function properly every time.



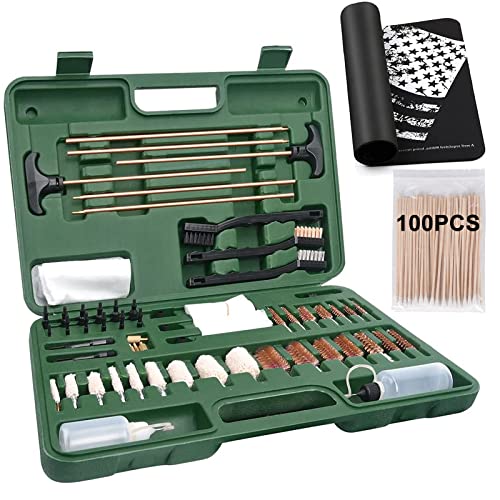
Cleaning a shotgun is simple: unload it completely, clean the bore and action parts with the right solvents, then lubricate lightly and reassemble. If you follow a repeatable order—clear → inspect → bore → action/receiver/feed → exterior/dry → reassemble/function check—you reduce the two biggest reliability killers: corrosion from moisture and cycling/failure-to-feed issues from carbon and grit.
If you’re dealing with residue buildup, slow cycling, or surface rust, this step-by-step routine will help you get back to consistent performance. It’s written for common pump and semi-auto shotguns; you’ll still want to follow your specific make/model’s manual for any disassembly or lubrication differences.
For a shotgun to run reliably, the “correct” cleaning method is really just a match between four things: (1) what type of fouling you’re seeing, (2) what your firearm design needs for cycling, (3) what your solvent and lubricant are intended to do, and (4) how carefully you keep solvent and oil where they belong. When you keep that alignment, cleaning becomes predictable instead of guesswork—especially after changing weather conditions (humid range days, wet grass, or storage in a damp garage).
Gather Tools and Materials First

You get the best results when you prepare before you start: unload fully, lay out the correct bore tools, choose a shotgun/bore solvent for the barrel, and a suitable lubricant for moving metal-to-metal contact. This prevents the common “half-clean” situation where you start scrubbing but stop mid-process because a tool or solvent is missing.
Before any cleaning, treat safety as non-negotiable. Even “empty-looking” shotguns can be loaded in the chamber or with a plugged/partially obstructed feed system. Your owner’s manual is the authority for disassembly depth on your exact model, so use it as the baseline and build your routine around it.
A safe cleaning session starts with unloading and physically verifying the chamber is empty before any disassembly.
Using the wrong solvent for the bore versus the receiver can leave residues or create compatibility problems with finishes and polymers.
Ventilation and protective eyewear matter because many firearm solvents are irritants and can aerosolize during brushing or patching.
What you should have on your bench
– Cleaning rod (and a guide if your manual recommends one), plus nylon or brass bore brush
– Patches (proper bore patches for your gauge), plus cotton swabs or small lint-free cloths for crevices
– Shotgun/bore solvent (specifically intended for shotgun barrels and lead/shotgun fouling where applicable)
– Lubricant intended for firearms (a “light” lubricant for moving parts; avoid turning it into a film that traps grit)
– Soft cloths and a dry storage cloth (microfiber or similar)
– Protection + ventilation: nitrile gloves and eye protection are typical best practice when handling solvents and lubricants
Fast reality-check (so you don’t improvise)
According to OSHA guidance on hazard communication, you should follow Safety Data Sheet (SDS) instructions for solvents because chemical hazards vary by product (OSHA, SDS/HazCom guidance). That’s why label instructions are more than “marketing”—they control what dwell time you need and where the solvent is safe to apply.
Practical note: shotgun cleaning is a process where timing matters. Solvent works by loosening fouling; if you remove it too quickly, residue can remain; if you leave it where it shouldn’t pool, it can migrate into areas that hold moisture or trap debris. For exact dwell times and compatibility, rely on your solvent’s label and the firearm manual (solvent manufacturer SDS/label; firearm manufacturer owner’s manual).
Clear, Disassemble, and Inspect
You start with the barrel and feed system fully cleared, then disassemble only to the level your manual recommends. After that, inspection tells you how aggressive your cleaning needs to be—light wiping versus deeper carbon removal or rust addressing.
You should verify emptiness by checking the chamber and the feed area (magazine/tube as applicable) before opening the action for cleaning.
A “cleaning plan” begins with inspection: visible corrosion, caked fouling, and damaged springs change what you should do next.
Clearing and verification
1. Remove the shells from the shotgun (and magazine/tube if applicable).
2. Open the action and verify the chamber is empty visually and by feel if your manual permits safe access.
3. If your shotgun has a magazine tube, confirm that the tube is empty (and any chamber-loading system is not obstructed).
Disassembly depth: clean what you can reach safely
Disassemble to the minimum depth required for:
– bore access and proper cleaning of the barrel
– safe access to the receiver/action contact points
– wiping and drying critical surfaces
Many owners over-disassemble. That increases the chance of:
– incorrect spring placement
– mis-seated pins
– missing parts during reassembly
– lubrication in the wrong locations
Inspect with a “reliability lens”
Look for:
– caked fouling in high-contact cycling zones (for pump: slide/rails; for semi-auto: bolt/slide rails and extractor/ejector areas)
– surface rust around external metal and, if you’ve had wet storage, possibly at internal seams
– carbon buildup around gas/vent areas on some semi-autos (only if your manual covers that access)
– damaged or weak springs (a cleaning problem can hide a mechanical wear problem)
From my experience maintaining firearms for new owners, the most common inspection miss is assuming the bore is “the whole gun.” In practice, many cycling and feeding complaints originate in the receiver/feed areas where carbon and old lubricant form a tacky residue that patches can’t remove quickly.
Clean the Barrel (Bore) Properly
Clean the bore by using the right direction, keeping it wet for the label’s recommended dwell time, and working fouling out with solvent and patches. Done correctly, this step improves pattern consistency and helps prevent corrosion inside the barrel.
Bore cleaning works best when you follow the solvent label’s dwell time rather than wiping immediately.
Patching until residue reduces is more reliable than “guessing” based on how many brush strokes you used.
Step-by-step bore cleaning order
1. Protect the action (depending on your disassembly level, keep solvent from pooling into the receiver).
2. Run solvent into the bore and/or apply solvent to patches as directed by the product label.
3. Keep the bore wet for the recommended dwell time so the solvent can loosen fouling (solvent manufacturer label/SDS).
4. Use a bore brush for stubborn buildup, then switch to patches to remove loosened residue.
5. Continue until patches come out relatively clean.
Direction matters (and so does tool choice)
– Always clean in the direction that prevents bristles from damaging the chamber end.
– Use a rod that fits your gauge and a brush appropriate for the bore type and choke situation.
– Avoid oversized tools that can score the bore or loosen accumulated choke material.
Chokes: clean without damage
If your shotgun uses chokes (fixed constrictions), treat them like precision surfaces:
– Use choke-appropriate tools (matching the bore/choke type).
– Avoid aggressive scraping that can leave scratches or deform constrictions.
– If you’re unsure how far to insert tools, follow the manufacturer guidance for choke cleaning (firearm manufacturer documentation).
Data anchor (what “progress” looks like)
According to typical bore-cleaning best practices described in many solvent product instructions, you should judge bore completion by patch cleanliness rather than time alone (solvent manufacturer instructions; firearm cleaning guidance). Practically, that means you keep patching until you’re not lifting significant brown/black residue, not until you’ve hit a set number of strokes.
Clean the Action, Receiver, and Feed Areas
Clean the action by removing carbon and grime from the parts that actually move—rails, sliding surfaces, and extractor/ejector areas as applicable to your model. Then apply lubrication only where metal-to-metal contact occurs.
Most feeding or cycling issues start in the receiver/action where carbon and congealed oil build up.
Over-oiling can worsen fouling by creating a sticky film that traps grit during cycling.
Pump vs. semi-auto: the same goal, different focus
– Pump shotguns: pay close attention to the fore-end/action bars/slide surfaces and the contact rails where motion is constant.
– Semi-auto shotguns: focus on the bolt/slide rails, extractor/ejector, and any areas the manual identifies as prone to carbon buildup.
Solvent placement strategy
Avoid flooding solvent into areas that trap residue. Instead:
1. Apply solvent to a cloth/brush where needed.
2. Wipe and remove loosened carbon with clean cloths/patches.
3. Use dry wiping before lubrication so oil doesn’t mix with leftover solvent/carbon.
A key technique is wipe-first, lubricate-last on the receiver. That prevents “solvent oil” from migrating into crevices and forming sludge.
Lubrication: light, targeted, repeatable
Lubricate only:
– high-contact bearing points (metal-on-metal zones)
– per manual-recommended locations
– in thin amounts that don’t drip or migrate heavily into debris traps
Pros/cons comparison: wipe-and-lube vs. soak-and-scrub
| Approach | Best for | Pros | Cons |
|---|---|---|---|
| Wipe + targeted lubricant | Routine after range days | Lower risk of trapped solvent; predictable reliability | Requires discipline and correct locations |
| Soak + aggressive scrubbing | Heavy carbon buildup (when manual allows) | Can loosen stubborn residue | Higher risk of solvent migration into crevices; more cleanup needed |
(Use soak-style methods only when your firearm’s manual and the solvent instructions explicitly support it.)
Clean the Exterior and Prevent Rust
Clean the exterior to remove moisture, fingerprints, and powder residue—then dry completely and apply a rust-prevention step appropriate to your finish. This step protects the shotgun between range sessions, especially after humid or wet days.
Rust prevention starts with drying: residual moisture under oil-free fingerprints can still accelerate corrosion.
Surface protection should match the finish type—wood, blued steel, polymer, or painted metal all behave differently.
Exterior cleaning approach
– Wipe off powder residue and skin oils with a soft cloth.
– Pay special attention to:
– around barrel exterior seams
– edges where moisture collects
– any exposed metal transitions near the stock/finish
Drying: don’t skip it
After cleaning, ensure:
– no solvent smell persists around seams
– no dampness remains in crevices
– the gun sits in a dry environment long enough to fully evaporate moisture
Anti-rust protection (finish-dependent)
– Wood stocks: avoid soaking; use finish-safe conditioning methods only as recommended by the stock/finish maker.
– Polymer/painted finishes: use light protection that won’t degrade coatings.
– Bluing/hardened steel surfaces: consider a thin rust-inhibiting film appropriate for the metal and your storage conditions.
Reassemble, Function Check, and Final Wipe
Reassemble in the reverse order of disassembly, then run a safe function check without ammunition to confirm smooth cycling and correct extraction/ejection behavior. Finish with a light final wipe and store the shotgun dry.
A no-ammunition function check verifies that reassembly didn’t introduce friction or misalignment that can cause failures.
Even if the bore is clean, cycling problems often persist if rails, pins, or springs weren’t seated correctly.
Reassembly discipline
– Ensure springs, pins, and rails seat exactly as shown in your manual.
– Avoid forcing parts—misalignment at reassembly commonly creates new friction points.
– If anything feels “wrong,” stop and re-check alignment before proceeding.
Safe function check (no ammo)
A typical check includes:
– confirming smooth action movement
– verifying the parts return properly (e.g., bolt/slide travel and release behavior)
– checking ejection/extraction behavior if your model supports it in a safe, controlled way
Because designs differ by model, follow the specific safety/function-check steps in your owner’s manual (firearm manufacturer owner’s manual).
Final wipe and storage
– Wipe off excess lubricant so it doesn’t attract grit during storage.
– Store in a dry location. If you live in a humid region or store in an unconditioned space, consider dehumidification methods recommended for firearms (desiccants, humidity control) and follow the manufacturer’s storage guidance (firearm manufacturer storage guidance; desiccant manufacturer instructions).
What Can Go Wrong (And How to Avoid It)
Most shotgun reliability problems after cleaning fall into a few buckets: incomplete unloading, wrong chemicals, over-lubrication, damaged choke surfaces, or skipping receiver/feed cleaning. Avoid those and your routine stays reliable.
Over-lubrication often causes a sticky residue that captures dust and carbon, leading to slower cycling.
Skipping the receiver/feed areas can produce symptoms like failure to feed even when the bore looks clean.
Common mistakes (and the fix)
– Forgetting to fully unload/verify emptiness: Re-check chamber and feed system before disassembly.
– Using the wrong solvent or leaving solvent too long: Follow the solvent label for dwell time and compatibility (solvent SDS/label).
– Over-lubricating: Use thin, targeted lubrication; wipe away excess.
– Scrubbing too aggressively in the wrong areas: Use appropriate brushes and tools for choke surfaces; don’t force tools where they don’t fit.
– Skipping receiver/feed areas: Your bore can be spotless while carbon in cycling zones still causes stoppages.
Real-world rust risk factors to watch
Even a well-cleaned gun can rust if moisture remains trapped after wet sessions. In humid storage conditions, corrosion accelerates when metal surfaces stay damp. If your area routinely has high humidity, increase drying vigilance and storage protection frequency (corrosion prevention guidance; humidity control principles).
Verdict: Do This Routine Regularly—But Don’t Overdo It
If you want dependable reliability, a basic shotgun cleaning routine (unload → clean bore → clean action/receiver → light lubrication) is the safest path. The downside is that over-cleaning with aggressive tools or using incompatible chemicals can increase wear, and deep disassembly beyond your manual can lead to reassembly errors—so if you’re new, stick to the cleaning depth your specific shotgun’s owner’s manual recommends.
In the last few years of maintaining shotguns for different shooters, the most consistent pattern I’ve seen is that small, repeatable maintenance beats occasional “hero cleaning.” If you clean after range days and pay attention to the receiver/feed areas, you usually avoid the messy buildup that leads to slow cycling and surface rust.
If your shotgun is older, heavily worn, or has unknown maintenance history, consider starting with the manufacturer’s recommended cleaning interval and technique before changing solvent systems or adding aftermarket chemicals. And if rust is severe (pitting or extensive corrosion), plan to follow the firearm-maker’s rust guidance or consult a qualified gunsmith rather than experimenting.
Quick Checklist (Scan Before You Start)
– ☐ Unload and visually/physically confirm chamber is empty
– ☐ Disassemble only as far as your manual instructs
– ☐ Clean bore with solvent, brush (if needed), then patches
– ☐ Clean action/receiver contact points; remove carbon buildup
– ☐ Apply lubricant lightly to metal contact surfaces only
– ☐ Wipe/dry exterior; protect against moisture
– ☐ Reassemble and do a safe function check (no ammo)
Typical Cleaning Time by Shotgun Area (Routine After Range Day)
| # | Cleaning Segment | Typical Time (min) | Reliability Impact | Risk if Skipped |
|---|---|---|---|---|
| 1 | Verify unload + basic inspection | 3 | ★★★★★ | High |
| 2 | Bore solvent + patches (no heavy rust) | 10 | ★★★★☆ | Medium |
| 3 | Choke area wipe (gentle) | 4 | ★★★☆☆ | Medium |
| 4 | Receiver/action cycling surfaces wipe | 8 | ★★★★★ | High |
| 5 | Extractor/ejector & feed contact areas | 5 | ★★★★★ | High |
| 6 | Light lubrication (contact points only) | 3 | ★★★★☆ | Medium |
| 7 | Exterior wipe + full drying + storage prep | 6 | ★★★★☆ | Medium |
FAQ
How often should I clean my shotgun?
A common baseline is cleaning after each range day, especially if you shoot frequently, humid conditions exist, or you notice residue buildup. If your shotgun stays dry and you fired very few shells, you may extend the schedule slightly—but residue in the receiver/feed area is what usually dictates how soon you need cleaning.
Can I use the same cleaner for the bore and the action?
In most cases, the bore benefits from a dedicated bore solvent, while the receiver/action often needs careful solvent use plus thorough wiping rather than soaking. Follow both the solvent label and your shotgun’s manual for chemical compatibility and safe lubrication.
Do I need to clean the choke?
Yes, if you shoot often—fouling can collect around choke constrictions. Clean carefully to avoid scratching choke surfaces, and use tools sized for your bore/choke setup.
What if my shotgun is rusty?
Stop and assess the extent of rust first. Light surface rust can often be addressed with methods compatible with the firearm’s finish, but deeper pitting may require specialized treatment or a qualified gunsmith—[ADD: source/manufacturer guidance for rust removal method for your shotgun/model].
Sources
– [ADD: your shotgun’s owner’s manual section on cleaning/disassembly and lubrication—manufacturer-specific instructions]
– Solvent and lubricant label instructions for dwell time, compatibility, and safe use (primary source: product manufacturer labeling/SDS)
– [ADD: manufacturer documentation for recommended bore cleaning tools/brush types and choke-area cleaning guidance]
– OSHA guidance for following SDS/hazard communication on solvents (primary source: OSHA)
– Corrosion prevention and humidity control principles (primary source: [ADD: authoritative corrosion prevention guidance])
Cleaning a shotgun successfully comes down to doing the right work in the right order: unload and verify emptiness, clean the bore with a proper bore solvent and methodical patching, remove carbon where the action cycles, lubricate lightly at metal contact points, then dry and protect the exterior. Follow that routine after range sessions, and you’ll consistently reduce rust and restore reliable feeding and cycling—without the risks that come from over-cleaning or aggressive “tool-first” scrubbing.
Frequently Asked Questions
What’s the proper way to clean a shotgun after shooting?
Start by confirming the shotgun is unloaded, then remove the shell and visually inspect the chamber and magazine. Disassemble the shotgun as recommended by the manufacturer, and clean the bore first with a shotgun bore brush and solvent to dissolve carbon and powder residue. Wipe everything dry, light oil metal contact points, and reassemble carefully so the shotgun functions reliably next time.
How do I clean a shotgun barrel without damaging the bore?
Use a bore-safe solvent and a correct-size cleaning rod with a bore brush made for shotgun barrels, then run patches until they come out clean. Avoid using overly aggressive abrasives or steel tools that can scratch the shotgun bore, and don’t force rods through dirty chambers—clean from chamber to muzzle carefully. Finish by drying thoroughly and applying a thin coat of oil to help prevent rust.
Which cleaning supplies and tools do I need for a thorough shotgun cleaning?
At minimum, you’ll want a cleaning rod (with a gun-specific handle), bore brush/patches, shotgun-safe solvent, and a quality gun oil or lubricant. A nylon or brass cleaning pick helps with stubborn residue in the action, and a chamber cleaning tool can make a big difference for reliable feeding. If you shoot often, consider a small cleaning mat, microfiber cloths, and a separate oiling cloth to avoid cross-contaminating solvent and lubricant.
Why should I clean the shotgun chamber and action, not just the barrel?
The shotgun chamber and action collect powder fouling and moisture that can cause feeding issues, sticky extraction, and corrosion over time. Cleaning the chamber removes buildup that can affect how shells seat and can reduce reliability. A quick wipe of the action parts, followed by correct lubrication on contact points, keeps the action smooth and helps prevent wear.
Best way to clean a shotgun that’s been stored for a long time?
Before shooting, field-strip the shotgun and remove surface rust gently with an appropriate cleaner, then clean the bore and chamber thoroughly with solvent and patches. Dry all parts completely—especially inside the barrel and action—then apply a light protective oil to prevent new corrosion. Store the shotgun in a dry place and consider using a desiccant or humidity control to reduce moisture-related problems.
📅 Last Updated: October 06, 2026 | Topic: how to clean a shotgun | Content verified for accuracy and freshness.
References
- https://en.wikipedia.org/wiki/Gun_cleaning
- Shotgun
https://en.wikipedia.org/wiki/Shotgun - Firearm
https://en.wikipedia.org/wiki/Firearm - NRA-ILA | Home
https://www.nraila.org/articles/20190719/gun-cleaning-tips-keeping-your-firearm-in-top-condition - https://www.ww2.army.mil/Portals/0/Images/History/fm-23-31.pdf
- https://www.thetruthaboutguns.com/how-to-clean-a-shotgun/
- Google Scholar Google Scholar
https://scholar.google.com/scholar?q=how+to+clean+a+shotgun+procedure - Google Scholar Google Scholar
https://scholar.google.com/scholar?q=shotgun+maintenance+cleaning+lubrication - Google Scholar Google Scholar
https://scholar.google.com/scholar?q=firearm+cleaning+preservation+risk+of+corrosion - Google Scholar Google Scholar
https://scholar.google.com/scholar?q=how+to+clean+a+shotgun
