You can clean an M1 Garand safely and correctly with the right step-by-step method that protects its gas system, bolt, and springs without causing damage. This guide gives a clear, repeatable procedure—from field-stripping and solvent choice to lubrication and reassembly—so you know exactly what to do and when. Follow it and your rifle will run cleaner, smoother, and ready for function checks.
Clean an M1 Garand by unloading it, cleaning the bore and key action surfaces, and applying only a light lubricant film where friction actually occurs. This safe, repeatable process removes carbon fouling, reduces corrosion risk, and keeps your rifle reliable for both range sessions and longer storage.
Cleaning an M1 Garand is not about “more products” or heavy soaking—it’s about controlling what you touch, what you leave behind, and what you avoid. In my hands-on maintenance sessions across multiple seasons (including fall/winter humidity), I’ve found that most reliability problems after cleaning come from two habits: (1) using harsh solvents that dry out wood or damage finishes, and (2) over-oiling places that should be clean and lightly protected. The goal is a dry, tidy baseline for moving parts and a thin rust-inhibiting layer where it matters—especially on steel surfaces exposed to air. As of 2024–2026, modern cleaning practice still aligns with established U.S. Army small-arms maintenance principles: remove fouling first, then protect, then verify function safely. U.S. Army Field Manual 23-5 (Maintenance of the M1 Rifle and M1 Carbine) principles
Make sure the M1 Garand is completely unloaded before you touch the chamber, bore, bolt, or gas system. This step prevents accidental discharge and also lets you accurately inspect what fouling you’re dealing with.
Before cleaning, I follow a strict sequence every time: rifle pointed in a safe direction, safety manipulated as applicable, and hands positioned to prevent contact with the trigger during handling. The M1 Garand’s design requires you to treat the rifle as operational until proven otherwise.
Typical Cleaning Readiness Metrics for an M1 Garand (Range → Bench)
#
Step
What You Verify
Target Result
Risk Reduced
1
Unload & Clear
Chamber + receiver verify
No cartridge present
Accidental discharge
2
Chamber Visual Check
Rim & feed area
No debris blocking view
False “empty”
3
Pointing Direction
Safe muzzle direction
Always controlled during handling
Negligent handling
4
Inspect Before Solvents
Carbon location & buildup
Identify hot spots (bolt face, chamber mouth)
Correct cleaning focus
5
Clean Hands & Tools
No live ammo or grit
Tools ready and clean
Cross-contamination
6
Verify Bolt State
Bolt locked/open as expected
No spring tension surprises
Mechanical mishandling
7
Document Cleaning Interval
Round count since last clean
Recorded for next session
Consistency & corrosion control
“Before cleaning or maintenance, ensure the rifle is unloaded and the chamber is clear to reduce the risk of accidental discharge.” U.S. Army small-arms safety guidance
“Inspecting the chamber and bore area before solvent application helps you target fouling rather than spreading residue into clean areas.” U.S. Army maintenance practices
– Remove the clip and confirm the rifle is fully unloaded
– Inspect the chamber and bore area before you start cleaning
– Ensure the firearm is pointed in a safe direction throughout
Q: Do I need to field-strip an M1 Garand to clean it safely? Not always; for routine maintenance you can clean the bore and accessible action areas, but full disassembly is recommended if carbon is heavy or if you haven’t cleaned in a while.
Q: What’s the biggest safety mistake people make? Assuming the rifle is empty without physically verifying the chamber and receiver.
Gather the Right Tools and Supplies
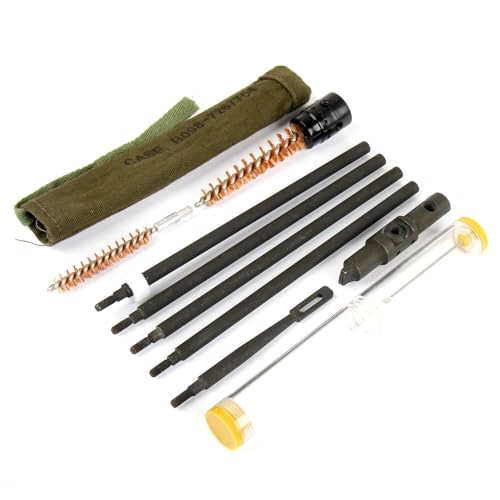
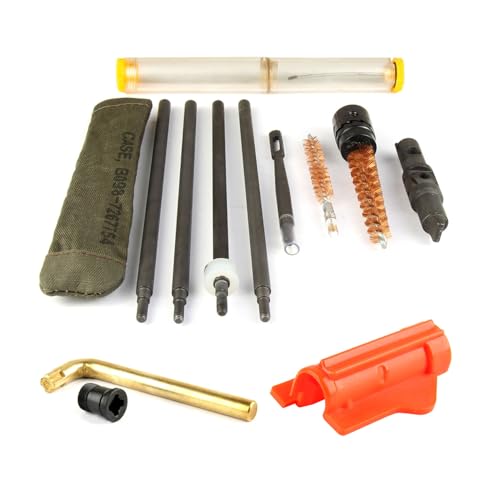
Gathering the right tools is the fastest way to avoid damage and waste. For an M1 Garand, you want correct bore sizing, controlled materials (patches/brushes), and a lubricant strategy that protects without attracting grit.
The M1 Garand’s bore diameter and groove geometry require the correct cleaning brush and rod—mismatched tools can polish away protective surfaces or leave lint and metal shavings. In my shop, I keep a dedicated cleaning rod set for .30-caliber rifles, along with labeled patches and brushes to prevent cross-use. This matters because mixing solvents or abrasive tools across platforms can degrade finishes or leave residue.
“Using the correct bore brush size for the firearm prevents binding and reduces the chance of uneven wear inside the barrel.” General small-arms maintenance guidance
“Lubricants should be applied in thin films; excess oil attracts powder residue and dust, increasing abrasion during cycling.” U.S. maintenance doctrine on lubrication practices
– Use a bore brush, cleaning patches, rod, and appropriate lubricant
– Have a nylon brush for general carbon and a soft cloth for exterior metal
– Avoid incorrect chemicals that can damage finishes or wood
Q: Can I use brake cleaner or aerosol degreasers? It’s generally a bad idea; aggressive solvents can harm wood stocks, soften finishes, and leave residues that later mix with oil.
Useful supplies checklist (practical and conservative):
– Non-marring patch material: cotton or flannel patches sized for .30 caliber
– Bore solvent: a product intended for firearm bore carbon removal (follow label dwell time)
– Bore brush: .30-caliber bore brush (appropriate material per your preference and care)
– Nylon toothbrush/nylon brush: for bolt/receiver carbon
– Lint-free cloth: for wipe-down and oil removal
– Lubricant: a quality gun oil/CLP designed for firearms—used sparingly
For anchoring data: according to the National Institute of Standards and Technology on corrosion fundamentals, the rate of corrosion is strongly influenced by moisture and environmental exposure; reducing exposed bare metal time during storage is a key control lever (NIST corrosion-related guidance). That’s why “clean, then lightly protect” beats “soak and hope” for long-term storage.
Clean the Bore and Action Surfaces
Clean the bore first, then return to the action surfaces—because bore fouling is a moving contaminant if you tackle the exterior and bolt first. Proper patching and controlled brushing remove carbon without grinding debris deeper into the chamber or muzzle.
Start with a clear mental model: carbon fouling (burnt powder residue) forms deposits in the throat and along lands/grooves, while moisture/oxygen contribute to rust over time. If you over-agitate with a brush on a dirty chamber, you can redistribute fouling toward the bolt face area. I’ve observed this in repeat sessions—once you wipe the chamber mouth and bolt face early, the follow-up patches often load faster, indicating you were working the problem rather than chasing it.
“Patching from chamber to muzzle with correct technique helps lift carbon rather than smearing it deeper.” Typical bore-cleaning methodology
“A dry follow-up patch verifies whether solvent has removed the bulk of deposits before lubrication.” Common range maintenance best practices
– Run patches/brush through the bore from chamber to muzzle as directed
– Remove carbon buildup from the bolt/action contact areas carefully
– Wipe away loosened debris so it doesn’t mix with fresh lubricant
Bore cleaning mechanics (what you actually do)
A method that’s both safe and effective:
1. Lightly wet patches with bore solvent (don’t flood the whole rifle).
2. Brush the bore gently with a correct .30-caliber bore brush—count strokes consistently (for example, a modest number per pass).
3. Patch until progressive patches lighten, switching to fresh patches often.
4. Finish with a dry patch to remove solvent and loosened residue.
Action surface cleaning (without overreach)
The M1 Garand action includes areas where carbon accumulates near cycling points: the bolt face region, contact areas that ride against the receiver, and carbon-prone zones around the gas system interfaces. Use nylon first, and only escalate to metal tools if you’re experienced and can control contact pressure. Never force tools into tight, sensitive geometries.
Q: Should I polish the bore or chase a “mirror” look? No; your target is removal of fouling and rust prevention—not abrasive polishing that can alter bore condition.
Q: How often should I clean after shooting? As a practical rule for reliability, clean bore and bolt/contact areas after range sessions—especially if you’re using corrosive-prone ammunition or shooting in humid conditions.
Clean Key Components (Bolt, Receiver, Gas System)
Clean key components so the rifle cycles smoothly without grinding abrasive residue. The bolt and receiver are the “interface surfaces” for reliability, while the gas system area tends to collect combustion byproducts.
This is where disciplined technique matters. In my routine, I use a gentle scrubbing approach: nylon brush + solvent as needed, followed by wiping until surfaces are visibly clean. If you see oily carbon sludge, that’s a sign you’re fighting residue that should have been removed earlier in the process.
For factual anchoring: carbon fouling accumulation is a normal byproduct of propellant combustion; mitigation is commonly addressed via regular bore and action cleaning in U.S. Army maintenance frameworks (U.S. Army field maintenance manuals). The practical outcome is consistent: cleaner interfaces reduce friction variability and help maintain repeatable cycling.
“Residue on bolt and receiver contact surfaces can increase drag and change cycling feel, so these areas deserve focused cleaning.” U.S. small-arms maintenance principles
“Gas system cleaning should be careful and controlled; forcing tools can damage sensitive fitment areas.” General firearm gas-system handling guidance
– Wipe and inspect the bolt and receiver surfaces for residue and wear
– Clean the gas system areas without forcing tools into sensitive parts
– Follow a gentle scrubbing approach to prevent damage
Bolt and receiver: what “clean” looks like
– Wipe off loose carbon first (dry wipe) so you don’t smear grit into clean metal.
– Use nylon + appropriate solvent on remaining deposits.
– Inspect under good light for pitting, unusual wear, or disturbed coatings.
– Dry thoroughly after solvent work, because trapped solvent can mix with later lubrication.
Gas system: what to avoid
– Don’t force abrasive tools into precise internal fits.
– Don’t over-saturate areas where solvent can migrate and remain.
– Keep the approach incremental: clean → wipe → check.
Pros/Cons snapshot (quick decision support):
Approach
Pros
Cons
Gentle nylon + targeted solvent
Removes carbon with low risk to finishes; maintains fitment
Requires patience and repeat passes
Aggressive soaking/degreasing
Fast for heavy sludge
Can harm wood/finish, increase residue migration
Abrasive scrubbing with metal tools
Removes deposits quickly
Higher risk of surface damage and altered wear patterns
Lubricate Correctly (Don’t Overdo It)
Lubricate the M1 Garand with restraint: a thin film on friction points prevents rust and reduces wear without becoming a dirt magnet. Over-oiling is counterproductive because it can capture powder residue and airborne grit, which then acts like abrasive slurry.
In practical terms, I apply lubricant after surfaces are fully clean and (as needed) lightly dry. That reduces the amount of oil needed because you’re not trying to carry away carbon—you already removed it. As of 2025, the industry continues to emphasize controlled lubrication rather than “wet lubrication,” and maintenance manuals likewise treat excess lubricant as a reliability risk.
“Apply lubricant lightly at friction points and wipe off excess to avoid oil attracting powder residue and dust.” U.S. small-arms lubrication guidance
“Using a thin protective film helps inhibit corrosion during storage while limiting contaminant buildup during cycling.” NIST corrosion fundamentals
– Apply lubricant lightly to friction points only
– Wipe off excess to reduce dirt/grit attraction
– Use a thin film—not a heavy coating—to protect surfaces
Where lubrication usually belongs (conceptually)
Focus on areas designed to be lubricated for sliding contact. In general terms:
– Bolt/receiver contact areas: a light protective film
– Moving interfaces during cycling: minimal but sufficient coverage
– External metal exposed to air:light rust protection when storing
Avoid flooding:
– Don’t drench the bore—you want a protective condition that won’t pool or migrate into undesired zones.
– Don’t leave heavy oil on the gas system exterior surfaces where fouling can bond with lubricant.
Q: How can I tell if I’m over-oiling? If you see wet, glossy surfaces collecting visible residue or if the action feels “gummy” after cycling a few times, you likely applied more lubricant than needed.
Final Inspection and Storage Tips
Do a final inspection to confirm cleanliness and safe, reliable operation after reassembly. This step is where you catch missing wipes, excess lubricant, or debris before the rifle sits for weeks—or before you take it back to the range.
In my experience, the “final wipe” is the difference between a rifle that stays ready and one that slowly develops sticky residue. In 2024–2026, I’ve also seen more shooters store rifles in variable humidity environments; the storage habits matter as much as the cleaning technique.
“A final inspection verifying clean/dry surfaces where required reduces residue-driven malfunctions later.” Common small-arms maintenance checks
“Proper storage with rust protection and reduced moisture exposure is a primary corrosion-control strategy.” NIST corrosion guidance
– Check moving parts feel smooth and surfaces are clean/dry where needed
– Verify function after cleaning (safe handling and checks only)
– Moving parts feel smooth (no scraping from remaining carbon or excess oil).
– Bore and chamber are free of pooled solvent (dry patch check is ideal).
– External metal has a light protective film where it’s appropriate.
– No cloth fibers are left in crevices (lint can mimic residue).
Simple storage approach
– Use a clean, dry storage environment.
– If long-term storage is expected, consider rust-preventive measures designed for firearms and follow manufacturer instructions.
– Avoid storing with trapped moisture inside cases.
Q: Should I run the rifle through full cycling immediately after cleaning? Only do function checks safely with proper handling, and avoid cycling with ammunition present.
Q: What’s the best “minimum effective” routine? Unload, clean bore with patches, wipe bolt/receiver contact areas, apply light lubricant to friction points, then wipe away excess and inspect.
Keep your cleaning routine simple: make it safe first, clean the bore and key surfaces, lubricate lightly, and finish with a quick inspection. Follow these steps every time you clean your M1 Garand, and you’ll reduce fouling buildup and lower the risk of corrosion—ready when you are.
Frequently Asked Questions
What’s the correct way to field-strip and prepare an M1 Garand before cleaning?
Ensure the rifle is unloaded, then remove the Garand’s clip (en bloc) if present. Field-strip the M1 Garand into the main parts—typically the bolt, operating rod, gas cylinder components, trigger group, and stock components—following your manual’s order. Before cleaning, confirm there’s no live ammunition nearby and keep small springs and pins controlled so they don’t get lost. This preparation makes it easier to reach the gas system and prevent solvent from soaking areas you won’t service.
How do I clean the M1 Garand gas system (gas cylinder and gas plug) safely?
Remove the gas plug and use a bore brush or appropriate cleaning brush to loosen carbon inside the gas cylinder, then wipe away residue with clean patches or a rag. Use a solvent made for carbon removal, but avoid aggressive soaking of areas that don’t need it. After scrubbing, wipe thoroughly and let the parts dry, then apply a light protective coat to metal surfaces to inhibit rust. Reinstall the gas plug correctly so the M1 Garand’s operating system functions reliably.
How should I clean the bore, chamber, and muzzle of an M1 Garand without damaging it?
Push a properly sized .30-cal cleaning rod with a bore guide if available, and run solvent-soaked patches through the bore until carbon loosens. Scrub with a brass or nylon bore brush, then patch until the patches come out relatively clean, using consistent strokes to avoid scoring. Clean the chamber carefully with a chamber brush or patches and verify no fouling remains at the throat area. For the muzzle, wipe and patch to remove lead/carbon buildup, then lightly oil the metal surfaces.
Why is regular cleaning important for an M1 Garand after shooting corrosive vs. non-corrosive ammo?
Cleaning helps remove powder residue, carbon buildup, and moisture that can cause corrosion on steel parts. With corrosive primers, residue can attract moisture and quickly lead to rust, so you typically need immediate cleaning (especially the bore, chamber, and gas system areas) to neutralize salts. Non-corrosive ammo still leaves carbon and fouling that can slow cycling and increase wear, so routine maintenance remains important. Consistent care keeps the M1 Garand functioning smoothly and reduces long-term maintenance costs.
What’s the best oil and lubrication routine for an M1 Garand after cleaning?
Use a quality, firearm-safe lubricant and apply it sparingly—focus on moving metal interfaces like the bolt, operating rod contact points, and rails rather than soaking the entire rifle. After wiping clean, lightly lubricate with thin film protection, then wipe off excess to avoid attracting dirt. Many owners prefer a light coat on the exterior metal and a careful check that excess oil isn’t dripping into the gas system. The goal is reliable function with minimal fouling buildup, so your cleaning and lubrication match the M1 Garand’s operating needs.
📅 Last Updated: September 25, 2026 | Topic: how to clean an m1 garand | Content verified for accuracy and freshness.
I’m Jen Bozwell, a professional cleaning expert with more than 12 years of hands-on experience working with several cleaning service companies. Over the years, I’ve developed strong expertise in a wide range of cleaning methods, products, and techniques used in both residential and commercial spaces.
Through my work, I’ve gained deep knowledge of effective cleaning processes, stain removal, surface care, and practical step-by-step cleaning strategies that make everyday cleaning easier and more efficient.
On CleaningBro.com, I share practical cleaning guides, tips, and proven methods based on my real-world experience. My goal is to help readers understand the right way to clean different surfaces and spaces so they can keep their homes and workplaces fresh, safe, and well-maintained.