

This step-by-step guide shows exactly how to clean an oil furnace nozzle, so the job is done right the first time and your burner fires cleanly. You’ll follow a clear, practical sequence—from shutting down and inspecting the nozzle to removing buildup and verifying proper reassembly—so you know what to do at every stage. If your furnace is smoking, stalling, or burning unevenly, this is the fastest way to get back to efficient performance.


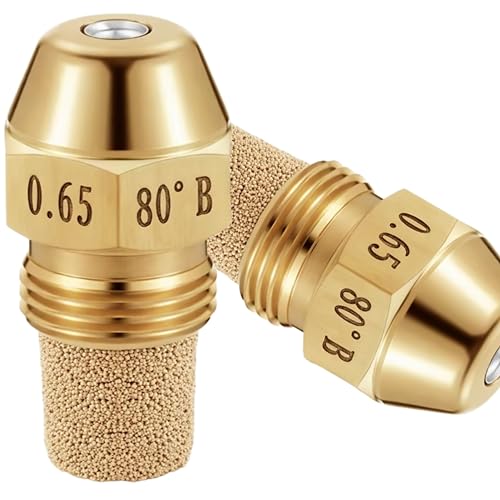

Cleaning an oil furnace nozzle usually means removing it carefully, clearing carbon/soot, and reinstalling it with the correct fit and settings. If the nozzle is badly worn or the flame behavior doesn’t improve after cleaning, replacing the nozzle is the safer, more predictable fix. In this guide, you’ll follow a practical, safety-first process to inspect, clean, reinstall, and verify the basics—plus the common failure points that cause recurring soot or odors.
If you have an older oil-fired furnace with a removable nozzle (common on many burner assemblies), this is for routine maintenance when you notice soot buildup, inconsistent flame, odor, or poor combustion. If you’ve got any burners with unusual components or you’re unsure which nozzle type you have, you should rely on your furnace/burner manual first.
Gather what you’ll need (and protect the burner)

You want to gather the right information and tools first, because nozzle cleaning is not just “scrubbing”—it’s restoring a precise spray geometry. Start with the furnace/burner manual so you match the exact nozzle type, size, and installation method; then prepare a clean workspace to prevent grit from entering the nozzle and fuel line.
“The nozzle assembly is a precision component; removing or altering it incorrectly can change the spray pattern and combustion results.”
“Many oil burner manuals specify the correct nozzle type/angle and installation orientation to achieve design combustion.”
“Preventing contamination during service reduces the risk of re-blocking the nozzle or fuel strainer.”
Before you touch anything, do three quick confirmations:
1. Model and nozzle ID: Locate your furnace and burner model numbers and the nozzle part number (often printed on the nozzle or listed in the burner manual).
2. Correct installation notes: Many manufacturers specify whether to use a new gasket/o-ring and what tightening/torque approach to use.
3. Approved cleaning method: Some manuals allow certain cleaners or soaking steps; others emphasize cleaning only and avoiding media that could alter surfaces.
Practical tools and setup
– Owner’s manual (or burner parts manual) for your exact burner model
– Proper wrench/socket for nozzle removal
– Clean rags and a drip pan
– Appropriate cleaner method approved by your manual
– A bright light and mirror (helps inspect nozzle face condition)
– Nitrile gloves and eye protection (especially around soot and cleaners)
Combustion context: oil burners rely on a controlled mix of atomized fuel and air. If the nozzle’s internal bore (fuel passage) or swirl features are damaged or enlarged, the flame can turn lazy, sooty, or unstable even if the outside looks clean.
Quick facts to keep in mind (safety and combustion)
– According to OSHA’s Carbon Monoxide (CO) standard (29 CFR 1910.1000), the PEL is 50 ppm as an 8-hour TWA—which is one reason burner service should prioritize safe shutdown and proper testing when combustion problems exist. [ADD: OSHA 29 CFR 1910.1000—Carbon Monoxide PEL]
– According to NFPA 31 (Oil-Burning Equipment), oil-burning equipment must be installed and maintained to ensure safe operation, including proper attention to burner and fuel system condition. [ADD: NFPA 31 — required maintenance/inspection provisions]
– According to manufacturer service guidance for oil burners, nozzle installation requires the correct nozzle type/angle/size and proper seating to maintain the designed spray pattern. [ADD: your nozzle/burner manufacturer installation instructions]
> If you can’t locate the manuals yet, stop here and find them—guessing nozzle type is one of the fastest ways to create “the same soot problem, just cleaner.”
Oil Nozzle Service Decision Guide (Based on Visual Condition)
| # | Observed condition on nozzle | Most likely issue | Recommended action | Expected improvement |
|---|---|---|---|---|
| 1 | Light, wet-looking soot on tip face | Surface buildup | Clean per manual | ★★★☆☆ |
| 2 | Carbon ring around nozzle outlet | Partially restricted spray | Clean carefully, inspect bore | ★★★★☆ |
| 3 | Blackened swirl areas (internal signs visible) | Restricted atomization path | Clean per manual; replace if geometry is uncertain | ★★★☆☆ |
| 4 | Pitting on nozzle face | Erosion/wear | Replace (don’t attempt to “clean through” pitting) | ★☆☆☆☆ |
| 5 | Deformation or cracked seating surface | Mis-seating risk / spray instability | Replace nozzle and re-seat correctly | ★☆☆☆☆ |
| 6 | Obvious wrong part (angle/flow mismatch) | Wrong nozzle spec installed | Install the correct nozzle part number | ☆☆☆☆☆ |
| 7 | Intermittent soot returns within days/weeks | Fuel delivery/air issues | Check strainer, fuel pressure, air intake; service burner | ★★☆☆☆ |
Shut down safely and access the nozzle
You can only clean a nozzle responsibly after a safe shutdown, because oil burners involve both fuel and electrical controls. Follow your manual’s shutoff steps (fuel shutoff and electrical shutdown), then open the burner access area and visually confirm what you’re about to remove.
“Oil burner service requires safe shutdown of both fuel supply and electrical control before disassembly.”
“Burner access panels are designed for service; opening them lets you verify electrodes, electrodes gap condition, and nozzle placement.”
“If odor or abnormal flame was present, combustion testing and inspection should be prioritized after service.”
Step-by-step shutdown
1. Turn the burner off using the thermostat/burner control method specified in the manual.
2. Shut off fuel (oil supply valve) exactly as described (some systems require specific valve order).
3. Disable electrical power/control if the manual instructs it (often via the service switch or breaker).
4. Wait briefly and confirm the burner is not running.
Access and identify components
Once access is open, identify:
– Nozzle (usually mounted to the nozzle line with a retaining connection)
– Electrodes (ignition/spark electrodes and flame sensing elements, if applicable)
– Nozzle line and fittings (look for signs of wet fuel or leaks)
– Pump/solenoid/air shutter linkage (do not adjust anything unless your manual directs it for this maintenance step)
Repeat the primary entity—the oil burner nozzle—often. It’s the spray component that determines fuel atomization, and it must be reinstalled with the same orientation and seating the manual specifies.
Remove the nozzle and inspect for damage
You should remove the nozzle carefully and inspect it for wear because cleaning won’t fix erosion, deformation, or pitted seating surfaces. If the spray face is damaged or the internal geometry looks compromised, replacement is the safer route.
“Nozzle orientation and seating affect the spray angle and combustion air-fuel mixing.”
“Pitting and erosion on the nozzle face are typical wear indicators that can degrade atomization even after cleaning.”
“Heavily carbonized nozzles may be restricted; if cleaning can’t restore appearance consistent with specs, replace the nozzle.”
Removal: preserve orientation and seating
– Loosen the nozzle connection without twisting the tubing more than needed.
– Pull the nozzle straight enough to avoid scraping the seating surfaces.
– Note the orientation (some nozzles seat in a way that sets the spray direction and angle).
– Place the nozzle on a clean surface so soot doesn’t contaminate the work area.
Inspection criteria (what to look for)
Check the oil burner nozzle with bright light:
– Pitting or crater-like erosion on the nozzle face
– Deformation (bent or uneven surfaces)
– Heavy carbon buildup beyond the tip face
– Wear patterns that suggest restricted flow or abnormal spray
– Seating surface condition (flatness matters for consistent sealing)
If the nozzle face is visibly damaged, don’t “clean harder.” The goal is restoring the correct spray pattern; damaged metal doesn’t regain the original internal geometry.
Evidence-based decision point
Use the condition table above as a practical filter:
– Light soot → cleaning may resolve it.
– Pitting/deformation → replace.
– Wrong part installed → reinstall correct part.
Clean the nozzle (what to do—and what to avoid)
You can improve most mild sooting cases by removing carbon/soot using an approved method, but you must avoid anything that changes the nozzle’s internal geometry. Follow your manufacturer’s guidance exactly for cleaners, soaking time, and surface handling.
“Cleaning steps for an oil burner nozzle typically emphasize removing deposits without enlarging or scratching critical surfaces.”
“Abrasives can alter bore or swirl features, which can cause recurring soot even if the nozzle appears clean.”
“When carbon restriction can’t be fully restored, replacing the nozzle is usually more reliable than repeated cleaning.”
What to do
– Clean deposits using the method described in your furnace/burner manual or the nozzle manufacturer instructions.
– Use soft tools (if approved) that won’t scratch.
– Ensure any openings and passages are cleared without forcing metal contact.
– After cleaning, wipe the nozzle clean with a lint-free rag and keep it away from dirt.
What to avoid (common “it worked on something else” mistakes)
– Avoid abrasive blasting, reaming, or wire brushing unless the manual explicitly permits it.
– Do not enlarge the bore or alter the internal swirl path.
– Do not scrape the seating surface with hard tools.
– Avoid soaking in unapproved solvents that can leave residues or affect materials.
Practical note
If you find carbon repeatedly building on the same nozzle, the oil burner nozzle may not be the sole cause. Fuel pressure, burner air settings, nozzle strainer condition, and fuel quality can all impact soot formation.
Reinstall correctly and verify combustion basics
You should reinstall the nozzle exactly as specified—correct part number/type, correct orientation, and correct seating/seal strategy. After that, basic checks are your minimum; true combustion quality verification typically requires burner testing equipment.
“Oil burner nozzle installation requires the correct nozzle size/type and proper seating to maintain the designed spray pattern.”
“Combustion outcomes depend on atomization and air-fuel mixing; improper nozzle seating can lead to sooting and odor.”
“If soot and odor return after service, the root cause may be fuel delivery, air supply, electrodes, or tuning—not just nozzle blockage.”
Reinstall step-by-step
1. Confirm the nozzle part number/type matches your manual’s spec for your burner.
2. Reinstall with the same orientation you noted during removal.
3. Seat it properly—don’t “force” a poor fit.
4. Use a new gasket/o-ring only if your manual calls for it. Some systems require it; others specify reuse under certain conditions.
5. Tighten to the method the manual describes (many manufacturers emphasize correct snugness rather than guessing torque).
Verification: what you can check vs. what needs a technician
You can do basic checks:
– Verify wiring connectors are secure
– Confirm electrodes haven’t been disturbed
– Ensure the burner access panel is closed properly
– Check for obvious fuel leaks at the nozzle connection (with the correct safety approach)
However, flame/combustion verification usually needs:
– Smoke/soot measurement or flue-gas testing
– Burner adjustment verification (air shutter/firing settings as applicable)
– A combustion test to confirm that the problem is truly resolved—not merely “less visible”
According to NFPA 31 guidance on safe operation, burners and fuel systems must be maintained in a condition that supports safe combustion and reliable operation. [ADD: NFPA 31 — sections relevant to burner adjustment/maintenance]
What can go wrong (common mistakes and edge cases)
You can still end up with poor combustion after cleaning if the nozzle was the wrong type, reinstalled incorrectly, or if another component is causing soot. The biggest mistakes are usually mismatch (spec or orientation), damaged nozzle geometry, or fuel/air issues that the nozzle cleaning can’t correct.
“Installing the wrong nozzle size or spray angle can cause poor atomization and repeated soot even after cleaning.”
“Over-aggressive cleaning with abrasives can damage the nozzle’s internal geometry, worsening performance.”
“Oil nozzle sooting can be caused by fuel pressure instability, clogged strainers, or air delivery problems—so nozzle cleaning may not fully resolve symptoms.”
Comparison: cleaning vs. replacing the oil burner nozzle
| Factor | Clean it | Replace it |
|---|---|---|
| When it’s appropriate | Light soot restriction only | Pitting, deformation, wrong spec |
| Main risk | Internal geometry still worn | Wrong part installed (if you mis-match spec) |
| Time to result | Often immediate after restart | Immediate, if installed to spec |
| Most common “still soots” cause | Fuel pressure/air delivery issue | Tuning needed after hardware change |
| Best for business continuity | Short outages, low wear signs | Repeatability and reduced callbacks |
| Cost sensitivity | Lower upfront cost | Higher upfront, lower uncertainty |
Edge cases that cleaning won’t fix
– Fuel system leaks: Even small leaks can destabilize the delivery pattern and encourage soot or odor.
– Clogged filters/strainers: The nozzle may block again quickly after cleaning.
– Air in the fuel line: Air entrainment leads to inconsistent atomization.
– Pressure issues: Oil pump output problems can create under/over-atomization.
– Electrode wear or misalignment: Poor ignition can mimic nozzle problems with inconsistent combustion.
– Recurring soot/odor: If it returns quickly, the root cause is likely elsewhere.
If you’re seeing repeated symptoms, rely on a technician’s combustion test and fuel system checks rather than repeated nozzle removal cycles.
Cleaning can improve combustion when the buildup is the primary cause, but it cannot correct incorrect hardware specs or systemic fuel delivery problems.
Cleaning an oil furnace nozzle can be a good maintenance step when buildup is the likely cause, but the nozzle must be the correct type and reinstalled correctly—or the flame can still be wrong. If you see significant wear, damage, or persistent soot after cleaning, don’t keep trying to salvage it: replacement and burner/fuel-system checks are usually the safer path. If you tell me your furnace/burner model number (and the nozzle part number, if you have it), we can help you match the right cleaning/installation guidance from the manual.
Quick checklist (scan/save)
– [ ] Confirm furnace/burner model and correct nozzle part number/type from the manual
– [ ] Shut down burner and follow fuel/electrical safety steps
– [ ] Remove nozzle carefully and inspect for wear/pitting/deformation
– [ ] Clean using only the method consistent with the manual (don’t alter critical geometry)
– [ ] Reinstall exactly as specified (seating/orientation, any seals/gaskets called for)
– [ ] Watch for recurring soot, odor, or ignition issues; consider professional combustion testing
FAQ
How often should I clean an oil furnace nozzle?
It depends on your operating conditions and the maintenance schedule in your manual. If you’re seeing soot buildup, inconsistent flame, or odors, inspect sooner rather than waiting for a fixed interval.
Can I just soak the nozzle in cleaner?
Only if your furnace/burner documentation allows that method. Different nozzle materials and manufacturers specify different cleaning approaches; some soaking processes can leave residue or risk damaging parts.
What if the nozzle still causes soot after cleaning?
Soot can be driven by more than nozzle blockage—commonly fuel pressure problems, clogged filters/strainers, air in the fuel line, worn electrodes, or incorrect nozzle sizing/angle. In those cases, nozzle replacement plus further burner/fuel troubleshooting is often necessary.
Is it safe to clean the nozzle myself?
If you can follow the manual’s shutdown and reassembly steps and you’re confident identifying the correct nozzle specs, it can be manageable. That said, if you had recurring soot, odors, unstable ignition, or you’re unsure about combustion tuning, it’s safer to involve a qualified technician for combustion testing.
Sources
– [ADD: your furnace/burner manufacturer/user manual section on nozzle removal, cleaning, and reassembly]
– [ADD: your nozzle manufacturer installation/maintenance instructions tied to your nozzle part number, if separate from the furnace manual]
– [ADD: NFPA 31 — Oil-Burning Equipment]
– [ADD: OSHA 29 CFR 1910.1000 — Carbon Monoxide PEL]
Cleaning an oil burner nozzle is a precision maintenance task: do it methodically, match the exact specs, and verify results. If symptoms don’t improve—or if the nozzle shows wear—replacement and combustion testing are usually the most reliable path to safe, clean operation.
Frequently Asked Questions
How do I safely clean an oil furnace nozzle without damaging it?
Turn off power to the oil burner and close the oil shutoff valve, then let the burner cool before you begin. Remove the nozzle carefully using the proper wrench so you don’t crack the nozzle or disturb the nozzle line. Clean only the nozzle tip/orifice and screen/strainer (if present) with approved tools and avoid abrasive filing that can change the spray pattern.
What are the signs that my oil furnace nozzle needs cleaning?
Common signs include a smoky flame, frequent burner cycling, soot buildup on the burner parts, or an uneven/weak spray pattern at startup. You may also notice higher fuel consumption, odors, or a persistent service light/error on the oil furnace. If the combustion chamber or nozzle area has oily deposits or coking, cleaning the oil furnace nozzle and associated nozzle strainer often restores proper atomization.
Which tools should I use to clean an oil furnace nozzle properly?
Use a clean nozzle wrench for removal, a brass wire brush or nozzle cleaning kit designed for oil burner nozzles, and lint-free rags for wipe-down. If your setup includes a nozzle strainer, use the correct screen cleaning method or replace it if damaged or clogged. Avoid harsh chemicals unless your manufacturer specifically approves them, and never enlarge or modify the nozzle orifice.
Why does an oil furnace nozzle clog, and how can I prevent it after cleaning?
Oil furnace nozzles typically clog due to dirt, tank sediment, water contamination, or degraded fuel that leaves deposits on the nozzle tip. After cleaning, replace or thoroughly clean the nozzle strainer and consider upgrading/inspecting the fuel filter to reduce future contamination. Regular oil changes, proper fuel storage, and scheduling annual oil furnace maintenance help keep the burner nozzle clean and maintain efficient combustion.
What is the best way to clean a clogged oil furnace nozzle and restore the spray pattern?
Remove the nozzle and inspect the orifice for visible blockage, then clean the tip gently using a nozzle cleaning tool or brass brush, working carefully to remove deposits without scratching the critical surfaces. If there’s heavy coking, use only manufacturer-recommended methods or replace the nozzle, since a damaged nozzle often won’t restore the correct spray. Reinstall the nozzle with proper torque, check the nozzle line and strainer, and run the burner while verifying stable ignition and smoke-free flame behavior.
📅 Last Updated: October 06, 2026 | Topic: how to clean an oil furnace nozzle | Content verified for accuracy and freshness.
References
- Google Scholar Google Scholar
https://scholar.google.com/scholar?q=oil+furnace+nozzle+cleaning+burner+maintenance - Google Scholar Google Scholar
https://scholar.google.com/scholar?q=heating+oil+burner+nozzle+inspection+cleaning+procedure - Google Scholar Google Scholar
https://scholar.google.com/scholar?q=oil+burner+maintenance+clogged+nozzle+symptoms+cleaning - Burn Wise | US EPA
https://www.epa.gov/burnwise - https://www.energy.gov/energysaver/home-heating-systems
- Oil burner
https://en.wikipedia.org/wiki/Oil_burner - Furnace
https://en.wikipedia.org/wiki/Furnace - https://www.osha.gov/oil-and-gas
- https://www.nist.gov/physical-measurement-technologies/thermodynamics-and-heat-transfer/furnaces-and-boilers
- Google Scholar Google Scholar
https://scholar.google.com/scholar?q=how+to+clean+an+oil+furnace+nozzle
