
How to Clean Keyboard Floors
To clean your keyboard floor, start by unplugging the keyboard and clearing the area. Use a soft brush or compressed air to remove dust and debris between keys. Choose a gentle, eco-friendly cleaner suited for your floor type and wipe with a microfiber cloth. After cleaning, let it dry completely in a well-ventilated spot to prevent moisture damage. Regular dusting and protective mats can help maintain cleanliness. Keep going to discover easy steps and tips for lasting upkeep.
Tools Needed for Cleaning Keyboard Floors
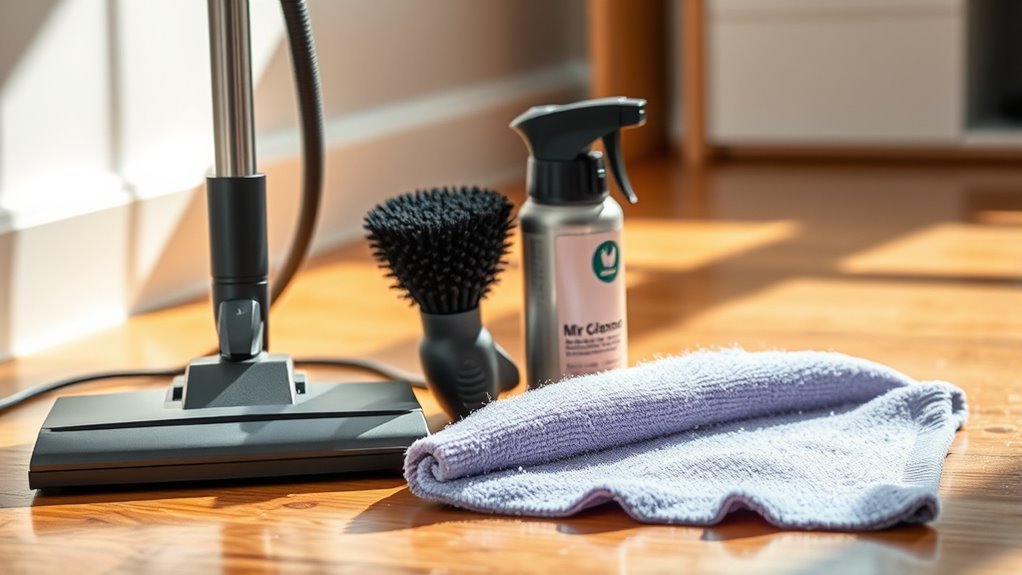
Before you begin cleaning keyboard floors, you’ll want to gather a few essential tools to make the job easier and more effective. Having the right keyboard cleaning tools on hand means you won’t be held back by unnecessary hassle. Start with a soft-bristled brush or microfiber cloth to gently remove dust and debris from the keys without causing damage. A vacuum with a brush attachment is a smart choice for thorough floor maintenance essentials, helping you reach tight spaces. Don’t forget compressed air to blow out stubborn particles stuck between keys. For the floor beneath, a mop or floor cleaner suited to your surface type guarantees you can maintain cleanliness without restriction. With these tools, you’re set to take control and keep your keyboard floors spotless with freedom and ease.
Preparing the Area for Cleaning
To prepare the area for cleaning, start by unplugging your keyboard and clearing the surrounding space to prevent any accidents or damage. This simple step sets the stage for effective cleaning preparation and helps maintain safe area organization. Next, remove any nearby objects or cables that might get in your way. You want a clear, open workspace that lets you move freely without restrictions. Good area organization not only keeps your equipment safe but also speeds up the cleaning process. Make certain you have your cleaning tools within reach to avoid unnecessary interruptions. Taking a moment for proper cleaning preparation guarantees you have full control over your environment, allowing you to clean your keyboard floor efficiently and without hassle.
Removing Loose Debris and Dust
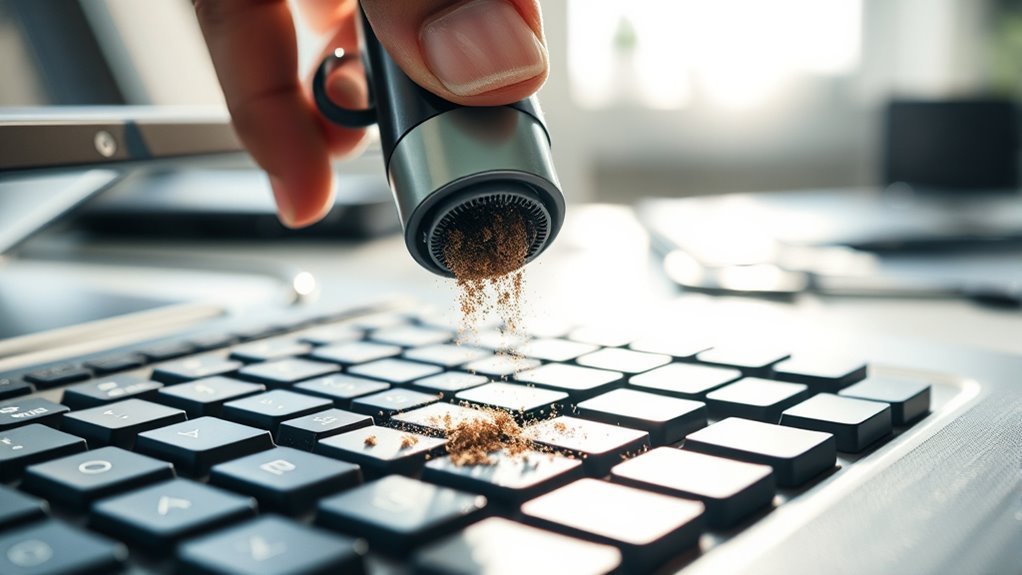
Start by gently shaking or flipping your keyboard to dislodge any loose debris hiding between the keys. This simple move frees keyboard crumbs and dust particles that tend to accumulate unnoticed. Next, use a can of compressed air or a soft brush to sweep away remaining dust particles without damaging the keys. Don’t rush—take your time to reach every crevice. You want to clear out all the dirt that can block key movement and affect performance. Removing these loose particles not only keeps things tidy but also extends your keyboard’s life, giving you the freedom to type without interruptions. Remember, a clean keyboard floor starts with a debris-free surface, so make this step your foundation before moving on to deeper cleaning methods.
Choosing the Right Cleaning Solution
While selecting a cleaning solution might seem straightforward, choosing the right one is essential to avoid damaging your keyboard floor. You’ll want to steer clear of harsh chemicals that can erode the surface or leave harmful residues. Opt for eco-friendly cleaners—they’re gentle, effective, and respect both your floor and the environment. If you prefer commercial solutions, pick those specifically designed for delicate flooring to guarantee they won’t cause discoloration or wear. Always check labels for compatibility with the material of your keyboard floor, and avoid anything too abrasive or oily. By carefully selecting your cleaning solution, you maintain your floor’s integrity and enjoy the freedom of a clean, safe space without worrying about unintended damage.
Step-by-Step Cleaning Process
First, you’ll want to gather all the cleaning supplies you’ll need to make the job easier. Start by removing any loose debris from the keyboard floors to prepare for a thorough clean. Then, follow some effective deep clean techniques to get your floors spotless.
Gather Cleaning Supplies
You’ll need a few essential supplies before you can effectively clean keyboard floors. Start by gathering quality cleaning products designed for electronics to avoid damage. Choose gentle, non-abrasive solutions that break down grime without leaving residue. Next, grab a couple of microfiber cloths—they’re perfect for picking up dust and smudges without scratching surfaces. These cloths also hold onto dirt, preventing it from spreading around. Having a small brush or compressed air can help reach tight spots, but focus on the cleaning products and microfiber cloths first. By prepping these supplies, you’re setting yourself up for a smooth, efficient cleaning session. This simple setup lets you maintain freedom from grime without hassle or risk to your keyboard floors.
Remove Loose Debris
Typically, the best way to start cleaning keyboard floors is by removing any loose debris. You want to liberate your space from keyboard crumbs and dust collection that limit your freedom to enjoy a clean setup. Begin by gently shaking or tapping your keyboard over a trash bin. Use a soft brush or compressed air to sweep away remaining particles.
| Step | Action |
|---|---|
| 1 | Turn keyboard upside down |
| 2 | Gently tap to release crumbs |
| 3 | Use soft brush for dust collection |
| 4 | Blow compressed air between keys |
| 5 | Inspect for remaining debris |
This method gives you control over the mess without damage, setting the stage for a fresh, free workspace.
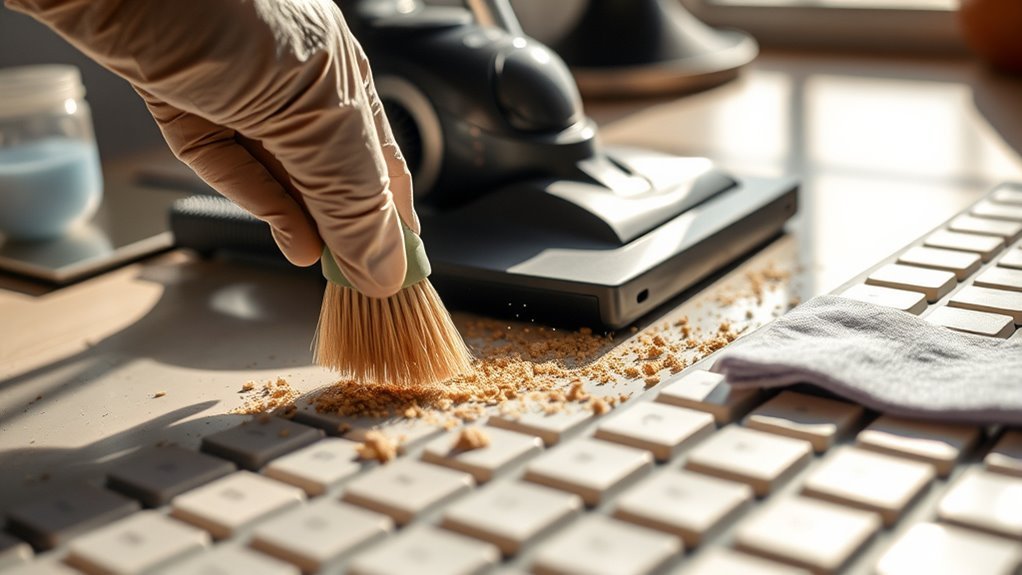
Deep Clean Techniques
After clearing away the loose debris, it’s time to tackle the deeper layers of dirt and grime that settle beneath the keys. Start by gently removing the keycaps with a key puller if possible; this gives you access to hard-to-reach spots. Use a soft brush or compressed air to dislodge dust and particles. Next, apply a mild cleaning product—preferably one made for electronics—on a microfiber cloth to wipe down the surface and keycaps. Avoid harsh chemicals that could damage components. Let everything dry fully before reassembling. To maintain freedom from sticky buildup and keep your keyboard floors pristine, stick to a consistent cleaning frequency—ideally once a month or more if you use your workspace heavily. This routine saves you from tedious deep cleans later on.
Dealing With Stubborn Stains
When stubborn stains won’t budge with regular cleaning, you’ll need to try more effective stain removal techniques. Choosing safe cleaning solutions is key to protecting your keyboard floors while tackling tough spots. Let’s explore how to handle these stains without causing damage.
Effective Stain Removal
Stubborn stains on keyboard floors can be tricky, but tackling them early makes a big difference. Understanding different stain types—like ink, grease, or food spills—helps you choose the right approach. The key is not to wait; regular cleaning frequency prevents stains from setting deep, giving you more freedom to enjoy your space without constant worry.
When you spot a stain, act quickly with gentle blotting instead of rubbing, which might spread it. Identify the stain type to decide whether a mild detergent or a simple water wipe will do. Consistency in your cleaning routine keeps stains manageable and your keyboard floors looking fresh. With the right timing and technique, you’ll reclaim your freedom from stubborn marks swiftly and effectively.
Safe Cleaning Solutions
Although tough stains can test your patience, choosing safe cleaning solutions guarantees you don’t damage your keyboard floors while tackling them. You want to keep your space fresh without harsh chemicals, so eco friendly products are your best bet. They’re gentle on surfaces and the environment, giving you freedom from worry. If you’re up for it, homemade cleaners are a fantastic alternative—simple blends like vinegar and water or baking soda paste work wonders on stubborn marks. Just apply lightly, let it sit briefly, then wipe clean. Avoid abrasive scrubbing that could scratch the flooring. By sticking to safe, green options, you protect your keyboard floors and maintain a healthy space, letting you enjoy a spotless, worry-free environment without compromising your values.
Drying and Airing Out the Keyboard Floor
After cleaning, you’ll want to let your keyboard floor dry completely to prevent moisture damage or mold growth. Good air circulation is key here—it helps control moisture and speeds up drying. Find a spot where fresh air flows freely, like near an open window or a fan. Avoid trapping dampness by keeping doors open to encourage airflow. You might picture:
Let your keyboard floor dry fully with fresh air to avoid moisture damage and mold growth.
- A gentle breeze wafting across the floor
- Sunlight filtering through a window, warming the surface
- A small fan quietly circulating air around
This simple step frees your keyboard floor from lingering dampness, protecting it and maintaining its cleanliness. By mastering moisture control through proper drying and airing out, you’re ensuring your space stays fresh and damage-free—giving you the freedom to focus on what truly matters.
Preventative Measures to Keep Keyboard Floors Clean
To keep your keyboard floors clean, you’ll want to establish a regular dusting routine that prevents buildup. Using protective floor mats can also catch dirt before it reaches the surface. These simple steps save you time and effort in the long run.
Regular Dusting Routine
Establishing a daily dusting routine can make a big difference in keeping your keyboard floors clean and free from debris. When you commit to regular dust accumulation prevention, you’ll enjoy a cleaner space that supports your freedom to focus and create. Here are some keyboard hygiene tips to help you stay on top of dust:
- Use a soft microfiber cloth to gently wipe the floor around your keyboard, capturing fine dust without scratching.
- Employ a handheld vacuum with a brush attachment for quick, thorough dust removal in hard-to-reach spots.
- Lightly mist a cloth with a gentle cleaner to remove stubborn dust without leaving residue.
Protective Floor Mats
Protective floor mats can help you cut down on dirt and damage around your keyboard area. Choosing the right floor mat materials is key; options like rubber, vinyl, or fabric each offer unique benefits. To keep them effective, regular mat cleaning techniques such as vacuuming, wiping, or washing are essential. Here’s a quick guide to help you pick and maintain your mat:
| Material | Durability | Cleaning Method |
|---|---|---|
| Rubber | High | Wipe with damp cloth |
| Vinyl | Medium | Mop with mild soap |
| Fabric | Low | Vacuum, machine wash |
| Polyurethane | High | Wipe, mild detergent |
| PVC | Medium | Wipe or mop gently |
Using mats frees you from constant floor scrubbing, preserving your space and your freedom to focus on what matters.
Tips for Regular Maintenance
Although keyboard floors are designed to withstand heavy use, you’ll want to keep up with regular maintenance to preserve their appearance and functionality. Staying proactive with keyboard maintenance tips can save you time and hassle. Simple dusting techniques done frequently prevent buildup and keep your floors looking fresh.
Here are some easy ways to maintain your keyboard floors:
- Use a soft-bristle broom or vacuum with a brush attachment to gently clear dust and debris.
- Wipe spills immediately with a damp cloth to avoid stains.
- Apply a mild floor cleaner regularly to maintain shine without damaging the surface.
Signs It’s Time for a Deep Clean
When you notice persistent dirt, discoloration, or a dull finish on your keyboard floors despite regular upkeep, it’s a clear sign that a deep clean is needed. You might also spot accumulated grime in hard-to-reach crevices or experience a lingering odor, both indicating that your usual cleaning frequency isn’t enough. Maintaining good keyboard hygiene isn’t just about appearances—it helps prevent wear and guarantees a healthier environment. If you’re finding that your standard routine isn’t cutting it anymore, it’s time to step up your cleaning game. Don’t wait until buildup becomes overwhelming; recognizing these signs early allows you to reclaim the freedom of a spotless, smooth surface. Deep cleaning keyboard floors occasionally keeps them durable and looking fresh, complementing your desire for effortless upkeep.
Frequently Asked Questions
Can Keyboard Floors Be Cleaned With a Steam Cleaner?
You might wonder if a steam cleaner’s the way to go. Steam cleaner benefits include deep sanitizing without harsh chemicals, which sounds great for freedom from toxins. But you’ve got to take steam cleaning precautions—too much moisture can damage sensitive surfaces or electronics. So, if your keyboard floors can handle moisture, a steam cleaner can work, but always test a small spot first to keep your space safe and fresh.
Are There Eco-Friendly Cleaning Solutions for Keyboard Floors?
You’re in luck—there are plenty of eco-friendly options to keep your keyboard floors spotless. Natural cleaners like vinegar, baking soda, and lemon juice work wonders without harsh chemicals. You can even whip up DIY solutions mixing these ingredients with water for a safe, effective clean. Choosing natural cleaners not only protects your space but also gives you the freedom to clean confidently, knowing you’re kinder to the environment.
How Often Should Keyboard Floors Be Professionally Cleaned?
It’s funny how your busy schedule and cleaning needs often align—coincidence or not, frequency recommendations suggest professional cleaning every 6 to 12 months keeps your space fresh and inviting. If you crave freedom from constant upkeep, setting clear cleaning schedules helps you balance cleanliness without feeling trapped. By sticking to these intervals, you reclaim your time while ensuring a pristine environment, letting you focus on what truly matters without worrying about hidden grime.
Can Cleaning Damage the Electronic Components Beneath Keyboard Floors?
You might worry that cleaning could damage the electronic components beneath keyboard floors, but with proper keyboard maintenance, you don’t have to. Using gentle cleaning techniques, like avoiding excessive moisture or harsh chemicals, helps protect sensitive parts. Stick to recommended methods and tools, and you’ll keep your keyboard floors safe and functional. This way, you enjoy freedom from damage and prolonged device life without stress or restrictions.
Is It Safe to Use Abrasive Tools on Keyboard Floors?
You shouldn’t use abrasive tools on keyboard floors because they can scratch or damage the surface. While you want to keep things clean, it’s better to stick with gentle cleaning techniques that won’t harm the material or the electronics underneath. If you’re aiming for freedom in maintaining your device, choose soft cloths or brushes instead, ensuring your keyboard stays both functional and looking great without risking damage from harsh tools.


