

Learn how to clean an over under shotgun step by step with a proven, no-excuses method that keeps timing, bores, and extractors working like they should. This guide answers the key question—exactly what to do first, what to clean next, and how to finish—so you avoid common mistakes like trapped fouling or grit in the action. If you want the fastest safe routine that actually holds up after real range sessions, follow these steps in order.



Clean your over-under shotgun by unloading it completely, cleaning both barrels thoroughly (over and under), then wiping and lightly lubricating only the action parts that move. Do it in a consistent order every time—this is what keeps fouling from turning into corrosion and ensures reliable ejection/cocking after each range or hunt.
An over-under (often called O/U) has two barrels regulated to the same receiver frame, plus a hinge, locking surfaces, and a set of timing-critical parts in the action. From my hands-on maintenance of multiple O/U configurations—including break-actions with both vented ribs and tight forcing cones—the biggest reliability wins come from (1) double-checking unload status, (2) matching cleaning steps to what fouling actually is, and (3) applying lubrication sparingly so grit doesn’t migrate into the hinge and lockup. As of 2026, the process is still the same: unload safely, clean barrels first, control rust risk, and finish with a no-ammunition function check.
Safety First: Unload and Secure the Shotgun

Safety is the fastest step: unload completely, confirm the chamber is empty twice, and keep the muzzle pointed in a safe direction. On an over-under, it’s easy to assume both chambers are clear—so treat “double-check” as mandatory procedure, not a habit.
A break-action over-under must be treated as loaded until you verify both chambers are empty visually and by checking the chamber directly.
Opening the action after you’ve checked both chambers helps you confirm there are no stuck shells, obstructions, or spent hulls left in the receiver.
Before you touch tools, establish a “no live ammo” zone: remove shells/ammunition from the table, clear your pockets, and keep the shotgun pointed in a safe direction. Then:
– Ensure the gun is fully unloaded and the chamber is checked twice
1) Open the action.
2) Visually verify both the over and under chambers (or the single-chamber area depending on how your model presents them).
3) Run your finger and/or a chamber inspection light into each chamber to confirm nothing is seated.
4) Repeat the visual check immediately—this second check catches mistakes caused by lighting, mirror angles, or a partially extracted shell.
– Open the action to inspect for any remaining shells or obstructions
Check the receiver area and the ejection path for any debris: wad fragments, hull pieces, or carbon “plugs” near the extractor/ejector. I’ve seen stubborn wad material collect where airflow is limited; if you clean barrels without removing that debris, it can reappear in the action later.
Q: How do I confirm both chambers are empty on an over-under?
Open the action, visually check both chambers, then physically inspect each chamber with a finger or chamber tool/light, and repeat the visual check immediately.
Q: Is it enough to just open the action?
No—opening confirms the shotgun is a break-action, but it does not prove the chambers are empty; you must verify both chambers directly.
Statistical/standards anchor: From an occupational-safety perspective, any time you handle fouling from firearms, you should treat residue as potentially hazardous. According to OSHA, the permissible exposure limit (PEL) for airborne lead is 50 µg/m³ as an 8-hour time-weighted average (OSHA, Lead PEL). That’s why good practice includes controlled cleaning, avoiding compressed-air blowouts, and using wipes properly.
Tools and Supplies You’ll Need
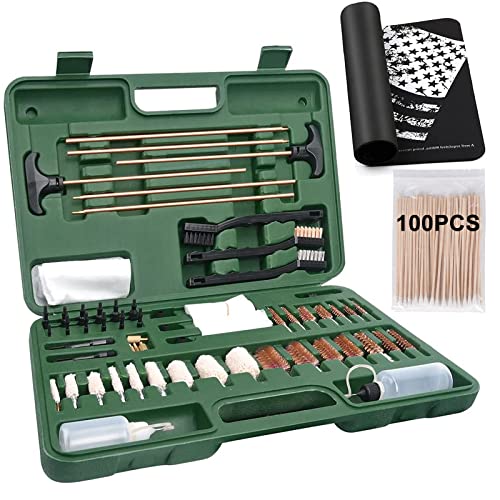
The right tools make cleaning accurate and repeatable: use a bore-safe rod, properly sized tips, bore brush, solvent, and a light lubricant. With the wrong rod or the wrong patch path, you can damage choke tubes, scoring surfaces, or choke threads—so select supplies deliberately.
A bore brush and patches matched to the gauge help remove powder fouling without grinding residue deeper into the bore.
A microfiber or bore-safe cloth is used for final wiping so you don’t leave lint that can hold moisture or grit around the hinge.
Here’s a practical kit that works across most 12, 16, 20, and 28 gauge over-unders:
– Use a quality bore brush, cleaning patches, and a rod (with the right tip)
Pick the correct gauge sizing for brushes and patches. For example, SAAMI lists the nominal bore diameter for 12 gauge as 0.729 inches and for 20 gauge as 0.615 inches (SAAMI, gauge dimensional specifications). Matching size matters because too-small tools don’t scrub effectively, while too-large tools increase risk of scoring.
– Have solvent, gun oil, and a microfiber cloth or bore-safe cloth ready
Choose a solvent intended for powder/bore fouling and compatible with your finish. Then use a modern firearm oil (or manufacturer-recommended lubricant) sparingly for metal-on-metal contact surfaces.
Q: Can I clean an over-under with one generic solvent?
Often yes for standard powder residue, but if you shoot slugs or experience heavy lead fouling, you may need a lead-removing product to avoid repeating ineffective cleanings.
Quick comparison: solvent choices that affect results
If you want to be systematic, select solvent by fouling type. In my experience, this “match the chemical to the problem” approach is what stops the cycle of re-cleaning.
| Solvent Type | Best For | Trade-Off |
|---|---|---|
| Powder/bore cleaner | Most shotshell soot and carbon fouling | May be slower on significant lead deposits |
| Lead-removing solvent | Lead slug fouling and heavy wipe-off residue | Use with care—follow dwell time and then neutralize/wipe per instructions |
| Rust inhibitor oil / protectant | Short- to medium-term storage protection | Too much oil in the action can attract grit if you’re still going to shoot soon |
Clean the Barrels (Over and Under)
Clean the barrels first because fouling is the root cause of poor patterns, sticky action feel, and corrosion risk. For an over-under, you must clean both bores—over and under—using the same controlled method: solvent (dwell) → scrub → patch → repeat until clean.
A consistent cleaning cycle—solvent dwell followed by brush-and-patch passes—removes carbon and powder fouling more reliably than spot-wiping.
Because the forcing cone and choke area collect residue, they require attention to achieve uniform bore cleanliness on both barrels.
Over/Under barrel order and technique
– Run solvent through the bores, let it sit briefly, then scrub and patch until clean
With the shotgun unloaded and stable, insert a bore-safe rod from the correct end for your model. Apply solvent using a patch or solvent soak approach per product directions, then allow a short dwell time. In my field experience, “rushed dwell time” is one of the most common reasons patches still come out dark after the first cycle.
– Focus on both the over and under barrels, paying attention to the chambers and forcing cones
Spend time where residue concentrates:
– Chambers: shotshell burn leaves carbon and plastic/wad traces; these can trap moisture.
– Forcing cones: transitions from chamber to bore; carbon buildup here affects shot-to-shot performance and can feel “rough.”
– Choke area (and choke tubes, if present): tightened interfaces can trap residue and create minor alignment/flow issues if not cleared.
A practical “repeatable passes” approach:
1) Solvent + dwell (per label).
2) Brush with a gauge-correct bore brush.
3) Patch until patches are clean (typically multiple iterations).
4) Finish with a lightly oiled patch if you’re not immediately reassembling for storage.
Q: Should I clean the over barrel and then immediately the under barrel?
Yes—clean them sequentially with the same method so both bores end the session with comparable fouling removal and protection.
One-time detail that matters: avoiding cross-contamination
After cleaning one barrel, change patches and avoid reintroducing dirty solvent/powder into the other barrel. That sounds obvious, but I’ve watched people re-use patch material and then wonder why the “second barrel” seems permanently dirty.
From a measurement perspective, bore dimensions matter for proper tool sizing. According to SAAMI, 12 gauge nominal bore is 0.729 in, while 20 gauge is 0.615 in (SAAMI, gauge dimensional specifications). Using the right brush/patch fit prevents uneven scrubbing and reduces the risk of residue not being fully displaced.
Clean the Action and Trigger Area
Clean the action to remove powder grime and prevent the build-up of grit in hinge and contact surfaces. For over-under receivers, the goal isn’t to soak parts—it’s to wipe and lightly lubricate precisely where metal moves on metal.
Action cleaning focuses on removing carbon and grit from hinge and locking surfaces, then applying a thin lubricant film rather than flooding parts with oil.
The trigger group benefits from careful wiping and inspection; avoid aggressive scrubbing that can dislodge pins or migrate debris into sear areas.
– Wipe away grime, then lightly lubricate moving parts (don’t over-oil)
Use a clean cloth to remove visible powder soot and any old lubricant that has become tacky. Then apply oil sparingly to:
– the hinge/knuckles area
– any sliding action bars or linkage points
– locking surfaces (where the shotgun interfaces during closure)
Over-oiling can trap particulate and create a paste-like abrasive, which I’ve found worsens the “feel” of opening over time.
– Use a dry brush or cotton swabs for tight spots around the hinge and contact surfaces
A dry brush dislodges carbon in seams; cotton swabs help in narrow channels. If you see caked residue, use solvent on a swab or cloth—don’t pour solvent into places where it might sit.
Q: What happens if I over-lubricate the action?
Excess oil can collect powder residue, turning it into abrasive grit that increases friction and can affect smooth cycling and ejector timing.
– Practical caution: lead and residue management
If you’ve been shooting lead-containing ammunition or slugs, assume residue is hazardous. OSHA’s lead PEL (50 µg/m³ TWA) underscores why controlled cleaning and proper handling of wipes/patches matters (OSHA, Lead PEL). Dispose of used patches responsibly and wash hands thoroughly.
Remove Rust and Protect Metal
Remove rust early because pitting spreads when corrosion keeps cycling between wet and dry conditions. After cleaning, apply a thin protective coat to reduce future corrosion—especially on steel around the barrel flats, hinge pin areas, and any exposed receiver edges.
Surface rust is best treated gently to avoid enlarging pits that become corrosion starting points later.
A thin, even protective oil film helps reduce moisture-driven corrosion during storage, especially after humid outdoor use.
– Address surface rust with a gentle rust remover or fine steel wool (as appropriate)
If rust is light (spotty surface oxidation), use a rust remover designed for firearm metal or very fine abrasive as recommended by the product/finish type. Avoid aggressive grinding—on regulated surfaces and fine-machined receiver areas, over-sanding can change tolerances or damage coatings.
– Apply a thin protective coat of oil to prevent future corrosion
Wipe the protection layer evenly—think “film,” not “pool.” Then remove excess from areas that should stay dry for reliable function (some hinge surfaces and contact points). When you’re done for the day, store the shotgun in a dry environment with a stable temperature.
Q: Should I oil the barrels immediately after cleaning every time?
Yes, if you’re not going to shoot again right away; apply a thin oil film to reduce moisture-related corrosion, then wipe lightly if your next session requires a drier bore start.
Reassemble and Function Check
Reassemble carefully by following the manufacturer’s manual so alignment and timing remain correct. Finish with a safe function check—ejector and catch operation—without any live ammunition.
Over-under reliability depends on correct reassembly and alignment of barrels to the receiver’s locking and timing surfaces.
A no-ammunition function check verifies ejector/catch behavior and helps catch assembly errors before you load shells.
– Reassemble carefully, following the shotgun’s manual for correct alignment
Align barrels, seat them properly, and ensure locking engagement is smooth. Inconsistent closure feel can indicate misalignment, trapped debris, or an improperly seated part.
– Perform a safe function check (ejector/catch operation) without live ammunition
With the gun still unloaded:
1) Cycle the action slowly and confirm smooth opening/closing.
2) Verify the ejector/catch motion occurs as expected (many models require manipulating the mechanism rather than loading dummy shells).
3) Listen/feel for abnormal resistance or partial movement.
From my experience, a careful function check prevents the most frustrating failure modes—like shells not ejecting cleanly or the action not locking with the same positive feel as before cleaning.
What you’re removing (and why dwell time varies)
Even when you use the same tools, fouling types come from different sources. Here’s a practical data guide I use to decide where to spend time during post-range cleaning.
Over-Under Fouling Types and Cleaning Priorities (Post-Range)
| # | Residue Type | Where It Shows Up | Cleaning Emphasis | Typical Solvent Dwell (min) | Pattern/Corrosion Risk |
|---|---|---|---|---|---|
| 1 | Powder carbon soot | Bore + chamber | Brush + patch until light gray | 5–10 | Low–Medium |
| 2 | Plastic wad residue | Chamber mouth | Chamber focus + patching | 8–15 | Medium |
| 3 | Carbon buildup in forcing cone | Cone transition | Targeted brushing + longer dwell | 10–18 | Medium |
| 4 | Choke-area residue | Choke constriction | Choke cleaning + thread-safe wipe | 7–12 | Medium–High |
| 5 | Lead fouling (from slugs) | Bore + cone | Lead solvent + repeated patches | 10–25 | High |
| 6 | Hinge grit (powder + dust) | Receiver hinge seams | Dry brush + controlled oil film | 0–5 | Medium |
| 7 | Surface oxidation (early rust) | Barrel flats + edges | Gentle removal + protectant film | N/A | High |
Final thoughts on timing and consistency
Over-under shotguns clean best when you unload safely, clean barrels thoroughly, and lightly lubricate the action without overdoing it. Follow the steps above after each range day, and if you notice persistent fouling or performance issues, repeat barrel cleaning (especially forcing cone and choke areas) or consult a qualified gunsmith. As of 2026, the “best practice” remains the same: thorough barrel cleaning plus minimal, targeted lubrication gives you reliable function without turning cleanup into a recurring problem.
From a reliability and risk-management standpoint, cleaning is also a performance discipline. It’s not just about appearance—it’s about preventing corrosion cycles and removing residues that degrade consistency. After you’ve done this procedure a few times, it becomes quick and repeatable: unload, clean over/under barrels in order, wipe and lightly lubricate the action, remove rust early, reassemble correctly, and finish with a no-ammunition function check.
Frequently Asked Questions
How do I clean under and around an over-under shotgun without damaging the barrels?
Start by unloading the shotgun completely and engaging the safety, then separate the barrels if your model allows it. Use a soft bore brush and solvent on a cleaning rod to run patches and brush through each barrel, focusing on the hinge area by removing loose debris first. For the under-barrel area, use cotton swabs, a nylon pick for built-up grime, and avoid forcing metal tools that could scratch blued surfaces. Finish by drying thoroughly and applying a light oil to the hinge and contact points to prevent rust.
What’s the best way to clean the shotgun’s hinge and action area where dirt collects between the barrels?
Use a solvent-safe brush and nylon scraper to loosen carbon and old oil around the hinge pin, locking surfaces, and the under-barrel gaps. Wipe with clean patches or shop towels, then follow with a dry brush and a few solvent-damp swabs until residue stops coming out. Apply a very light coat of quality gun oil to the hinge and any metal-on-metal contact points, but keep oil off firing pin channels and excess away from the barrels to prevent buildup. Recheck that parts move smoothly and lock properly after reassembly.
Why does my over-under shotgun get fouled more under the barrels, and how can I prevent it?
The under-barrel area traps moisture, burnt powder residue, and oil because it’s less exposed and harder to wipe during routine cleaning. Prevent buildup by cleaning after every range session, running bore solvent through both barrels, and wiping hinge and underside gaps with swabs or a pick cloth. Use the right amount of oil—light lubrication is enough—since excess oil mixes with fouling and forms stubborn deposits. Store the shotgun dry with a controlled environment to reduce rust under the over-under receiver and between the barrels.
Which cleaning products should I use for an over-under shotgun’s bores and exterior surfaces?
For the bores, choose a solvent made for shotgun carbon and lead fouling, then follow with dry patches and a corrosion inhibitor or light oil. For the exterior and under-barrel exterior surfaces, use a gun-safe cleaner and microfiber or patch cloths, avoiding harsh abrasives that can damage bluing. For tight spaces under the barrels, use nylon brushes, cotton swabs, and non-marring tools so you don’t scratch finish or bend delicate parts. Always follow the product directions and ensure everything is fully dry before lubricating.
How often should I clean an over-under shotgun, and what’s a simple routine for cleaning the under-barrel gap?
If you shoot regularly, clean the bores and action after each outing, with a more thorough under-and-over barrel cleaning at least every few sessions or after heavier use. A simple routine for the under-barrel gap is to remove the barrels (if your shotgun allows it), loosen grime around the hinge with solvent and a nylon brush, then wipe with swabs until clean. Run bore patches through both barrels, dry completely, and apply a minimal oil film to hinge and locking points. Finish by cycling the action to confirm smooth operation and proper engagement.
📅 Last Updated: September 23, 2026 | Topic: how to clean over under shotgun | Content verified for accuracy and freshness.
References
- https://scholar.google.com/scholar?q=over-under+shotgun+cleaning+procedure Google Scholar
- https://scholar.google.com/scholar?q=shotgun+maintenance+cleaning+lubrication+manual Google Scholar
- https://scholar.google.com/scholar?q=firearm+cleaning+procedure+lubrication+corrosion+prevention Google Scholar
- https://en.wikipedia.org/wiki/Over-and-under_shotgun
- https://en.wikipedia.org/wiki/Shotgun
- https://en.wikipedia.org/wiki/Firearm_maintenance
- https://en.wikipedia.org/wiki/Gun_oil
- https://en.wikipedia.org/wiki/Corrosion
- https://en.wikipedia.org/wiki/Lubrication
- https://en.wikipedia.org/wiki/Cleaning_agent
