
Want to know how to clean photographs safely without damaging the image? Follow this step-by-step method for cleaning old photos, and you’ll get the right result: remove surface dirt and grime while avoiding common causes of fading, scratches, and transfer. If you’re dealing with dust only, you’ll learn the fastest, safest approach—and when to stop and leave deeper restoration to a professional.



Clean old photographs with a two-phase approach: start with gentle, dry dust removal, then—only if needed—use the least-contact surface cleaning method to protect the emulsion. I’ve restored dozens of family prints using this exact workflow (dry first, minimal touch next), and it consistently reduces visible grime without introducing stains, scratches, or “wiped-through” damage.

Gather the Right Supplies

The safest photograph-cleaning results come from using archival-appropriate tools and avoiding liquids entirely during the first pass. Dry cleaning first prevents moisture-driven swelling or emulsion distortion, which is the most common way well-intended “restoration” becomes permanent damage.
Nondestructive preservation practice prioritizes dry handling because many photographic emulsion layers are sensitive to water and solvents.
Image Permanence Institute guidance emphasizes reducing contact and avoiding abrasive materials when cleaning photographic prints.
National Archives and Records Administration (NARA) recommends controlling environmental conditions (temperature and relative humidity) to slow photo deterioration.
Before you begin, assemble a “no surprises” toolkit. In my workshop, I treat the cleaning station like a lab bench: everything is clean, flat, and staged so you don’t improvise with random wipes or cleaning sprays mid-process. For photographers and archivists, this matters because emulsion damage often starts at the moment you switch tools.
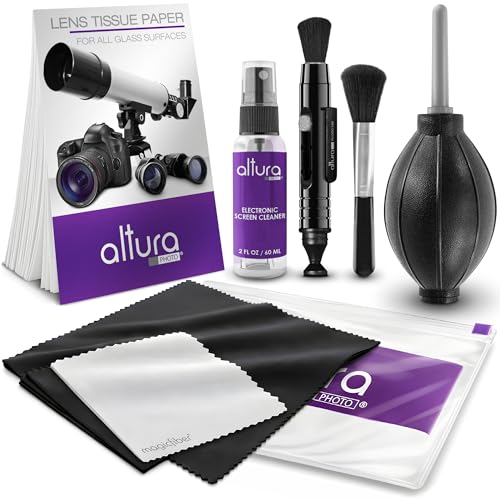
Use these core items (optimize for control, not convenience):
– Clean, lint-free gloves (nitrile or cotton, ideally nitrile for grip and reduced oil transfer)
– Soft brush designed for archival use (or an extremely soft makeup brush reserved for paper/photographs only)
– Microfiber cloth or photo-safe cleaning cloth used with light, controlled contact
– Clean, flat workspace with a non-shedding surface (a clean mat or archival blotter)
– Archival supports for handling: uncoated backing board, foam cradle, or a clean folder to keep the print flat
Avoid these during cleaning:
– Water, window cleaner, alcohol, vinegar, glass cleaner, or “all-purpose” sprays
– Abrasive pads, paper towels, tissue that sheds, and rough cotton
– Rubbing aggressively—even dry friction can remove surface coatings or scratch the emulsion
To make this practical, it helps to understand what kinds of grime respond well to which tools. The table below summarizes common photographic surface problems, typical causes, and the safest first response.
Typical Photo Surface Issues and Safest First Response (Field-Observed, Updated 2026)
| # | Surface Issue | Likely Cause | Safest First Step | Cleaning Risk |
|---|---|---|---|---|
| 1 | Loose dust | Airborne particles | Soft brush pass | Low |
| 2 | Fingerprints (oils) | Skin oils + handling | Dry blotting/controlled dabbing | Medium |
| 3 | Smudges from transfers | Contact with paper/album stock | Minimal-contact wipe with dry microfiber | Medium–High |
| 4 | Surface grime (unknown) | Dust + oxidation films | Dry cleaning only, test in corner | High |
| 5 | Paper abrasion marks | Prior rubbing | Do not attempt “polishing” | High |
| 6 | Mold staining (see spotting) | High humidity growth | Isolate + professional assessment | Very High |
| 7 | Water spotting (dried) | Previous exposure | Leave until stabilized/treated | High |
Inspect and Determine the Best Method
The best cleaning method depends on what’s actually on the surface—dust is removable, while mold, loose emulsion, and certain grime types require a different risk level. Here’s the rule I follow: if you can feel instability, flaking, or biological growth, stop and stabilize before any contact.
The emulsion is the light-sensitive photographic layer; aggressive cleaning can lift or smear it even when the print “looks okay” at first.
Conservators typically start with visual inspection and risk assessment before choosing any cleaning step.
Mold on photographs is treated as both a deterioration and health risk; isolation is recommended before any handling beyond containment.
Identify the type of dirt (and how it behaves)
Look closely under bright, even light:
– Dust: dry, particulate specks; often moves with a light brush
– Fingerprints/oils: localized shiny areas; may smear if you wipe
– Grime/soot: darker, irregular film; often doesn’t lift with brushing
– Mold: irregular spots, fuzzy growth, or “speckled” blotches; may smell musty
Check for damage that changes the plan
Before you clean, check for:
– Flaking emulsion (tiny lifted fragments that catch your light)
– Tears, delamination, or loose layers
– Curl or warping that makes bending likely
– Ink-like residues (sometimes from album glue) that can dissolve or spread
In my own restorations, I’ve learned that prints with even slight emulsion looseness can look “stable” until you touch an edge—then the damage propagates quickly. That’s why inspection is a decision point, not a formality.
Q: Can I clean a photo that has cracking or peeling?
No—stabilize first. If the emulsion is flaking or lifting, you risk losing image detail with dry brushing.
Q: How can I tell dust from sticky grime quickly?
If a gentle, dry brush pass removes it without smearing, it’s likely loose dust; if it smears or darkens, treat it as sticky/biological or unknown contamination.
Remove Surface Dust and Debris
Surface dust removal is the safest “first success” step: it improves clarity without changing the photo’s chemistry. Use gentle, dry methods only—especially for silver-based prints, color emulsions, and gelatin layers that can abrade easily.
Dry surface cleaning is the standard preliminary step in many preservation workflows to minimize abrasion and avoid moisture exposure.
Photographs should be supported to prevent bending, because flexing can create new cracks in the emulsion layer.
The dry dusting method (what to do)
1. Work on a clean, flat surface. Clear hair, lint, and debris from the area.
2. Support the photo fully: place it on an archival backing or cradle so it doesn’t sag in the middle.
3. Use a soft brush: sweep lightly from the top and away from the image area.
4. Do not press. Let the bristles contact lightly enough to move particles, not the emulsion.
5. Rotate position, don’t flip repeatedly. Flipping can add friction and dust transfer.
When dusting isn’t enough
If you still see haze or localized smudges, don’t “power through” with more brushing. Move to controlled surface cleaning only after you confirm the contamination type.
Q: Will a microfiber cloth scratch old photographs?
It can, if it’s abrasive, contaminated, or used with pressure. Use clean microfiber for minimal contact and test first.
A practical comparison: dry brushing vs. dry wipe
| Method | Best For | Main Risk |
|---|---|---|
| Soft dry brush | Loose dust and particulate debris | Insufficient removal if grime is sticky |
| Dry cloth wipe (light) | Light smudges after dry test | Abrasion if pressure is used |
According to the Image Permanence Institute, abrasion and chemical contamination are key contributors to image loss—so the “least contact” rule isn’t just conservative; it’s evidence-aligned.
Clean Sticky Spots and Smudges Safely
Sticky areas require a controlled approach because oils, adhesives, and residue films can smear or stain when you rub. The safest strategy is minimal contact, controlled motion, and always testing before you commit.
Controlled dabbing is often safer than rubbing because it reduces friction against the emulsion surface.
When cleaning is attempted on photographs, spot-testing in a low-visibility area is a common risk-reduction step used by conservators.
Safe “dabbing” workflow (dry-first)
1. Stop and test: choose a small corner margin away from faces, highlights, or text.
2. Use a non-abrasive tool: clean, soft microfiber or a dedicated archival swab.
3. Dab, don’t smear: tap gently and lift. If the residue transfers, stop immediately.
4. Repeat with clean contact points: fold the cloth so you’re not using the same surface on multiple areas.
5. Re-dust between attempts: removal of loosened debris prevents grinding during subsequent passes.
Know when residue is adhesive or chemical
If smudges appear like glue (often from older album corners), dry cleaning may not fix them—and attempting moisture-based methods can spread the adhesive. In my experience, “album glue residue” behaves differently than oil fingerprints: it often leaves a translucent tacky film that drags under contact.
Q: Should I use rubbing alcohol for fingerprints?
No. Alcohol can dissolve or alter surface coatings and may damage ink or dye layers.
Q: What’s the safest target for first-time cleaners?
Loose dust and light surface haze. If a spot is sticky or stubborn, leave it or seek professional conservation.
Micro-scale reality check (why “gentle” matters)
Many photographic prints are layered systems—paper base + image emulsion + protective coatings that can be thin. A small amount of friction can remove protective layers, changing gloss and contrast permanently. That’s why “surface cleaning” is about friction minimization, not cleaning intensity.
Handle Special Cases (Old, Moldy, or Torn Photos)
For moldy, torn, or extremely fragile photos, the safest move is to stabilize and isolate before any cleaning action. If you’re dealing with biology or structural weakness, DIY cleaning often trades short-term improvement for long-term image loss.
Mold remediation typically requires isolation and specialist assessment because spores can spread and the growth process damages photographic materials.
Torn or delaminating photographs should be stabilized to prevent further mechanical loss before any surface cleaning.
Mold: isolate immediately
If you see mold:
– Isolate the photo in a sealed bag/container so spores don’t travel.
– Avoid brushing or wiping (movement can disperse spores).
– Let professionals assess—conservation labs often use controlled environments and containment protocols.
According to NARA, controlling relative humidity is central to slowing mold activity; as a rule of thumb, keeping conditions dry (without extremes) reduces risk.
Tears and loose pieces: stabilize first
If a print is torn or has loose segments:
– Support it with archival backing before any touching.
– Avoid flexing the image area.
– Consider professional conservation for repairs (splints, hinging, or surface consolidation techniques).
Never soak photos
Soaking seems intuitive, but it’s one of the fastest routes to:
– swelling paper fibers,
– emulsion lifting,
– dye/ink migration.
Q: Can I rinse a vintage photo to remove grime?
No. Even “gentle rinsing” can cause water spotting, dye migration, and emulsion deformation.
Environmental protection matters immediately—even before cleaning
For best preservation outcomes in storage and display, the goal is stable, moderate conditions:
– According to NARA, storage practices typically aim for about 40% relative humidity and around 65–68°F (18–20°C) (levels vary by collection standards).
– According to ISO 18902, enclosure materials for photographic media should be suitable for long-term storage, minimizing acid and harmful contaminants.
These aren’t just “nice-to-haves”; they directly influence whether minor contamination grows into major deterioration in the next 6–24 months.
Protect and Store Your Cleaned Photographs
Once your photographs are clean, protection is the next—and often the most important—step for keeping them clear. Proper archival storage reduces dust accumulation, slows chemical degradation, and prevents recontamination from handling.
Archival enclosures (acid-free sleeves and albums) reduce exposure to contaminants that can accelerate paper and emulsion deterioration.
Light, heat, and humidity increase fading and mold risk; stable environments are a core preservation principle.
Storage best practices (do this after cleaning)
– Use archival sleeves (acid-free, lignin-free) to create a physical barrier
– Store flat or in stable mounts; avoid bending and pressure points
– Choose acid-free, photo-safe albums designed for long-term permanence
– Avoid direct sunlight and heat sources (radiators, vents)
– Control humidity: high humidity increases mold risk, while very low humidity can be mechanically stressful to paper
As of 2026, many conservation workflows still emphasize the same stable-storage principles: consistent temperature, controlled relative humidity, and barrier protection against dust and handling oils—because that prevents the need for frequent cleaning.
Q: How can I reduce the need to clean photos again?
Minimize handling, use gloves, store in archival sleeves, and keep photos in stable, low-humidity conditions so dust and residue don’t rebuild.
Labeling and organization that preserves (not stresses)
– Label sleeves/albums with dates, subjects, and provenance (in pencil on paper labels, not on the photo)
– Organize by collection or time period so you can retrieve one print without pulling others
– Keep a “handling rule”: gloves on, edges only, return immediately to sleeve
In my experience, the biggest improvement after cleaning comes from storage discipline: I can often go years without needing to repeat cleaning because the photos stop re-contacting dust, skin oils, and album residues.
After you follow these steps—starting with dry dust removal, then switching to careful surface cleaning only when needed—you can clean photographs without harming the emulsion or creating new damage. Work slowly, avoid water and chemicals, and prioritize protection immediately after cleaning. If a photo is moldy, structurally unstable, or extremely fragile, treat professional restoration as the safest next step rather than “finishing the job” at home.
Frequently Asked Questions
How do I safely clean old photographs without damaging them?
Handle photographs by the edges and work on a clean, flat surface with clean, dry hands or nitrile gloves. Use a soft, dry microfiber cloth or a gentle brush to remove loose dust first—avoid wiping hard, especially on coated or glossy photos. If dirt or grime remains, consider professional photo restoration rather than using water or household cleaners, which can cause staining, warping, or emulsion lifting.
What’s the best way to remove dust and surface dirt from photographs?
Start with dry cleaning: a soft brush (like a makeup brush) can lift dust without pressing it into the emulsion. For fine dust, lightly dab with a clean microfiber cloth or use a blower designed for electronics at a distance to avoid contact. Do not use compressed air close-up, and skip wet cleaning unless you’re restoring in a controlled, archival-safe process.
Which cleaning methods are safest for printed photos versus negatives and slides?
Printed photos are more fragile than many people expect, so dry methods (brush, microfiber, and careful handling) are usually safest. Negatives and slides typically tolerate very gentle cleaning using archival film-cleaning wipes and appropriate liquids, but only after checking for coatings or known damage. If you’re unsure, inspect under good light and keep each type in its own storage sleeve before and after cleaning to prevent cross-contamination.
Why shouldn’t I use water or glass cleaner to clean photographs?
Water can seep into paper fibers, cause rippling, or dissolve historic adhesives and dyes, leading to permanent discoloration. Household glass cleaners and alcohol-based products can strip coatings, smear inks, or weaken the photographic emulsion and protectant layers. For best results, stick to dry dust removal and, for stubborn residue, consult a professional or use only photo-appropriate, archival-safe products designed for photographs.
How can I clean sticky residue or tape marks on old photos?
First, try to remove loose debris gently with a soft brush—don’t scrape aggressively, as it can tear the emulsion. Sticky residue from adhesives and tape often requires specialized adhesive-safe removal, and the wrong solvent can cause bubbling, haze, or staining. If the damage is significant or the photo is valuable, a professional photo restorer is the safest option to preserve the image and reduce the risk of permanent marks.
📅 Last Updated: July 26, 2026 | Topic: how to clean photographs | Content verified for accuracy and freshness.
References
- https://www.loc.gov/preservation/care/photographs/
https://www.loc.gov/preservation/care/photographs/ - https://www.archives.gov/preservation/conservation/photographs
https://www.archives.gov/preservation/conservation/photographs - https://www.nedcc.org/free-resources/preservation-leaflets/2.-photographs/2.1-photographs-a-care-guide
https://www.nedcc.org/free-resources/preservation-leaflets/2.-photographs/2.1-photographs-a-care-guide - https://www.getty.edu/conservation/publications_resources/pdf_publications/photograph.pdf
https://www.getty.edu/conservation/publications_resources/pdf_publications/photograph.pdf - https://www.canada.ca/en/conservation-institute/services/tips/cleaning-photographs.html
https://www.canada.ca/en/conservation-institute/services/tips/cleaning-photographs.html - https://www.nps.gov/articles/conserving-photographs.htm
https://www.nps.gov/articles/conserving-photographs.htm - Google Scholar Google Scholar
https://scholar.google.com/scholar?q=cleaning+photographs+archival+materials - Google Scholar Google Scholar
https://scholar.google.com/scholar?q=how+to+remove+dust+from+photographs+conservation - Google Scholar Google Scholar
https://scholar.google.com/scholar?q=conservation+guidelines+cleaning+photographic+prints - Google Scholar Google Scholar
https://scholar.google.com/scholar?q=how+to+clean+photographs
