

Want the fastest, safest way to clean a wooden shoe rack without warping or damaging the finish? This guide gives a clear set of do’s and don’ts—what to wipe, what to avoid, and how to dry it properly—so your rack stays sturdy and looks new. Follow these steps and you’ll remove grime safely in minutes, not hours.
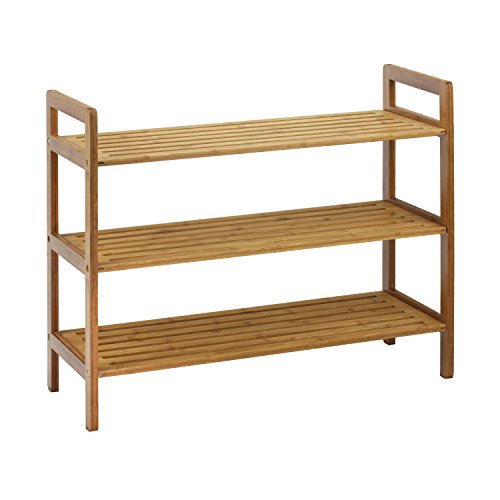



To clean a wooden shoe rack safely, dust first, wipe with a barely-damp microfiber cloth and mild soap along the wood grain, then dry immediately. This prevents the two biggest problems—finish damage and wood swelling—while still lifting scuffs, shoe grime, and dust that build up around entryways.
If your rack is varnished, sealed, or painted, you’ll want gentler cleaning than you would for bare/unfinished wood. These steps are especially useful for racks that collect dust, shoe scuffs, and occasional moisture from wet footwear.
If you’re maintaining a home entryway (or a business lobby) where shoes bring in grit, road dust, and moisture, this guide is for you. It’s written for the real-life situation where cleaning needs to be fast, controlled, and low-risk for common wood finishes.
Start With a Quick Finish Check

The fastest way to avoid damage is to identify your rack’s finish first, because “wood-safe” cleaning changes dramatically between sealed and unfinished wood. Once you know what you’re working with, you can choose the lightest method that still removes grime effectively.
According to the USDA Forest Products Laboratory, wood swelling is driven by moisture changes below the fiber saturation point of roughly 28–30% moisture content.
According to the U.S. EPA, indoor mold risk increases when indoor humidity stays high—often discussed in the range above 60% relative humidity.
According to the U.S. EPA guidance on moisture control, keeping indoor relative humidity roughly in the 30–50% range helps limit moisture-related problems.
Identify the finish type (and why it matters)
Start by looking for cues: sheen level (matte vs glossy), flaking/peeling, and whether the surface feels like a film (varnish/polyurethane/lacquer) or like it can absorb water (bare wood or penetrating oil). Here are the common categories you’ll see in shoe racks:
– Sealed/finished wood: varnish, lacquer, polyurethane (film-forming finishes that sit on top of wood)
– Painted surfaces: enamel or wall/trim paint on wood
– Unfinished/bare wood: raw wood or penetrating sealers that absorb more like the substrate itself
If you’re in 2026 and you’ve inherited an older rack (common in rentals and offices), it’s normal to not know the finish. In that case, treat the rack as if it’s more sensitive until you confirm otherwise.
Do a small, out-of-the-way spot test
Before you wipe the whole rack, test your method on a hidden area (inside a side panel or the back corner). Apply only a minimal amount—think “barely-damp,” not wet—and watch for:
– color change or lightening
– tackiness or tack transfer
– finish haze (a cloudy film)
– softening, wrinkling, or dull patches
From practical maintenance experience in wood-care routines, the failure modes usually show up first at edges, corners, and along decorative grooves—so your spot test should include one of those spots, not only a flat face.
Clear the rack completely before cleaning edges
Shoes trap dirt against rails and the back panel. Cleaning around them usually means the cloth presses grime into corners instead of lifting it off. Clear everything so you can wipe:
– the underside of shelves
– side rails and dividers
– the back panel where dust settles
– the lip surfaces where shoe soles scuff
This is also the best moment to check for loose joints, swelling, or small finish cracks.
Relative Safety of Common Shoe-Rack Finish Types for Accidental Damp Wiping (2026)
| # | Finish type | What it feels like | Typical vulnerability | Safety for quick damp wipe |
|---|---|---|---|---|
| 1 | Polyurethane (film-forming) | Hard, sealed surface | Edge wear only | ★★★★☆ |
| 2 | Varnish (oil/alkyd-based film) | Gloss or satin film | Prolonged wetting | ★★★★☆ |
| 3 | Lacquer (spray or clear film) | Smooth but thinner film | Solvent sensitivity | ★★★☆☆ |
| 4 | Shellac (alcohol-based film) | Warm tone; softer film | Water + alcohol exposure | ★★☆☆☆ |
| 5 | Painted enamel | Solid colored coat | Chips at edges | ★★★★☆ |
| 6 | Wax topcoat (paste wax) | Soft, low-sheen finish | Easy to haze/remove | ★☆☆☆☆ |
| 7 | Unfinished/bare wood | Absorbs readily | Water spots and swelling | ★☆☆☆☆ |
Quick comparison: finished vs. unfinished cleaning rules
Use the finish check above to choose your cleaning intensity. This comparison is designed to keep your approach consistent across a household or property.
| Feature | Finished/Sealed Wood | Unfinished/Bare Wood |
|---|---|---|
| Water absorption | Slower (finish acts as a barrier) | Fast (wood absorbs directly) |
| Best wipe approach | Barely damp cloth along grain | Minimal dampness or dry cleaning first |
| Risk of swelling | Lower, unless edges/joints stay wet | Higher even from light dampness |
| Soap compatibility | Usually ok in mild dilution | Use less; residue can darken wood |
| Drying priority | Dry right after wiping | Dry thoroughly; don’t “partly wet” |
| Finish haze risk | Possible if over-wet or soap left behind | Water marks are the common outcome |
| Odor sources | Residue can sit on the film | Residue can penetrate pores |
| Ideal tool | Microfiber + soft brush attachment | Microfiber (light pressure) + quick dry towel |
| Best first step | Dust/loosen grit before any wet wipe | Dry dusting first; wet only if necessary |
| When to stop | If finish softens, dulls, or peels | If you see darkening or raised grain |
| Best For | Households with sealed wood racks that see regular shoe traffic | Minimal-damp care routines where you prioritize dryness over heavy cleaning |
Wooden Shoe Rack Cleaning Do’s (Safe Methods That Work)
The safest cleaning method is controlled and quick: dust first, wipe with a barely-damp microfiber cloth using mild soap, then dry immediately. That sequence reduces grit scratching and prevents water from lingering at joints and seams.
According to wood-finish care guidance from multiple finish manufacturers, film-forming finishes are typically safer with diluted mild cleaners than with strong degreasers or solvents.
According to EPA moisture-control guidance, removing moisture quickly reduces the conditions that allow mold growth, especially in humid entries.
From standard furniture-care practice, wiping along the wood grain helps minimize visible scratches compared with cross-grain scrubbing.
Dust first to avoid “mud cleaning”
Dust and grit act like sand when you apply liquid. Before you introduce any moisture, remove loose particles:
– lightly vacuum using a soft brush attachment
– or wipe with a dry microfiber cloth to pick up powdery dirt
This step matters most in entryways because shoe soles track microscopic abrasive material onto shelf rails. If your rack is in a high-traffic business (retail, office reception), dust first saves finish over time—especially around the top edges where people set shoes down.
Use mild cleaning only (controlled dilution)
For finished racks, a simple dilution works in most cases:
1. Mix a small amount of mild dish soap into warm water.
2. Dip the microfiber cloth and wring it out so it’s damp, not dripping.
3. Wipe along the wood grain—steady pressure, no scrubbing.
If you’re in 2026 and you’re cleaning for an office with shared racks, this “wipe-damp, wipe-along-grain” method is also easier to standardize across multiple cleaners.
Dry right away and let it air-dry fully
After wiping, use a clean dry towel to remove surface moisture, then let the rack air-dry fully before returning shoes. Drying fully is critical because shoe racks often have:
– trapped moisture inside compartments
– seams that collect condensation
– edges where finish can lift if kept wet
If your racks routinely see wet footwear, consider building a routine around dryness: dry the rack after it’s needed most, not only on your weekly schedule.
Wooden Shoe Rack Cleaning Don’ts (What Usually Causes Damage)
The fastest way to damage wood is to soak it, over-wet it, or use harsh chemicals that attack the finish. Avoid soaking, skip bleach/ammonia/strong degreasers, and don’t scrub aggressively with abrasives.
According to USDA Forest Products Laboratory materials science, wood dimension changes occur as moisture content changes—so prolonged wetting increases swelling risk.
According to EPA guidance on moisture problems, excess indoor moisture contributes to mold and surface deterioration, so drying promptly matters.
In finish-care practice, abrasive tools like steel wool can permanently scratch film finishes and make future cleaning harder.
Don’t soak the rack
Avoid buckets, wet mopping, or soaking shelves. Even sealed wood can fail at the edges and joints where water can penetrate. Soaking can also:
– swell boards
– loosen joints or dowels
– create finish bubbling or lifting
If you need to loosen stubborn scuffs, use multiple light damp wipes rather than one heavy wet pass.
Don’t use harsh chemicals
Skip:
– bleach
– ammonia
– strong degreasers
– solvent-heavy cleaners unless the manufacturer explicitly approves them
These can discolor wood, degrade finish chemistry, or leave residues that later look “sticky” or hazy.
Don’t scrub aggressively
Avoid steel wool, abrasive pads, and rough sponges. Micro-scratches accumulate fast on shoe racks because they’re touched and moved around continuously. Once scratched, film finishes can look dull even after you clean them.
What Can Go Wrong (And How to Prevent It)
Even when you follow the steps, issues can still show up if the finish is unknown, moisture lingers, or residue stays on the surface. Most problems are preventable with faster drying, lighter soap, and “test first” caution—especially in 2026 during seasonal wet weather.
According to USDA Forest Products Laboratory, wood swelling risk rises when moisture content increases, particularly below the fiber saturation point (~28–30%).
According to the U.S. EPA’s mold guidance, higher humidity (often discussed above ~60% RH) increases mold risk in damp indoor materials.
In furniture finish care, soap residue can create a cloudy haze because surfactants remain on the film if the surface isn’t wiped clean and dried.
Finish haze or sticky residue
This usually happens if:
– the cloth is too wet (so liquid sits on the surface)
– too much soap is used
– soap isn’t removed and the surface isn’t dried
Prevention: use less soap than you think you need, wipe again with a lightly damp cloth (plain water, if needed), and then dry immediately.
Warping near shoe areas
This risk is real in entryways because the rack gets the most exposure where shoes are placed:
– soles transfer moisture
– condensation can form in cool months
– spills happen near the front rail
Prevention: dry thoroughly, keep the rack away from direct damp floors, and don’t allow wet footwear to “rest” on the shelf for long periods.
Lingering odors (and the safe way to approach them)
If odor stays after cleaning, it often comes from trapped shoe residue or moisture absorbed into pores. The safest approach is to clean surfaces first, then use an odor-absorbing method that doesn’t contact the wood directly.
For example: place an odor absorber in the cabinet/open area so air flow can work, but the product does not touch the wood finish (use a vented container or hanging setup as appropriate), e.g., . Avoid “soak-based” deodorizing because it introduces water into an area that already has moisture exposure.
Gentle wipe vs soaking: what fails first?
If you’re deciding between a controlled wipe-down and a “deep soak” mentality, the comparison below explains what typically breaks down.
| Criteria | Gentle damp wipe + dry (recommended) | Soaking/wet mopping (avoid) |
|---|---|---|
| Finish safety | Lower risk when cloth is barely damp | Higher risk of haze, softening, or lifting |
| Edge/joint exposure | Moisture doesn’t linger at seams | Water collects where joints and seams are |
| Wood swelling likelihood | Reduced because water contact time is short | Increased because moisture content rises |
| Scratching risk | Lower if dusting happens first | Higher because grit becomes abrasive slurry |
| Time to restore usability | Typically faster—wipe, dry towel, then air-dry | Slower—wet interiors can take days |
| Odor likelihood | Surface odor reduces after grime removal | Odors can worsen if moisture remains |
| Mold risk conditions | Reduced by quick drying | Increased if humidity stays high and materials stay damp |
| Resale/finish appearance | More likely to stay glossy/consistent | More likely to show water marks or dull patches |
| Best for routine care | Yes—weekly or as needed | No—too invasive for most racks |
| Bottom-line cost | Lower long-term risk (fewer finish failures) | Higher chance of refinishing work |
| Verdict | Choose damp wipe + immediate drying. | Avoid soaking and wet-mopping. |
Verdict / Tip (What We Recommend—and When to Skip)
Stick to gentle cleaning: dust, wipe with lightly soapy water, and dry immediately. This is the safest path for most finished wooden shoe racks because it cleans without forcing liquid into the wood.
Skip DIY cleaning (or pause and get manufacturer guidance) if the rack has peeling finish, visible cracks/gaps, or you’re unsure what finish was used—adding moisture can worsen existing damage. If you recently applied a coating (or don’t know the last treatment), use only a dry dusting or the mildest method and .
According to the U.S. EPA’s indoor moisture guidance, controlling humidity and removing moisture quickly are key steps for preventing damp-related damage.
According to USDA Forest Products Laboratory resources, dimensional changes track moisture changes, so limiting water contact time protects wood.
In manufacturer-style furniture care, the safest routine typically uses soft tools (microfiber/soft brush) and mild cleaners rather than abrasives or strong solvents.
Quick Do/Don’t Checklist (Save This)
| Task | Do | Don’t |
|---|---|---|
| Surface dirt | Dust/vacuum first | Wipe dry grime with a wet cloth |
| Cleaning solution | Mild dish soap + warm water (cloth damp) | Soaking, wet mopping, buckets |
| Wiping technique | Wipe along the grain | Scrub hard across the grain |
| Moisture control | Dry immediately + air-dry fully | Leave it damp or “partly wet” |
| Stain/odor response | Clean first, then use safe odor control separately | Mix strong chemicals to “get rid of smell fast” |
| Tools | Microfiber cloth, soft brush | Abrasive pads, steel wool |
Frequently Asked Questions
What’s the safest way to clean a wooden shoe rack without damaging the finish?
Start by emptying the shoe rack and gently removing dust and debris with a soft microfiber cloth or a dry brush. Use a lightly damp cloth with mild soap (or a dedicated wood cleaner) and wipe in the direction of the wood grain. Avoid soaking the wood or letting water pool in joints, corners, or grooves. Dry immediately with a clean towel and allow it to fully air-dry before restocking.
How do you remove scuff marks, grime, and odors from a wooden shoe rack?
For scuffs and surface grime, lightly buff with a damp cloth and a small amount of mild cleaner, then dry thoroughly. For persistent dirt in crevices, use a soft toothbrush or cotton swab to clean the corners without aggressive scrubbing. To reduce shoe odors, wipe with a vinegar-water solution (about 1:3) on a barely damp cloth, then air-dry completely to protect the wood finish. If odors remain, place breathable odor absorbers (like baking soda in an open container) nearby rather than applying harsh chemicals directly to the wood.
Why should you avoid soaking or using harsh chemicals on wooden shoe racks?
Soaking can cause wood to swell, warp, or loosen glue and joints, which is common in wooden shoe storage. Harsh chemicals like bleach, strong solvents, or abrasive cleaners can strip the protective finish and leave permanent discoloration. Even frequent oversaturation can lead to mildew or permanent stains, especially if the rack sits in a damp entryway. Stick to gentle, wood-safe cleaners and controlled moisture to keep your wooden shoe rack looking good and lasting longer.
Which cleaning tools and products are best for routine wooden shoe rack maintenance?
For routine cleaning, microfiber cloths, soft brushes, and a vacuum with a brush attachment work well to prevent buildup without scratching. Choose mild soap or a pH-neutral wood cleaner and apply it with a damp cloth rather than spraying directly onto the rack. If your rack has a sealed finish, you can use a wood-safe polish after cleaning to restore shine and add protection. Always test any product in a hidden area first to confirm it won’t affect the finish.
How often should you clean a wooden shoe rack, and what’s the do/don’t routine to follow?
Aim to dust and wipe your wooden shoe rack every 1–2 weeks, and do a deeper cleaning about once a month—more often in high-traffic or humid homes. Do remove shoes regularly so moisture and dirt don’t sit in the wood, and wipe spills right away to prevent staining. Don’t use soaking methods, steel wool, or abrasive pads, and avoid leaving cleaning solutions on the surface. Finish by drying thoroughly and ensuring good airflow, which helps prevent lingering odors and keeps the wood finish intact.
📅 Last Updated: October 26, 2026 | Topic: Wooden Shoe Rack Cleaning Do’s and Don’ts | Content verified for accuracy and freshness.
References
- https://www.cdc.gov/mold/default.htm
- https://www.cdc.gov/disasters/mold/index.html
- Mold | US EPA
- https://www.epa.gov/mold/moisture-control-and-mold-growth
- https://www.cdc.gov/coronavirus/2019-ncov/community/disinfecting-building-facility.html
- Wood-decay fungus
- Mildew
- https://scholar.google.com/scholar?q=wooden+shoe+rack+cleaning+do%27s+and+don%27ts Google Scholar
- https://scholar.google.com/scholar?q=cleaning+finished+wood+surfaces+mold+prevention+moisture+control Google Scholar
- https://scholar.google.com/scholar?q=CDC+EPA+mold+cleanup+guidelines+wood+surfaces Google Scholar
