Top 10 Tips for Cleaning Windowsills
To clean your windowsills effectively, start by gathering eco-friendly supplies and removing dust with a soft brush or vacuum. Use a mild solution like diluted vinegar or soap, and clean wooden sills gently along the grain to avoid damage. For vinyl or plastic, use a soft cloth, avoiding excess water to prevent warping. Dry thoroughly to stop mold, then protect surfaces with a sealant. Keep a regular cleaning routine, and you’ll soon enjoy fresh, well-maintained windowsills with ease. Explore these tips in detail for the best results.
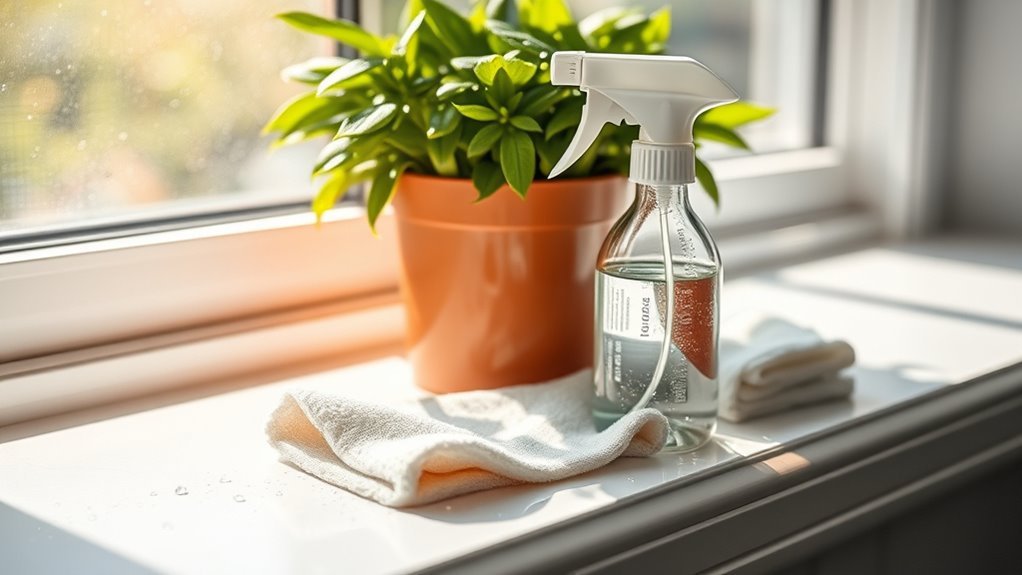
Gather the Right Cleaning Supplies

Before you start cleaning your windowsills, make sure you’ve gathered all the necessary supplies. Choosing the right cleaning products is key to freeing yourself from harsh chemicals and unnecessary waste. Opt for eco friendly options that are gentle on the environment but tough on dirt. You’ll want a soft cloth or sponge, a small brush for tight corners, and a bucket of warm water mixed with an eco friendly cleaner. These simple tools help you maintain your windowsills without compromising your values or the planet. By preparing thoughtfully, you take control of the process and enjoy the satisfaction of a clean space done your way—efficiently and responsibly. This mindful approach to supplies sets the tone for a hassle-free, liberating cleaning session.
Remove Dust and Loose Dirt First
Before you start wiping, grab a soft brush to gently loosen dust and dirt from your windowsills. If you want a more thorough clean, use a vacuum to suck up any remaining debris. This step helps prevent spreading dust around when you wipe down the surface.
Use a Soft Brush
One essential step in cleaning your windowsills is to use a soft brush to remove dust and loose dirt first. Choosing the right brush and mastering soft brush techniques lets you clear debris without scratching surfaces, giving you control and freedom in your cleaning routine. Brushes with natural bristles, synthetic fibers, or microfiber heads each offer unique benefits based on your windowsill material and personal preference.
- Opt for natural bristles for gentle yet effective dusting
- Use synthetic fibers to tackle stubborn dirt without damage
- Microfiber brushes trap fine particles for a thorough clean
Vacuum for Thorough Cleaning
Grab your vacuum to tackle dust and loose dirt that a brush might miss on your windowsills. Choosing the right vacuum types and using proper vacuum attachments help you reach tight corners and remove hidden debris efficiently. A handheld vacuum with a crevice tool is perfect for narrow spaces, while a stick vacuum offers more power for larger areas. Always start with lower suction to avoid scattering dust. Here’s a quick guide:
| Vacuum Type | Best Attachment | Ideal Use |
|---|---|---|
| Handheld | Crevice tool | Tight corners |
| Stick | Brush attachment | Broad surfaces |
| Canister | Upholstery nozzle | Delicate dust removal |
| Robot | Standard brush | Regular maintenance |
| Cordless | Multi-surface tool | Quick spot cleaning |
Vacuum first for freedom from dust before any wet cleaning.
Use a Mild Cleaning Solution

You’ll want to pick gentle ingredients for your cleaning solution to avoid damaging the windowsill. Always dilute it properly before use to keep it safe and effective. Don’t forget to test a small, hidden area first to make sure it won’t cause any harm.
Choose Gentle Ingredients
Although it might be tempting to reach for strong chemicals, choosing gentle ingredients for your windowsill cleaning is much safer and just as effective. By opting for natural alternatives, you protect your space, your health, and the environment. Eco friendly solutions give you the freedom to clean without worrying about harsh fumes or residue. Here are three gentle ingredients to take into account:
- White vinegar: cuts through grime and disinfects naturally
- Baking soda: gently scrubs without scratching surfaces
- Castile soap: a plant-based cleaner that’s tough on dirt but kind to your windowsills
Using these simple, effective options lets you keep your home fresh while embracing a healthier, more sustainable lifestyle. You’ll enjoy spotless windowsills without compromising your values or freedom.
Dilute Properly Before Use
Choosing gentle ingredients is only part of the process; how you prepare them matters just as much. Diluting your cleaning solutions properly guarantees they’re effective without being harsh on your windowsills. Using the right dilution ratios helps preserve the surface and keeps your space fresh.
Here’s a quick guide to common dilution ratios for mild cleaning solutions:
| Cleaning Solution | Dilution Ratio |
|---|---|
| White Vinegar & Water | 1:3 (vinegar to water) |
| Mild Dish Soap & Water | 1-2 drops per cup |
| Baking Soda Solution | 1 tbsp per cup water |
| Commercial Cleaner | Follow label instructions |
Stick to these ratios, and you’ll enjoy a clean, damage-free windowsill with freedom to breathe easy.
Test on Small Area
Before cleaning your entire windowsill, test the solution on one small, hidden spot first. This step guarantees your chosen cleaning method won’t harm the surface, preserving your freedom to enjoy a spotless space without damage. Using mild cleaning solutions allows you to check surface compatibility safely and effectively.
Here are some quick test methods to follow:
- Apply a small amount of the diluted cleaner on an inconspicuous area.
- Wait a few minutes to observe any discoloration, bubbling, or texture changes.
- Wipe the spot gently to see if the surface reacts or weakens.
Clean Wooden Windowsills Gently

When you clean wooden windowsills, you need to be gentle to avoid damaging the finish or warping the wood. Start by dusting off loose dirt with a soft cloth or brush. For deeper cleaning, use a mild soap diluted in water—harsh chemicals can strip the finish and hurt the wood care you want to preserve. Apply your cleaning solution lightly with a damp cloth, never soaking the wood. Wipe in the direction of the grain to protect the surface. After cleaning, dry the sill thoroughly to prevent moisture damage. These careful cleaning techniques help maintain your windowsills’ natural beauty and durability, giving you the freedom to enjoy a fresh, polished look without risking costly repairs or refinishing.
Treat Vinyl and Plastic Sills With Care
Although vinyl and plastic windowsills are more resistant to moisture than wood, you still need to handle them with care to avoid scratches and discoloration. Proper vinyl care and plastic maintenance keep your sills looking fresh and extend their lifespan without restricting your freedom to enjoy your space. Here’s how to treat them right:
- Use a soft cloth or sponge with mild soap to clean—avoid abrasive scrubbers that can damage surfaces.
- Steer clear of harsh chemicals or bleach, which can cause discoloration and weaken the material.
- Dry the sills thoroughly after cleaning to prevent water spots and maintain their crisp appearance.
Tackle Stubborn Stains Effectively
When stubborn stains show up on your windowsills, choosing the right cleaner is key to avoiding damage. You’ll want to use gentle scrubbing tools that won’t scratch the surface while still tackling grime effectively. Applying targeted stain removal techniques can help restore your windowsills without extra effort.
Choose the Right Cleaner
Since windowsills often collect tough grime and built-up dirt, choosing the right cleaner is key to tackling stubborn stains effectively. You want cleaning products that work hard without holding you back or harming your space. Opting for eco friendly options gives you freedom from harsh chemicals and keeps your home safe and fresh. Here’s what to look for:
- Plant-based or biodegradable formulas that break down dirt naturally
- Multi-surface cleaners that simplify your routine
- Non-toxic sprays to protect your family and pets
Use Gentle Scrubbing Tools
Choosing the right cleaner sets the stage, but tackling stubborn stains on your windowsills often calls for the right tools. You want to reach for gentle scrubbers that effectively lift grime without damaging surfaces. Opt for scrubbers made from safe materials like soft sponges or microfiber cloths—they’re tough on dirt but kind to your windowsill’s finish. Avoid harsh brushes or abrasive pads that can scratch or wear down delicate paint or wood. Using gentle scrubbers lets you maintain your freedom to clean thoroughly without worrying about causing harm. Remember, the goal is to refresh your space while preserving its integrity. With the right gentle tools in hand, you can confidently tackle those pesky stains and keep your windowsills looking their best.
Apply Stain Removal Techniques
Although gentle tools are essential, you’ll need targeted stain removal techniques to handle tough spots on your windowsills. Different stain types demand specific removal methods, so knowing what you’re dealing with helps you act fast and free your space from stubborn marks. For grease, a mix of dish soap and warm water works wonders. Mold requires a diluted bleach solution to kill spores effectively. For mineral deposits, vinegar is your go-to natural cleaner.
- Identify the stain type before treatment to pick the right removal method
- Test any solution on a hidden area to protect your windowsill finish
- Use a soft cloth or sponge to apply cleaners gently without damage
With these tactics, you’ll reclaim your windowsills’ cleanliness without hassle or damage.
Avoid Excess Water to Prevent Damage
When cleaning your windowsills, you’ll want to be careful not to use too much water. Excess moisture can lead to water damage, warping, or peeling paint, which defeats your effort to keep things fresh and free. Instead, use a damp cloth rather than soaking the surface, allowing you better moisture control and less risk of harm. By limiting water exposure, you maintain the integrity of your windowsills and avoid costly repairs down the line. Remember, a little goes a long way—apply cleaning solutions sparingly and wipe away any excess liquid promptly. This simple habit helps you protect your space while enjoying the freedom of a clean, well-maintained home without unnecessary damage.
Dry Thoroughly to Prevent Mold
Since moisture can easily linger on windowsills, drying them thoroughly is essential to prevent mold growth. You want to keep your space fresh and free from mold, so don’t rush this step. Proper moisture control is key to mold prevention and maintaining a healthy environment.
Here’s how to dry your windowsills effectively:
- Use a clean, dry cloth or microfiber towel to soak up any leftover dampness.
- Allow the windowsill to air dry completely by opening nearby windows or turning on a fan.
- Check corners and crevices carefully, as moisture tends to hide there.
Protect Windowsills With a Sealant
After making sure your windowsills are completely dry, the next step is to protect them with a sealant. Sealant benefits include shielding your windowsills from moisture, dirt, and wear, extending their life without constant fuss. You’ll gain freedom from frequent repairs and enjoy a cleaner, more durable surface. When applying, use a brush or roller for even coverage, ensuring you follow the manufacturer’s instructions closely. Pay attention to edges and corners where water tends to settle. Allow the sealant to dry fully before exposing the windowsills to any moisture. With the right application techniques, you can keep your windowsills looking fresh and strong, giving you peace of mind and more time to enjoy your space without worrying about damage.
Maintain Regular Cleaning Schedule
Regularly cleaning your windowsills is key to keeping them in great shape and preventing buildup of dirt and grime. To enjoy the freedom of a fresh, inviting home without hassle, setting a consistent cleaning frequency is essential. You don’t have to clean every day, but sticking to a schedule helps avoid overwhelming messes. Use schedule reminders on your phone or calendar to keep you on track effortlessly.
Here’s how to maintain your routine:
- Choose a cleaning frequency that fits your lifestyle, like weekly or biweekly.
- Set digital reminders to prompt you when it’s time to clean.
- Combine cleaning your windowsills with other chores for efficiency.
Frequently Asked Questions
Can I Use Vinegar Instead of Commercial Cleaners on Windowsills?
You can definitely use vinegar instead of commercial cleaners on windowsills. Vinegar benefits include being a natural, non-toxic cleaning alternative that’s great for cutting through grime without harsh chemicals. If you want cleaning freedom, vinegar offers an eco-friendly option that’s safe and affordable. Just mix it with water, spray it on, and wipe away dirt easily. It’s a smart choice if you want effective results without relying on commercial products.
How Often Should I Repaint Wooden Windowsills?
You should repaint wooden windowsills every 2 to 3 years to keep up with window maintenance and guarantee paint durability. Of course, this depends on your local climate and how exposed the sills are to sunlight and moisture. Keep an eye out for peeling or cracking paint—that’s a sign it’s time to refresh. Staying on top of this lets you enjoy the freedom of worry-free upkeep and beautiful, protected wood surfaces.
Are There Eco-Friendly Sealants for Windowsills?
You’re in luck—there are plenty of natural sealant options that let you protect your windowsills without harming the planet. Look for sealants made from plant-based oils, beeswax, or natural resins; these eco-friendly choices fit perfectly with sustainable window treatments. By choosing these, you’re not only sealing your windowsills but also embracing freedom from harsh chemicals and supporting a greener lifestyle. It’s all about keeping your space safe and earth-friendly.
Can Mold on Windowsills Cause Health Problems?
Yes, mold on windowsills can cause health problems, especially if you’re sensitive or have allergies. It releases spores that might trigger respiratory issues, headaches, or skin irritation. To avoid these health risks, it’s smart to focus on mold prevention by keeping your windowsills dry and well-ventilated. Taking these steps helps you maintain a healthier, freer living space without being tied down by persistent mold problems.
What Tools Are Best for Cleaning Hard-To-Reach Corners?
When you’re tackling hard-to-reach corners, you’ll want to grab corner brushes—they’re perfect for getting into tight spots where regular cloths can’t reach. Pair those with squeegee techniques to sweep away grime effortlessly, especially on smooth surfaces. You’ll love how these tools free you from the hassle of stubborn dirt, giving you the freedom to clean efficiently without stress. Embrace the right gear, and those tricky corners won’t stand a chance!


