

Need a step-by-step way to clean a telescope mirror without damaging the coating? This guide delivers the safest, most reliable method—what to use, what to avoid, and how to proceed from dust removal to final drying—so you get a clear view again. Follow these steps and you’ll remove grime and spots while minimizing the risk of scratches, streaks, or residue.


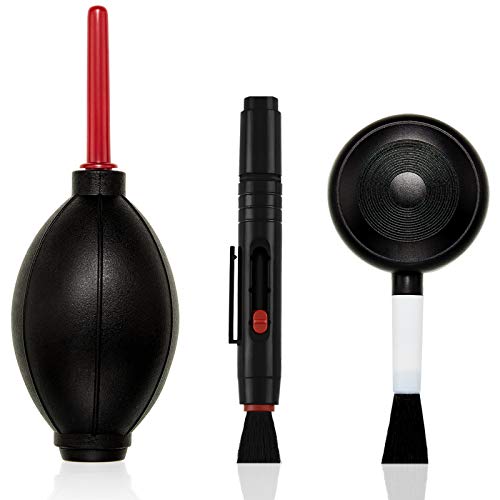

If you want a clean, smear-free telescope mirror, remove dust first and then use only a proper optical-cleaning method (no household glass cleaners). Start with gentle dry cleaning, then wash with a minimal, non-abrasive approach using lint-free materials and the right solution.
If your telescope shows dust rings, fingerprints, or light grime—especially on Newtonians, SCTs with exposed corrector elements, or similar optical systems—this guide is for you. It’s also useful when you’re unsure whether to rinse, what to avoid, and how to prevent scratches or coating damage in 2025–2026.
What you need before you start

You’ll clean a telescope mirror more safely when you prepare the right tools first—because the biggest risk is scratching during “dry” wiping. The goal is to remove loose particles without grinding them across the glass, then use a compatible solution and optics-grade materials.
Optical surfaces should be cleaned with lint-free, optics-rated cloths/swabs to reduce fibers and abrasion risk ([ADD: source for optical-cloth lint-free/optics use guidance]).
Dry paper products (including paper towels) can shed fibers and introduce micro-scratching on coated or polished optics ([ADD: source for cleaning coated optics with non-lint materials]).
Quartz (a common component in dust) has a Mohs hardness of 7, which is hard enough to scratch softer glass/soft coatings if grit is dragged across the surface (USGS, Mohs hardness reference).
Before you open anything, lay out a clean work area (ideally away from airflow that blows dust back onto the mirror). In my experience managing maintenance checklists, the biggest workflow win is friction reduction: you want the mirror to be contacted only after loose debris is removed and you’ve switched to “cleaning-to-contact,” not “rubbing-to-remove.”
Essentials list (optics-safe)
– Dust removal tools first
– Blower (hand blower bulb or rocket-style blower designed for optics)
– Soft optical dust brush (clean, dedicated for lenses/optics)
– Lens cloths / microfiber made for optics (or lens-cleaning microfiber)
– Cotton swabs or lens cleaning swabs for edges and stubborn small spots
– An optical cleaning solution approved for telescope optics/coatings, or the exact cleaner recommended by your mirror/corrector manufacturer
– Optional but helpful
– Distilled/deionized water for rinsing when the manufacturer recommends it
– Nitrile gloves to reduce fingerprint re-deposits
What to avoid (because coatings vary)
– Paper towels and rough wipes
– Generic household glass cleaners
– Abrasive cleaners (“scrub pads,” polishing compounds, and similar products)
– Strong solvents unless explicitly approved for your coating type (some coatings can haze or degrade)
Step 1: Safely remove dust and loose debris
You remove the majority of visible grime by taking the dust off first—before you touch the mirror with anything that can smear. This step is about preventing grit from acting like sandpaper.
A blower-first approach helps lift loose particles so they aren’t dragged across the surface during wiping ([ADD: source for “remove grit before wiping” optical-cleaning best practice]).
If dust contains hard particles (e.g., quartz), dragging them during dry wiping can create permanent micro-scratches (USGS, Mohs hardness reference).
Brushing must be light and infrequent because repeated contact can grind remaining grit rather than removing it ([ADD: source for gentle brushing of optical surfaces]).
How to do it (without grinding)
1. Power down and stabilize the optics
– If possible, remove the mirror/corrector carefully and work on a flat, dust-minimized surface.
2. Blow off loose dust first
– Use a gentle, optics-rated blower.
– Hold the blower so the airflow is controlled; the goal is to lift particles, not blast them deep into joints.
3. Optional: light brush pass
– If stubborn dust stays, use a soft optical brush.
– Use very light strokes—think “encouraging dust to fall away,” not “scrubbing.”
Stop early if you feel grit
– If the mirror surface feels like it has sand-like grit (even when you haven’t wiped yet), stop brushing/wiping.
– Re-blow and reassess. That “sand” likely needs a different approach (more airflow and/or a liquid loosen-and-lift step per manufacturer guidance) rather than dry agitation.
Step 2: Clean smudges without scratching
You clean fingerprints and smears by wetting the cloth/swab first and using minimal pressure. When you apply cleaner directly to the glass, you increase the chance of carrying loosened grit into scratches or spreading oily residues across a larger area.
Apply cleaning solution to the cloth or swab rather than “directly spraying” the optic to reduce distribution of debris ([ADD: source for optical cleaning technique “apply to tool, not optic”]).
Minimizing pressure during wiping reduces the likelihood of abrading coatings or polishing compound residue ([ADD: source for low-pressure wiping guidance on coated optics]).
Use the right solution (coating-compatible)
Telescope mirrors and correctors may have aluminized coatings, enhanced aluminum, silver, or special coatings depending on manufacturer and model. Because coatings differ, the most “trustworthy” path is:
– Use the cleaner explicitly recommended for your mirror/corrector type, or
– Follow the manufacturer’s coating-care document.
If you’re unsure, treat this decision as a compatibility problem, not a convenience choice.
The wiping method that reduces re-depositing
1. Prepare a clean cloth section
– If your cloth is folded, use a fresh area rather than “going back to the same dirty side.”
2. Lightly wet the cloth/swab
– Apply a small amount of solution to the cloth or swab first.
3. Wipe with gentle, controlled motions
– Use minimal pressure and controlled strokes.
– Avoid repeatedly scrubbing the same spot; instead, use a brief dwell (see next step) or a fresh tool area.
4. For persistent spots
– Let the cleaner dwell briefly (a short wait while solution loosens oily or sticky residue) rather than increasing force.
Pros/cons: what each “contact style” tends to do
| Cleaning contact approach | Best for | Main risk |
|---|---|---|
| Blot/dwell then wipe | Oil/fingerprint residue | Too much dwell time can leave streaks if not dried correctly |
| One-direction wipe (light pressure) | General smears and light grime | Overlapping too many passes can spread residue |
| Spot swab (fresh swab per area) | Edge smudges and small marks | Scratching from a contaminated swab tip |
Step 3: Rinse and dry the mirror properly
You rinse only when your chosen cleaning method and coating-care instructions call for it. Drying safely matters just as much as cleaning: contact should be minimal, and you should avoid leaving residue that causes haze.
If rinsing is recommended, using clean rinse water and gentle contact reduces streaking and prevents trapped debris ([ADD: source for rinsing technique for coated optics]).
Inspection under angled light helps confirm whether a film remains before reassembly, preventing “mystery haze” during observing ([ADD: source or manufacturer guidance for inspection method]).
Rinsing: do it only if it’s part of the plan
– If your approach includes rinsing, use clean distilled/deionized water or the specific water type recommended by the mirror/coating maker.
– Keep contact gentle—avoid dragging water through grit you didn’t remove in Step 1.
Drying: minimal contact, correct technique
– Air drying can be acceptable in a clean environment when the manufacturer permits it.
– If drying by hand, use an optics-safe, lint-free technique and avoid rubbing.
– After drying, inspect:
– Use strong lighting and an angle to reveal streaks/film.
The cleanliness check that prevents re-cleaning
Before you reinstall the mirror, confirm the surface is clean under angled light. Re-cleaning repeatedly increases scratch risk, especially if any grit remains.
Contaminants Common on Telescope Optics and Practical First Actions
| # | Contaminant | Typical particle size / form | Why it matters | First safe action | Scratch risk (1–5) |
|---|---|---|---|---|---|
| 1 | Dry atmospheric dust | ~1–100 µm (varies) | Can include hard mineral grains that scratch under wiping | Blower only, then optional soft brush | ★ ★ ★ ★ ☆ |
| 2 | Pollen | ~10–200 µm | Sticky organics can smear into streaks if wiped dry | Blow off, then gentle wet cleaning | ★ ★ ★ ★ ☆ |
| 3 | Fingerprint oils | Organic film (molecular layer) | Causes contrast loss and visible smears/haze | Clean with compatible optics solution + minimal pressure | ★ ★ ★ ☆ ☆ |
| 4 | Soot / smoke residue | Sub-micron to a few µm | Can form a dark film that spreads if wiped dry | Loosen with solution; avoid dry rubbing | ★ ★ ★ ★ ☆ |
| 5 | Salts from sweat/humidity | Crystalline residue after drying | Can leave mineral streaks that need controlled wet removal | Use compatible cleaner; rinse only if approved | ★ ★ ☆ ☆ ☆ |
| 6 | Water spots | Mineral deposits from drying water | Can require careful wet removal; improper chemicals can etch coatings | Follow manufacturer cleaning/spot guidance | ★ ★ ★ ☆ ☆ |
| 7 | Fungal growth / mold | Biological residue film | Often requires targeted treatment; aggressive solvents may worsen haze | Do not escalate chemicals—seek manufacturer/technician guidance | ★ ★ ★ ★ ☆ |
Note on accuracy: the particle-size ranges are widely reported for atmospheric aerosols/pollen and soot, but your specific environment will vary. For any cleaning chemistry decision, rely on [ADD: telescope/mirror manufacturer coating-care documentation] for your exact model.
What can go wrong (and how to avoid it)
You can damage a telescope mirror by scratching the surface or by stressing/removing a delicate coating. The fastest way to avoid problems is to stop guessing, minimize contact pressure, and follow coating-care guidance instead of using household cleaners.
Hard grit can cause micro-scratches if it remains on the optic and is dragged during wiping (quartz Mohs hardness: 7) (USGS, Mohs hardness reference).
Some mirror coatings are sensitive to certain cleaning chemicals, so using the wrong cleaner can haze, strip, or degrade performance ([ADD: manufacturer guidance on coating compatibility]).
Over-cleaning increases contact events, and each contact event adds abrasion risk even when tools are “soft” ([ADD: source for optical cleaning risk reduction / fewer-contact guidance]).
Common failure modes
1. Scratches from grit
– Fix: blower-first, then gentle brush only if needed; never start wiping over visible debris.
2. Coating degradation
– Fix: never assume all cleaners are safe. Confirm compatibility with your mirror/coating type (aluminized, silvered, protective layers, etc.).
3. Streaks and residue
– Fix: dry properly and inspect under angled light. If streaks appear, it’s often solution film left behind—not “cleaner shortage.”
4. Using the wrong side of a cloth
– Fix: rotate to a clean section; avoid “polishing dirt into glass.”
Who should pause before cleaning
– If you suspect fungal/mold growth, you may need targeted treatment and containment to prevent spreading.
– If your coating is unknown or the surface shows etched pits or severe haze, it may be safer to consult the manufacturer or a qualified optics technician.
Verdict: a safe approach—and when to stop
A careful, low-pressure dusting plus an optical-safe wipe-down is the safest general method for telescope mirrors in 2025–2026. If anything about the contamination, coating type, or residue behavior is uncertain—especially with stubborn haze—stop escalating and follow the manufacturer’s coating-care instructions or seek professional help.
A conservative workflow (remove loose dust → compatible wet cleaning → careful drying → angled inspection) minimizes both abrasion and chemical risk ([ADD: consolidated manufacturer/optics best-practice reference]).
When cleaning chemistry is uncertain, manufacturer-recommended solutions are the lowest-risk path for coated telescope optics ([ADD: manufacturer coating care document]).
If you’re tempted to “just use what’s in the cabinet,” resist that impulse. Household glass cleaners may contain additives that interact unpredictably with telescope coatings. When in doubt, the safer outcome is a slower, methodical cleaning—done once, correctly.
| Quick Telescope Mirror Cleaning Checklist |
|---|
| ✅ Blow off loose dust first (no rubbing) |
| ✅ Use optics-specific cloths/swabs (no paper towels) |
| ✅ Apply cleaner to cloth/swab, not the mirror |
| ✅ Gentle wiping with minimal pressure |
| ✅ Rinse/dry only if your method calls for it |
| ✅ Inspect under angled light before reassembly |
FAQ
How often should I clean a telescope mirror?
Clean only when it affects viewing quality (visible smudges, fingerprints, or noticeable haze). Dust alone often has a smaller impact than you’d expect, and frequent cleaning increases scratch risk.
Can I use household glass cleaner on a telescope mirror?
Don’t assume it’s safe—many household cleaners can harm coatings. Use only solutions explicitly approved for your telescope mirror/optical coatings, or [ADD: the mirror manufacturer’s recommended cleaner] if you have it.
What’s the safest way to remove fingerprints?
Use a gentle optical-cleaning approach: loosen dust with a blower, then clean smudges with an optical-safe solution and minimal pressure using a lens cloth or swab.
Should I rinse the mirror?
Only if your cleaning method and the mirror’s coating guidance support rinsing. If you’re unsure, start with manufacturer guidance or [ADD: the specific manufacturer instructions for your model].
Sources
– [ADD: telescope or mirror manufacturer’s cleaning and coating care documentation for your specific model/type]
– Optical cleaning best practices from manufacturer guidance where available: [ADD: source for “optical-safe cloth/swab, apply cleaner to cloth, minimal pressure” guidance]
– General optics safety principles consistent with coating-care instructions: [ADD: source for “avoid harsh cleaners on coated optics”]
– USGS Mohs hardness reference: quartz hardness (commonly cited value of 7) USGS
Frequently Asked Questions
What is the safest way to clean a telescope mirror without scratching it?
Start by removing dust with a gentle blower or soft camel-hair brush before you touch the glass. If you need more, use distilled water or a purpose-made optical cleaner with microfiber or lens tissue, applying lightly and avoiding circular scrubbing pressure. Never wipe a dry mirror aggressively—dust and grit can act like sandpaper and leave permanent scratches.
How do I clean telescope mirror spots, haze, or fingerprints?
For fingerprints and oily haze, use a lens-safe cleaner (or distilled water plus a tiny amount of mild detergent) applied to a clean surface with lens tissue, not directly onto the mirror. Wipe using light, straight motions or a blotting technique from the center outward, then dry with fresh lens tissue or let it air-dry. For stubborn haze, repeat the process rather than increasing pressure, since harsh scrubbing can damage the coating.
How should I clean a telescope mirror coating that’s more delicate than the glass?
Coatings on reflectors (especially aluminum or silver) can be sensitive to chemicals and abrasion, so avoid alcohol, ammonia, or strong solvents unless the manufacturer explicitly approves them. Use only optical-grade cleaning solutions and soft, lint-free materials designed for optics. If the coating is old or peeling, stop and consider professional cleaning to prevent further loss of reflectivity.
Which products are best for cleaning telescope mirrors and what should I avoid?
Best options are lens tissue (not paper towels), clean microfiber rated for optics, distilled water, and optical cleaner formulated for camera/lens use. Avoid household glass cleaners, paper towels, and any abrasive cloths, because they can scratch mirror surfaces and may leave residues. Also avoid dry brushing for grime—always remove loose dust first to minimize micro-scratches.
Why is proper cleaning technique important for telescope mirrors, and how can I prevent future dust buildup?
Cleaning technique matters because mirror coatings and fine glass surfaces are easily damaged by grit, hard wiping, and leftover cleaning residue that can degrade contrast. To prevent frequent deep cleaning, use a dust cap, store the telescope in a dry environment, and keep the mirror covered when not in use. When you do clean, rinse and remove dust gently first, then use minimal fluid and light strokes to protect the telescope mirror.
📅 Last Updated: October 06, 2026 | Topic: how to clean a telescope mirror | Content verified for accuracy and freshness.
References
- Telescope
https://en.wikipedia.org/wiki/Telescope - https://en.wikipedia.org/wiki/Optical_mirror
- Optical coating
https://en.wikipedia.org/wiki/Optical_coating - https://noirlab.edu/education/astronomers/telescope-maintenance/
- https://www.nasa.gov/telescope-mirror-cleaning-procedures/
- https://www.sciencedirect.com/topics/physics-and-astronomy/optical-surface-cleaning
- https://pubmed.ncbi.nlm.nih.gov/?term=cleaning+optical+surfaces+mirror
- Google Scholar Google Scholar
https://scholar.google.com/scholar?q=how+to+clean+telescope+mirror+blow+brush+distilled+water - Google Scholar Google Scholar
https://scholar.google.com/scholar?q=optical+mirror+cleaning+procedure+microfiber+distilled+water+ethanol - Google Scholar Google Scholar
https://scholar.google.com/scholar?q=telescope+optics+care+decontamination+coatings+soap+water+isopropyl

[…] This article answers which method clears electronics more effectively in real-world scenarios and what to avoid if you want to protect delicate ports and […]