
What tools and supplies do you actually need to clean a car dashboard without damaging the finish? Start with dashboard-safe cleaner, soft microfiber cloths, and a small detailing brush to lift dust and residue from textured surfaces and air vents. For tight controls and seams, keep cotton swabs and a non-greasy protectant in your kit so the results last.



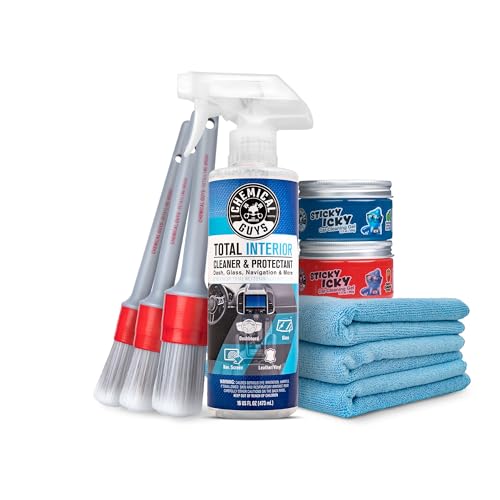
If you want a dashboard that looks clean without damaging finishes, use a simple cloth-applied routine: microfiber towels + a soft brush + a gentle dashboard cleaner + a UV protectant. Apply product to your towel (or brush), not directly onto the dash, and work in small sections—this reduces dust scatter, minimizes streaks, and helps prevent sun-related fading (especially as dashboard materials age in 2026).
If you’ve got visible dust, sticky smudges, or grime around vents and controls, this is for you—especially if you want a routine that won’t damage matte plastics, textured finishes, or screen surfaces. It also helps when you’re working on a dashboard with buttons, seams, or delicate trims where overspray can cause problems.
Tools and supplies you need to clean a car dashboard

The best starting point for car dashboard cleaning is a “two-towel” kit plus one soft applicator and two products (cleaner + protection). Here’s the smallest set that reliably handles everyday dust, heavier grime, and long-term UV wear across most interior materials.
– Microfiber towels (at least one for dust removal and one for final buffing)
Use one towel dry (for loose dust) and keep a second towel for removing cleaner residue and buffing to an even finish. In practice, I prefer lighter-weight microfiber for the first pass and a thicker or waffle-weave microfiber for the final buff, because it helps with streak control on smooth vinyl and glossy trim. For dashboards in 2026, where surfaces can be coated or semi-textured, microfiber is still the least risky choice compared with paper towels.
– Soft detailing brush or soft-bristle brush (for vents, seams, and grooves)
Choose a brush with soft bristles designed for interiors. The goal is controlled agitation: you dislodge dust from air vent louvers, button seams, and textured plastics without creating micro-scratches that rough pads can leave behind. If your dash has a stippled or grainy finish, a soft detailing brush helps you “lift” grime instead of smearing it.
– Gentle dashboard cleaner + UV protectant (plus cotton swabs/foam applicators for tight spots)
A gentle dashboard cleaner breaks up everyday oils and skin residue without aggressively stripping matte surfaces. A UV protectant restores a uniform look and helps reduce fading over time—important because dashboards sit under intense sun: according to the Skin Cancer Foundation, windshields can block about 99% of UVB, but UVA still contributes to long-term material aging and discoloration. Add cotton swabs for button edges and crevices, and foam applicators when you need controlled product distribution on textured areas.
Dashboard Cleaning Compatibility Snapshot (Real-World Cleaner Types)
| # | Cleaner approach | Typical pH range | Main benefit | Dashboard compatibility | Streak / residue risk |
|---|---|---|---|---|---|
| 1 | pH-neutral interior cleaner (water-based) | ~pH 6–8 | Safe oil/soil removal | ★★★★★ | Low (cloth-applied) |
| 2 | Dedicated “dashboard” spray (often mild blend) | Often pH-neutral | Designed for interiors | ★★★★☆ | Medium (if overapplied) |
| 3 | APC diluted per label (for sticky grime) | Varies; typically mild alkaline | Breaks up grime + skin oils | ★★★☆☆ | Medium (rinse/buff needed) |
| 4 | Diluted mild all-purpose cleaner (unknown formula) | Unknown unless labeled | Works “sometimes” | ★★★☆☆ | Medium–High |
| 5 | Isopropyl alcohol (spot use only) | ~70% typical | Removes light oily residue | ★★☆☆☆ | High (can dry out) |
| 6 | Ammonia-based degreasers/solvents | Strong alkaline / solvent blends | Heavy cleanup power | ★☆☆☆☆ | Very high |
| 7 | Steam on textured plastics/screens | Water/heat (no pH) | Fast heat-based loosen | ★☆☆☆☆ | Very high (moisture risk) |
Cleaners: what to pick for vinyl, plastic, and screen-safe care
The safest dashboard cleaner choice for most cars is a pH-neutral, non-greasy formula applied to cloth—not sprayed directly. This reduces chemical stress on finishes while still lifting dust and everyday oils.
– Choose a pH-neutral, non-greasy cleaner when possible; avoid harsh solvents/ammonia unless your owner’s manual or product label specifically says it’s safe
Matte dashboards often use pigments and binders that can look patchy if you over-strip them. A pH-neutral cleaner is gentler because it doesn’t aggressively attack surface polymers. If your dash includes gloss trim, a non-greasy formula also helps prevent that “oily haze” you sometimes see when cleaners leave invisible residues.
– For touchscreens or infotainment areas, use a screen-safe approach (cloth-only application) and avoid getting liquid into edges or openings
Many screens have an oleophobic (oil-resistant) layer and tight tolerances around the bezel. According to Apple Support, cleaning should avoid soaking, and liquid should not enter openings—so the practical method is cloth-applied cleaner on microfiber, then careful wiping.
– For stuck-on grime, you may need an APC-type cleaner diluted per the label’s instructions:
If the grime is sticky (from sunscreen, hand oils, or aerosol overspray), an APC (all-purpose cleaner) can help—when diluted. The label dilution ratio matters because undiluted APCs can be too aggressive for matte textures and can increase streak risk. Apply the diluted APC to a brush or microfiber, work gently, and buff out any residue.
Prep for less streaking: dry dusting and safe mixing
The fastest path to a streak-free car dashboard is to start dry, test first, and keep liquids under control. Prep matters because loose grit is abrasive, and heat makes everything flash faster (which can leave mineral-like residues).
– Let the dash cool before cleaning, and start with a dry wipe to remove loose grit (so you don’t grind it into the surface)
Interior surfaces can get hot when the car sits in sun. According to the National Highway Traffic Safety Administration (NHTSA), interior temperatures in parked cars can rise rapidly, reaching extreme levels in short periods (U.S. safety guidance emphasizes fast temperature increases). In that kind of heat, cleaners evaporate quickly and can leave streaks before you can buff.
– Test any cleaner in an out-of-the-way spot first: back corner near the door (behind or under a trim edge)
Matte plastics can react differently than glossy vinyl. A back corner near the door is usually low-visibility and gives you a “worst case” view without committing the whole dashboard finish.
– Apply cleaner to your towel/brush, not directly to the dashboard—especially around buttons, seams, and airbag areas
Cloth-applied product reduces overspray and prevents moisture from migrating into openings. This is also the simplest way to protect switch housings, vent adjusters, and any seam where liquids might creep under trim.
Step-by-step dashboard cleaning method
The most reliable method for car dashboard cleaning is a controlled sequence: dust removal → targeted spot cleaning → final buff → UV protection. This flow avoids grinding, avoids over-wetting, and keeps the finish uniform.
– Dust removal first: wipe top-to-bottom with a clean microfiber, then swap to a fresh side as it loads up
Use gentle pressure and straight passes. When your microfiber starts to gray, flip or swap it—otherwise you’re re-depositing dust and making the next step harder. Top-to-bottom matters because gravity pulls remaining dust downward, and you want fewer particles to land on already-wiped areas.
– Spot-clean the dirty areas: use lightly damp microfiber for general grime, and cotton swabs/brushes for vents and crevices
For general smudges, use a “barely damp” microfiber—think damp enough to lift, not wet enough to drip. For vents and grooves, a soft brush dislodges dust; then cotton swabs or a smaller microfiber picks it up. If grime is lodged, do several short passes instead of one aggressive scrub.
– Finish with protection: apply a thin, even layer of UV protectant and buff after it haze-sets (follow your product’s directions—)
UV protectants work best in a thin layer. Overapplication can feel tacky and can attract dust, making the dashboard look “dirty” sooner. After the protectant haze sets for the label-specified dwell time, buff with a clean microfiber towel until you get an even sheen level that matches surrounding areas.
Cleaner choice trade-offs (quick comparison you can decide from)
The best cleaner for your car dashboard is the one that removes the mess without changing the finish look. Here’s how two common approaches compare in practice.
| Feature | pH-neutral interior cleaner (cloth-applied) | APC-type cleaner (diluted, cloth/applied) |
|---|---|---|
| Finish safety for matte plastics | High—designed to be gentle | Medium—safe when diluted, less forgiving |
| Control of streaking | Better when you buff | Needs extra buffing to avoid residue |
| Effect on skin oils | Good for regular maintenance | Very good for sticky buildup |
| Ease of dilution | Often ready-to-use | Requires exact label dilution |
| Risk around seams/controls | Lower—less aggressive chemistry | Higher—still manageable with cloth application |
| Screen safety compatibility | Generally safer when screen-safe and cloth-only | Often riskier—use only if label explicitly approves |
| Odor/sensitivity | Typically mild | Can be stronger, especially at higher dilution |
| Best for routine speed | Yes—fast maintenance | Yes—when needed, but more step cleanup |
| Residue potential | Low with correct technique | Medium—buffing is essential |
| Matte “shine change” risk | Lowest | Moderate—can temporarily alter texture |
| Best For | Daily/weekly cleaning and preventive care | Tackier grime on high-contact zones (vents, edges, seams) |
What can go wrong (and how to avoid it)
The most common dashboard-cleaning failures are caused by over-wetting, using the wrong chemistry, or scrubbing too aggressively. Avoid those three variables and you’ll prevent most streaking, hazing, and finish changes.
– Overspraying or overwetting can leave streaks, residue, or moisture where you don’t want it (like switches or vent openings)
If liquid enters seams, it can sit behind trim or around buttons. That moisture can pick up dust and show up later as dark lines. The cloth-applied method is the main safeguard.
– Using the wrong chemical can change the look of finishes—matte dashboards can get shiny, and some textures can get “stripped”
Matte surfaces often depend on micro-texture and specific coating properties. Solvents and harsh cleaners can alter that texture, turning “flat” into “glossy.” Stick to pH-neutral and follow the label for any stronger product (like APC).
– Abrasive tools (paper towels, rough scrubbers) can create visible micro-scratches, especially on softer plastics
Micro-scratches don’t always show immediately—they can reveal themselves under cabin lighting. Microfiber is typically the safer default, while soft brush bristles can help without grinding.
Cloth-applied vs spray-on: what’s the real difference?
If you’re deciding how to apply product, cloth application is the safer default for car dashboard cleaning. Here’s why, using practical criteria.
| Criteria | Cloth/brush-applied cleaner | Spray directly onto dash |
|---|---|---|
| Liquid control | High control—small amounts | Low control—fine mist spreads |
| Overspray risk | Minimal | High |
| Moisture near seams/controls | Reduced | Increased chance of seepage |
| Streak likelihood | Lower with buffing | Often higher—too much liquid |
| Textured/matte finish impact | Gentler distribution | Can over-wet and change sheen |
| Vent and button detail work | Brush + cloth reach is precise | Mist settles where you don’t want it |
| Screen safety | Better for cloth-only technique | Risk of liquid at edges/openings |
| Repeatability | Consistent results | More variable by mist density |
| Cleanup effort | Usually just buffing | May require extra wipe passes |
| Finish longevity | Preserves texture better | Greater chance of residue build-up |
| Verdict | Choose cloth/brush-applied every time | Spray-on increases risk |
Verdict: the smallest kit that gets good results
If you want the simplest, reliable setup, aim for: two microfiber towels, a soft brush, a gentle dashboard cleaner, and a UV protectant. The main downside is that protectants can attract dust or make the surface slightly tacky if you apply too thick—so thin coats and buffing matter, especially after sunny days in 2026.
Skip DIY cleaning (or be extra cautious) if your dashboard material is already deteriorating (peeling, cracking, or flaking), or if the owner’s manual warns against certain products—.
Quick scan checklist (save this):
| Step | What you use | Stop if you notice… |
|---|---|---|
| Dry wipe | Dry microfiber | Grit being smeared across the dash |
| Clean | Cleaner on microfiber/brush | Smearing, hazing, or streaks |
| Detail | Swabs/brush | Residue piling in vents/seams |
| Protect | Thin UV protectant + buff | Sticky feel or shiny blotches |
Frequently Asked Questions
What tools and supplies do I need to clean a car dashboard safely?
Start with microfiber cloths, a soft detailing brush, and a vacuum with a brush attachment to remove dust from vents and seams. Use a dashboard-safe interior cleaner and a dedicated protectant (often labeled for vinyl, plastic, or leather) to avoid drying out surfaces. Avoid all-purpose cleaners and alcohol-heavy sprays unless the product explicitly says they’re safe for automotive dashboards.
How do I choose the best dashboard cleaner for different materials like vinyl, plastic, and leather?
Check the product label for “dashboard” or “interior” use and confirm it’s compatible with your specific surface type (vinyl/plastic vs. leather). For textured dashboards, pick a cleaner that lifts grime without leaving residue and pair it with soft bristles so you don’t scratch. If your dashboard has leather or leatherette, use a leather-safe cleaner and conditioner to prevent cracking and fading.
Which cleaning brushes and microfiber pads work best for vent grilles and tight dashboard areas?
Use a small soft detailing brush (nylon or similar) for air vents, instrument clusters, and crevices where dust builds up. For wiping, choose multiple clean microfiber cloths—one for applying cleaner and another dry cloth for buffing to reduce streaks. In tight spots, consider a foam swab or detailing brush with a slim handle to reach along buttons, edges, and screen bezels.
Why does the dashboard look streaky after cleaning, and how can I prevent it?
Streaking usually happens when too much cleaner is applied, the surface is wiped while still wet, or the product leaves a residue. Use a light mist on the cloth instead of spraying directly on the dashboard, then wipe with a clean, dry microfiber to polish. Finish with a dashboard protectant designed to minimize smudges and help repel dust, keeping your interior looking clean longer.
Best way to apply dashboard protectant—what should I use and how often should I clean?
Apply protectant with a microfiber applicator pad or a clean microfiber cloth to ensure even coverage without pooling in seams. Work in small sections, let it haze briefly if the label instructs, then buff for a uniform finish and reduced glare. For maintenance, dust the dashboard regularly and do a deeper interior dashboard cleaning every 2–4 weeks (or sooner if you drive in heavy sun, pollen, or dusty conditions).
📅 Last Updated: November 02, 2026 | Topic: Tools and Supplies You Need to Clean a Car Dashboard | Content verified for accuracy and freshness.
References
- Auto detailing
- Microfiber
- https://www.who.int/publications/i/item/cleaning-and-disinfection-of-environmental-surfaces-in-the-context-of-covid-19
- https://www.cdc.gov/coronavirus/2019-ncov/community/disinfecting-building-facility.html
- https://www.epa.gov/coronavirus/disinfectants-coronavirus-questions-and-answers
- Personal Protective Equipment – Overview | Occupational Safety and Health Administration
- https://pubmed.ncbi.nlm.nih.gov/?term=microfiber+cloth+surface+cleaning+disinfection
- https://scholar.google.com/scholar?q=car+dashboard+cleaning+vinyl+protectant+microfiber+cloth Google Scholar
- https://scholar.google.com/scholar?q=microfiber+cloth+effectiveness+surface+cleaning+study Google Scholar
- https://scholar.google.com/scholar?q=automotive+interior+cleaning+chemicals+compatibility+vinyl+plastic Google Scholar

[…] You can usually assess what caused the cracking and clean the area safely in about 30 minutes with dashboard-safe cleaner, a soft microfiber cloth, and a UV protectant, so the finish stays flexible and […]