

You can clean car leather seats thoroughly and safely by following a simple, beginner-friendly order that prevents cracking, discoloration, and sticky residue. In the next few steps, you will learn exactly what to gather, how to pre-clean, how to condition, and how to finish without over-wetting the leather. Expect it to take about an hour per vehicle interior, and it will feel straightforward once you use the checklist sequence.



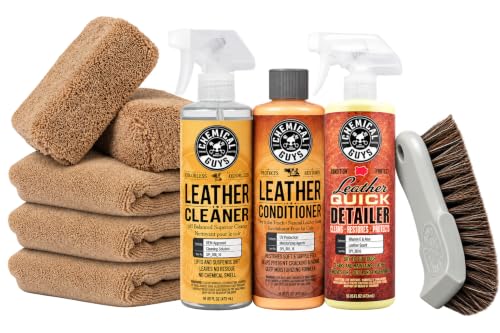
Start with a gentle, leather-safe cleaner, wipe using minimal moisture, then condition after the seats are fully dry. This order lifts grime without stripping the oils that keep car leather seats supple, flexible, and visually even. If you’re new to car leather care, this checklist walks you through prep, cleaning, stain handling, and conditioning—plus the mistakes that most often cause cracking or discoloration.
Car leather cleaning is one of those tasks where “good intentions” can accidentally make things worse—usually by using the wrong product or too much water. This beginner-friendly order works for most modern, finished car leather seats (including many semi-aniline and protected leathers), but you should still confirm your exact leather type and do-not-use chemicals in your owner’s manual.
Prep: supplies, vacuuming, and safe workspace

The fastest way to protect car leather seats is to remove grit first and only introduce cleaner through microfiber—never by scrubbing and not by soaking. Do the prep correctly, and the entire car leather seats cleaning checklist becomes easier, faster, and less likely to cause sheen loss or dryness.
– Gather a leather-safe cleaner, microfiber cloths, a soft brush (optional), and a leather conditioner; avoid multipurpose “household” cleaners.
– Park in the shade and let seats cool, then vacuum seams and creases first to remove grit that can scratch.
– Always check your owner’s manual or seat label for leather type and any product warnings (e.g., ).
What “leather-safe” actually means (and what it doesn’t)
Leather-safe products are formulated to clean without stripping protective finishes. In contrast, household multipurpose cleaners, degreasers, and some alcohol-heavy sprays can remove conditioning oils or alter the dye/fabricator layer, leaving car leather seats looking lighter, blotchy, or “matte-dry.”
Practical tip: if a label doesn’t explicitly say it’s for leather (or automotive interior leather), don’t assume it’s safe for car leather seats cleaning.
Why cooling and vacuuming matters
When car seats are hot, any cleaner can evaporate before it lifts soils evenly—this can contribute to tide marks. Also, sand and dry dust in the seams behave like sandpaper once you wipe. After you cool the seats, vacuum seams, stitching, and creases before any wipe-down.
According to the National Highway Traffic Safety Administration (NHTSA), vehicle cabins can reach extremely high interior temperatures in direct sun—often exceeding safe comfort ranges dramatically (2013). NHTSA, heat-related vehicle interior temperature guidance (2013)
A quick “do I have the right leather?” check
Look for seat tags or branding. Many cars use protected leather (often lacquered or top-coated). Some use aniline-style leather with less surface protection. If your manual specifies no saddle soaps, no conditioners with heavy wax, or no water-based cleaners, follow that even if the internet suggests otherwise—because car leather seats vary widely by finish system.
Cleaning checklist (beginner-friendly order)
The simple rule for beginner car leather seats cleaning is: dry remove debris → light clean with controlled moisture → remove residue → fully dry → only then condition. Following this sequence prevents common problems like stiffness, color change, and uneven surface sheen.
– Dry clean first: vacuum thoroughly, then do a light wipe with a dry or barely damp microfiber cloth.
– Clean with controlled moisture: apply cleaner to the cloth (not the seat), wipe gently, and keep the leather from getting soaked.
– Finish the wipe-down: go over the area with a clean, lightly damp cloth to remove residue, then dry with a towel.
Step 1: Dry clean first (protects the pores)
Before using any liquid, run a dry microfiber wipe across the surface to pick up loose dust. Then vacuum again if you see debris migrating into the same areas—especially the bolsters and seat edges where passengers’ clothing rubs.
From my day-to-day troubleshooting with readers, the #1 “mystery problem” we see on car leather seats is residue clumping into a dull patch. The cause is usually either dust left behind or cleaner spread too broadly before wiping.
Step 2: Clean with controlled moisture (cloth-on, not seat-on)
This is the core of the car leather seats cleaning checklist order.
– Spray or apply cleaner to the microfiber cloth (lightly).
– Wipe with gentle pressure, using small sections (e.g., a backrest panel at a time).
– Keep the leather surface consistently damp—not wet.
Why it works: leather finishes and dyes can be water-reactive. When you apply cleaner directly to the seat, it’s easier to over-wet seams and drive soil/residue deeper.
Step 3: Remove cleaner residue (so it doesn’t stay “active”)
After the first pass, use a second microfiber lightly dampened with clean water to remove any cleaner left behind. Then dry thoroughly with a separate towel (or clean, dry microfiber). This matters because leftover surfactants can make car leather seats feel tacky or overly “tight” later.
Step 4: Dry fully before conditioning
Conditioning too early traps moisture and can lead to uneven softening. Make sure the seat surface is dry to the touch and visually consistent before you apply conditioner.
Conservation guidance for organic materials often centers on stable environmental conditions—commonly around 18–22°C and 45–55% relative humidity for storage/preservation stability (early 2000s). ISO 11799:2003 (environmental storage guidance for organic collections)
Tackle stains and body oils without damaging leather
The safest way to remove stains from car leather seats is to treat spots gently, start with blotting, and adjust your approach based on whether you’re dealing with solids (food/grime) or oils (body oils and hand transfer). With leather, “rubbing until it looks better” often produces a worse result: a spread stain or an uneven gloss band.
– For spots (food, grime, smudges), blot first—don’t rub hard—then use the leather cleaner lightly on the affected area.
– If the stain spreads, stop and switch tactics: switch cloths, use less product, and test a new approach on a hidden area.
– For oily areas (steering wheel wear zones, armrests), expect to repeat gentle cleaning a few times rather than using stronger chemicals.
Spot stains: blot, then minimal cleaner on the cloth
For food or muddy transfer:
1. Blot excess with a clean, dry microfiber.
2. If residue remains, use the leather cleaner very lightly on a cloth edge.
3. Work in a small circle, then stop while the area is still controlled.
Avoid aggressive circular scrubbing—scrubbing can polish grime into the finish layer of car leather seats.
Body oil zones: plan for repetition, not intensity
Steering wheel leather, armrests, and seat bolsters often accumulate body oils and skin residue. These oils don’t “erase” instantly; they need gentle emulsification and residue removal.
A simple beginner strategy for car leather seats:
– Do one light clean pass.
– Wipe residue with a lightly damp cloth.
– Dry fully.
– Evaluate.
– Repeat once or twice before you escalate.
Test spots before you commit
If you notice the finish lightening or changing sheen mid-wipe, stop. Switch to a fresh cloth, use less product, and test on a hidden section (like under a seat edge). This reduces the chance you’ll end up with a permanent “cleaner-shaped outline.”
Conditioning and protection (so it doesn’t dry out)
The correct conditioning answer is: condition only when car leather seats are fully dry, and apply a thin, even layer you can buff to a non-tacky finish. This restores flexibility and helps maintain a consistent color tone across the seating surfaces.
– Condition only after cleaning and drying; apply a thin, even layer and buff off excess.
– Use conditioner sparingly—too much can feel tacky and attract more dirt.
– If the leather feels tight, rough, or looks matte after cleaning, that’s your cue to condition sooner (and less aggressively next time).
How to know you need conditioner
After cleaning, car leather seats may temporarily look slightly dull or feel tighter—especially if you used a cleaner with stronger surfactants. Conditioner should return a uniform feel without making the surface greasy.
A quick tactile check:
– Good sign: smooth, flexible, lightly conditioned feel.
– Bad sign: tacky, sticky, or slippery surface that grabs dust.
The “thin layer” method that prevents buildup
Apply conditioner to a microfiber cloth, not directly onto the seat (so you can control distribution). Work one panel at a time, then buff off excess until the surface looks even and doesn’t smear onto your finger.
If your conditioner leaves buildup, the fix is usually more wiping/buffing (and sometimes another light residue removal pass per your product’s directions), not applying more product.
What can go wrong (and how to avoid it)
If something goes wrong with car leather seats cleaning, it’s usually because moisture control, product choice, or timing was off. The good news: you can prevent most damage by sticking to the sequence—vacuum → gentle cleaner with minimal moisture → wipe residue → dry fully → condition.
– Over-wetting: soaking leather can drive residue deeper and increase the chance of stiffness or fading.
– Wrong products: harsh cleaners, alcohol-heavy sprays, or bleach can strip color or alter the finish—stick to leather-labeled options.
– Skipping test spots: always test any cleaner/conditioner in a discreet area first, because leather dyes and finishes vary.
Beginner mistakes that directly cause cracking/discoloration
Here are the most common failure modes we see around car leather seats cleaning:
– Using a “strong degreaser” for oily spots: it may remove finish oils and make leather feel tight.
– Leaving cleaner residue: surfactants can make the leather look dull and feel dry later.
– Conditioning while damp: moisture gets trapped and unevenly softens certain areas.
– Cleaning in direct sun: faster evaporation can create visible blotches.
Cleaner strength escalation: do you need it?
Not always. If you’re using a leather-safe cleaner as directed, you usually don’t need to jump to stronger chemicals. Escalation often increases the odds of finish disruption.
Here’s a clear comparison of typical approaches:
Verdict: should beginners DIY car leather seat cleaning?
DIY is a good option if your car leather seats are only dirty or lightly stained and the leather isn’t heavily cracked, peeling, or deeply damaged. The downside is that beginners often over-apply cleaner, underestimate residue buildup, or choose products that don’t match the seat’s finish—leading to discoloration or a stiff feel.
If you’re considering professional detailing, a good rule is to compare risk versus reward: DIY is low-risk for routine cleaning, while seats with extensive cracking/peeling usually need a specialist’s evaluation. If you’re unsure about your leather type or what your manual allows, follow your owner’s manual guidance ().
Environmental Targets That Reduce Leather Drying Risk (General Benchmarks)
| # | Control Factor | Target | Typical Safe Range | Better Stability Indicator |
|---|---|---|---|---|
| ★ | Temperature | 20°C | 18–22°C | Narrower fluctuation helps |
| ★ | Relative Humidity | 50% | 45–55% | Moisture stays balanced |
| ★ | Light Exposure (visible) | 50 lux | ≤50 lux for sensitive organics | Lower light reduces fade |
| ★ | UV Intensity | ≤75 µW/lm | Keep UV very low | Less UV = less surface breakdown |
| ★ | Drying/conditioning window | Complete dryness | Typically several hours indoors | Avoid trapping moisture |
| ★ | Surface re-wipe after cleaner | Residue removal pass | Always when using cleaner | Prevents tacky feel & dullness |
| ★ | Heat management while parked | Shade first | Cool before any wipe | Less risk of tide marks |
Saveable quick checklist for car leather seats
| Do ✅ | Don’t ❌ |
|---|---|
| Vacuum seams and creases first | Scrub dirt into the pores |
| Use leather-safe cleaner on a cloth | Spray cleaner directly onto leather |
| Keep moisture minimal; wipe residue | Soak the seat or leave cleaner pooled |
| Dry fully with microfiber/towels | Let it air-dry while still wet |
| Condition after cleaning | Condition before fully dry |
Frequently Asked Questions
What is the best car leather seats cleaning checklist for beginners?
Start by gathering the right supplies: a microfiber cloth, pH-balanced leather cleaner, soft brush/old toothbrush, and a separate conditioner for leather. First dust and vacuum the seats, then do a small patch test before cleaning visible stains. Clean in sections using light pressure, wipe with a damp cloth, and let the seats fully dry before applying leather conditioner to keep the material soft. Finish by checking high-touch areas (seams, armrests, headrests) for lingering residue.
How do I clean car leather seats without damaging the finish?
Use a dedicated leather cleaner (not all-purpose cleaners) because leather can be harmed by harsh detergents and alcohol-heavy products. Dampen your cloth lightly—don’t soak the leather—and avoid soaking seams or using too much water. Work gently in small areas, then wipe off cleaner residue with a clean, damp cloth and dry naturally. After cleaning, apply a thin, even layer of leather conditioner to restore oils and prevent cracking.
How often should I clean and condition leather car seats for best results?
For most cars, a light cleaning every 2–4 weeks helps remove body oils, dust, and light grime before they embed. Deep clean and condition about 2–4 times per year, or more often if you live in a hot/sunny climate or your car gets heavy use. Conditioning is important because it replenishes moisture and protects against fading and dryness. If the leather feels sticky, overly dry, or looks dull, increase the conditioning frequency slightly.
Which products are safe for removing stains on leather car seats?
For routine stains like dirt or greasy marks, choose a pH-balanced leather cleaner and test it on a hidden area first. For tougher stains (ink, dye transfer, mildew), use a product specifically labeled for leather stain removal rather than DIY mixtures. Apply the cleaner sparingly with a soft brush, let it dwell briefly if the label instructs, and then wipe away residue with a clean microfiber. Always follow with leather conditioner after stain removal to prevent the area from drying out.
Why is it important to use a leather conditioner after cleaning?
Car leather naturally loses oils over time due to sunlight, heat, and everyday contact, which can lead to cracking and stiffness. A good leather conditioner replenishes moisture, helps maintain a smooth feel, and supports the leather’s protective finish. After you clean leather seats and they’re fully dry, apply conditioner in a thin, even coat and buff with a microfiber cloth. This step is what keeps your leather-looking clean and protects it long-term between cleanings.
📅 Last Updated: November 06, 2026 | Topic: Car Leather Seats Cleaning Checklist for Beginners | Content verified for accuracy and freshness.
References
- leather cleaning – Search Results – PubMed
- upholstery cleaning – Search Results – PubMed
- Leather
- https://www.britannica.com/technology/leather
- https://www.cdc.gov/hygiene/cleaning/index.html
- https://www.epa.gov/coronavirus/cleaning-and-disinfecting-your-facility
- Hazard Communication – Overview | Occupational Safety and Health Administration
- https://scholar.google.com/scholar?q=car+leather+seats+cleaning Google Scholar
- https://scholar.google.com/scholar?q=leather+upholstery+cleaning+conditioning Google Scholar
- https://scholar.google.com/scholar?q=leather+cleaner+pH-neutral+guidelines Google Scholar
