

Looking for the best products for cleaning the seams on a butcher block countertop? For most homes, the clear winner is a food-safe mineral oil plus a dedicated butcher-block seam cleaner (followed by a thorough wipe and dry), because it lifts grime without swelling or damaging the wood. If your seams are already blackened with buildup, an enzymatic cleaner designed for wood joints is the fastest reliable step before resealing with oil.



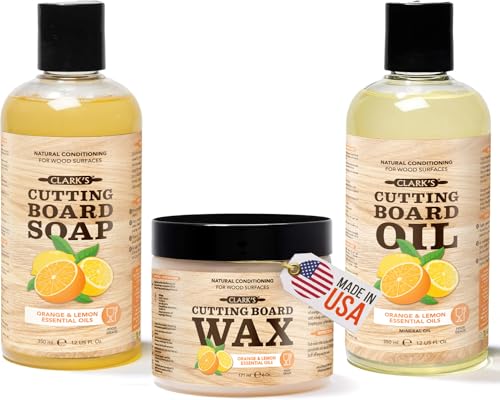
Use a mild, pH-neutral cleaner applied with minimal water, then scrub the seams with a soft nylon brush or toothbrush and dry thoroughly. Once the grime lifts, re-oil or re-wax the butcher block so the seam edges don’t stay exposed, rough, and odor-trapping. You’ll learn which products and tools are genuinely seam-friendly—and which ones create swelling, discoloration, or lingering smells.
This is for anyone dealing with dark, sticky, or grimy lines between panels/laminations on a butcher block countertop—especially if you cut meat there often and the seams trap residue.
What “works best” for butcher block seams (and why)

The best approach is gentle chemistry plus controlled moisture plus complete drying. Seams behave differently than the main countertop surface because the gap acts like a retention channel for grease, meat proteins, and wash-water.
According to the FDA Food Code (2022), food-contact surfaces must be cleaned before sanitizing—cleaning removes food and residue so disinfectants can work.
According to the FDA Food Code (2022), hot-water sanitizing for food-contact items is typically 171°F (77°C) for required contact time, which is often too harsh for wood seam gaps.
According to the FDA Food Code (2022), chemical sanitizer concentrations (e.g., chlorine) are controlled in defined ppm ranges—using these on unfinished wood seams can strip or damage finishes and trap moisture afterward.
Why seams get dark and sticky in the first place
Seams collect grease and moisture because they sit in small gaps where liquids and food particles linger. Even when you wipe the main surface, residue can remain down in the channel between panels—then harden during drying cycles and repeated use. Over time, that trapped residue can darken (especially around meat oils) and develop an odor even when the surface “looks clean.”
From a process standpoint, treat seam cleaning like a simplified HACCP-style workflow: remove visible debris first, clean with appropriate chemistry, and then restore the protective barrier. In practical terms, the “protective barrier” is what prevents water from repeatedly wicking into the seam edges.
What “best” actually means for wood
Your goal isn’t to soak the seam out—it’s to lift buildup without swelling the wood or damaging your finish layer. Swelling happens when enough moisture enters the end grain or exposed seam edges; discoloration happens when residues oxidize or when a finish is stripped; lingering smell happens when proteins and fats remain lodged in the seam gap and the area stays partially damp.
Best products/tools for cleaning the seams (safe, practical picks)
The safest seam-cleaning products are those that are pH-neutral (or pH-balanced), used sparingly, and paired with a soft, non-grinding scrubbing tool. Here are practical options that reduce the two biggest risks: roughening the seam edges and over-wetting the gap.
A mild, pH-neutral cleaner is generally safer than strong oxidizers or alkaline degreasers because aggressive chemistries can strip oils and weaken wood-finish bonding.
Soft nylon bristles (toothbrush or seam brush) remove residue mechanically without the gouging risk of metal scrubbers, which can raise fibers and stress finish edges.
Drying fully matters because wood swelling is driven by moisture uptake; removing surface and seam-channel water reduces the cycle that traps odor.
Mild cleaner options (low risk for finish systems)
– A pH-neutral dish soap or a mild wood/food-surface cleaner (use only a small amount).
If you don’t have a label-ready product, look for explicit wording like “pH-neutral” or “pH-balanced” on the bottle.
Why this matters: Most butcher block finishes rely on oils, waxes, or film-forming resins staying intact. Strong degreasers can strip that protection, and stripping increases how quickly seams re-soak and re-collect grease.
Seam scrubbing tools (the “mechanical” part)
– Soft nylon toothbrushes or small nylon seam brushes
They work along the line between panels without grinding it open.
– Microfiber cloths or lint-free pads
Use them right after scrubbing to lift loosened gunk; don’t let it re-settle in the seam.
For stubborn buildup (only if your finish tolerates it)
– Plastic scraper or flexible nylon scraper
Use light pressure only to lift residue that won’t come up with brushing.
– For discoloration or odor trapped in crevices:
If you’re unsure, confirm the product’s guidance specifically mentions butcher block / wood finish compatibility.
Reconditioning products (to protect seams after cleaning)
– Food-grade mineral oil (and/or butcher block finishing wax) as directed by your finish system.
If you use oil/wax systems, the wax layer often helps reduce how readily seam channels wet out. If you have a film finish (like polyurethane), you may not need—or may not want—to oil the surface at all; doing so can interfere with the coating depending on the chemistry.
Seam-Friendly Cleaning & Reconditioning Options (Practical Risk Ranking)
| # | Tool / Product class | Expected seam-safe use | Typical finish compatibility | Seam safety impact |
|---|---|---|---|---|
| 1 | pH-neutral / pH-balanced cleaner (sparingly) | Low moisture | Oil & oil/wax | ★★★★★ |
| 2 | Soft nylon toothbrush / seam brush | Mechanical lift | Oil & oil/wax & film | ★★★★★ |
| 3 | Microfiber / lint-free wiping | Residue removal | All finish types | ★★★★☆ |
| 4 | Plastic/flexible nylon scraper | Spot residue lift | Oil & film (light use) | ★★★☆☆ |
| 5 | Food-grade mineral oil | Seam re-oil | Oil & oil/wax | ★★★★★ |
| 6 | Butcher block finishing wax | Moisture barrier | Oil & oil/wax | ★★★★☆ |
| 7 | Bleach / strong oxidizers (seam use) | High moisture & finish risk | Usually incompatible | ★☆☆☆☆ |
Quick decision guide by finish system (so you don’t mismatch products)
Use this before you pick an oil/wax vs cleaner so you don’t accidentally strip a topcoat or leave oil on a sealed surface.
| Finish type | Cleaning chemistry tolerance | Seam moisture risk | Re-oiling/waxing value |
|---|---|---|---|
| Oil-only (typical butcher block “board oil”) | High with pH-neutral, low with harsh degreasers | Medium (seams can wick moisture) | Very high—restores seam edges |
| Oil + wax | High with mild soap; avoid strong solvents | Lower than oil-only (wax adds barrier) | High—re-wax improves gap resistance |
| Film/sealed (polyurethane or similar) | Varies—follow coating care; avoid oil overcoat if not approved | Lower on surface but seams can still be vulnerable at edges | Low to medium—may require finish-specific “recoat,” not oil |
| Best For (seam work) | Oil-only and oil/wax systems benefit most from re-oiling after seam cleaning; film/sealed systems benefit most from finish-approved cleaners and gentle gap-drying | ||
How to clean the seams step-by-step (without swelling the wood)
The right method keeps moisture off the seam gap and removes loosened grime immediately. Follow the sequence: dry pre-clean → minimal-liquid spot cleaning → lift residue → full drying → recondition.
Dry pre-cleaning reduces how much cleaner liquid you need, which lowers the chance of moisture wicking into seam channels.
Controlled moisture is safer for wood than soaking: seam swelling is driven by water uptake into end-grain and microgaps.
Re-oiling or re-waxing restores water resistance at seam edges, reducing repeat buildup and odor trapping.
Step 1: Dry pre-clean
– Brush out crumbs with a dry, soft nylon brush.
– Vacuum gently if you have upholstery/crevice attachments (). As a practical target, use a crevice tool around 1/4–1/2 inch so you don’t scrub the seam with suction debris.
Why it helps: grit acts like sand during wet scrubbing. Dry removal first prevents grinding residue deeper into the gap.
Step 2: Spot-clean the seam (minimal liquid)
– Mix a small amount of pH-neutral dish soap with warm water; dampen a cloth or the brush lightly—don’t pour into the seam.
– Scrub along the seam in short passes, then wipe away residue immediately with a clean cloth.
Practical technique: I keep the brush mostly “damp,” not dripping, and I wipe after every few strokes. That habit alone prevents the seam from staying wet while you work.
Step 3: Lift remaining residue
– Use a plastic scraper only where buildup is stuck.
– If needed, use a cotton swab or detail brush to pull out loosened grime, then wipe again.
Use caution: scraping can soften or roughen finish edges if you apply pressure. Let the tool lift, don’t force it.
Step 4: Dry fully
– Pat dry with a towel, then let it air-dry with good airflow until the seam area feels dry.
If your kitchen is humid, speed drying with a fan aimed at the seam line. Avoid “closing it up” under cabinets or covering it immediately.
Step 5: Re-oil/re-wax the countertop
– Apply your butcher block conditioner sparingly and follow the product instructions.
– Give it time to soak in before using the surface again (). If you don’t have the label, check the manufacturer guidance—oil cure time varies by formula, humidity, and how much is applied.
If your seam gap is still visibly uneven or rough, you may need reconditioning sooner rather than repeating aggressive cleaning.
What can go wrong (and how to avoid it)
The biggest failures are over-wetting and mismatching chemistry to your finish. If you see swelling, white haze, or persistent odor, stop and adjust moisture and product choice.
Over-wetting is the most common cause of seam swelling because water migrates into microgaps and end grain.
Bleach and abrasive cleaners can strip or roughen finish layers, leaving seams more absorbent and prone to re-soiling.
If odor persists after cleaning, residue may remain lodged in the seam gap or the finish layer may have been compromised.
Over-wetting the seams
– Common mistake: pouring water into the seam or leaving a damp brush on the gap.
– Fix: apply cleaner sparingly and wipe/dry right after scrubbing.
A helpful rule: if you can see liquid sitting in the seam, you’ve used too much.
Using harsh chemicals or abrasives
Avoid bleach, strong degreasers, and abrasive powders—they can fade finishes, strip oils, or roughen seam edges. Also be cautious with “deodorizing” products that are actually oxidizers; they can change color and leave residue that’s harder to remove later.
Damaging the finish layer
If your butcher block has a clear coat or polyurethane finish, it may require different cleaners than an oil-only surface. If you’re unsure, test your cleaner in a hidden spot first.
“Pretty clean” but still smelly
Odor may be trapped in the seam gap rather than on the surface. If smell persists, stop and reassess whether your finish is being stripped or whether residue is still lodged deeper—.
Verdict: best seam-cleaning approach (and who should skip this)
For most butcher block countertops—especially oil-finished ones—the best product strategy is: pH-neutral soap (small amount) + soft nylon toothbrush/seam brush + thorough drying + re-oiling. This is gentler than bleach or abrasive cleaners and reduces the chance of seams swelling.
According to the FDA Food Code (2022), cleaning must precede sanitizing; however, wood seams often should be maintained with finish-safe cleaning rather than sanitizer immersion.
Soft mechanical cleaning plus immediate wipe-drying minimizes moisture retention that drives swelling and odor recurrence in seam gaps.
Reconditioning with oil/wax after seam cleaning helps restore the wood’s water resistance at the edges where gaps most easily wick moisture.
| Criteria (seam outcomes) | Seam-friendly routine | Harsh routine (avoid) |
|---|---|---|
| Moisture in seam gap | Minimal (damp brush/cloth, immediate wipe) | High (pouring, soaking, wet dwell time) |
| Finish stripping risk | Low with pH-neutral chemistry | High with bleach/strong degreasers |
| Mechanical damage | Low (soft nylon, light scraping only) | High (metal scrubbing, aggressive scraping) |
| Odor recurrence | Lower (remove residue + dry + recondition) | Higher (residue left or moisture retained) |
| Color stability | More stable on oil/wax systems | More likely to fade or discolor |
| Repeat maintenance time | Shorter because seams stay less “sticky” | Longer because buildup hardens again |
| Wood swelling chance | Reduced through wipe-dry workflow | Increased by prolonged wetness |
| Compatibility with oil-only | High (clean + re-oil) | Low (strips oils) |
| Compatibility with film finishes | Moderate if cleaner is approved | Can still damage edges or coatings |
| Operational hygiene fit | Works with “clean before sanitizing” logic | Often bypasses the safe wood-compatible sequence |
| Verdict | Best overall balance of cleanliness + wood protection | Most likely to cause swelling/discoloration/lingering smell |
Skip (or pause and reassess) if:
– Your countertop is sealed with an unknown coating and you don’t have the manufacturer’s care guidance.
– The seams are separating significantly, lifting, or showing active water damage—cleaning won’t fix structural gaps.
– You’re tempted to use strong oxidizers/solvents without confirming they’re safe for your specific finish—.
Quick checklist (scan/save)
| Task | What to use | Avoid |
|---|---|---|
| Loosen crumbs | Dry soft nylon brush | Metal scrubbers |
| Clean seam buildup | pH-neutral dish soap (sparingly) + damp brush | Pouring water into seams |
| Scrape stuck residue | Plastic scraper (light pressure) | Abrasive powders |
| Remove residue | Microfiber/lint-free cloth | Leaving residue to dry in seams |
| Dry completely | Towel + air-dry time | “Wet it and walk away” |
| Protect after | Food-grade mineral oil/wax per directions | Skipping reconditioning |
Frequently Asked Questions
What are the best products for cleaning the seams on a butcher block countertop?
Look for food-safe cleaners that won’t leave residues in the seam lines, such as pH-neutral dish soap diluted in warm water or a dedicated wood-and-food-safe cleaner. For stubborn grime, a paste made from baking soda and water can help lift buildup gently without scratching the surrounding wood. Avoid harsh degreasers and chlorine bleach, since they can damage the finish and leave lingering odors that are hard to remove.
How do I clean butcher block countertop seams without damaging the wood?
Use a soft toothbrush or small nylon scrub brush to work your cleaner into the seam crevices, then wipe thoroughly with a damp cloth. Keep the seam area slightly damp rather than soaking it, because excess moisture can swell the wood and worsen gaps over time. After cleaning, dry completely and recondition as needed with a butcher block conditioner or mineral oil that’s safe for food contact surfaces.
Which cleaning tools work best for removing gunk and grime from seam gaps?
A soft-bristle toothbrush, microfiber cloths, and cotton swabs are excellent for reaching tight junctions without gouging the wood. For deeper seams, consider a plastic seam brush or a non-metal detail brush so you don’t scratch or lift grain. If you use a scraper to remove buildup, choose a plastic edge carefully and stop if you see finish lifting or exposed raw wood.
Why do seams on butcher block counters get dirty faster, and what products help?
Butcher block seams trap crumbs, oils, and moisture because they’re natural lines where boards meet, creating small pockets for debris. Regular cleaning with a gentle, food-safe soap reduces oil buildup, while occasional targeted spot treatment with a baking soda paste helps loosen stubborn residue. Pair cleaning with timely sealing/re-oiling so the seam area resists absorbing grime and staining.
What’s the best way to disinfect butcher block seams while keeping them food-safe?
Prefer food-safe sanitizing methods like diluted hydrogen peroxide (used sparingly and wiped dry) or a manufacturer-recommended wood sanitizer that’s labeled for food-contact surfaces. Apply with a cloth or brush into the seam, let it sit for the recommended contact time, then wipe and dry completely to prevent water penetration. Finish by reconditioning the area with butcher block oil/mineral oil so the wood stays protected and the seam remains clean longer.
📅 Last Updated: October 24, 2026 | Topic: Best Products for Cleaning the Seams on a Butcher Block Countertop | Content verified for accuracy and freshness.
References
- Butcher block
- Cutting board
- FDA Food Code | FDA
- https://www.fsis.usda.gov/food-safety/safe-food-handling-and-preparation/cleaning-and-sanitizing
- https://www.cdc.gov/foodsafety/cleaning/index.html
- John Boos & Co. | The Trusted Tradition
- https://www.fpl.fs.fed.us/documnts/fplgtr/fpl_gtr190.pdf
- https://scholar.google.com/scholar?q=butcher+block+countertop+seams+cleaning+wood+care Google Scholar
- https://scholar.google.com/scholar?q=wood+cutting+board+cleaning+and+sanitizing+cracks+seams+study Google Scholar
- https://scholar.google.com/scholar?q=food+contact+wood+surfaces+cleaning+sanitizing+guidelines+CDC+FDA+FSIS Google Scholar
