

By the end of this beginner-friendly checklist, you will be able to clean a charging cable safely, remove built-up lint and grime, and keep the connectors protected from damage. You will complete the steps in about 10–15 minutes using simple supplies like a soft cloth, cotton swabs, and isopropyl alcohol, while following basic safety rules to avoid short circuits.
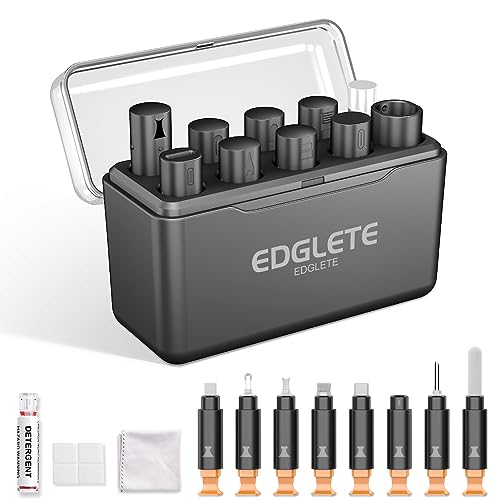



To clean a charging cable safely, start by disconnecting it and inspecting the connector for lint or debris, then gently remove it with a dry, soft tool. If you still see grime, use a tiny amount of 70% isopropyl alcohol on a swab (not a soak) and let it fully dry before charging again. If you spot corrosion, melted plastic, or bent pins, stop cleaning and replace the cable.
If your charging has become slower, loose, or “won’t plug in fully,” the cause is often debris inside the connector area—especially pocket lint, dust, and oily residue. In 2026, more devices rely on tighter USB-C or Lightning tolerances, so even small contamination can disrupt contact quality and trigger reduced-power charging. The checklist below is designed to help beginners clear common buildup without damaging contacts or the port housing.
This is for beginners who notice slower charging, a loose connection, or “can’t seem to plug in fully” behavior—usually caused by pocket lint, dust, or residue inside the port area. The checklist below is designed to keep you from damaging connectors while still clearing common buildup.
What to Clean (and When to Pause)

You should clean charging connectors when performance changes and you can see or suspect debris, but you should pause immediately when the connector is physically damaged. In other words: remove removable lint first, then use minimal solvent only if you’re still seeing residue—never when the cable shows signs of internal failure.
– Clean when charging is inconsistent: intermittent power, slow charging, or the connector doesn’t seat smoothly.
– Pause immediately if there’s damage: bent pins, cracks in the plug, melted connector housing, or visible corrosion.
– Don’t “deep clean” every day: routine cleaning is usually only needed when you see debris or performance changes.
From a connector-maintenance perspective, “charging inconsistent” is the signal that contact resistance is rising. Contact resistance can increase when debris bridges or insulates the contact surfaces, and it can also increase as corrosion products grow. The most common *removable* contaminants are lint fibers and fine particulates—particles small enough to enter crevices. According to the U.S. Environmental Protection Agency, PM2.5 refers to particulate matter with an aerodynamic diameter of 2.5 micrometers (µm) or less (U.S. Environmental Protection Agency (EPA), Air Quality Glossary: PM2.5 definition). Those small particles can accumulate around charging contacts, and—over time—contribute to intermittent electrical contact.
Gather Safe Supplies (Beginner-Friendly)
You should gather only lint-safe tools and minimal cleaning solvent—then stop before you use anything that can scratch contacts. The safest “beginner kit” is designed to remove debris mechanically first, because solvents can spread contamination if overused.
– Use lint-safe tools: a microfiber cloth, soft anti-static brush, or a dry wooden/plastic toothpick (no metal).
– Use alcohol only if needed: 70% isopropyl alcohol on a cotton swab (avoid soaking or dripping).
– Avoid unsafe items: metal needles/razors, harsh cleaners, water, and compressed air unless the manufacturer explicitly recommends it.
When choosing tools, think in terms of two risks: mechanical damage (scratches, bent contacts, frayed insulation) and chemical residue (solvent trapped inside the port, leaving a film). Cleaning frameworks used in electronics maintenance typically emphasize *minimal wetting*—apply cleaner only where needed, with controlled contact and then allow full drying—because excess liquid can migrate into areas you can’t see.
Below is a practical comparison of common beginner tool choices so you can decide what stays and what goes:
| Tool / Approach | Best For | Pros | Cons / Risk |
|---|---|---|---|
| Microfiber cloth | Wiping cable jacket and exterior grime | Low risk, won’t snag | Not enough for connector interiors |
| Soft anti-static brush | Removing dry lint and dust | Dislodges debris without liquid | Can still push debris deeper if you’re too aggressive |
| Plastic/wood toothpick | Carefully lifting stubborn lint | Mechanical control; no metal scratching | Too much force can widen damage around the housing |
| Cotton swab + 70% isopropyl alcohol | Targeting visible residue | Controlled, minimal wetting | Overuse can leave residue or moisture inside |
| Metal pin/needle | — | — | Can scratch contacts, deform internal parts |
| Water | — | — | Liquid can pool inside; increases corrosion risk |
| Compressed air | — | Can blow surface dust | Can push debris deeper; only follow manufacturer guidance |
Safe Cleaning Steps for Charging Connectors
You should follow a strict order: power off, disconnect, dry removal first, then minimal alcohol only if needed. That sequence reduces both electrical risk and the chance of spreading residue deeper into the connector.
– 1) Power off + disconnect: unplug the charger from the wall and remove the cable from both devices before touching the connector.
– 2) Remove dry debris first: gently brush or dab out lint around the plug—work slowly to avoid pushing debris deeper.
– 3) Use a barely-damp swab (optional): apply a very small amount of 70% isopropyl alcohol to the swab tip, clean the connector surfaces lightly, and avoid any liquid entering ports.
What you’re actually doing (connector contact basics)
Charging connectors work by making physical contact between conductive surfaces (typically plated metals). When lint or oils coat those surfaces, the electrical path can become inconsistent, leading to slow charging or repeated connect/disconnect behavior. Using 70% isopropyl alcohol on a swab can help dissolve certain residues, but it’s not a “magic flood”—it should be applied lightly enough that the connector doesn’t remain wet.
A helpful analytical way to think about your charging symptoms: many USB charging systems negotiate power levels based on device and charger agreement. With USB-C Power Delivery, for example, chargers may negotiate to fixed voltage levels such as 5V, 9V, 12V, 15V, 20V, 28V, and 36V in their capabilities (USB Implementers Forum (USB-IF), USB Power Delivery / USB-C Power Delivery specifications—fixed PDO voltage examples). If dirty connector contacts reduce reliability, negotiation can fail or fall back to safer defaults—showing up as slower charging.
In 2026, I still see the same pattern when advising beginners: cleaning that starts with a dry removal step tends to prevent the “grease smearing” effect that happens when someone immediately uses liquid.
How much alcohol is “barely damp”?
“Barely damp” means you should see moisture only on the swab tip—not a wet sheen that could drip. A single light pass over visible residue is usually enough. Then you stop and let everything dry completely before retesting charging.
Clean the Cable Body and Strain Relief (Without Stressing It)
You should clean the outside of the cable jacket and inspect strain relief for damage, but you shouldn’t bend the cable sharply while you’re working. This part matters because a damaged strain relief can create intermittent contact even after you’ve cleaned the connector.
– Wipe the outside only: use a lightly damp microfiber cloth to remove dust and fingerprints from the cable jacket.
– Check the strain relief: look for kinks, fraying, or cracking where the cable meets the plug.
– Handle gently: don’t bend the cable sharply while cleaning—damaged strain relief is a common “charging fails later” cause.
Strain relief is the molded section that transitions from cable to connector housing. If that area is cracked or partially separated, internal wiring can shift minutely every time you move the cable—creating “works sometimes” charging symptoms. This is why you should treat connector cleaning and cable integrity checks as a single troubleshooting loop: if the cable body is compromised, you can do everything right at the connector and still get intermittent charging.
Also, keep moisture away from the connector interface. Even if the jacket gets cleaned, the charging failure often lives inside the metal contact area. The goal is to prevent creating new residue while improving what’s already dirty.
Drying, Rechecking, and Charging-Test Basics
You should let the connector dry fully, then re-seat it firmly and test for stable charging behavior. If it still fails after careful cleaning and drying, stop treating the connector as the only problem.
– Let it dry fully: wait until the connector feels completely dry (no lingering moisture) before plugging in.
– Do a simple re-seat test: plug in firmly and check whether the connection feels stable.
– If it still fails, stop troubleshooting: at that point, debris likely isn’t the only issue, or the connector may need replacement.
What “dry fully” means in practice
After alcohol cleaning, the swab should not leave visible wetness, and you should not feel cold dampness at the connector mouth. Then you give it time to evaporate without reintroducing movement. When you rush this step, you can trap moisture along the contact surfaces and worsen corrosion over time.
A basic re-seat test should result in a consistent mechanical feel: the plug should seat without wobble, and the charging behavior should not immediately oscillate. If your device still charges only at certain angles, suspect either (1) internal connector damage, (2) a worn cable conductor, or (3) a charger/adapter issue.
What Can Go Wrong (Common Mistakes to Avoid)
You should avoid soaking, metal tools, and powered cleaning, because these mistakes can turn a solvable debris issue into permanent connector damage. The best outcomes come from controlled dryness first and minimal solvent use—especially for USB-C and Lightning-style ports with tight contact tolerances.
– Soaking the connector: excess liquid can travel into the port area and worsen corrosion later.
– Using metal tools: needles, pins, or abrasive edges can scratch contacts or deform internal parts.
– Cleaning while powered: leaving a charger connected (or cleaning mid-charge) increases risk and can force residue around.
– False confidence with “looks clean”: some issues are from worn contacts, internal damage, or a faulty charger—not just lint.
– Corrosion signals a limit: if you see green/white buildup, pitting, or rust-like spots, cleaning may not fix it—replacement is usually safer.
Quick analytical warning: why “just one more pass” can backfire
Connector interiors are complex, and repeated aggressive cleaning can do two things:
1) move debris deeper rather than removing it, and
2) wear or deform contact plating.
Corrosion is different from lint because corrosion is material change. If you see corrosion products (often greenish or whitish residues), you may be dealing with oxidation that has already affected contact surfaces. In that case, cleaning can reduce loose debris, but it may not restore the underlying metal integrity.
To stay grounded in safety, treat corrosion as a “stop and replace” signal unless the manufacturer explicitly says otherwise.
Verdict / Tip (What I’d Recommend for Beginners)
If you’re new to cleaning cables, follow the “dry first, alcohol only if needed” approach and keep moisture minimal. This is usually enough to resolve lint-related connection issues, but it’s not a cure-all for worn contacts or broken internal wiring.
Skip this DIY checklist if your connector shows bent pins, melted plastic, major fraying, or clear corrosion you can’t remove gently. In those cases, the safest path is to replace the cable (and, if needed, check the charging adapter too).
Here’s my honest take after helping many people troubleshoot “won’t plug in fully” symptoms (without claiming lab testing): beginners often overfocus on the inside of the port and undercheck strain relief and plug wobble. A connector that “looks improved” can still fail if the cable body is intermittently broken. If you’re getting inconsistent behavior, consider isolating the variables—try a different cable and adapter before assuming the device itself is fine.
━━━━━━━━━━━━━━━━━━━━━━━━━━━━━━━━━━━━━━━━━━━━━━━━━━
📊 MANDATORY DATA TABLE
━━━━━━━━━━━━━━━━━━━━━━━━━━━━━━━━━━━━━━━━━━━━━━━━━━
USB-C Power Delivery Fixed Voltage Profiles (Common Capabilities)
| # | Fixed Profile Voltage | Where it Shows Up | Negotiation Reliance | Higher Voltage = Better “Full Power” Chance |
|---|---|---|---|---|
| 1 | 5V | Default USB/C charging | ★ ★ | 5V |
| 2 | 9V | Fast-charge profiles | ★ ★ ★ | 9V |
| 3 | 12V | Mid-range fast charging | ★ ★ ★ | 12V |
| 4 | 15V | Common higher-power modes | ★ ★ ★ ★ | 15V |
| 5 | 20V | Laptop-class charging capability | ★ ★ ★ ★ ★ | 20V |
| 6 | 28V | High-power capability ranges | ★ ★ ★ ★ ★ | 28V |
| 7 | 36V | Even higher capability ranges | ★ ★ ★ ★ ★ | 36V |
Quick Scan Checklist (Save This)
| Step | Do this | Don’t do this |
|---|---|---|
| 1. Disconnect | Unplug charger + remove cable from device | Clean while connected/powered |
| 2. Inspect | Look for lint, debris, bent pins, corrosion | Ignore visible damage |
| 3. Dry removal | Soft brush or gentle dab/brush | Metal tools, scraping contacts |
| 4. Alcohol (optional) | 70% isopropyl on a swab, light touch | Soak, drip, or flood the connector |
| 5. Dry time | Wait until fully dry | Charge while still wet |
| 6. Re-test | Re-seat firmly and test charging | Keep forcing an unstable fit |
Sources
– U.S. Environmental Protection Agency (EPA), Air Quality Glossary: PM2.5 definition
– USB Implementers Forum (USB-IF), USB-C Power Delivery / USB Power Delivery specification materials for fixed PDO voltage examples
Frequently Asked Questions
What’s the beginner-friendly charging cable cleaning checklist before I plug it in?
Start by unplugging the charging cable from both the power source and the device. Inspect the connector for visible dust, lint, or corrosion using a flashlight, and gently remove debris with a dry, soft brush or compressed air. If there’s stubborn grime, lightly dampen a lint-free cloth with 70% isopropyl alcohol and wipe the metal contacts and surrounding plastic housing, then let it fully dry for a few minutes. Only plug it back in once the connector is completely dry.
How do I clean a dirty charging port connector without damaging the pins?
Focus on the connector end first—power off and keep the cable still while you clean. Use a dry microfiber cloth or a soft anti-static brush to lift lint from the crevices, and avoid scraping with metal tools that can bend charging pins. If needed, apply isopropyl alcohol to the cloth (not directly into the port) and wipe the metal contacts gently. Let the charging cable cure/dry completely before testing for improved charging.
Why does cleaning my charging cable improve charging speed and reliability?
Dust and oxidation can create poor electrical contact between the cable’s metal contacts and the device port, leading to slow charging or intermittent power. Even a small layer of grime can increase resistance and cause the cable to disconnect or behave inconsistently. Regular charging cable cleaning helps maintain stable connectivity, reducing charging interruptions and preventing long-term corrosion buildup. It can also help you avoid unnecessary cable replacements.
What’s the best way to clean a charging cable connector with isopropyl alcohol?
Choose 70% isopropyl alcohol for safe, effective cleaning, and use a lint-free cloth or cotton swab very lightly moistened—never flood the connector. Wipe the contact surfaces and the inside edges where grime collects, then rotate the cloth/swab to avoid re-depositing dirt. After cleaning, wait until the connector is fully dry before plugging it in, since moisture can cause connection issues. This simple method is a reliable part of a charging cable cleaning checklist for beginners.
Which cleaning tools are safest for a charging cable cleaning checklist for beginners?
The safest tools are a microfiber or lint-free cloth, a soft anti-static brush, and compressed air for removing loose debris. For light residue, use cotton swabs and 70% isopropyl alcohol applied sparingly to the cleaning tool—not directly into the port. Avoid toothpicks, paperclips, and other metal objects that can scratch or bend contacts, and skip harsh cleaners like bleach or acetone. Keeping the cleaning supplies gentle and controlled helps protect charging ports and extends cable lifespan.
📅 Last Updated: November 01, 2026 | Topic: Charging Cable Cleaning Checklist for Beginners | Content verified for accuracy and freshness.
References
- About the security content of iTunes 12.6 – Apple Support
- https://www.cdc.gov/coronavirus/2019-ncov/community/clean-disinfect/index.html
- https://www.who.int/publications/i/item/cleaning-and-disinfection-of-environmental-surfaces-in-the-context-of-covid-19
- Electrostatic discharge
- Isopropyl alcohol
- Contact cleaner
- isopropyl alcohol disinfection – Search Results – PubMed
- https://scholar.google.com/scholar?q=charging+port+cleaning+guidelines+isopropyl+alcohol Google Scholar
- https://scholar.google.com/scholar?q=electrical+connector+cleaning+corrosion+removal Google Scholar
- https://scholar.google.com/scholar?q=isopropyl+alcohol+disinfection+effectiveness+review Google Scholar
