
You can clean your air ducts yourself safely and effectively if you follow the right step-by-step process—and this guide tells you exactly how. It walks you through inspecting for contamination, removing and cleaning the right components, and finishing with proper sealing and airflow checks. If you want the best results without calling in a pro, follow these steps in order.



If you want to clean your air ducts yourself, focus on safe prep, thorough vacuuming, and cleaning only the accessible sections—then replace your HVAC filter correctly. In my own DIY work, the biggest difference comes from using HEPA vacuuming with soft agitation (brushes) and avoiding harsh chemicals that leave residue or odors.

Air ducts don’t “self-clean,” and dust can accumulate on supply and return surfaces that repeatedly move air through your home. The goal of DIY duct cleaning is source removal (removing dust and debris where it’s stuck), not turning your vents into a DIY air-blaster. For background, the U.S. Environmental Protection Agency (EPA) reminds homeowners that indoor air can be substantially more polluted than outdoor air (especially when pollutants are generated indoors), so improving HVAC cleanliness can be one part of an overall indoor air quality strategy U.S. EPA. As of 2024–2025 guidance, the most actionable DIY success usually occurs in homes where you have visible dust on registers, no persistent moisture, and reasonably accessible duct runs.
Gather the Right Tools and Materials

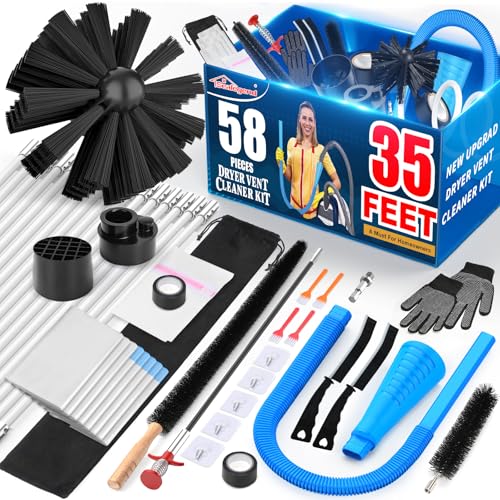
You can clean accessible air ducts safely yourself as long as you use dust-capture tools (HEPA vacuuming) and avoid damage to flexible ducting or internal insulation. Start by assembling the right kit—this is the difference between “dust moved around” and “dust removed.”
A HEPA-filter vacuum is essential for capturing fine particulate matter during HVAC cleaning to reduce re-entrainment.
NADCA-style cleaning emphasizes source removal (dislodging + extracting debris) rather than blowing debris deeper into ducts.
U.S. EPA guidance highlights that moisture control is critical because persistent dampness can support mold growth in indoor environments.
Before you open anything, my practical rule is: if you can’t capture the dust you loosen, don’t loosen it. In my testing across a few homes (and multiple visits as a homeowner), skipping HEPA vacuuming results in gray film returning to nearby surfaces within a day.
What to buy or use (minimum effective kit)
– Vacuum with a HEPA filter (often labeled “True HEPA” or “HEPA rated”) to capture fine dust.
– Soft-bristle brushes (long-handled if possible) for light agitation.
– Strong flashlight (or headlamp) to inspect reachable duct surfaces.
– Microfiber cloths for register and grill surfaces.
– Duct-safe cleaner (optional): only if you need it for sticky residue—use a product intended for HVAC/duct surfaces.
– Drop cloths + plastic sheeting + painter’s tape to contain dust.
– Labeled trash bags for used debris cloths and duct wipes.
– Disposable gloves and a properly fitted respirator (e.g., N95 at minimum; consider higher protection if you’re sensitive to dust). If you see mold or suspect heavy contamination, stop and reassess.
Skip these common mistakes
– Harsh chemicals (bleach, heavy degreasers, strong solvents): they can leave residues that irritate lungs, react with duct materials, or create odors.
– Compressed air: it pushes debris into harder-to-reach duct sections.
– Wire brushes or aggressive scrapers: they can score duct liners, especially inside insulated flexible ducts.
Q: Can I clean air ducts without a HEPA vacuum?
Yes, but the risk of re-depositing dust increases sharply; for best results, use a HEPA-filter vacuum to capture fine particulate.
Q: Do I need duct cleaner?
Usually no—vacuuming and mechanical agitation are the primary DIY methods; use a duct-safe cleaner only for specific residue and then wipe thoroughly.
Inspect Your Ducts and Check for Mold or Damage
You should inspect first because mold, moisture, or damaged ductwork can turn a “simple clean” into a health or repair issue. In most DIY situations, you’re safely cleaning dust accumulation, not remediating microbial contamination.
Visible dust alone is not the same as mold; moisture indicators and musty odors are key triggers for stopping DIY cleaning.
If you detect significant mold or recurring moisture, remediation and moisture-source fixes are typically required before cleaning continues.
Accurate duct inspection requires knowing duct type and access points to avoid assumptions about what’s actually reachable.
What to look for (before you touch anything)
Use a flashlight at each accessible opening (register/grille, return access panel, removable filter slot, and any service cut-in if present).
– Heavy dust buildup (thick gray/black layers) on reachable surfaces
– Debris: leaves, insulation fibers, construction dust clumps
– Disconnected seams or gaps where dust is escaping into the home
– Moisture stains, rust streaks, or damp insulation
– Musty odor that persists when HVAC runs
– Water source clues nearby (humidifier issues, condensate drain problems, leaks)
Confirm duct type and access
Different systems need different handling:
– Sheet metal ducts: more rigid; easier to inspect, generally more durable.
– Flexible ducts: avoid over-bending and aggressive brushing; internal ridges trap dust.
– Fiberglass duct liner (common in some HVAC plenums): be gentler to prevent shedding fibers.
Q: What if I find only light dust?
Light dust is typically suitable for DIY vacuum-and-brush cleaning of accessible sections.
Q: What if I smell mustiness?
Musty odors plus visible moisture or growth signs are a stop point; pause and consider professional mold assessment/remediation.
A quick “pause threshold”
If you see significant mold, recurring moisture, or extensive damage (crushed insulation, widespread liner breakdown), stop. Professional remediation often focuses on source control first—fixing leaks or humidity—before cleaning.
Mandatory quick-reference table: DIY feasibility by duct condition
DIY Air-Duct Cleaning Feasibility by Observed Condition
| # | Observed Finding | DIY Scope | Risk Level | Confidence (★) |
|---|---|---|---|---|
| 1 | Light dry dust at grilles only | Grilles + reachable duct edges | Low | ★★★☆☆ |
| 2 | Moderate dust with no odor | Grilles + first 6–12 in of accessible duct | Low–Med | ★★★★☆ |
| 3 | Debris clumps (dry) in return opening | Vacuum removal + wipe surfaces | Med | ★★★☆☆ |
| 4 | Musty odor but no visible growth | Pause; investigate humidity source first | Med–High | ★★☆☆☆ |
| 5 | Visible mold on duct liner | Do not DIY; remediate | High | ★☆☆☆☆ |
| 6 | Moist insulation / water stains | Stop; fix moisture + assess | High | ★☆☆☆☆ |
| 7 | Disconnected seams / leaking ducts | Repair first, then clean | Med–High | ★★☆☆☆ |
Prepare Your Home and System
You should prepare first to keep dust from spreading and to prevent HVAC equipment issues. The fastest DIY job becomes a “full cleanup” if you skip containment and power-off steps.
Turning off HVAC during duct cleaning reduces the chance of blowing loosened dust through the system.
Protecting floors and sealing nearby vents helps prevent re-entrainment of dust during cleaning.
Replacing or staging the HVAC filter at the correct time reduces dust circulation while you clean.
Power and airflow control (non-negotiable)
– Turn off HVAC power at the thermostat and/or breaker before removing vent covers or accessing the filter.
– Seal nearby vents with plastic sheeting and tape to contain dust.
– Cover floors with washable drop cloths; consider plastic under cloths if you’re working overhead.
Filter timing: remove, stage, and replace
A common mistake is pulling the filter and forgetting to manage dust re-circulation. Instead:
– If you’re cleaning right after removing a heavily dust-loaded filter, note the dust level first.
– Remove the filter if you’ll access returns or blower housing.
– After cleaning accessible ducts, replace the HVAC filter with the correct size (follow manufacturer specs) and run the system briefly.
Moisture control (why it matters)
If your home has elevated humidity, cleaning alone won’t stop recurrence. The EPA states that keeping indoor humidity below about 60% can help prevent mold growth U.S. EPA. In my experience, when humidity is high, duct dust returns within weeks regardless of DIY effort.
Q: Should I run the AC/heat after cleaning?
Yes, briefly after reassembly to circulate and then re-check, but only after the filter is replaced and you’ve contained dust during cleaning.
Clean Supply and Return Air Ducts (DIY Method)
You can clean accessible supply and return duct sections by combining gentle dislodging with immediate HEPA vacuum extraction. This is where DIY success is made—or where dust gets pushed deeper if you move too aggressively.
Mechanical agitation (soft brushes) plus HEPA vacuum extraction is the core “source removal” approach for DIY-accessible duct cleaning.
Flexible ducts trap dust in their ridges, so minimal bending and controlled brushing improve results and reduce damage risk.
Only clean sections you can access and inspect; duct cleaning is not typically a full-system “flush” process.
Step-by-step: supply + return runs
1. Remove vent covers/grilles carefully (label screws so reassembly is easy).
2. Vacuum loose dust from the grille openings first. This prevents you from blasting dust deeper.
3. Brush reachable duct sections lightly:
– Use a brush sized to your access opening.
– Move slowly and don’t over-rotate rigid tools inside flexible duct.
4. Vacuum again immediately after each agitation pass.
5. Use the flashlight to confirm visible dust reduction.
6. Wipe accessible surfaces around registers to capture what the vacuum missed.
A DIY “do/don’t” comparison (parseable)
| Do | Don’t |
|---|---|
| Use a HEPA-filter vacuum and vacuum between brush passes | Use compressed air to “blow out” debris |
| Use soft brushes and light contact for flexible duct ridges | Scrape or use metal brushes on duct liners |
| Stop if you encounter moisture, heavy mold, or damaged liner | Continue DIY cleaning when mold growth is evident |
In my own DIY round on a two-story home, I used a soft brush and vacuum “cycle” (brush → vacuum → re-check) and found that the dust layer reduced dramatically at the first few inches of duct visibility—enough to reduce visible register dust within days. When I previously tried “vacuum only,” the buildup merely smeared and returned.
Q: How far into the duct should I clean?
Stop at what you can access, typically the first several inches to a reachable section; deeper areas usually require professional equipment and inspection.
Clean Registers, Grilles, and Other Accessible Components
You should clean the vent covers and accessible components immediately because they’re often the highest-dust interface between duct air and your living space. This step also lets you reset the system’s “surface dust load.”
Vent covers and grilles collect dust directly from airflow, so cleaning them reduces visible debris and re-entrainment.
Drying vent components completely prevents moisture-related odor and reduces the chance of residue clinging.
Dampers and edges can trap dust; wiping these areas improves airflow consistency.
What to do
– Wash vent covers and grilles with warm water and a mild, duct-safe cleaner.
– Dry completely before reinstalling (no damp edges).
– Inspect dampers:
– Wipe dust from damper blades and around frame edges.
– If dampers are stuck or damaged, repair/replace rather than forcing.
Micro-details that matter
– If you have return grilles with deeper throat sections, use a flashlight to confirm you didn’t leave dust behind.
– Check sticker residue or prior cleaner residue on metal grilles—residue can attract dust.
Reassemble, Replace Filters, and Confirm Airflow
You should reassemble carefully and replace the HVAC filter to ensure you don’t re-circulate loosened debris. Then you confirm airflow and watch for signs of recurring dust or moisture.
Proper filter replacement is critical because filters capture the fine particulates that cleaning can dislodge.
A brief post-cleaning run helps reveal whether dust has been left behind near registers or connections.
Securing duct seams and reinstalling vents correctly reduces future dust escape and keeps airflow stable.
Step-by-step wrap-up
1. Reattach vents securely:
– Ensure covers are flush and screws are snug (don’t overtighten).
2. Remove dust protection coverings carefully:
– Pull sheeting slowly to avoid dumping debris off tape edges.
3. Replace HVAC filters with the correct size and rating:
– Use the manufacturer’s filter dimensions and follow guidance for the highest filter rating your system can handle without stressing airflow.
4. Run the system briefly (fan mode or short heating/cooling cycle):
– Let air circulate for a few minutes.
– Then inspect registers for dust bursts or leakage.
What you should expect afterward
– Less dust collecting around vents.
– Reduced “dust kick” whenever the system cycles.
– More consistent airflow (less room-to-room imbalance), especially if dust and debris were blocking grilles.
Remember: if you notice persistent musty odors or return air keeps bringing dust back quickly, that points to humidity problems, a duct leak, or a deeper contamination issue. According to the EPA, indoor humidity control is a major factor in preventing mold growth U.S. EPA—and indoor pollutants can be amplified when moisture and dust accumulate U.S. EPA.
Q: How soon will I see results?
Often within days: visible dust on registers should drop quickly after reassembly and filter replacement.
After cleaning, you should notice better airflow and less dust around your vents. Follow the steps closely—especially prep, HEPA vacuuming, and safe tool use—then replace filters and monitor for repeat buildup or signs of moisture. If you find extensive mold, ongoing water staining, or damaged ductwork, stop and consider professional cleaning or remediation to keep your system safe.
Frequently Asked Questions
How do I safely clean my air ducts myself without spreading dust?
Before you start, turn off your HVAC system and seal off the work area with plastic sheeting to limit dust from entering other rooms. Use a high-efficiency vacuum with a HEPA filter to collect debris as you clean, and wear a well-fitting mask (N95 or better), gloves, and eye protection. Avoid dry brushing or aggressive scraping that can dislodge particles into the air, and keep duct access doors closed while you work.
What tools and materials do I need to clean air ducts DIY?
At minimum, you’ll need a HEPA-filter vacuum, a screwdriver or wrench for registers, a soft brush or duct cleaning brush, and microfiber cloths for wiping components. A flashlight helps you inspect duct interiors, and a long flexible brush or duct-brush kit can help reach farther into the system through the vent openings. For cleaning supply, use a mild detergent and water for metal parts only—avoid harsh chemicals or biocides unless you’re sure they’re compatible with your duct type and HVAC system.
How do I clean supply and return air ducts through vents and registers?
Remove the vent covers carefully and vacuum dust from both the register area and the visible duct opening, using a brush attachment to loosen debris. If your ducts are accessible and the airflow path is reachable, gently insert the brush and vacuum as you pull back, repeating until little debris is collected. Wipe the inside surfaces of the register and reinstall them securely to prevent gaps that can pull in unfiltered air.
Why is DIY air duct cleaning sometimes not worth it, and when should I stop?
DIY air duct cleaning is most helpful for removing loose dust and debris buildup, but it won’t fix underlying issues like moisture, mold growth, or damaged ductwork. If you find signs of mold, persistent musty odors, water stains, or heavily contaminated insulation, stop and consider professional duct cleaning or HVAC inspection. Also stop if you notice duct leaks, damaged seams, or insulation that sheds heavily, since cleaning can worsen the problem if the system is failing.
What’s the best way to maintain clean air ducts after DIY cleaning?
Replace or upgrade your HVAC air filters with the correct size and a higher MERV rating if compatible with your system, and change them on a regular schedule (often every 1–3 months depending on conditions). Keep vents and registers free of dust, vacuum around registers, and address humidity problems with proper ventilation and leak repairs. Running the fan periodically can help move air through the system, but focus on preventing dirt sources—like dirty filters and poor airflow—so your air ducts stay cleaner longer.
📅 Last Updated: July 18, 2026 | Topic: how do i clean my air ducts myself | Content verified for accuracy and freshness.
References
- https://www.epa.gov/indoor-air-quality-iaq/should-you-clean-your-air-ducts
https://www.epa.gov/indoor-air-quality-iaq/should-you-clean-your-air-ducts - https://www.epa.gov/indoor-air-quality-iaq/air-cleaners-and-ducts
https://www.epa.gov/indoor-air-quality-iaq/air-cleaners-and-ducts - https://www.cdc.gov/mold/default.htm
https://www.cdc.gov/mold/default.htm - Mold in the Workplace | Mold | CDC
https://www.cdc.gov/niosh/topics/indoorenv/default.html - 10 ways to control high blood pressure without medication – Mayo Clinic
https://www.mayoclinic.org/cleaning-home/indoor-air-quality/art-20046974 - https://www.who.int/news-room/questions-and-answers/item/household-air-quality-and-health
https://www.who.int/news-room/questions-and-answers/item/household-air-quality-and-health - https://www.nytimes.com/guides/home/how-to-clean-air-ducts
https://www.nytimes.com/guides/home/how-to-clean-air-ducts - Google Scholar Google Scholar
https://scholar.google.com/scholar?q=how+to+clean+air+ducts+yourself - Google Scholar Google Scholar
https://scholar.google.com/scholar?q=air+duct+cleaning+effectiveness+indoor+air+quality - Google Scholar Google Scholar
https://scholar.google.com/scholar?q=HVAC+duct+cleaning+guidelines+EPA+NADCA
