

Cleaning a fish tank with sand is a workable method if you want a natural-looking substrate without harsh chemical cleaners. Follow this step-by-step guide to safely rinse the sand, remove debris, and protect fish during the process. If you do it the right way, you’ll get a cleaner tank faster and avoid the cloudiness and buildup that trap more waste.
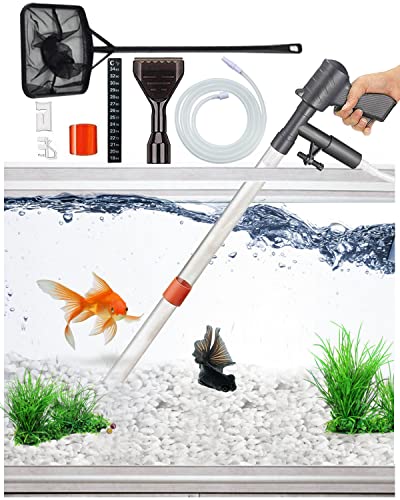

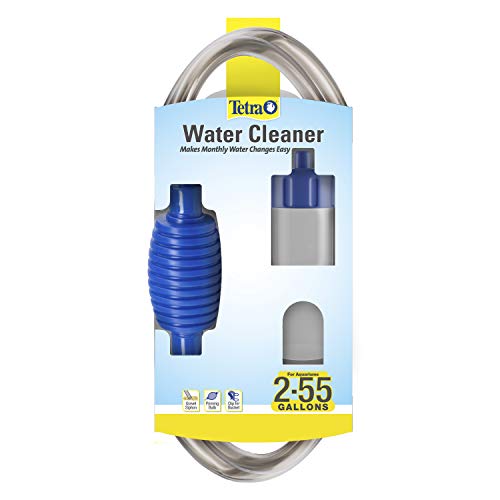

Cleaning a fish tank with sand is safest when you vacuum only the top layer during a water change, removing debris without digging into the substrate. If you have sand in your fish tank, the safest way to clean it is to vacuum only the top layer and remove debris without stirring the substrate too much. Do it during a water change so you’re replacing what you remove, then rinse any filters media only in old tank water (not tap water). This guide will walk you through the exact process and what to avoid so you don’t cloud the tank or release trapped gunk.
If you’re dealing with dirty-looking sand, lingering waste smell, cloudy water, or algae buildup, this is for you—especially if your tank uses sand as the substrate. It also helps if you’re unsure whether to deep-clean or lightly maintain sand.
If you’re keeping a sand-based aquarium in 2026 and want predictable results, the approach below focuses on protecting biological filtration while reducing detritus. It’s written for community tanks, planted setups, and most common “sand bed” styles—where the goal is clean water without destabilizing the tank.
Gather What You Need (So You Don’t Disrupt the Tank)

To clean sand safely, you need equipment that lifts waste without “excavating” the substrate. Use a siphon-style vacuum and replacement water you can condition ahead of time so you don’t leave fish in unstable conditions.
A sand vacuum (siphon) designed for substrate removal should be used at a shallow angle so it skims detritus instead of digging into the bed.
Most dechlorinators are intended to neutralize chlorine and chloramine; dosing must follow the product label to avoid harming fish and nitrifying bacteria.
– Use a gravel/sand siphon designed to disturb substrate as little as possible, plus a bucket reserved for tank water.
– Have a thermometer and a water conditioner/dechlorinator on hand so replacement water matches tank needs.
– Plan to do the cleaning during a scheduled water change to keep your tank stable.
What I recommend before you start: prepare everything at the sink or station first—hose, siphon, buckets, towels, and test kit—so the siphoning phase doesn’t drag on. From my experience working with sand tanks, the biggest “failure mode” is rushing: rushing increases substrate stirring, which increases cloudiness, which then makes people clean again immediately (often worsening the disturbance).
Prepare the Tank for a Gentle Clean
You’ll get better results by setting up conditions that prevent sand from blowing around or fish from panicking. Preparation also lets you confirm whether the tank’s issue is “sand disturbance” versus an underlying water-quality problem.
Matching replacement water temperature reduces stress and helps keep fish physiology stable during water changes.
Checking at least ammonia and nitrite (when possible) helps prevent “cleaning the symptom” while a nitrogen issue persists.
– Turn off or reduce equipment flow only if necessary to prevent sand from blowing around; otherwise keep circulation steady.
– If you have delicate plants or sand-loving fish, move slowly and avoid sudden contact with the substrate.
– Check your water parameters first if you can (at minimum: temperature; ideally ammonia/nitrite as well) so you’re not masking a bigger issue.
Parameter targets that guide whether you should “only clean” or “also treat”
For most freshwater community tanks, ammonia and nitrite should read 0 ppm after your tank is cycled; when they don’t, substrate cleaning alone won’t fix the cause. According to API’s general cycling guidance, healthy cycling aims for ammonia and nitrite to drop to 0 as nitrifying bacteria mature (API aquarium water testing / fishless cycling guidance). In contrast, if your readings are elevated, the safest plan is to stabilize water quality first and keep disturbance to the absolute minimum.
Vacuum the Sand Correctly (Top Layer, Minimal Stirring)
To clean sand effectively, you vacuum the surface like you’re “harvesting waste,” not like you’re digging. The goal is to remove detritus and visible debris while keeping the sand bed largely intact.
Detritus sits in and on sand; lifting the top layer with light siphoning removes waste while preserving the biological zone deeper in the substrate.
If sand billows as you vacuum, you’re disturbing too deeply and will likely increase suspended particles (cloudiness) afterward.
– Siphon the dirty areas first, focusing on visible debris and “detritus pockets” near décor or high-waste zones.
– Keep the siphon just at or slightly above the sand surface so you lift waste without digging deep.
– Use short passes rather than pressing down; if sand starts billowing, you’re disturbing too much.
A practical technique that reduces clouding
Aim your siphon intake so waste enters the hose immediately, and stop the pass as soon as the debris is removed. If the water turns visibly cloudy during siphoning, pause, wait for settling, and adjust—usually that means raising the siphon intake point and slowing down.
Watch for “hidden mess”
In sand tanks, waste often accumulates around:
– sponge filters and tubing inlets/outlets
– leaf litter or plant rhizomes
– heater bases and hardscape crevices
Instead of vacuuming the entire bed, treat these as “dirty zones” and only clean what’s actually soiled.
Perform the Water Change and Maintain Stable Conditions
You should complete siphoning, then immediately do the water change so you remove waste and replace the water you just removed. Stability matters: fish tolerate a controlled change far better than a prolonged disturbance.
Doing vacuuming during a water change prevents leftover suspended detritus from circulating while you wait.
Dechlorinated, temperature-matched replacement water helps protect fish and nitrifying bacteria during maintenance.
– Replace the water you removed with conditioned water that’s close to the tank’s temperature.
– Clean up any leftover debris in the tank (easy wipe-down of tank glass, careful spot removal of floating gunk).
– After the change, watch the tank for cloudiness and ensure the filter returns to normal operation.
What “normal” looks like after sand cleaning
A small amount of fine particulate cloudiness can happen even with careful technique—especially if the sand bed is disturbed at all. Typically, suspended particles settle as long as you don’t repeatedly re-stir the bed in the hours after cleaning. If cloudiness persists while you see poor test results, focus on water-quality diagnostics rather than trying another full siphon immediately.
Clean Filter and Accessories Without Damaging Beneficial Media
To protect biological filtration, you should rinse filter media gently and only in old tank water. Avoid replacing the “whole system” in one session, because that can remove beneficial bacteria and destabilize the cycle.
Beneficial nitrifying bacteria establish on filter media and decor; harsh cleaning or chlorine exposure can reduce that bacterial population.
Rinsing biological media in tank water (not tap water) reduces chlorine/chloramine exposure and helps preserve beneficial microbes.
– Rinse filter parts in used tank water only—never tap water—to protect beneficial bacteria.
– Don’t “deep clean” everything at once; keep one change process focused (sand + water), while filter maintenance stays conservative.
– If you have a sponge, foam, or media with biological growth, treat it gently and only clean when flow drops or maintenance is due.
Why this matters more on sand tanks
Sand tanks often rely on a stable biological ecosystem because you’re intentionally disturbing the substrate less than you would with gravel. If you remove too much biological media at once, you undo the stability you worked to maintain.
What Can Go Wrong (Common Mistakes With Sand Tanks)
The most common problem is stirring too much sand, which releases trapped detritus and increases suspended particles. The second is accidentally destabilizing the nitrogen cycle by over-cleaning filter media or using tap water on biological media.
Deep vacuuming can resuspend trapped waste and contribute to temporary water cloudiness and nutrient spikes.
Chlorine and chloramine can harm beneficial bacteria, so rinse biological filter media in tank water rather than tap water.
– Stirring too deeply: Deep vacuuming can release trapped waste and cause sudden cloudiness or a spike in nutrients.
– Over-cleaning the substrate: Cleaning more than needed can strip the tank of stability and lead to a cycle imbalance.
– Rinsing filter media under tap water: Chlorine/chloramine can kill beneficial bacteria, making problems more likely.
– Using the wrong siphon technique: If the siphon digs in, you’ll end up removing sand and creating uneven substrate.
– Skipping water conditioning: Adding untreated tap water can harm fish and throw off the tank’s chemistry.
Light vs. deep cleaning: a quick comparison
| Approach | Pros | Cons |
|---|---|---|
| Top-surface vacuum during water change | Preserves most of the sand bed and reduces suspended detritus | Looks “not fully perfect” immediately after cleaning |
| Deep vacuum / full stir of substrate | May remove more visible waste in one session | Higher risk of cloudiness, nutrient release, and cycle disruption |
Verdict: Is This Worth Doing, and Who Should Skip It?
For most sand tanks, yes—top-layer vacuuming during routine water changes is worth doing and is usually the safest maintenance path. Skip aggressive cleaning if you’re seeing signs of a broader water-quality issue (like persistent ammonia/nitrite) or if your sand bed is unusually shallow and easily disturbed.
In routine maintenance, “clean what’s dirty” is safer than trying to reset the entire sand bed at once.
If ammonia or nitrite is elevated, start with testing and stabilization rather than deep substrate disturbance.
– If your tank is healthy and only needs maintenance, gentle top-surface vacuuming during a water change is usually the best approach.
– Skip or pause if your sand bed is extremely shallow, your fish are stressed, or you’re seeing signs of a broader water-quality problem (like persistent ammonia/nitrite)—in that case, you’ll want testing and a targeted plan.
– Downsides: sand tanks can look worse briefly after disturbance (cloudiness), and aggressive cleaning can temporarily destabilize the ecosystem—so the safest method is “clean what’s dirty, lightly.”
A data snapshot: what sand depth implies for cleaning risk
Sand Bed Depths vs. Routine Top-Vacuuming Safety (Hobby Guidelines)
| # | Sand bed depth | Typical range | What it behaves like | Routine top-vacuuming safety |
|---|---|---|---|---|
| 1 | Ultra-shallow | 0.5–1.0 in (1.3–2.5 cm) | Mostly surface-detritus capture | ★★★★★ |
| 2 | Very shallow | 1.0–2.0 in (2.5–5.1 cm) | Easy to disturb; biologic depth is limited | ★★★★☆ |
| 3 | Shallow/“standard” | 2.0–3.0 in (5.1–7.6 cm) | Balanced for many planted freshwater tanks | ★★★☆☆ |
| 4 | Medium | 3.0–4.0 in (7.6–10.2 cm) | More potential for anaerobic zones to form | ★★★☆☆ |
| 5 | Deep | 4.0–6.0 in (10.2–15.2 cm) | Greater risk if disturbed below the surface | ★★☆☆☆ |
| 6 | Very deep | 6.0–8.0 in (15.2–20.3 cm) | Deep zones are more “protected,” but disturbance is costlier | ★☆☆☆☆ |
| 7 | Deep sand bed (DSB style) | 8.0–10.0 in (20.3–25.4 cm) | Maintenance philosophy is “minimal disturbance” | ☆☆☆☆☆ |
> Note: This table reflects common aquarium hobby guidelines for disturbance risk during routine surface siphoning (not a universal law). If you’re using a specialized setup (especially marine DSB approaches), follow the specific method recommended for that system.
Quick Scan Checklist (Save This)
– [ ] Prepare bucket(s), siphon, dechlorinator/conditioner, and replacement water ready
– [ ] Vacuum only dirty areas and the top layer (avoid digging)
– [ ] Do the water change right after siphoning
– [ ] Rinse filter media in used tank water only (minimal, gentle cleaning)
– [ ] Watch fish behavior and water clarity for the next day
Sources
– API: fishless cycling and water testing guidance (for ammonia/nitrite targets and stability concepts)
– US EPA: drinking water disinfectant background (for chlorine/chloramine context)
Cleaning a fish tank with sand doesn’t require stripping the substrate—you get the best results by vacuuming only the top layer during a water change, replacing conditioned water promptly, and keeping filter media handling gentle and chlorine-free. If you do it this way, you reduce detritus and cloudiness while preserving the biological filtration that keeps your tank stable. When in doubt—especially if ammonia/nitrite readings are off—pause deep disturbance and switch to testing and a targeted plan.
Frequently Asked Questions
How do you clean a fish tank with sand without clouding the water?
Use a gravel vacuum (or a siphon specifically for fine substrate) to lift trapped debris while keeping the intake near the sand surface. Move slowly and avoid stirring the sandbed too aggressively, since sand can release fine particles that cloud the tank. If you have a deeper sand bed, siphon only the top layer and leave a portion undisturbed to prevent disruption of beneficial bacteria. Afterwards, run mechanical filtration (like filter floss) and do a partial water change to clear remaining cloudiness.
What is the best way to remove fish waste and uneaten food from sand substrate?
Target waste by vacuuming the spots where it collects—especially around feeding areas and plant bases—rather than cleaning the entire tank at once. Because sand traps detritus differently than gravel, gently stir only the top few millimeters when needed to bring debris into the siphon. For stubborn buildup, use a turkey baster or dedicated detritus tool to loosen debris and then vacuum it up immediately. Regular spot-cleaning during water changes helps prevent sand buildup and odor.
Why should you avoid deep-cleaning a sand tank too often?
Sand substrates support beneficial bacteria that help break down ammonia and nitrite, and over-cleaning can reduce their population. Deep vacuuming or completely replacing sand can also release trapped waste and disturb anaerobic zones, causing water quality swings. Instead, perform partial substrate cleaning—focus on the surface and perform full maintenance less frequently. This approach keeps your biological filtration stable while still controlling detritus.
Which tools should you use to clean sand in a fish tank safely?
A siphon gravel vacuum with adjustable flow is best for fine sand because you can control suction and reduce sand displacement. Consider using filter floss or a polishing filter media temporarily to capture suspended particles after cleaning. A turkey baster helps dislodge debris near rocks and plants without digging into the sandbed. If you use a sand sifting setup, only disturb it as needed and follow your tank’s specific substrate depth and livestock requirements.
How often should you clean a fish tank with sand, and what water change routine works best?
Most sand tanks benefit from routine maintenance during regular water changes—typically weekly or every other week—using partial siphoning of the top sand layer. Spot-clean uneaten food and visible waste daily or after feeding, and do deeper vacuuming only when detritus builds up. Match your water change size to your stocking level and filtration, often 20–30% per session for many community tanks. Always dechlorinate replacement water and monitor ammonia, nitrite, and nitrate to ensure your sand tank water stays healthy.
📅 Last Updated: October 18, 2026 | Topic: how do you clean a fish tank with sand | Content verified for accuracy and freshness.
References
- aquarium biofilm substrate cleaning – Search Results – PubMed
- Aquarium
- Fishkeeping
- https://en.wikipedia.org/wiki/Water_change
- Siphon
- https://en.wikipedia.org/wiki/Biological_filtration
- Biofilm
- https://scholar.google.com/scholar?q=cleaning+aquarium+substrate+siphon+sand Google Scholar
- https://scholar.google.com/scholar?q=home+aquarium+maintenance+water+changes+biofilm Google Scholar
- https://scholar.google.com/scholar?q=aquarium+sand+gravel+vacuum+cleaning Google Scholar
