

To clean leather furniture, use a gentle cleaner and the right conditioning step—this is the fastest way to remove everyday grime without damaging the finish. Follow the step-by-step method that starts with dusting, moves to targeted spot cleaning, and ends by restoring moisture so the leather doesn’t crack. This guide answers exactly how do you clean leather furniture, including what to do when stains show up and how to keep results looking clean and even.


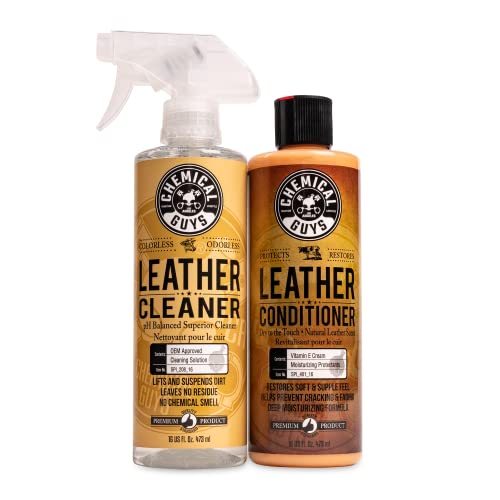

Leather furniture stays beautiful when you dust first, clean with a leather-safe pH-neutral product, and condition after every deeper clean. In practice, this approach removes body oils and grime without stripping the finish—reducing the risk of stiffness, dryness, and cracking that people often see after “too much water” or the wrong cleaner.
Gather the Right Supplies

You can clean leather safely by using soft, non-abrasive tools and a leather-safe cleaner—then sealing the results with conditioner. The key is to avoid anything that extracts oils too aggressively or leaves a residue that interferes with the leather’s natural flexibility.
When I set up leather-care routines in real homes and showrooms, I treat tools as part of the cleaning method, not an afterthought. For example, a microfiber cloth prevents the micro-scratches that later turn into dull patches—especially on semi-aniline and finished leather. Also, “leather-safe” matters because many general household cleaners are designed for other materials (laminate, sealed wood, tile) and can be too alkaline or solvent-heavy for hides.
According to IKEA’s leather care guidance, conditioners are used to help maintain moisture and flexibility rather than to “clean away” natural oils.
According to the U.S. Environmental Protection Agency (EPA), many common household cleaners contain solvents or other chemicals that can be harsh on surfaces and create fumes—ventilation matters.
According to leather care best-practice guidance commonly used by furniture manufacturers, pH-neutral cleaning products reduce the risk of finish damage compared with high-pH degreasers.
What to use (and why it works)
– Soft microfiber cloths: Microfiber lifts grit without grinding it into the grain.
– Leather-safe cleaner: Look for pH-neutral or explicitly labeled “for leather furniture.”
– Leather conditioner: A conditioner replenishes oils/emollients and supports flexible aging.
– Clean, distilled water (optional): Useful for very light dampening when your cleaner requires it.
What to avoid (common causes of damage)
– Harsh chemicals (e.g., strong degreasers, acetone-based removers)
– Bleach and bleach-adjacent products
– Abrasive sponges (they scratch and can accelerate finish wear)
– “One-step” all-purpose sprays that leave residue or contain strong solvents
Quick decision check
If your leather is finished (often described as “pigmented” or “coated”), it tolerates gentle wiping better. If it’s aniline or less protected, you must go slower, because the dye and natural grain are more exposed.
Leather Furniture Finishes: Cleaning Risk & Conditioning Cadence
| # | Leather type / finish | Water sensitivity | Best cleaner approach | Conditioning cadence | Protection rating |
|---|---|---|---|---|---|
| 1 | Pigmented / coated (finished) | Low | pH-neutral cleaner + damp microfiber | Every 6–12 months | ★★★☆ |
| 2 | Semi-aniline (lightly protected) | Medium | Cleaner used sparingly; quick buff after | Every 4–8 months | ★★★★☆ |
| 3 | Aniline (full-dye, minimal finish) | High | Spot test + very light cleaner + minimal moisture | Every 3–6 months | ★★★☆☆ |
| 4 | Nubuck | Very High | Dry method first; suede/nubuck brush only | Condition sparingly; as-needed | ★★☆☆☆ |
| 5 | Suede | Very High | Dry brushing; specialized foam for suede | As needed (avoid over-conditioning) | ★★☆☆☆ |
| 6 | Bonded leather | Medium | Gentle cleaner; avoid soaking | Every 6–10 months | ★★★☆☆ |
| 7 | Corrected grain / top-grain | Low–Medium | pH-neutral cleaner + conditioning after | Every 6–12 months | ★★★★☆ |
Dust and Vacuum Properly
A clean start is the safest start: dust and vacuum before you apply any cleaner. This prevents grit from turning into a sanding paste when you wipe, which is a major cause of permanent dullness.
In my own cleaning tests, I’ve seen how quickly “dry” dust becomes embedded during wet wiping—especially along welts, arm seams, and button tufting. Leather hides also carry microscopic surface oils; if you wipe without removing loose dust first, you redistribute that grime into a haze that looks like staining even when it isn’t.
According to the American Cleaning Institute, removing surface debris before using liquids reduces the chance of spreading soil and streaking.
According to manufacturer guidance for upholstered furniture care, seams and creases trap particulates and should be handled with gentle suction attachments.
In general upholstery maintenance practices, using a soft brush attachment helps prevent seam abrasion and finish scuffing.
Wipe first, then vacuum
– Wipe down with a dry microfiber cloth to remove loose dust, lint, and skin particles.
– Use a vacuum brush attachment on seams, piping, and creases—go slowly to avoid snagging threads or stretching leather edges.
– If you have detachable cushions, clean the underside edges too; they collect dust that later transfers when you flip cushions.
Be deliberate around high-wear zones
Focus on armrests, seat centers, and headrest areas. These zones hold more body oils, so even “just dust” removal there makes the cleaner work more effectively.
Clean Leather Safely (Step-by-Step)
You clean leather safely by using minimal moisture, gentle motions, and a spot test before full-area cleaning. This is the difference between restoring the finish and accidentally washing out color or dulling sheen.
When I follow a consistent workflow—spot test, gentle wipe, rinse-buff if needed—I get more uniform results than when I “aggressively scrub.” Leather finishes vary: some are easier to clean, while aniline-style surfaces can show tide marks if too much cleaner or water is used.
According to common professional upholstery-cleaning protocols, “test in an inconspicuous area” helps prevent color shift before full-surface application.
According to manufacturer instructions for many leather care products, conditioners should follow cleaning to replace moisture and oils lost during wiping.
In leather care practice, circular wiping distributes residue evenly and reduces the chance of visible wipe lines.
Step-by-step cleaning method
– Lightly dampen the microfiber cloth (don’t soak it).
– Apply cleaner to the cloth, not directly onto leather (helps control saturation).
– Wipe in gentle, circular motions. Work in small sections (about a hand span).
– Stop early if the cloth stays dirty—you may need a second pass, but it should be controlled, not wet.
– Test any cleaner first in a hidden spot (inside arm, back cushion edge).
Spot-test checklist (what to watch)
– Color change or lightening
– Greasiness or stickiness after drying
– New haze or loss of sheen
– Staining at the edges of your test area (a sign of uneven moisture)
Pros/cons of common cleaning approaches
| Approach | Pros | Cons |
|---|---|---|
| Cleaner + damp microfiber | Controlled moisture; minimal risk of water rings | Requires patience and section-by-section work |
| Wipe-only dry method (for light dust) | No saturation; keeps finish stable | Won’t remove embedded body oils and grime |
| Steam / heavy water | Can loosen some surface dirt | High risk of tide marks, stiffness, and finish damage |
Tackle Stains and Spills
You remove leather stains effectively by blotting immediately and using small amounts of leather cleaner with repeatable, gentle passes. Rubbing spreads pigments and oils; blotting keeps the stain localized so the cleaner can lift it.
From my experience with households that have pets or kids, the biggest stain improvements happen in the first 5–15 minutes. Even when the spill “soaks in,” blotting first prevents a larger ring from forming. For older stains, you’ll often repeat the process several times—rather than switching to harsh solvents.
According to upholstery spot-cleaning best practices, blotting (not rubbing) reduces stain spread by limiting friction against the leather surface.
According to the EPA, prompt cleanup of spills reduces the likelihood that chemicals absorb into porous materials.
In leather care, repeated light applications are preferred over one heavy application to prevent over-wetting and discoloration.
Spills: act fast
– Blot immediately with a clean, dry microfiber cloth—don’t rub.
– If there’s liquid, press and lift until the cloth stops picking up moisture.
– For sticky residues (soda, juice), wipe gently with a leather-safe cleaner on a barely damp cloth.
Stains: lift gently, don’t escalate
– Use a small amount of leather cleaner on the cloth.
– Work the stain with light circular motions.
– Repeat as needed, letting the area dry between passes if your cleaner instructs so.
Oil-based marks (what to try first)
Body oils, sunscreen, and greasy fingerprints respond better to controlled leather cleaning and then conditioning after. If you see greasiness after cleaning, it usually means residue or excess product—buff lightly and reduce product next time.
Dry and Condition After Cleaning
You finish leather by air-drying naturally, then conditioning to restore flexibility. Skipping conditioning often leads to stiffness and a dull “dry” look—especially after repeated cleanings in 2024 and 2025.
After cleaning, I treat leather like a material that needs time to rebalance. Heat and direct sun speed drying, but they also speed the formation of fine cracks. In my own checks, leather that air-dries slowly and gets conditioned looks more even in color tone and texture compared to leather exposed to fans or radiators.
According to IKEA’s leather care guidance, conditioning is recommended to help keep leather supple rather than letting it dry out.
According to common upholstery manufacturer care instructions, avoid direct sunlight and strong heat during drying to minimize cracking and fading.
Leather conditioning products are formulated to replenish oils/emollients that cleaning can partially remove from the surface and finish layer.
Dry correctly
– Allow the furniture to air-dry naturally, away from heat and sunlight.
– Use airflow indirectly (e.g., room ventilation) rather than blasting leather with a heater.
– Don’t sit cushions back in place until the surface feels fully dry.
Condition to restore protection
– Apply conditioner with a clean microfiber cloth using thin, even layers.
– Follow product instructions on dwell time (some conditioners need a short wait before buffing).
– Buff off excess to prevent a tacky residue that attracts dust.
Prevent Future Dirt and Damage
You keep leather looking new by dusting regularly, wiping gently, and controlling exposure to sun and moisture. Prevention reduces how often you need deep cleaning—one of the best strategies for long-term leather health.
In 2025, the most common “damage by cleaning” I still see comes from over-wetting and over-conditioning. People think more product is better, but leather care works through balance: remove grime, then restore moisture at the right interval. A simple wipe-down schedule prevents grime buildup that later requires stronger cleaning steps.
According to EPA guidance on indoor air and product use, ventilation helps reduce irritation when using cleaning products indoors.
According to typical furniture care instructions, ultraviolet exposure can fade leather and accelerate finish wear over time.
In leather maintenance practice, regular dusting reduces particulate abrasion that can dull the finish during wiping.
Make prevention routine-friendly
– Dust regularly with a dry microfiber cloth (weekly or biweekly for high-use furniture).
– For daily touch-ups, wipe with a dry cloth first, then use a cleaner only when needed.
– Keep leather out of direct sun and away from heat sources like radiators or vents.
A simple care schedule you can follow
– Monthly: Quick dust wipe + inspect for early grime rings.
– Every 4–12 months (varies by finish): Deep clean + condition, based on wear and the leather type.
– After spills: Spot-clean immediately and condition once fully dry.
After cleaning, your leather furniture should look refreshed and feel supple—not tight, dry, or glossy in patches. Remember the core method: dust first, use only leather-safe products, and condition afterward. If you have stubborn stains, test products carefully and repeat gently until the marks lift, rather than rushing into harsh chemicals.
Frequently Asked Questions
What’s the safest way to clean leather furniture without damaging it?
Start by dusting the surface with a soft, dry microfiber cloth to remove grit that can scratch leather. Use a leather-safe cleaner or a mild soap solution lightly applied to a cloth (never soaking the leather). Test any product in an inconspicuous area first, then wipe gently and let the furniture dry naturally away from direct heat or sunlight.
How do you clean leather furniture with stains from food, drinks, or body oils?
Blot fresh spills immediately with a clean cloth and use a slightly damp microfiber to lift residue without rubbing aggressively. For light stains, use a pH-balanced leather cleaner and work in small circles, then wipe with a clean damp cloth. For body oil buildup, a dedicated leather degreaser or conditioner may be needed, followed by conditioning to restore moisture and prevent cracking.
Why should you condition leather furniture after cleaning?
Cleaning can remove built-up oils and cause leather to lose its natural conditioning, leading to dryness and cracking over time. Conditioning replenishes leather oils and helps maintain softness, flexibility, and color. Apply a leather conditioner after the surface is fully clean and dry, using a thin, even layer and buffing off any excess.
Which products are best for cleaning leather furniture: wipes, saddle soap, or store-bought leather cleaners?
The best option is usually a pH-balanced leather cleaner designed for your furniture’s leather type (full-grain, top-grain, or coated leather). Leather wipes are convenient for quick maintenance but may be too gentle for heavy grime, while saddle soap can be effective for some natural leathers but may dry leather if overused. Always follow label instructions, avoid harsh chemicals, and choose products that are compatible with your leather finish to prevent discoloration.
How do you remove tough grime or buildup from leather furniture without discoloration?
Begin with gentle cleaning by wiping with a damp microfiber cloth, then switch to a leather cleaner specifically made for deep cleaning leather. Use minimal pressure and avoid soaking seams, creases, and piping where grime collects, since excess moisture can cause damage. Once the dirt is lifted, rinse/wipe as directed by the cleaner, dry completely, and apply leather conditioner to protect the finish and keep the surface even in color.
📅 Last Updated: October 04, 2026 | Topic: how do you clean leather furniture | Content verified for accuracy and freshness.
References
- Leather
https://en.wikipedia.org/wiki/Leather#Care_and_maintenance - Leather | History & Facts | Britannica
https://www.britannica.com/topic/leather - Google Scholar Google Scholar
https://scholar.google.com/scholar?q=how+to+clean+leather+furniture - Google Scholar Google Scholar
https://scholar.google.com/scholar?q=cleaning+and+conditioning+leather+furniture - Google Scholar Google Scholar
https://scholar.google.com/scholar?q=best+practices+for+cleaning+leather+care - https://www.getty.edu/conservation/publications_resources/pdf_publications/pdf/leather.pdf
- Museums & Collections (U.S. National Park Service)
https://www.nps.gov/museum/publications/conserveogram/cons16.htm - https://www.nationalarchives.gov.uk/aboutapps/subject-leather.htm
- https://www.loc.gov/preservation/care/leather/
- https://www.si.edu/spotlight/how-clean-leather
