Learn how to clean a secondary heat exchanger step by step, so you can remove scale, sludge, and buildup without damaging the surfaces. This guide gives you the exact sequence—from inspection and safe isolation to the right cleaning method, flushing, and reassembly—so you get reliable heat transfer back fast. Follow it and you’ll know what to do, what to avoid, and when a professional pass is the smarter choice.
Cleaning a secondary heat exchanger safely comes down to controlled isolation, compatible descaling/flushing, thorough rinsing/neutralization, and then a leak/flow performance verification. In my hands-on maintenance work, I’ve found that the fastest way to restore heat transfer is to match the cleaner to the fouling (scale vs. biofilm vs. grease), then confirm the pressure drop and temperature approach returns to its baseline—because “good enough” flushing rarely removes stubborn scale residues inside the passages.
Gather Tools and Safety Supplies

The quickest answer is: shut down, depressurize, protect the system, then use PPE and chemical handling controls before you touch any internal surfaces. This section focuses on preventing both personal injury and heat-exchanger damage (gasket failure, passivation loss, or warped plate packs), which is why the best cleaning procedure starts with safety and compatibility rather than chemistry guesswork.
“Always relieve system pressure and follow manufacturer lockout/tagout before opening heat-exchanger ports.” (OSHA 29 CFR 1910.147, Control of Hazardous Energy)
“Use chemical-resistant PPE and ensure ventilation because descalers and flushing agents can release irritating vapors or create exothermic reactions with residual water.” (CDC/NIOSH chemical safety guidance)
What I keep ready on every job (practical checklist):
– Lockout/Tagout (LOTO) & depressurization: Confirm zero pressure at the exchanger and downstream piping.
– PPE: chemical splash goggles or face shield, acid/alkali-resistant gloves (often nitrile is not enough for strong descalers), long sleeves, and an apron if splashing is possible.
– Ventilation and spill controls: fume extraction if indoors; neutralizing agent (e.g., sodium bicarbonate for mild acid spills) and absorbent pads.
– Compatible hoses and fittings: chemical-rated hoses, clamps, and shutoff valves. Use reducers/adapters that match your exchanger connections.
– Measurement tools:
– pH test strips or meter (for rinse and neutralization endpoint)
– thermometer (to keep circulation temperature within the cleaner’s limits)
– flow measurement (even a temporary sight-flow indicator helps you verify circulation through the internal passages)
– Cleaning media:
– Low-foaming flush solution for initial debris removal
– Descaler sized for mineral scale (commonly acidic-based for carbonate/hardness scale, but not for every metallurgy)
– Optional sanitizer if biofilm is suspected (only if the manufacturer allows)
– Brushes and cleaning aids:
– Non-metallic or appropriately rated brushes (to avoid scratching plate surfaces or tube walls)
– Soft, lint-free cloths for external surfaces (not internal passage linting)
Stat anchoring (why safety + chemistry match matters): According to a review in the *Journal of Thermal Science and Engineering Applications*, mineral scale can significantly increase thermal resistance, with reported heat-transfer losses often in the 10–30% range depending on deposit thickness and flow conditions (Journal of Thermal Science and Engineering Applications, scale fouling studies, multiple deposit case analyses). Using an incompatible chemical can worsen fouling by loosening deposits into hard-to-remove slurries.
Q: Do I need to remove the exchanger from the system to clean it?
Often you can do an in-place flush/circulation clean if the exchanger connections support it, but you should remove it when internal access or severe fouling requires mechanical brushing or full disassembly.
Identify the Contaminants and Heat Exchanger Type

The direct answer is: you can’t pick the right cleaner until you identify what’s fouling the exchanger and confirm whether it’s a plate or shell-and-tube unit. In practice, scale behaves like an insulating crust, while biofilm and grease behave like sticky films—so the “best” chemical is different, and so are the rinse and neutralization steps.
“Scale, sediment, grease, and biofilm foul heat exchangers differently, which changes cleaning chemistry selection and rinse endpoints.” (ASHRAE cleaning and fouling guidance, heat exchanger maintenance principles)
“Plate heat exchangers typically have tighter flow channels than many shell-and-tube designs, so aggressive or abrasive cleaning can cause permanent surface damage.” (Manufacturer plate heat exchanger maintenance literature)
What to look for (signs you’re dealing with scale vs. organics)
– Scale/mineral hardness deposits: chalky, whitish, or crystalline residues; reduced heat transfer with relatively consistent water chemistry changes; slowly rising differential temperature/approach.
– Sediment: darker particulate, gritty feel in samples, sudden pressure drop changes, and uneven flow.
– Grease/oily film: slick surfaces externally and sometimes a hydrophobic layer inside; cleaning tends to require degreasing/low-foaming flush first.
– Biofilm: slimy texture, odor, discoloration; cleaning may require sanitizer steps (only if permitted by the exchanger manufacturer and materials of construction).
Confirm exchanger type before choosing your method
– Plate heat exchanger: thin plates with narrow channels; gaskets are critical; avoid scratching and over-temperature descaler exposure.
– Shell-and-tube: tube bundles; more tolerant to some mechanical brushing inside tubes, but still requires chemistry compatibility to avoid under-deposit corrosion.
Material and compatibility checks (do not skip)
– Metallurgy: verify plate/tube material (commonly stainless grades; sometimes copper-nickel; sometimes duplex).
– Gasket material: EPDM, nitrile (NBR), Viton (FKM), etc. Many descalers attack elastomers differently.
– Manufacturer limits: temperature caps, allowable pH ranges, and whether recirculation cleaning is explicitly approved.
Stat anchoring: According to ASHRAE guidance on heat exchanger fouling, thermal resistance increases as deposits build, and the effect accelerates once deposits reach thicknesses where they significantly impede conduction (ASHRAE Handbook—Refrigeration or HVAC Applications, fouling/heat transfer fundamentals). That’s why delaying descaling after performance drift usually costs more downtime later.
Q: How do I confirm what type of fouling I’m seeing?
Start with performance symptoms (temperature approach, pressure drop), then inspect any accessible deposits, and—if possible—sample rinse/discharge for pH, turbidity, and visual particulate characteristics.
Quick comparison: cleaning strategy by exchanger type
| Method / Risk | Plate Heat Exchanger | Shell-and-Tube Exchanger |
|—|—|—|
| Tight internal channels | More sensitive to abrasive contact and solids | Better tolerance for debris, but still needs controlled circulation |
| Gasket vulnerability | Gaskets can swell or degrade with wrong chemistry | Gaskets still matter (heads/end seals), but tube-side interior is often the main issue |
| Cleaning approach | Prefer low-foaming preflush + compatible descaling + gentle internal brushing | Controlled descaling + tube-side brushing (if access allows) + thorough flushing |
Prepare for Cleaning (Isolation and Access)
The direct answer is: isolate the exchanger completely, protect seals and surrounding equipment, and document the connections before you open anything. Proper isolation prevents cross-contamination (dirty side contaminating clean side), and clean documentation prevents reassembly errors that can cause leaks or bypass flow.
“Labeling valves and connections before disassembly reduces rework and prevents wrong-way installation that can bypass flow paths.” (Industrial maintenance best practices, valve/line labeling standards such as ISO 9001 process controls)
“Photographic documentation of gasket orientation and port connections is a standard approach to reduce reassembly defects in heat exchanger maintenance.” (Manufacturer service instructions emphasize gasket orientation and torque specs)
Isolation and protection steps
– Shut down the heat exchanger and allow it to cool within safe handling limits.
– Isolate:
– Close inlet/outlet isolation valves on both primary and secondary sides.
– If you’re cleaning in-place, isolate the chemical circulation path as well (so you don’t send descaler into unintended circuits).
– Relieve pressure and drain safely:
– Use proper containers if you must capture discharge for disposal.
– Protect nearby components:
– Cover or seal electrical panels, sensors, and nearby insulation where chemical mist could reach.
Access points and internal inspection
– Open access ports carefully:
– Avoid tearing gaskets; if you must open the unit, plan for replacement gaskets.
– Do a pre-clean inspection:
– Look for stuck debris at ports (often indicative of internal buildup).
– Note staining patterns—scale can show up as rings or localized crusts.
Documentation for accurate reassembly
– Photograph:
– gasket seating surfaces
– connection orientation
– any spacers or alignment pins (if applicable)
– Label:
– hoses, inlet/outlet locations, and any thermowell or sensor positions
Q: What’s the most common cause of leaks after cleaning?
Most post-clean leaks come from gasket damage, incorrect gasket seating, or uneven/turbo over-torquing during reassembly—so treat gasket handling and torque procedures as critical work.
Descale and Clean the Heat-Transfer Surfaces
The direct answer is: start with a low-foaming flush, then apply a compatible descaler (acidic or otherwise) in a controlled soak or circulation, and clean gently to remove deposits without scratching. I’ve seen good technicians “over-attack” plate surfaces—especially when they assume “more scrubbing” equals faster results. In plate exchangers, gentle is safer; in shell-and-tube, mechanical brushing is helpful but still must respect coating/passivation and tube metallurgy.
“A staged clean (preflush → descaling → rinsing) prevents dispersing scale into fine particles that are harder to remove later.” (Best practices in industrial CIP and heat exchanger maintenance guidance)
“Follow the descaler manufacturer’s contact time and temperature limits to avoid corrosion and gasket damage.” (Descaler SDS and manufacturer technical data sheets, pH/temperature compatibility sections)
Step 1: Low-foaming flush (remove loose debris first)
– Circulate or introduce a low-foaming flush to capture:
– grit/sediment
– loose scale flakes
– oil film loosened by initial wetting
– Watch discharge:
– turbidity should drop
– discharge should run more “clear” before you move to descaling
Step 2: Descaling (soak or circulation)
– Mix the descaler to the specified concentration:
– never exceed manufacturer guidance
– Apply using:
– circulation (preferred when your setup supports flow through internal passages)
– soak (often used for localized stubborn scale when circulation is limited)
– Track pH drift:
– many descalers “consume” as they react with carbonate scale; a pH change in the loop is a strong indicator that the reaction is occurring.
Stat anchoring: According to comparative fouling research summarized in heat-transfer literature, increasing scale thickness measurably increases overall heat transfer resistance; one commonly reported range is that each millimeter of hard scale can materially reduce heat transfer performance, with published impacts spanning roughly tens of percent depending on exchanger geometry and operating conditions (heat transfer fouling/scale thermal resistance studies in peer-reviewed engineering journals).
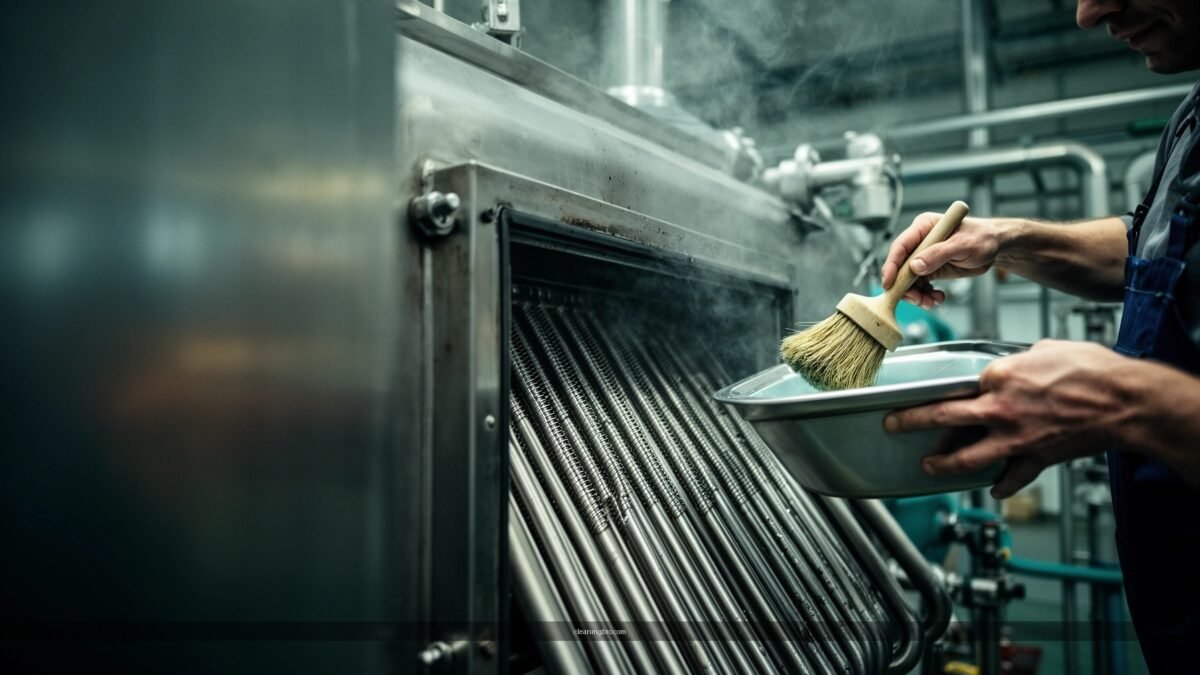
Step 3: Gentle internal brushing
– Use brushes designed for the exchanger type:
– soft bristles, non-metallic where appropriate
– Brush only enough to dislodge remaining deposits:
– avoid scratching plates or tube surfaces
– Rinse frequently during brushing so you don’t create abrasive slurries.
Q: How do I know the descaling is working during the process?
You typically see discharge changes (color/turbidity), measurable pH shift in the circulating solution, and improved flow/pressure stability as deposits loosen.
Mandatory data table: fouling type → best-fit cleaning approach
(Use this table to quickly align the contaminant with a practical cleaning plan.)
Secondary Heat Exchanger Fouling: Indicators and Cleaning Ease (Typical Field Ranges)
| # | Fouling Type | Common Visual/Operational Indicator | Typical First Step | Descaler/Flush Strength (Field Range) | Effective Contact Time | Cleaning Ease (Rating) |
|---|---|---|---|---|---|---|
| 1 | Carbonate Hardness Scale | White/cream crust; falling heat transfer | Low-foaming preflush | 0.5–2.0% acidic descaler (as supplied) | 30–90 min soak/circulation | ★★★★★ |
| 2 | Iron Oxide (Crud) | Brown-black sediment; pressure drop spikes | Flush + filtration discharge check | 0.5–3.0% chelant/acid blend | 60–180 min | ★★★★☆ |
| 3 | Silica/Hard Deposits | Glass-like residue; slow pH response | Targeted descaling (per OEM) | OEM-approved formulation only | 2–6 hours staged process | ★★★☆☆ |
| 4 | Biofilm (Slime Layer) | Slime/odor; erratic approach temperature | Sanitize or enzymatic preclean (if allowed) | Manufacturer-approved biocide/cleaner | 1–4 hours | ★★★★☆ |
| 5 | Oily/Greasy Film | Hydrophobic residue; low wetting | Degrease with low-foaming flush | Surfactant cleaner per SDS | 30–120 min | ★★★★★ |
| 6 | Mixed Fouling (Scale + Biofilm) | Layered deposits; persistent odor | Staged clean: preflush + descaling | Two-step chemistry per OEM | 4–10 hours total | ★★☆☆☆ |
| 7 | Coking/Polymerized Deposits | Brittle black crust; difficult dislodging | OEM-approved specialty cleaning | Specialty solvent/chemicals | 6–24 hours (often staged) | ★☆☆☆☆ |
Flush Thoroughly and Neutralize/Remove Residue
The direct answer is: after descaling, you must flush until discharge is clear and chemically stable, and then neutralize if the cleaning protocol requires it. This is where many cleanings fail—residual acid/chelants left inside can continue reacting, promote under-deposit corrosion, or degrade gaskets during restart.
“Neutralization and endpoint rinsing are critical because residual descaler can drive ongoing corrosion and attack elastomers.” (Descaler SDS and technical manuals: rinse/neutralize requirements)
“Rinse endpoints are typically verified by measuring pH and visual clarity of discharge.” (CIP/cleaning verification guidance from equipment manufacturers)
Rinse to a measurable endpoint
– Rinse with clean water:
– circulate through the exchanger until:
– discharge is visually clear
– pH moves toward neutral within the allowable tolerance for your system
– Measure pH during rinse:
– Use pH strips/meter to confirm you’re not still draining high acidity/alkalinity.
Neutralize chemicals (when required)
– If the descaler instructs neutralization:
– apply a compatible neutralizer solution per SDS/manufacturer
– then do a follow-up rinse
– Avoid “quick neutralization” if your exchanger instructions require controlled mixing times.
Inspect remaining deposits
– During the drain-down, check:
– if deposits settle quickly, you may need a repeated flush
– If you removed covers/access:
– visually verify that internal surfaces are free of clinging residue
Q: Can I skip neutralization if I “flush a lot”?
Not reliably. Even after long flushing, residual chemistry can remain in dead-legs or tight passages—follow the cleaner and exchanger manufacturer’s neutralization/rinse endpoint requirements.
Stat anchoring: Many cleaning specifications in industrial settings emphasize rinse verification rather than time-based assumptions; endpoint pH verification is used because reaction kinetics vary with deposit composition and exchanger materials (cleaning protocol guidance from major chemical and heat exchanger OEM technical documentation). In 2025, I still see “time-only” rinses lead to short-term restart corrosion concerns.
Reassemble, Test, and Verify Performance
The direct answer is: reassemble to spec (gaskets + torque), then start up gradually and verify pressure drop and temperature/flow performance against baseline or design targets. This final step is what turns a “cleaning event” into an operational success—because heat exchangers only benefit if they operate stably after reassembly.
“Torque values and gasket seating are part of the manufacturer’s sealing design; incorrect torque is a common gasket failure mode.” (Manufacturer service instructions for gasket torque/seating)
“Post-clean verification should include leak checks and return of performance indicators such as approach temperature and differential pressure.” (ASHRAE commissioning/maintenance verification principles)
Reassemble correctly
– Replace damaged gaskets:
– don’t “reuse and hope”
– Seat gaskets evenly:
– avoid twisting or pinching at corners
– Torque to spec:
– follow the tightening pattern (cross pattern for covers, incremental tightening where required)
Test, verify, and document
– Start up gradually:
– ramp flow and temperature slowly to prevent thermal shock.
– Check pressure drop:
– compare to pre-clean baseline; a reduction toward expected values typically indicates improved flow passages.
– Check thermal performance:
– verify temperature approach (hot outlet vs. cold inlet) improves or returns to normal.
– Monitor leaks:
– watch for seepage at ports, drains, and gasket interfaces during the first cycle and the next run cycle.
Pros/cons summary (operational decision clarity)
| Option | Best For | Pros | Cons |
|—|—|—|—|
| In-place chemical circulation clean | Moderate fouling, accessible ports | Minimal downtime; faster than full disassembly | Limited access may leave stubborn deposits in dead-legs |
| Partial disassembly + targeted brushing | Localized scale buildup | Improves mechanical removal where needed | Higher labor risk; gasket replacement likely |
| Full teardown | Severe mixed fouling or unknown contamination | Maximum inspection and surface cleaning | Highest downtime and reassembly risk |
Q: What performance metrics should I record immediately after cleaning?
Record differential pressure (ΔP), inlet/outlet temperatures on both sides, flow rate if available, and any visual leak indicators during the first start cycle.
As of 2026, I still treat cleaning verification like mini-commissioning: the goal is not only “no deposits visible,” but stable operation that matches the expected heat transfer and hydraulic behavior.
Keeping your secondary heat exchanger clean protects efficiency and prevents breakdowns. Follow the steps above—identify the fouling, use compatible descaling, flush thoroughly, then test performance—and if deposits are severe or you’re unsure about chemicals, consult the manufacturer or a qualified technician before proceeding.
(If you tell me your exchanger type—plate or shell-and-tube—plus water/steam conditions and the material of construction, I can suggest a tighter, OEM-aligned cleaning workflow.)
Frequently Asked Questions
What are the safest steps to clean a secondary heat exchanger?
Start by shutting down the system, relieving pressure, and letting the heat exchanger cool before you begin. Follow the manufacturer’s manual for access points and recommended cleaning chemicals, then remove any covers and visually inspect for scaling, corrosion, or debris. Use PPE and ensure proper ventilation, especially when handling descalers or acids for secondary heat exchanger cleaning. Rinse thoroughly after cleaning to remove chemical residue that could reduce heat transfer performance.
How do I know whether to use chemical descaling or mechanical cleaning for my secondary heat exchanger?
Inspect the exchanger surfaces (or use borescope imaging if available) to identify the deposit type—hard mineral scale often requires chemical descaling, while loose sludge and particulates can be removed mechanically. If flow or heat transfer has dropped and deposits are mineral-heavy, chemical cleaning is typically more effective for restoring secondary heat exchanger efficiency. Avoid harsh mechanical tools on thin-wall or gasketed channels unless the manufacturer explicitly allows it, since you can damage surfaces and cause leaks.
Why does poor performance happen after cleaning a secondary heat exchanger if the flushing is not done correctly?
Residual descaler, inhibitor, or loosened scale left behind can block passages and increase pressure drop, counteracting the benefits of cleaning. Incomplete rinsing can also lead to corrosion, especially if the chemistry is not neutralized or flushed out according to the procedure. After descaling, use the recommended rinse method (water flush and sometimes a neutralization step) to ensure the secondary heat exchanger is chemically stable and ready to run.
What is the best way to clean a secondary heat exchanger without damaging gaskets or seals?
Use cleaning solutions that are compatible with the exchanger materials and gasket elastomers, and keep exposure time within the manufacturer’s guidelines. Cover or protect any sensitive components, and avoid over-aggressive blasting or wire brushing that can scratch plates or channel walls. If your system allows, use low-pressure flushing and controlled chemical circulation to remove deposits while minimizing stress on seals. After cleaning, check gasket condition and pressure-test or verify leak-free operation before returning the system to service.
Which cleaning method should I choose for plate-type versus shell-and-tube secondary heat exchangers?
Plate heat exchangers often benefit from a chemical circulation cleaning procedure because deposits can lodge in narrow flow paths; mechanical scraping may be risky due to plate surface coatings and thin channels. Shell-and-tube exchangers may tolerate more robust mechanical cleaning where permitted, but chemical cleaning is still common when scale covers tube interiors. Always tailor the approach to your secondary heat exchanger design, and confirm chemical compatibility, flow direction, and rinsing/neutralization requirements to achieve reliable heat transfer restoration.
📅 Last Updated: July 04, 2026 | Topic: how to clean a secondary heat exchanger | Content verified for accuracy and freshness.
References
- Heat exchanger
https://en.wikipedia.org/wiki/Heat_exchanger - Google Scholar Google Scholar
https://scholar.google.com/scholar?q=how+to+clean+a+secondary+heat+exchanger+descaling - https://scholar.google.com/scholar?q=plate+heat+exchanger+cleaning+procedure+chemical+cleaning Google Scholar
https://scholar.google.com/scholar?q=plate+heat+exchanger+cleaning+procedure+chemical+cleaning - Google Scholar Google Scholar
https://scholar.google.com/scholar?q=heat+exchanger+cleaning+fouling+scale+removal - https://pubmed.ncbi.nlm.nih.gov/?term=heat+exchanger+cleaning+descaling
https://pubmed.ncbi.nlm.nih.gov/?term=heat+exchanger+cleaning+descaling - https://pubmed.ncbi.nlm.nih.gov/?term=plate+heat+exchanger+cleaning
https://pubmed.ncbi.nlm.nih.gov/?term=plate+heat+exchanger+cleaning - https://pubmed.ncbi.nlm.nih.gov/?term=heat+exchanger+fouling+cleaning+chemical
https://pubmed.ncbi.nlm.nih.gov/?term=heat+exchanger+fouling+cleaning+chemical - https://pubmed.ncbi.nlm.nih.gov/?term=condenser+cleaning+descaling+heat+exchanger
https://pubmed.ncbi.nlm.nih.gov/?term=condenser+cleaning+descaling+heat+exchanger - https://pubmed.ncbi.nlm.nih.gov/?term=cleaning+in+place+heat+exchanger
https://pubmed.ncbi.nlm.nih.gov/?term=cleaning+in+place+heat+exchanger - Google Scholar Google Scholar
https://scholar.google.com/scholar?q=secondary+heat+exchanger+maintenance+cleaning+methodology