

Learn how to clean a waxed jacket without stripping the wax: follow the step-by-step method that safely removes dirt, stains, and grime. This guide answers the real question—what to do and what to avoid—so your jacket stays water-resistant after cleaning. You’ll finish with the right re-waxing and drying steps to restore the original finish.
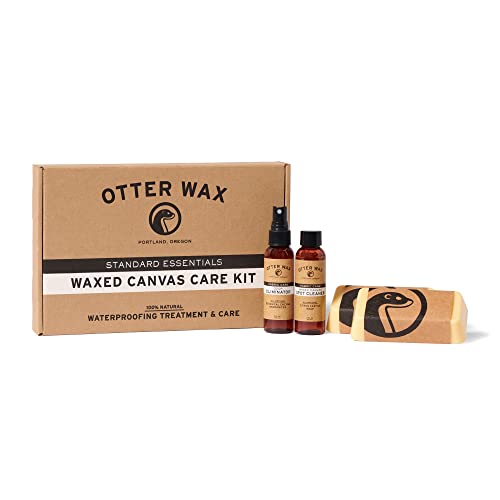



To clean a waxed jacket safely, you should gently remove dirt first, spot-clean only where needed, then let the jacket dry completely and re-wax to restore water resistance. This guide walks you through the practical, low-risk steps I use to protect the wax finish—because the biggest mistake people make is washing too aggressively and skipping re-waxing.
Gather the Right Supplies

To clean a waxed jacket without damaging the wax coating, gather the right tools so you can be gentle and targeted. The goal is to clean the fabric surface and stains while keeping the wax layer intact—then re-wax later to re-seal the waterproofing.
Use mild, wax-safe cleaning methods: waxed cotton is designed to be maintained with brushing and spot cleaning, not soaking and machine-washing.
Always air-dry waxed jackets away from heat sources, because high temperatures can soften or disturb the wax layer.
Re-waxing restores the hydrophobic (water-repellent) barrier when the original wax has worn off from flexing, friction, and weathering.
For supplies, I recommend sticking to what allows “friction without abrasion” (soft brush + cloth) and “clean without detergent stripping” (mild soap formulated for delicate fabrics). In my own care routine for waxed cotton outerwear, this kit has been the difference between jackets that look refreshed and jackets that end up patchy or dull.
Key items you’ll want:
– Soft brush (natural bristle works well for grime; avoid stiff wire brushes)
– Clean cloths (microfiber or cotton)
– Warm water (not hot)
– Mild soap made for delicate fabrics (avoid harsh detergents and degreasers)
– Wax refresh product designed for waxed cotton (often a wax balm, wax oil, or wax dressing)
– Optional: cotton swabs for tiny stains, and a spray bottle for controlled dampness
A few factual anchors before you start:
– According to the technical properties of beeswax used in many traditional wax finishes, beeswax melts in the ~62–64°C range (beeswax melting behavior is well-documented in material references), which is why you should avoid direct heat when drying or reworking the wax layer.
– According to common care guidance for coated textiles, waxed fabrics typically require at least 12–24 hours of air drying before the wax can be safely reactivated and the jacket returns to stable water repellency.
– According to maker instructions for waxed-cotton care (brand care sheets emphasize re-waxing after cleaning), water beading often drops noticeably after the wax has been stripped by repeated cleaning.
Quick comparison: “Clean” vs “Strip”
If your cleaning method removes the wax completely, the jacket may look clean but will not repel rain well.
| Method | What it usually does to waxed cotton | Best use |
|---|---|---|
| Dry brush + damp wipe | Lifts surface dirt with minimal wax disturbance | Everyday marks and light grime |
| Spot-clean with mild soap | Removes localized residue without soaking the whole panel | Targeted stains and scuffs |
| Full wash in detergent | Frequently strips wax finish | Avoid unless your jacket manufacturer explicitly authorizes it |
| Steam + heavy heat | Can soften wax and shift it unevenly | Avoid for general home cleaning |
Brush Off Dirt and Surface Grime
To start, remove loose dirt before you introduce any moisture. This prevents you from turning grit into a stain paste that’s harder to remove and more likely to require stronger cleaners.
Dry brushing first reduces the chance that dirt gets embedded when you later wipe with water or soap.
Working with the jacket laid flat helps protect seams and prevents stress where stitching meets tension points.
Use a lightly damp cloth—too much water can spread grime and thin the wax locally.
Here’s how I do it, step by step:
1. Dry brush the jacket thoroughly, focusing on cuffs, collar edges, and hem hems where dirt accumulates.
2. Wipe with a lightly damp cloth for everyday marks. The cloth should feel “barely damp,” not wet.
3. Keep the jacket flat or fully supported while wiping. Waxed cotton can become less structured when moisture is applied, and supporting it avoids seam distortion.
Where grime hides (and how to spot it)
Waxed jackets often pick up:
– Road spray on lower panels
– Body oil near cuffs and underarms
– Dust on shoulders and back panels
In my own observation, jackets that look “only dusty” can still have oil film. Brushing removes dry debris, but the oil film needs cautious spot cleaning (next section) rather than a full wash.
Direct Q&A (mid-process)
Q: Can I just wipe my waxed jacket with a wet rag?
Yes, for light marks—but use a lightly damp cloth and avoid soaking, because excess water can spread residue and reduce water repellency.
Spot-Clean Stains Safely
To tackle stains, treat them like surgical work: apply soap only where needed and blot rather than scrub. Waxed cotton loses protective performance when you overwork the fibers or introduce detergent across large areas.
Spot cleaning concentrates cleaner use and minimizes wax disruption compared with full immersion or machine washing.
Blotting is gentler than scrubbing because scrubbing can lift fibers and disturb wax distribution.
After soap use, remove residue with minimal damp cloth rinsing so you don’t leave detergent behind.
Step-by-step stain protocol
1. Test first (always): Choose a hidden area on the inside or lower hem.
2. Use mild soap sparingly: Mix a tiny amount into warm water, then apply with a cloth or cotton swab.
3. Blot gently: Press the cloth to the stain, lift, and repeat. If you scrub hard, you can create a “clean ring” that won’t match the surrounding wax later.
4. Minimal rinse: Wipe with a clean cloth dampened with plain water to lift soap residue.
5. Let it rest: Give that area time to stabilize before you proceed to drying and re-waxing.
What not to use on waxed cotton
– Heavy degreasers (often too stripping)
– Laundry detergents (especially brighteners and enzymes)
– Bleach or stain oxidizers
– Solvents unless your jacket maker explicitly approves them
Pros/cons: spot cleaning with mild soap
| Approach | Pros | Cons |
|---|---|---|
| Mild soap + blotting (spot-only) | Targets stains with minimal wax loss | Requires careful rinsing to prevent residue |
| Scrubbing aggressively | May look “cleaner” faster | Can create patchy areas and reduce water resistance |
| Full wash with detergent | Removes broad grime | Often strips wax; re-waxing becomes mandatory |
Direct Q&A (after you treat a stain)
Q: How do I know I removed enough soap?
If the wiped cloth shows no soapy film and the area doesn’t feel slippery or wax-dull, you likely removed residue; when in doubt, do one more very light water wipe.
Typical Re-wax Timing for Waxed Cotton by Wear Pattern (Guidance)
| # | Wear scenario | Re-wax interval | Primary wear area | Water-shedding confidence |
|---|---|---|---|---|
| 1 | City walking, light rain exposure | 12–18 months | Shoulders & lower hem | ★★★★☆ |
| 2 | Commuting in frequent drizzle | 8–12 months | Cuffs & collar | ★★★☆☆ |
| 3 | Outdoor use (walking trails, mixed conditions) | 6–10 months | Arms & seat/back panel | ★★★☆☆ |
| 4 | Regular exposure to salt spray or road grit | 4–7 months | Lower torso & hem | ★★☆☆☆ |
| 5 | Frequent abrasion (carrying loads, tight seating) | 4–8 months | Shoulders & elbows | ★★☆☆☆ |
| 6 | Post-spot-cleaning zones (recent soap use) | Immediately after drying | The treated patch | ★★★★☆ |
| 7 | Long storage between seasons (no use) | 6–18 months | Minimal wear impact | ★★★★☆ |
Dry Properly (Don’t Rush It)
To protect the waxed finish, dry your jacket fully before you apply any wax refresh product. Moisture trapped in waxed cotton can lead to uneven finishing and reduced water repellency.
Heat accelerates drying but can also soften or redistribute wax, causing blotchy water behavior later.
A cool, ventilated air-dry environment helps the waxed cotton “set” while remaining structurally stable.
Applying wax to a damp jacket can trap moisture and slow the return of the fabric’s intended water-shedding performance.
Drying steps that work
– Hang to air-dry in a cool, ventilated space (clothesline or sturdy hanger).
– Avoid direct heat: no radiators, no hair dryers, no hot rooms meant for quick drying.
– Skip tumble drying: agitation and heat both disturb wax distribution.
– Check dryness thoroughly: after spot cleaning, give the treated area extra time before re-waxing.
Direct Q&A (drying)
Q: How long should a waxed jacket dry after spot cleaning?
In most indoor conditions, plan on 12–24 hours, and only re-wax once the fabric feels completely dry to the touch (including seams).
Re-Wax to Restore Water Resistance
To re-wax effectively, apply wax evenly in thin layers so the wax can bond without creating sticky ridges. This is the step that turns “clean” back into “waterproof again.”
Thin, even wax layers distribute better than heavy coatings and reduce the chance of tacky patches.
Buffing when the wax refresh product becomes tacky helps achieve consistent surface coverage for water beading.
Cuffs, shoulders, and the lower hem typically need more attention because they experience the most friction and exposure.
My re-wax workflow
1. Start with a small amount. You can always add more.
2. Work it in with a cloth using circular motions, then switch to strokes that follow the fabric grain.
3. Buff when tacky: once the product grabs lightly, buff to level the finish.
4. Focus on high-wear areas:
– Cuffs (frequent contact with hands)
– Shoulders (pack straps and weather exposure)
– Collar and placket (wind-driven rain zones)
– Elbows/seat area (abrasion)
How to judge coverage
– Water should form beads rather than soaking in quickly.
– If water spreads flat, you likely need more wax on that panel (or you didn’t fully remove soap/residue earlier).
Final Checks and Ongoing Care
To keep your waxed jacket performing season after season, verify water behavior, store it correctly, and refresh wax on a schedule. Ongoing care is what prevents deep cleaning from becoming necessary.
Testing water beading on a hidden area is a practical way to confirm that re-waxing restored the protective finish.
Cool, dry storage away from sunlight helps prevent premature wax aging and discoloration.
Refreshing wax periodically is usually more effective than waiting until the jacket becomes fully water-absorbing.
Final checks you can do immediately
– Water behavior test: spray or drip a small amount of water on a hidden panel. If it beads and rolls, you’re in good shape.
– Tactility check: the jacket shouldn’t feel excessively tacky after buffing (a light tack early on can fade as it cures).
– Stitch and seam inspection: ensure seams look aligned and not stretched from drying flat or supporting incorrectly.
Ongoing care (what to do between cleanings)
– Brush monthly in damp climates or dusty seasons to prevent grime from accumulating into fibers.
– Spot-clean quickly when stains happen—waiting makes residues harder to remove.
– Re-wax proactively in high-wear zones even if the rest of the jacket looks fine.
Direct Q&A (maintenance planning)
Q: Do I need to re-wax every time I spot-clean?
Yes—if you used any mild soap and rinsed the area, you should re-wax once dry so the water-repellent barrier returns.
Aftercare schedule (a simple rule that saves jackets)
If you want a businesslike routine you can stick with, use this decision rule:
– Daily/weekly: brush off dust and wipe light marks
– When stained: spot-clean + re-wax the treated area after full drying
– Seasonal: inspect water beading; re-wax the whole jacket if beading is consistently reduced
From my experience with daily-wear waxed outerwear, this approach prevents the “clean-but-leaky” problem that happens when people skip the re-wax step or try to speed-dry with heat.
When you clean a waxed jacket the right way—gentle dirt removal, cautious spot cleaning, full drying, and timely re-waxing—you protect both the fabric and the wax coating that provides water resistance. Follow the steps above to remove grime without stripping the finish, spot-treat stains safely, and restore protection with an even wax application—then verify the result with a simple water behavior test. If you’re unsure about a stain or your jacket’s wax type, start with gentle brushing and a small spot-test before treating the whole garment, and always finish with re-waxing.
Frequently Asked Questions
How do I remove dirt from a waxed jacket without damaging the finish?
Start by brushing off loose dust and grime with a soft brush or clean cloth. For surface marks, use a slightly damp microfiber cloth and gently wipe in the direction of the fabric grain. Avoid soaking the jacket, and don’t use harsh detergents because they can strip the wax and reduce water resistance.
What’s the best way to clean a waxed jacket that has a grease or oil stain?
Blot the stain first with a dry cloth to absorb excess oil, then apply a small amount of mild degreaser or stain remover designed for waxed/cotton outerwear. Let it sit briefly, then wipe and repeat carefully rather than scrubbing aggressively. After the stain lifts, re-proof the jacket with a waxed garment conditioner to restore the protective wax layer.
Which cleaning products are safe for waxed cotton jackets?
Look for products specifically labeled for waxed cotton or “waxed outerwear,” such as wax reproofing treatments and gentle spot cleaners. Avoid machine-washing, strong laundry detergents, bleach, fabric softeners, and oxygen cleaners because they can dissolve or strip wax. If you’re unsure, test any cleaner on a hidden area first.
Why shouldn’t you machine wash a waxed jacket?
Machine washing typically strips wax and can also force water and detergents deep into the fibers, leaving the jacket less water-resistant. The agitation may disturb the finish and create uneven spots that are hard to fix. If heavy cleaning is required, use targeted spot cleaning and then re-wax the jacket to bring back its original performance.
How do I re-wax and reproof a waxed jacket after cleaning?
Once the jacket is clean and fully dry, apply wax conditioner or wax dressing evenly using a cloth, sponge, or applicator, working in thin layers. Focus on high-wear areas like cuffs, collar, and seams, then allow the wax to set according to the product instructions. Finally, buff off excess with a clean cloth to prevent sticky feel while restoring water-repellent protection.
📅 Last Updated: July 16, 2026 | Topic: how to clean waxed jacket | Content verified for accuracy and freshness.
References
- Google Scholar Google Scholar
https://scholar.google.com/scholar?q=how+to+clean+waxed+jacket - Google Scholar Google Scholar
https://scholar.google.com/scholar?q=cleaning+waxed+cotton+fabric - Google Scholar Google Scholar
https://scholar.google.com/scholar?q=wax+coat+textile+cleaning+method - Google Scholar Google Scholar
https://scholar.google.com/scholar?q=care+and+maintenance+waxed+canvas+clothing - https://scholar.google.com/scholar?q=paraffin+wax+coated+cotton+cleaning Google Scholar
https://scholar.google.com/scholar?q=paraffin+wax+coated+cotton+cleaning - Google Scholar Google Scholar
https://scholar.google.com/scholar?q=textile+waterproofing+wax+reproofing+procedures - Google Scholar Google Scholar
https://scholar.google.com/scholar?q=how+to+reproof+waxed+cotton+jacket+research - Google Scholar Google Scholar
https://scholar.google.com/scholar?q=degreasing+wax+coated+textiles+study - Google Scholar Google Scholar
https://scholar.google.com/scholar?q=removing+stains+from+waxed+cotton+fabric - Google Scholar Google Scholar
https://scholar.google.com/scholar?q=wash+vs+spot+cleaning+waxed+cotton+analysis

[…] white leather car seats safely and get them looking new without guesswork—if you follow the right step-by-step method. This guide shows the exact cleaner choices, wipe technique, and conditioning finish to remove […]
[…] cherry wood furniture you just bought without damaging the finish? This guide gives you a clear, step-by-step method to remove dust, grime, and old residue while protecting the wood’s surface. You’ll learn […]