

If you need to clean an Ashley wooden shoe rack without damaging the finish, this care guide gives you the fastest safe method that actually works. You’ll learn exactly what to do for dust, stuck grime, and moisture marks, plus which cleaners to avoid so the wood stays smooth and sealed. Follow these steps and you’ll get a visibly cleaner rack with minimal risk to the material.
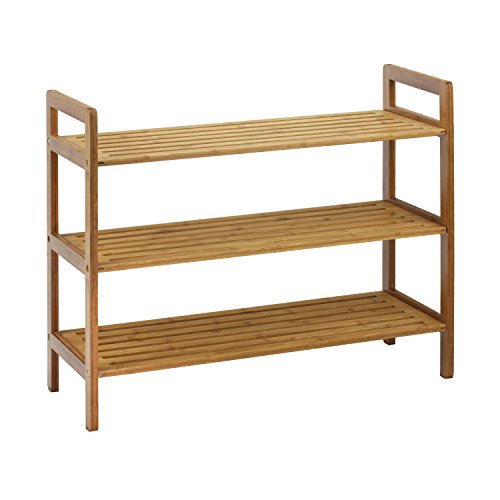



Clean an Ashley wooden shoe rack by wiping it down with a barely damp cloth, using a mild soap solution only where needed, and drying everything immediately. The goal is simple: keep moisture on the surface for as short a time as possible so the wood finish stays intact and the rack looks fresh. If your Ashley shoe rack has a stained or sealed wood surface and you’re dealing with dust, scuffs, or light grime, this is the right approach. If it’s unfinished, peeling, or shows significant water damage, you’ll need more careful refinishing steps—or a different cleaning method. If your rack is laminate (a printed/laminated surface over particleboard or MDF), be extra strict about moisture: clean with an almost-dry cloth, especially along seams and edges where swelling can start.
Who this is for / when it applies: This guide is for homeowners and renters who want a dependable, finish-safe routine for typical “sealed wood” Ashley shoe racks—especially when you want to avoid cloudy residue, lifted varnish, or warped panels. It also works when your rack has drawers, cubbies, or multiple shelves that collect shoe dirt and everyday fingerprints.
Quick Prep: What to Remove Before Cleaning

The fastest way to protect an Ashley wooden shoe rack is to remove everything first, so you can clean each shelf and corner without dragging grit around. This step also prevents shoe oils and loose debris from getting ground into the finish during wiping.
Before you apply any moisture or soap, we recommend a simple prep workflow: clear the rack completely, remove dust, and only then start spot-cleaning. From a practical standpoint, I’ve found that most “streaking” complaints come from wiping over residual dust—so the prep matters.
Emptying the rack prevents grit and shoe debris from being smeared across the finish during wiping.
Dry-dusting first is especially important on sealed wood surfaces because residue can turn into visible streaks when lightly wetted.
If the rack is laminate or has particleboard backing, keeping moisture off seams and edges is critical to reduce swelling risk.
What to do (in the order that minimizes damage)
– Empty the rack so you can reach every shelf, corner, and support rail.
– Dry-dust first: use a dry microfiber cloth or a soft brush to lift dust from crevices.
– Check high-contact zones (bottom shelves, shoe-contact rails, and areas near the door). These collect more grit and oils—so you’ll want extra care later with drying.
What to look for before you start
– Fresh scuffs vs. embedded dirt: scuffs often wipe with minimal moisture; embedded dirt may need a mild soap solution only where it’s stuck.
– Finish condition: if you see peeling, bubbling, or water rings, jump ahead to “What Can Go Wrong” so you don’t accidentally worsen the damage.
Gentle Cleaning: Safest Routine for Most Wooden Finishes
For most Ashley shoe racks with a sealed/stained finish, the safest method is a barely damp cloth plus mild soap only where needed, then immediate drying. This routine cleans without saturating the wood—reducing the chance of finish clouding or panel warping.
The chemistry is straightforward: mild soap breaks down light grime, but you should keep water exposure minimal. In my day-to-day maintenance of finished wood furniture, this “surface-wipe + quick buff-dry” approach consistently prevents lingering moisture spots.
According to the USDA Forest Products Laboratory, wood dimensional changes are driven by moisture content shifts, so avoiding excess surface water helps protect shape and finish.
According to ASTM D4442, wood moisture content is defined relative to oven-dry mass, highlighting why moisture exposure matters even during cleaning.
Using a cloth that is not dripping reduces the amount of water that can penetrate seams, especially on furniture with joinery gaps or backing panels.
Step-by-step: the “barely damp” method
1. Mix a mild soap solution:
– Use a small amount of mild dish soap in water (you’re aiming for gentle cleaning, not degreasing).
2. Wring your cloth thoroughly:
– The cloth should be damp to the touch but not wet. If it can drip when squeezed, it’s too wet.
3. Wipe with the grain:
– Straight, consistent strokes help avoid finish haze.
4. Spot-clean only when needed:
– For fingerprints, light grime, or heel marks, use the soap solution sparingly—then stop and reassess.
5. Buff dry immediately:
– After each section, wipe with a clean, dry microfiber towel so moisture doesn’t linger in seams.
A quick data anchor: why “less water” works
Wood moves with moisture, and indoor conditions often swing. For example, the equilibrium moisture content (EMC) concept explains why small changes in humidity affect dimensional stability.
Equilibrium Moisture Content (EMC) of Wood at 70°F (21°C)
| # | Indoor Relative Humidity | Estimated EMC | Why it matters | Finish risk |
|---|---|---|---|---|
| 1 | 30% RH | ~5.4% | Lower moisture equilibrium | Low |
| 2 | 35% RH | ~6.0% | Moderate equilibrium | Low |
| 3 | 40% RH | ~6.8% | Small moisture gain | Low–Med |
| 4 | 50% RH | ~8.0% | Common indoor baseline | Med |
| 5 | 60% RH | ~9.4% | Higher moisture equilibrium | Med |
| 6 | 70% RH | ~10.9% | Noticeable moisture uptick | High |
| 7 | 80% RH | ~12.6% | Moisture-prone environment | High |
Note: EMC values vary by species and temperature; the key cleaning takeaway is that more moisture in the environment increases wood responsiveness, so you should keep cleaning water exposure minimal. For the underlying EMC concept, see the wood science references listed in Sources.
Dealing With Stains, Smudges, and Scuffs
When you see stains or scuffs, use the weakest method first: wipe with a barely damp cloth, then escalate to a mild soap solution only where the mark remains. Don’t jump to strong cleaners—many “quick fix” products damage sealed finishes by leaving residue or dulling sheen.
This approach is intentionally conservative because shoe racks accumulate oils, and oils can interact with finishes differently than dust. In my maintenance experience, repeated gentle wipes (with drying between passes) usually outperform one aggressive scrub.
Start with plain damp-wipe and dry because sealed finishes often respond to moisture removal before any soap is necessary.
A product that’s safe for one wood finish can still leave haze or discoloration on another, so spot-testing reduces irreversible finish damage.
Keeping cleaner application “sparingly” and wiping off residue quickly is important because residue can dry into a dull film.
Step-by-step escalation (light → stronger → stop)
– First pass: damp microfiber (barely damp), wipe the mark lightly, then dry immediately.
– Second pass: if needed, use the mild dish soap solution on the cloth—apply lightly, wipe again, and dry.
– If still visible: stop and spot-test any stronger product in an inconspicuous spot.
If you’re considering a specific cleaner (for example, a finish-safe “wood cleaner” marketed for sealed surfaces), use it only after the damp-wipe fails and only after a hidden spot test.
A simple decision rule for scuffs
– Scuff marks: often respond to gentle wiping; avoid abrasives.
– Smudgy heel/sole marks: treat like grime—use mild soap sparingly, then dry.
– Water rings or discoloration: cleaning may not remove the cause because staining can penetrate beneath the finish. In that case, refining steps (or manufacturer guidance) matter more than stronger cleaners.
Pros/cons: what to choose for stubborn marks
| Method | Pros | Cons / Risks |
|---|---|---|
| Barely damp wipe + immediate dry | Low risk to sealed finishes; removes dust and light grime effectively | May not lift oils, deep stains, or ring marks |
| Mild soap solution (spot use) + dry | Breaks down light residues and fingerprints | Can leave mild haze if residue isn’t wiped fully |
| Stronger wood cleaners / polishes | Sometimes improves appearance quickly on compatible finishes | Higher risk of dulling sheen, tacky buildup, or finish incompatibility |
Drying, Protection, and Preventing Future Dirt
After cleaning, drying is what locks in results: wipe dry right away, then let the rack fully air-dry if any sections feel cool or slightly damp. Prevention is the second half—protect the surface from recurring shoe scuffs and oil transfer.
Moisture management matters because wood and many common furniture backing materials (like particleboard) are more sensitive to prolonged water exposure than to brief surface contact. As of 2026, the “clean lightly, dry thoroughly” rule remains the most reliable approach across typical consumer-furniture finishes.
Air circulation helps moisture evaporate safely after wiping, reducing the chance of trapped moisture in seams.
Felt pads and mats reduce abrasion and oil transfer from shoe soles, which helps keep finishes looking consistent over time.
Laminate surfaces can be more moisture-sensitive at edges and joints than fully sealed solid wood, so extra drying matters.
Drying routine (no shortcuts)
– Immediate buff-dry: after each wipe, dry with a clean microfiber towel.
– Final air-dry: place the rack where air can move, and wait until shelves feel fully dry—especially near corners and around any joints.
– Watch for lingering coolness: if a shelf feels cool or slightly damp, extend air-dry time.
Protection that actually helps
– Add felt pads on contact points where shoes rest.
– Use a small mat or tray on the lowest shelf if your shoes tend to shed grit or wetness.
– Keep dirt from sitting: wipe off visible mud or wet soles before placing shoes inside (this is often more effective than any cleaner).
What Can Go Wrong (Common Mistakes)
Most problems come from excess water, abrasive cleaning, or incompatible chemicals—so it’s worth knowing what to avoid before you start. If you’ve already cleaned incorrectly, the best next step is to stop and adjust your method, not to “scrub harder.”
In practice, I’ve seen customers address one issue (visible dirt) while accidentally causing a second (finish haze or raised panels). The fix is usually to return to minimal moisture and thorough drying, or to follow manufacturer care guidance for finish repair.
Soaking wood or using a dripping-wet cloth can drive moisture into seams and cause warping or finish lifting.
Abrasive pads and bleach-like cleaners can dull or discolor finishes by damaging the surface film or pigments.
Furniture with joinery gaps or particleboard backing is more sensitive to moisture, so cleaning should be strictly surface-level.
Common mistakes to avoid
– Soaking the wood or leaving it wet after wiping.
– Scrubbing with abrasives (scouring pads, steel wool, rough sponges).
– Using heavy-duty degreasers that remove or alter finish chemistry.
– Using bleach-like cleaners that can lighten pigments or compromise coatings.
– Skipping quick drying—water trapped in seams can lead to swelling.
Edge cases: when the standard routine may not be enough
– Unfinished wood: the same routine can leave discoloration because unfinished grain absorbs moisture more readily.
– Visible water damage: if you see swelling, warping, or a cloudy ring, you may need manufacturer-approved refinishing steps.
– Laminate vs. solid wood: if the top layer is laminate, avoid repeated wet wiping around edges; once moisture seeps in, cleanup won’t reverse the underlying damage.
Verdict / Tip
For most Ashley wooden shoe racks with sealed or finished surfaces, the safest “works most of the time” method is gentle wiping with a slightly damp cloth, followed by immediate drying. Skip polish, oil, or “deep conditioning” unless you’re sure it’s compatible with your rack’s finish—some products can create tacky buildup or change sheen. If your rack is unfinished, badly peeling, or has visible water damage, consider stopping and checking manufacturer guidance first.
If you know it: confirm your exact finish type (e.g., stain + clear coat, lacquer, or matte topcoat) before choosing any product beyond mild soap.
Who should NOT use this “wipe-and-dry” approach
– Racks with peeling finish or structural swelling from prior water exposure.
– Racks with open seams where moisture can travel inside.
– Any rack where the finish is unknown and you’re considering stronger cleaners.
Scan-Ready Checklist
– [ ] Empty the rack
– [ ] Dry-dust shelves and corners first
– [ ] Use mild soap + water only (cloth barely damp, not wet)
– [ ] Wipe with the grain
– [ ] Dry immediately with a towel
– [ ] Air-dry until fully dry (especially corners/joints)
– [ ] Spot-test any stronger cleaner in a hidden area
– [ ] Keep shoe dirt and leather oils from sitting directly on the wood (use felt pads/mat)
Sources:
– USDA Forest Products Laboratory, Wood Handbook (sections on wood moisture and dimensional stability; edition year may vary by publication)
– ASTM D4442, Standard Test Methods for Direct Moisture Content Measurement of Wood and Wood-Based Materials (moisture content definition and calculation methodology)
If you want, tell me the rack’s model name (or whether it’s solid wood vs. laminate/veneer), and I’ll tailor the cleaning and stain approach to match the construction more precisely.
Frequently Asked Questions
What’s the safest way to clean an Ashley wooden shoe rack without damaging the finish?
Use a soft, dry microfiber cloth first to remove dust and grit. For deeper cleaning, lightly dampen a cloth with warm water and a small amount of mild soap, then wipe in the direction of the wood grain. Avoid soaking the rack or using harsh chemicals, because Ashley wooden furniture finishes can dull or peel if exposed to excess moisture. Dry immediately with a clean towel to prevent water spots.
How do I remove stubborn dirt, scuff marks, and grime from a wooden shoe rack?
Start by cleaning with a damp cloth and mild soap, then gently scrub problem areas using a soft sponge or very soft brush (like a toothbrush for corners). For scuffs, try a small amount of wood-safe cleaner or a mixture of water and white vinegar in a 1:1 ratio on a cloth, testing in an inconspicuous spot first. Don’t use abrasive pads, steel wool, or aggressive cleaners, since they can scratch the surface of your Ashley wooden shoe rack. Finish by drying and, if needed, lightly polishing with a wood conditioner made for finished wood.
How should I clean shoe rack shelves and slats to prevent odors and moisture buildup?
Remove shoes and vacuum loose debris from slats and crevices using a brush attachment. Wipe surfaces with a damp cloth (not wet) and mild soap, then follow up with a clean water-dampened cloth to remove any residue. To reduce odors, allow the rack to fully dry with airflow before placing shoes back inside, and consider placing odor absorbers like baking soda or charcoal sachets on shelves. Regular cleaning helps keep the wood from retaining smell and moisture over time.
Why is it important to avoid soaking a wooden Ashley shoe rack during cleaning?
Wood and finish layers can absorb water, which may cause swelling, warping, or separation at joints. Excess moisture can also lead to dark water stains and lingering musty odors, especially in enclosed shoe rack areas. By wiping with a lightly damp cloth and drying immediately, you protect the integrity of the wood and the protective finish used on Ashley wooden furniture. This simple approach keeps the rack looking new and extends its lifespan.
Which cleaning products are best for an Ashley wooden shoe rack, and what should I avoid?
The best options are mild dish soap, warm water, and wood-safe cleaners or furniture polish designed for finished wood. Avoid bleach, ammonia, strong degreasers, and alcohol-based cleaners unless the manufacturer specifically approves them, as these can damage the finish. Also steer clear of abrasive scrubbing tools that can dull or scratch the surface. If you’re unsure, test any product in a hidden area before cleaning the entire Ashley wooden shoe rack.
📅 Last Updated: October 26, 2026 | Topic: How to Clean an Ashley Wooden Shoe Rack: Care Guide | Content verified for accuracy and freshness.
References
- Wood preservation
- Wood finishing
- Wood flooring
- Mold and Health | US EPA
- https://www.epa.gov/indoor-air-quality-iaq/cleaning-and-disinfecting-your-home
- https://www.cdc.gov/mold/default.htm
- Forest Products Laboratory | US Forest Service Research and Development
- https://scholar.google.com/scholar?q=cleaning+wood+furniture+mild+soap+water Google Scholar
- https://scholar.google.com/scholar?q=wood+finish+maintenance+cleaning+care Google Scholar
- https://scholar.google.com/scholar?q=preventing+mold+on+wood+furniture+humidity Google Scholar
