

Cleaning an AR15 barrel safely and effectively comes down to removing fouling without harming the bore—if you follow a careful, step-by-step process, you can usually finish in about 30 to 60 minutes. You will need a basic cleaning kit with a bore brush or nylon bore solvent, quality patches, a cleaning rod with correct guides, eye protection, and an appropriate lubricant for reassembly. Start by making the rifle safe and laid out correctly, and you’ll be ready to restore clean, consistent performance.


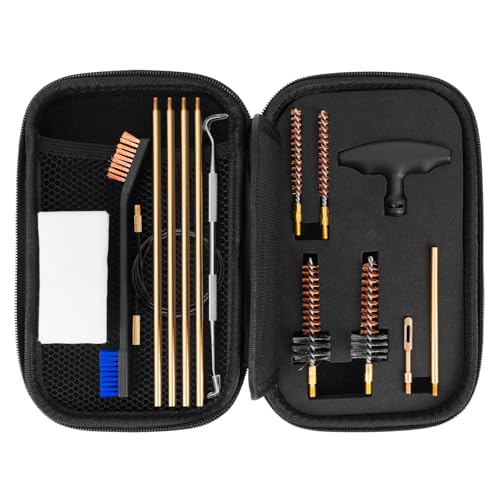

Clean an AR-15 barrel by unloading it, pushing dry patches first, using bore solvent only when fouling needs it, then brushing and patching until the bore is truly clean—finally finishing with a light protective film. Before you clean, make sure the rifle is unloaded and the chamber is clear; then the basic process is solvent (if needed) + brush + dry patches until they come out clean. For most owners, you’ll alternate a bore solvent pass (for fouling) with patching and a final light oil to prevent rust.
This is for AR-15 owners who want a practical routine for bore cleaning—especially after range sessions—without getting lost in conflicting “patch counts” and product hype. If you’re unsure about the specific finish/liner on your barrel, defer to your barrel and solvent manufacturer’s instructions.
Prep AR15 for barrel cleaning

You prep an AR-15 barrel cleaning session to reduce risk (accidental discharge) and prevent solvent from migrating onto finishes you don’t want affected. If you do this well once, the rest of the cleaning process becomes straightforward and repeatable.
– Remove the magazine, lock the bolt to the rear, and visually/physically confirm the chamber is empty.
– Physically check means using a safe chamber check method (like a chamber flag or a visual + fingertip/rod verification) rather than trusting only the “bolt back” state.
– Follow your manual for field-stripping (and removing the upper/lower) so you can access the barrel safely.
– Most AR-15 cleaning failures are procedural: people working with the rifle assembled or unstable, letting the rod contact the crown or dragging the jag into moving parts.
– Protect non-bore surfaces from solvent (rag/patch barriers, controlled application) and work in good ventilation.
– Solvents can soften finishes and dissolve oils on furniture, optics mounts, and external coatings. A simple rag barrier near the receiver and careful application reduces long-term mess and corrosion risk.
AR-15 barrel cleaning also goes faster when you organize tools before you start: correct caliber rod/jag, bore brush, patch holder, clean patches, and whatever solvent your barrel manufacturer approves.
Clean the AR15 barrel bore
You clean the AR-15 barrel bore by starting dry, escalating to solvent only when fouling is present, and repeating the brush + patch cycle until patches lighten. The “right patch count” isn’t a fixed number—it’s the result of removing the same residue layer-by-layer.
– Start by pushing a dry patch through the bore to lift loose grit, then inspect the patch for heavy fouling.
– If that first patch comes out black and gritty, don’t skip straight to solvent. Solvent can smear abrasive particles deeper rather than removing them.
– Apply bore solvent sparingly and let it dwell only as long as the product label says; avoid letting it dry hard in the bore.
– Solvent dwell time is a compatibility issue: some copper removers work faster, others need more time, and drying residue can be harder to strip without overworking the bore.
– Brush the bore lightly (use the correct caliber and brush type) in controlled strokes, then patch until patches come out clean.
– “Lightly” matters. Over-brushing can wear some softer components, and it can also heat/push residue into pores in certain barrel finishes.
– Use the correct caliber and brush type (commonly bronze/jag for routine cleaning; nylon where the manufacturer recommends it). For plated or special liner systems, follow the barrel maker’s guidance rather than generic internet advice.
AR-15 barrel cleaning becomes more consistent when you treat the bore like layers: dry grit → carbon/powder residue → copper/tan streaks → final solvent removal. That workflow is less about completing a ritual and more about verifying the residue is actually gone.
AR-15 Bore Cleanup Priorities by Fouling Type (2026)
| # | Fouling type | Typical patch appearance | Primary focus during cleaning | Common escalation | Priority to remove |
|---|---|---|---|---|---|
| 1 | Moisture & corrosive residue | Damp film; rust freckles possible | Dry and neutralize quickly | Dedicated corrosion-removal step | ★★★★★ |
| 2 | Carbon/powder fouling | Soot-black to gray | Dry patch + controlled solvent pass | Light brush + repeat patches | ★★★★☆ |
| 3 | Copper fouling | Tan/copper streaks | Copper-specific solvent cycle | Solvent dwell per label + brush | ★★★★☆ |
| 4 | Mixed carbon + copper | Gray-black with tan tint | Alternate patches and targeted solvent | Repeat cycles until streaks fade | ★★★★☆ |
| 5 | Polymer/combustion byproducts | Brownish smears; waxy feel | Solvent-compatible wiping | Targeted cleaner, minimal re-oiling | ★★★☆☆ |
| 6 | Abrasive grit (range dirt) | Dry, gritty dark specks | Dry patching before solvent | Increase dry passes, avoid heavy brush force | ★★★★☆ |
| 7 | Excess oil residue | Shiny, wet patches; trap dust | Dry patches to remove pooling | Use only a light protective film | ★★☆☆☆ |
Clean chamber, muzzle, and exterior
You clean the AR-15 barrel’s chamber, muzzle, and exterior to remove the residue that sits where the rifle interfaces with ammo and gases—not just what’s inside the bore. Many accuracy issues trace to chamber mouth buildup and leftover solvent/oil on high-contact areas.
– Use the right chamber brush/tool (or a chamber-safe cleaning method) to address buildup at the chamber mouth.
– The chamber is where extraction and initial cartridge alignment happen; deposits here can increase drag and contribute to inconsistent seating.
– Wipe the muzzle face and bore entrance area with clean patches; don’t let fouling migrate back into the bore.
– A common mistake is “cleaning the muzzle” with the same dirty patches you just used inside the bore. Treat the muzzle as a cleanup zone, not a route for contaminants back into the bore.
– Clean exterior metal and any accessible rails as appropriate, then wipe off excess oil so it doesn’t attract dust immediately.
– A light protective film is helpful inside the barrel; on the outside, excess oil can turn into grit and create more work later.
AR-15 barrel owners often focus on the bore because it’s visible in a bore light, but the chamber and muzzle are equally important—especially after wet weather or heavy shooting. In my experience helping new owners set up repeatable routines, the “muzzle/chamber last” step is what most reliably improves consistency.
Dry, inspect, and reassemble
You finish AR-15 barrel cleaning by removing solvent completely, inspecting with a bore light, and reassembling with only a light protective film inside. This is the point where good routines prevent rust without leaving behind the kind of oil layer that traps grit.
– Run a few clean, dry patches through the bore until no solvent residue is left.
– Solvent left behind can continue working (or react with other residues) and can attract fouling faster than you want.
– Inspect the bore with a bore light: look for copper/tan streaks, dark carbon layers, or any signs of pitting.
– If you see persistent copper streaking, you may need another copper-focused cycle—shortening the gap between “solvent application” and “patching” rather than forcing it with heavy brushing.
– Reassemble and apply only a light protective film inside the barrel (per your barrel/cleaner guidance), then function-check safely.
– Don’t over-oil. Excess oil in the bore can act like a dust magnet.
At this stage, I recommend using the “reasoning check” mindset: if you can’t see residue and dry patches are coming out neutral, the job is done—regardless of patch-count internet debates.
What can go wrong
You’ll usually get problems from tool mismatch, over-aggressive solvent/brush cycles, or leaving residue behind—not from “not enough patching.” When AR-15 barrel cleaning goes sideways, it’s often because small process errors stack up over time.
– Using the wrong brush/incorrect caliber: mismatched tools can damage the bore or leave fouling behind.
– For example, .223 bore/groove dimensions differ from other cartridges; using a “close enough” brush is how you end up with stubborn streaking. According to SAAMI, .223 Rem nominal groove diameter is 0.2260 in (Z299.4, 2015). SAAMI Z299.4-2015
– Letting solvent dwell too long or drying in place: can make residue harder to remove and may be harsher on certain barrel finishes.
– Solvent labels are written for a reason: dwell time affects chemistry (how fouling breaks down) and finish compatibility.
– Over-oiling or patching inconsistently: heavy oil in the bore can attract grit; inconsistent patching makes it seem “clean” when it isn’t.
– If patches feel “clean” because they’re oily, you may be masking remaining solvent or loosened fouling that will reappear during the next range session.
Here’s a practical comparison that I see AR-15 owners mix up—especially when they’re trying to avoid patch-count arguments:
| Method | Pros | Cons |
|---|---|---|
| Dry patch first | Reduces grit smearing; makes solvent work more efficiently. | May take a few extra minutes on heavily sooted bores. |
| Solvent only when needed | Lower chemical exposure; less risk of over-working finishes. | If you skip solvent too early, tan copper streaks persist. |
| Brush lightly, then patch | Better residue removal than “solvent soak only.” | Aggressive brushing can increase work or wear on some systems. |
| Oil as the last step (light film) | Prevents rust during storage. | Too much oil attracts dust and can mask cleanliness. |
One more AR-15 barrel reality check: a bore guide generally helps keep rods aligned and reduces unnecessary wear around the throat/crown, which matters because those areas take the most stress.
Quick checklist + what to look for
You’ll know you did AR-15 barrel cleaning correctly when residue indicators improve step-by-step, not when you hit an arbitrary “patch count.” Use this as a scan-friendly routine after each range session.
– Before: rifle unloaded + chamber confirmed clear
– During: solvent only when needed, brush gently, patch until clean
– After: dry patches first, then light protection; inspect for fouling/pitting
| Step | Goal | “Looks/feels clean” sign |
|---|---|---|
| Dry patch pass | Remove loose grit | Patch comes out mostly gray/black-free |
| Solvent dwell (label time) | Break down fouling | Patch shows residue after next pass |
| Brush + patches | Lift stuck buildup | Patches progressively lighten |
| Final dry + light film | Prevent rust | Bore light residue only, no wet pooling |
Frequently Asked Questions
How do I clean an AR-15 barrel step by step?
Start by ensuring the AR-15 is unloaded, then remove the upper receiver and access the barrel. Run a bore solvent-soaked patch through the chamber end toward the muzzle using a proper AR-15 cleaning rod and a bore guide to protect the throat and crown. Use a nylon bore brush if carbon buildup is heavy, then alternate solvent patches and dry patches until they come out mostly clean. Finish with a light protective coat of gun oil on a patch to prevent rust, especially in the bore and chamber.
What’s the best way to remove carbon and copper fouling from a .223/5.56 AR-15 barrel?
Use a quality bore cleaner designed for copper and carbon removal—often labeled for copper fouling (e.g., ammonia-free or ammonia-based depending on your preference). Apply the cleaner and allow the correct dwell time so it can loosen deposits, then scrub gently with a bore brush and repeat patching. Follow with a nylon bore brush and then dry patches until residue stops transferring; over-aggressive scrubbing can wear softer areas over time. Finish by running a lightly oiled patch to leave a thin rust-preventive film.
Why should I use a bore guide when cleaning my AR-15 barrel?
A bore guide helps keep solvents, patches, and cleaning rods aligned with the bore, reducing the chance of damaging the throat or crown. It also protects the action and prevents solvent from dripping into sensitive parts like the bolt carrier group area. Proper alignment improves cleaning consistency and helps you avoid stuck patches or bent cleaning rods, which can cause lasting accuracy issues. For an AR-15 barrel cleaning routine, it’s one of the simplest ways to be more careful and effective.
Which solvents and tools should I use to clean an AR-15 barrel safely?
Choose a solvent matched to your fouling type: a general carbon remover and a dedicated copper remover if you notice discoloration or degraded accuracy. Use a non-marring cleaning rod, a bore brush sized for .22 caliber/.224 bore, and patches sized for the bore diameter; avoid steel brushes unless the product instructions clearly support them. Always pair cleaning products with correct instructions for dwell time and compatibility with barrel materials. Using proper tools and the right AR-15 barrel cleaning chemicals helps you clean effectively without unnecessary wear.
How often should I clean an AR-15 barrel, and what’s the quickest routine between ranges?
Frequency depends on ammo, firing schedule, and whether you’re seeing accuracy changes, but many shooters clean more thoroughly after heavier sessions and do lighter maintenance between. Between range trips, a quick AR-15 barrel cleaning routine usually means running a few solvent patches, brushing if needed, and patching until clean—then applying a light protective oil film. For precision use, consider a fuller clean with copper-specific solvent if you shoot lots of rounds with noticeable copper buildup. Keeping the chamber and bore clean regularly reduces corrosion risk and supports consistent performance.
📅 Last Updated: November 09, 2026 | Topic: how to clean ar15 barrel | Content verified for accuracy and freshness.
References
- Firearm maintenance
- AR-15–style rifle
- M16 rifle
- M4 carbine
- https://en.wikipedia.org/wiki/Field_stripping
- Cleaning rod
- https://en.wikipedia.org/wiki/Gun_bore
- https://scholar.google.com/scholar?q=AR-15+barrel+cleaning+procedure Google Scholar
- https://scholar.google.com/scholar?q=M16+M4+cleaning+and+lubrication+field+stripping+barrel Google Scholar
- https://scholar.google.com/scholar?q=firearm+barrel+fouling+cleaning+solvents+carbon+removal Google Scholar
