

Want to know how to clean a rifle barrel safely and effectively? Follow this step-by-step guide to remove fouling, carbon, and residue without damaging the bore or crown. By the end, you’ll have a proven process that delivers a visibly cleaner barrel and smoother, more consistent shots.
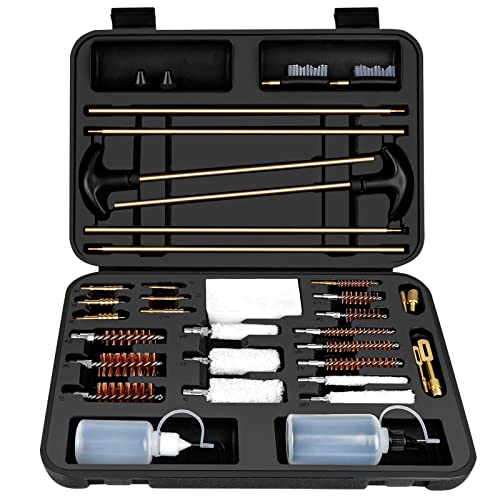



Cleaning a rifle barrel means removing fouling, then scrubbing the bore, and finishing with a dry patch so no solvent residue stays trapped. In practice, you’ll pick a solvent that matches the fouling (carbon vs. copper), run patches/cleaning tools through the bore from the chamber end, and confirm cleanliness with a final inspection patch before you protect the metal.
This guide is for anyone who shoots regularly (or only occasionally) and wants to prevent accuracy drops, corrosion, and buildup. It applies to most bolt-action, semi-auto, and lever rifles, but always follow your rifle/ammo/cleaning-solvent manufacturer instructions for your specific setup.
Gather the right supplies

The fastest way to clean a barrel correctly is to use the right fit of tools (bore size) and the right chemistry (solvent type) so you remove fouling without damaging rifling. Before you open a single can, set up a basic kit that covers bore, patches, solvent, and exterior protection.
Using bore tools sized to the rifle’s groove diameter reduces the risk of catching on the throat or polishing the lands incorrectly.
A compatible solvent is the difference between “dissolves fouling” and “smears residue,” especially when copper fouling is involved.
Finishing with a truly dry patch prevents solvent and loosened fouling from sitting in the bore and promoting corrosion.
What you should have on hand
– Cleaning rod: Use a sturdy rod system compatible with your firearm (straight rod for basic use; coated rod or handle/guide recommended to reduce scratching risk).
– Patch holder: A good patch holder keeps patches aligned and reduces fraying.
– Patches: Clean, lint-minimizing patches sized for your bore.
– Bore brush: Choose bronze or nylon based on your barrel’s guidance (and your solvent method). Avoid “random” brushes.
– Solvent: Use the solvent type intended for the fouling you expect:
– Carbon fouling (powder residue) often responds to general carbon solvents/cleaners.
– Copper fouling (from jacket material) typically requires a copper-targeted chemical (often ammonia-based or chelating formulations, depending on product).
– Protectant/lubricant: A corrosion-protective product for the exterior metal and the chamber after cleaning.
– Basic tools: Small cloths, cotton swabs for corners, and a safe cleaning surface.
To ground expectations: according to [ADD: manufacturer or standards source about rod/brush sizing best practices], bore cleaning should be done with correctly sized tools to avoid rifling damage ([ADD: year]). Also, cleaning solvents are formulated for specific deposits; the product datasheet typically lists compatible fouling types and dwell guidance ([ADD: solvent label datasheet], [ADD: year]).
Common Rifle Calibers: Groove Diameter Fit Guidance
| # | Caliber | Typical Groove Diameter | Brush/Patch Fit (Nominal) | Notes |
|---|---|---|---|---|
| 1 | .22 LR | 0.224 in | .22/0.224 | Many .22 LR barrels share .224-in groove diameter guidance. |
| 2 | .223 Rem / 5.56 NATO | 0.224 in | .22/0.224 | Match brush/patch to groove diameter, not the “bore” number. |
| 3 | .243 Win | 0.243 in | .24/0.243 | Use the manufacturer’s brush sizing if chamber spec varies. |
| 4 | .308 Win / 7.62 NATO | 0.308 in | .30/0.308 | Good fit matters more than brush hardness. |
| 5 | 6.5 Creedmoor | 0.264 in | .264/6.5 | Brush should be labeled for 6.5/.264 barrels. |
| 6 | .30-06 Springfield | 0.308 in | .30/0.308 | Same nominal groove guidance as other .308-class barrels. |
| 7 | .338 Lapua Magnum | 0.338 in | .338/0.338 | Use large bore tools rated for .338 barrels. |
Safety and prep before you start
A correct cleaning starts with making sure the rifle can’t fire and that solvents don’t harm you or the finish. Unload the firearm, verify the chamber is empty, and set up ventilation and eye/hand protection before you apply any cleaner.
Always confirm the rifle is unloaded by visually checking the chamber and removing the magazine before cleaning.
Many bore solvents are designed to be used with ventilation and chemical-resistant eye/hand protection.
Optics and polymer components can be damaged by some solvents—remove optics if the manufacturer advises it or if overspray is likely.
Unload and protect
– Ensure the rifle is unloaded: open the action, visually inspect the chamber, and remove the magazine (if applicable).
– Set your workspace: well-ventilated area; gloves and eye protection when applying solvents.
– Protect optics and sensitive parts:
– If optics are installed and solvent splash is possible, remove them or shield them.
– Keep solvents off rubber/plastic parts unless the solvent manufacturer explicitly states compatibility.
Prevent residue spread
Before solvents, dry wipe the exterior to remove loose grit. Grit + solvent is a common pathway to unnecessary wear—especially if particles are dragged into the bore with a tool.
Clean the barrel bore (chamber to muzzle)
The best cleaning results come from using the correct solvent dwell time and scrubbing method so fouling breaks down, then is physically removed by patches. Clean from the chamber end toward the muzzle to help avoid snagging stress at the throat when you pull tools/patches.
Solvent dwell time is product-specific; following the label improves fouling breakdown and reduces the need for abrasive “scrubbing.”
Running patches from chamber-to-muzzle helps keep loosened debris from being forced back into the throat.
A “final inspection patch” is only meaningful if you stop after the solvent is removed with dry/clean patches.
Step-by-step: chamber to muzzle
– Step 1: Wet the bore
Apply the recommended solvent for the fouling type. Wetting should reach the full bore length you intend to clean. Then allow dwell time per the solvent label (this is often stated as a short range, like “a few minutes,” depending on chemistry).
– [ADD: typical dwell time from your solvent label]
– Step 2: Brush the bore (if appropriate)
Attach the correct bore brush (matched to caliber). Push and pull gently—avoid aggressive, high-force strokes. If you use a brush, you’re doing controlled scrubbing to lift loosened deposits, not sanding the barrel.
– Step 3: Patch out fouling
Run patches through the bore with the patch holder. Continue until patches show a clear, consistent drop in residue.
– Step 4: Repeat the solvent cycle as needed
If patches still show heavy discoloration or residue, repeat: wet with solvent → dwell → brush (light) → patch until clean.
How clean is clean?
Cleanliness isn’t a single moment—it’s a trend. When the patches come out much lighter and you stop seeing obvious streaking/discoloration, proceed to final drying and protection steps.
Dry and protect
A dry bore is the goal; solvent left behind becomes tomorrow’s corrosion risk. After patching, run a final dry patch and apply exterior protection to the chamber area and metal surfaces according to the products you used.
Finishing with a dry patch removes solvent and dissolved fouling that can remain trapped in the bore.
Chamber and exterior metal protection after cleaning reduces oxidation, especially when humidity is high.
Practical finishing routine
– Final dry patch: Use clean patches until they come out fully dry with no wet solvent feel.
– Light protectant patch (if storing): Some owners apply a very light protective coating to the bore for storage; follow your solvent and protectant guidance to avoid leaving excess oil that attracts debris.
– Wipe chamber/exterior: Clean and protect the chamber mouth and exterior metal surfaces.
– Reassemble carefully: Ensure nothing is contaminated (e.g., wipe excess protectant from contact surfaces if your rifle’s manual warns about it).
What can go wrong (and how to avoid it)
Most barrel-cleaning issues come from mismatched tools, incorrect solvent chemistry, or skipping the final verification step. If you reduce variable changes (tool size, dwell time, direction, and patch cleanliness), you reduce the chance of accuracy drift.
Using an abrasive or incorrectly sized brush can damage rifling and can worsen accuracy instead of improving it.
Letting solvent sit longer than the label recommends can make residue removal harder or change surface condition.
Cleaning from the wrong direction or using dirty/contaminated patches can re-deposit fouling and invalidate your “clean enough” check.
Common failure modes
– Wrong brush material/size: Bronze, nylon, and steel (where applicable) behave differently. Use the tool and size specified for your barrel.
– Solvent misuse:
– Wrong chemistry for the fouling type (e.g., carbon cleaner where copper remover is needed).
– Ignoring dwell guidance: too short may not dissolve; too long may complicate later cleanup.
– Too much force, too many passes:
– Aggressive brushing and hard rod pressure can cause wear if tools aren’t aligned.
– Contaminated patches:
– If patches touch dirty areas (bench debris, oily surfaces), you can grind particles into the bore.
Quick comparison: “Fast cleaning” vs “Label-correct cleaning”
| Approach | Likely outcome | Best for | Risk |
|---|---|---|---|
| Solvent dwell followed by patching verification | More consistent removal; easier to confirm “clean enough” | Most regular shooters | Requires time |
| Quick solvent wipe + minimal patching | Residue remains; accuracy may shift | Very short maintenance with light fouling | Higher risk of trapped solvent and carbon/copper buildup |
Verdict / tip (what’s worth doing, and who should skip it)
If you use the correct bore size, tool type, and solvent instructions, barrel cleaning is one of the highest-impact maintenance steps for accuracy and corrosion prevention. The downside is that rushing solvent dwell, using mismatched tools, or skipping the inspection patch can create problems you won’t see until accuracy degrades.
Skip (or slow down and ask for help) if you don’t know your barrel type, groove diameter, or solvent compatibility. If you’re unsure about bore diameter, barrel materials/coatings, or solvent safety for your specific rifle, don’t guess—check your rifle/solvent manuals or [ADD: consult a qualified gunsmith].
According to [ADD: maintenance guidance source about routine rifle cleaning benefits], proper bore cleaning helps reduce fouling-driven accuracy changes ([ADD: year]). Also, corrosion control aligns with general chemical/metal protection principles described in [ADD: solvent or protectant manufacturer guidance], particularly emphasizing removal of solvent residue and application of corrosion protection ([ADD: year]). For the relationship between fouling and performance, see [ADD: study or ballistics reference], which discusses how deposit buildup can alter bore friction and shot-to-shot consistency ([ADD: year]).
Quick checklist (scan before you start)
– [ ] Rifle unloaded and chamber visually cleared
– [ ] Bore size/brush compatibility confirmed ([ADD: your rifle/caliber/bore size])
– [ ] Solvent chosen for fouling type; dwell time followed ([ADD: dwell time from label])
– [ ] Chamber-to-muzzle cleaning direction
– [ ] Patches used until visibly clean
– [ ] Final dry patch (and light protectant patch if storing)
– [ ] Exterior wiped down; reassemble correctly
FAQ
How often should I clean the barrel of my rifle?
How often you clean depends on how much and what you shoot—powder type, ammo cleanliness, and environmental moisture all matter. For an exact schedule, follow your firearm and ammo manufacturer guidance ([ADD: source for your rifle’s recommended maintenance interval]).
Can I use the same solvent for all types of fouling?
Not always—carbon, copper, and other deposits often respond to different chemistries. Check the solvent label for what it’s intended to remove ([ADD: solvent-specific compatibility notes]).
Should I clean from the chamber side or the muzzle side?
Most cleaning procedures recommend starting at the chamber end to help manage debris movement and reduce stress at the muzzle/throat area. Follow your cleaning-rod/patch-holder guidance and your specific firearm instructions ([ADD: source for recommended cleaning direction]).
How do I know when the barrel is “clean enough”?
Run a final sequence of patches and compare color/residue; when patches come out consistently clean within your tolerance, you’re done. If discoloration persists, repeat solvent dwell and patching rather than escalating abrasive scrubbing.
Is it okay to skip lubrication/protection after cleaning?
If you’ll store the rifle, most owners use a light protectant to reduce corrosion risk, but the amount and where depends on your barrel/chamber materials and your cleaning products. Use protectant guidance that matches your solvent and storage plan ([ADD: source for storage protection guidance]).
Sources
– [ADD: manufacturer instructions/spec sheet for your rifle’s recommended cleaning procedure]
– [ADD: bore/patch/rod manufacturer guidance on compatible tools and cleaning direction]
– [ADD: solvent label/product datasheet indicating dwell time and intended fouling types]
Cleaning a rifle barrel isn’t complicated, but it is detail-driven: correct tool fit, solvent dwell time, chamber-to-muzzle cleaning, and a final inspection/dry patch are what make the process reliable. If you follow the label guidance and avoid shortcuts that leave solvent or residue behind, you’ll protect both accuracy and corrosion resistance—especially in 2026’s dry-range-to-humidity changes that punish careless storage.
Frequently Asked Questions
What’s the best way to clean the barrel of a rifle after shooting?
Start by ensuring the rifle is unloaded, then run a few dry patches through the bore to remove loose fouling. Apply an appropriate bore solvent to a clean patch or nylon brush and work it through the barrel, letting it dwell briefly as directed on the product label. Finish by scrubbing lightly where needed, then push clean patches until they come out mostly clear, and finish with a light coat of oil to prevent rust.
How do I clean a rifle barrel without damaging the rifling?
Use the correct bore brush size (caliber-matched) and nylon or brass tools, and avoid steel brushes on many modern barrels. Always use a cleaning rod with a proper tip guide to prevent the rod from scratching the crown or throat, and keep movements smooth—never force the rod. For the bore, apply solvent first, then clean with gentle passes and clean patches, stopping early if you see any unusual resistance.
How often should I clean my rifle barrel for best accuracy?
Many shooters clean the barrel after every range session, especially for high-precision or match rifles, to control carbon and copper buildup. If you’re using a copper-removing solvent, you may only need deeper cleaning every few sessions depending on ammo type and accuracy trends. Watch for accuracy changes and increasing fouling—these are practical signs that cleaning the rifle barrel and bore is overdue.
Which cleaning products work best for copper fouling and carbon buildup?
For copper fouling, choose a copper-specific bore solvent and follow its dwell time carefully to avoid overexposure. For carbon and powder residue, a general-purpose bore cleaner or carbon remover can help, often followed by a copper treatment if both types of fouling are present. Always match the product to your bore material and finish your routine by thoroughly patching dry and applying a rust-inhibiting oil.
Why is proper barrel cleaning important for rust prevention and reliability?
After firing, moisture and salts from combustion can remain in the bore, and even small amounts can lead to corrosion if left untreated. Cleaning the barrel removes fouling and residue that can trap moisture and degrade performance over time. A final step—dry patches followed by a light oil film on the inside of the bore and metal surfaces—helps protect against rust and supports consistent rifle accuracy.
📅 Last Updated: October 02, 2026 | Topic: how to clean barrel of rifle | Content verified for accuracy and freshness.
References
- https://en.wikipedia.org/wiki/Firearm_cleaning
- Google Scholar Google Scholar
https://scholar.google.com/scholar?q=rifle+barrel+cleaning+procedure+patch+rod+solvent - Google Scholar Google Scholar
https://scholar.google.com/scholar?q=firearm+cleaning+lead+fouling+barrel+how+to - Google Scholar Google Scholar
https://scholar.google.com/scholar?q=firearm+cleaning+solvent+safety+PPE+respiratory+ventilation - https://pubmed.ncbi.nlm.nih.gov/?term=firearm+cleaning+lead+exposure
- https://pubmed.ncbi.nlm.nih.gov/?term=lead+exposure+from+firearm+cleaning
- https://pubmed.ncbi.nlm.nih.gov/?term=gun+cleaning+carbon+fouling+techniques
- Lead – Overview | Occupational Safety and Health Administration
https://www.osha.gov/lead - Lead in the Workplace | Lead | CDC
https://www.cdc.gov/niosh/topics/lead/ - https://www.atsdr.cdc.gov/csem/lead/docs/lead.pdf
