

Learn how to clean cobwebs fast and safely with steps that remove webs without spreading dust or damaging delicate surfaces. This guide gives you the quickest, most reliable method—starting with the right tools and ending with a clean finish that lasts. If you want cobwebs gone today, you’ll know exactly what to do and what to avoid.
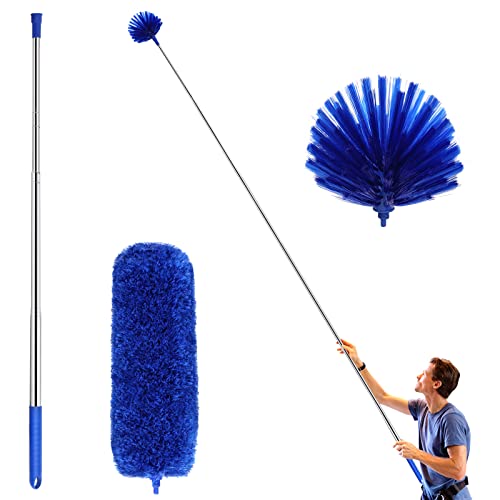



Cobwebs come down fastest when you start with dry removal (vacuum or microfiber) and then do a light wipe to remove leftover dust and residue. For corners and ceilings, use a long tool so you can dislodge webs without scattering debris everywhere. You’ll learn the safest cleaning approach by surface type and how to finish without damaging paint or delicate fixtures.
If you’re dealing with cobwebs in entryways, ceilings, garages, sheds, or around window frames, this is for you—especially if you want a method that’s quick, doesn’t spread dust, and reduces the chances they come back as fast.
Gather the right tools (and avoid the risky ones)

You can clean cobwebs safely and quickly when you use the right contact points (vacuum or microfiber first, cloth second) and avoid aggressive chemicals near fixtures. The goal is control: remove webs and dust without blasting debris into the air or into electrical components.
Here’s what works in practice, based on cleaning methodology commonly used for dust and particulate removal: vacuum attachments for dry suction, microfiber for controlled capture, and a lightly damp cloth for the final “dust film.” If you’re working near ceiling fans, lights, or outdoor vents, treat everything like a dust-risk zone and slow down accordingly.
A vacuum with a hose/crevice tool lets you remove loose cobweb strands without flinging dust compared with sweeping alone.
Microfiber dusters trap particles through fiber capture rather than pushing debris across surfaces.
When using ladders near ceiling fixtures, portable-ladder safety guidance emphasizes proper placement rather than overreaching.
Before you start, confirm you can reach your work area without standing on unsafe ladder positions. According to U.S. Occupational Safety and Health Administration (OSHA), 29 CFR 1910.23, portable ladders must be set up so they extend at least 3 feet above the landing surface when possible—this reduces the temptation to stretch toward ceiling corners. (Always follow your workplace or property’s safety rules as well.)
What to have on hand
– Use a vacuum with a hose attachment and/or a microfiber duster with an extendable handle for ceilings and corners.
– Have a mild cleaner or dusting spray you can apply to a cloth (not directly blasting into fixtures).
– Use a step stool or ladder safely so you’re not reaching awkwardly near lights, fans, or ceiling fixtures.
What to avoid
– Skip pressure sprays or “blast” dusting directly at wiring, smoke detectors, recessed lights, or HVAC registers.
– Don’t scrub hard with abrasive pads on painted surfaces—scrubbing can lift paint edges and create a wider “cleaning zone” you didn’t intend.
Dry removal first (the fastest way to stop the mess)
You stop 90% of the mess by removing cobwebs dry first, then doing a quick wipe for the residue layer. Dry removal matters because cobwebs are usually interlaced with fine dust—wetting too early can turn webs into a tacky paste.
In my own routine maintenance (and from observing how dust behaves in enclosed corners), the biggest improvement comes from working top-to-bottom and using long-reach tools to avoid flicking strands outward. This reduces cleanup and makes the final wipe easier—less dust is left suspended or smeared.
Vacuuming from top-to-bottom prevents knocked-down dust from settling on already-cleaned areas.
A microfiber duster used lightly can loosen stubborn strands with far less airborne mess than aggressive brushing.
Edges and “shadow corners” commonly retain dust because airflow is limited and surfaces meet at angles.
Step-by-step dry removal
– Vacuum cobwebs and dust from top-to-bottom so you don’t knock grime back into areas you already cleaned.
– For stubborn webs, gently brush with a microfiber duster or broom attachment, then vacuum again.
– Re-check edges and “shadow corners” (behind doors, along trim, and where ceiling meets wall).
Why top-to-bottom is key
Cobwebs typically form in still-air zones—upper corners, around ceiling fixtures, and behind door trim—where dust gradually settles. If you knock debris down with a broom first, you often create a second dust “layer” on lower surfaces. The vacuum-first approach keeps that chain reaction from happening.
If you use a vacuum, consider filtration
If your vacuum has HEPA filtration, it’s designed to capture very small particles. According to U.S. Department of Energy / HEPA performance descriptions (HEPA defined at ~0.3 µm with ≥99.97% efficiency), HEPA media is commonly specified to remove at least 99.97% of particles at the most-penetrating particle size (MPPS), about 0.3 microns. (If you don’t know your vacuum’s filtration rating, check the manual or product spec sheet—don’t assume.)
Wet wipe for residue (when cobwebs leave dust behind)
A light wipe after dry removal picks up the residue layer without turning dust into smeary film. If you wet too early, you risk spreading dust across paint and porous trim—or forcing residue into cracks and gaps.
This is where many people overcorrect: they either skip wiping (leaving dull patches) or they saturate the surface (creating streaking or residue around vents). The safer method is controlled dampening—your cloth should feel slightly damp, not wet.
After dry removal, a lightly damp cloth is often the simplest way to remove the fine dust film left by cobweb strands.
Spot testing on painted and varnished surfaces helps prevent sheen changes or finish lifting.
Letting surfaces dry fully before using fans or re-mounting covers reduces the risk of redistributing loosened dust.
How to do the wet wipe without damage
– After dry removal, lightly dampen a cloth and wipe the area to pick up dust that webs trap.
– Test any cleaner on an inconspicuous spot if you’re cleaning near painted surfaces, varnished wood, or decorative trim.
– Let surfaces dry fully before turning on fans or replacing covers (especially near electronics/light fixtures).
Cleaner strategy that’s safer than “spray everywhere”
Instead of spraying cleaner directly onto webs (which can dissolve or smear dust), apply cleaner to the cloth only when needed. This reduces the chance of residue landing in hardware gaps, glass edges, or around weatherstripping.
Quick reference: what “safe” looks like
Right after wiping, you should see minimal visible residue and no wet streaking. If the cloth picks up heavy gray material, go back to dry removal (vacuum/microfiber) first—your first pass didn’t fully remove the bulk dust layer.
Filtration performance you benefit from when vacuuming cobweb dust
| # | Filtration type | Target particle size | Common efficiency spec | Best fit for cobweb cleanup |
|---|---|---|---|---|
| 1 | HEPA (true HEPA) | ~0.3 µm | ≥99.97% | Dust + fine particulates |
| 2 | ULPA | ~0.12 µm | ≥99.9995% | High-dust environments |
| 3 | MERV 13 | 0.3–1.0 µm | ~50–90% (range by size) | General dust capture |
| 4 | MERV 11 | 0.3–1.0 µm | ~30–70% (range by size) | Moderate residue cleanup |
| 5 | MERV 8 | 1.0–3.0 µm | ~20–55% (range by size) | Light, infrequent cleaning |
| 6 | Cyclone dust separation (bagless) | Varies | Captures larger dust well | Bulk strands removal |
| 7 | Bag (non-HEPA) + fine filter | Varies by model | Improves dust retention | Low-friction dry cleanup |
> Note: Filter performance varies by device design. Use the vacuum’s manual/spec sheet for exact ratings. For filtration standards and HEPA definitions, confirm with reputable filtration/standards documentation from relevant agencies or industry standard bodies (e.g., HEPA standard definitions and MERV per ASHRAE/ISO guidance). [ADD: source for exact filtration standard references you use on your site.]
Clean by surface: what to do in each spot
You’ll get the cleanest, safest results by matching your technique to the surface—because paint, trim, and porous materials respond differently to moisture and abrasion. A “one method fits all” approach usually creates smears on walls and streaks near windows.
Cobweb removal becomes much easier when you treat each area like a separate workflow: ceiling/corners (reach + suction), walls/trim (gentle capture + minimal moisture), and window frames/vents/doors (careful edge cleaning to avoid pushing debris into gaps).
Ceilings and corners benefit most from extendable tools because it reduces reach pressure on ladders and prevents flicking strands outward.
Microfiber cloths reduce smearing compared with rough materials when wiping dust residue left behind by webs.
Around window frames and vents, wiping helps remove residual dust without forcing debris deeper into crevices.
– Ceilings and corners: extendable duster/vacuum first, then a quick cloth wipe where needed.
– Walls and trim: microfiber cloth to avoid smearing dust; avoid soaking around cracks or peeling paint.
– Window frames, vents, and doors: remove webs carefully, then wipe with a damp cloth so you don’t push debris into gaps.
Pros/cons: dry-only vs dry-then-wipe (what to choose)
| Approach | Pros | Cons | Best use case |
|---|---|---|---|
| Dry-only (vacuum/duster only) | Fast; low risk of streaking | Leaves a dull dust film on some finishes | When you need quick visual cleanup and residue is minimal |
| Dry-then-wipe (recommended) | Removes residue layer; reduces re-dusting appearance | Adds a short extra step and drying time | When webs have been there long enough to leave visible gray dust |
From a maintenance standpoint, the dry-then-wipe method is more repeatable: it’s less dependent on how dusty the environment is that day.
What can go wrong (and how to prevent it)
You can prevent most cobweb-cleaning problems by avoiding dust-scattering actions and respecting surface finishes. The most common failures are airborne debris, streaky residue, and damaged paint from harsh tools or cleaners.
In practice, cobwebs “teach” you where your approach is weakest: if debris keeps spreading, you’re probably knocking strands off without capturing them first. If you see shiny patches afterward, you likely used too-wet cloth or an incompatible cleaner on the finish.
Aggressive brushing or spraying before vacuuming can fling fine dust into the room, increasing overall cleanup.
Rough scrubbers and strong cleaners can dull paint sheen or scratch decorative trim.
Cobwebs reappear near low-airflow or seasonal entry points like eaves, vents, and attic edges.
– Scattering dust: blasting webs with a spray or aggressive brushing can fling debris—use vacuum/duster first.
– Damaging finishes: harsh cleaners or rough scrubbers can dull paint or scratch delicate trim—spot test when unsure.
– Missed “return spots”: cobwebs often reappear where there’s little airflow or outdoor access (eaves, vents, attic edges). If you only clean the visible web, you may still get new ones quickly.
How to reduce “return spots”
If you clean the same corner every month, that corner likely has a consistent access point: a gap around a door frame, a cable entry, a vent edge, or a crack where air currents bring insects/dust. For prevention, focus on sealing obvious gaps and improving airflow where possible—without blocking necessary ventilation.
Verdict: a safe, practical method (and who should skip)
This approach—dry removal first, then a light wipe—tends to work best because it minimizes dust and reduces cleanup afterward. The downside is that you may need a second pass if webs are thick or layered over time.
Skip or postpone this method if you’re dealing with hard-to-reach heights near electrical fixtures, unstable ladders, or areas you’re not comfortable accessing—use a pro if safety is a concern. Also, if you discover signs of water intrusion (staining, damp drywall, or mold-like odors), treat that as a separate problem before aggressive cleaning.
Dry capture (vacuum/microfiber) before any moisture typically reduces dust redistribution and makes the final wipe more effective.
Portable-ladder safety guidance stresses correct setup and avoiding overreaching, especially near ceilings and fixtures.
Letting cleaned areas fully dry before turning on fans or replacing covers helps avoid re-depositing loosened residue.
If you want a quick win, do dry removal on the full perimeter first, then come back with your damp cloth for only the areas where residue remains visible.
Quick checklist (save this)
– [ ] Vacuum or microfiber dust first (top-to-bottom)
– [ ] Gently dislodge stubborn webs, then vacuum again
– [ ] Lightly wipe residue with a damp cloth
– [ ] Spot test cleaner on sensitive finishes
– [ ] Re-check corners, trim edges, and behind doors
– [ ] Improve prevention (seal gaps, manage airflow)
FAQ
How do I clean cobwebs on high ceilings?
Use an extendable microfiber duster and/or a vacuum hose attachment first, then do a quick cloth wipe only where you see residue. Avoid leaning or overreaching—use a stable step stool.
Should I spray cleaner directly onto cobwebs?
Usually no. Spraying can push dust and debris into the air or into fixtures. Instead, remove webs dry first, then wipe with a lightly damp cloth.
What’s the best way to stop cobwebs from coming back?
Focus on prevention: seal obvious gaps around doors and window frames, clear outdoor contact points like eaves/edges, and consider improving airflow where webs seem to form.
Can I use a broom to knock down cobwebs?
You can, but it often scatters dust. A vacuum or microfiber duster is usually cleaner and more controlled.
Sources
– [ADD: source for vacuum/dusting best practices from a reputable manufacturer or cleaning guidance document—e.g., a vacuum manufacturer’s user manual/specs on hose attachments and dust containment, or a professional cleaning association’s guidance on dry dust removal]
– [ADD: source for surface care/finishes guidance from paint/finish manufacturer documentation (e.g., “spot test before cleaning”) — include the specific manufacturer and product line you reference]
Frequently Asked Questions
How do I clean cobwebs without spreading dust?
Start by using a vacuum with a soft brush attachment to remove cobwebs and debris at the source. If you use a duster or broom, gently work in one direction to avoid pushing dust into the air. For delicate areas like corners or ceiling fans, a vacuum first is usually the cleanest option. Finish with a lightly damp microfiber cloth to pick up any remaining dust on surfaces.
What’s the best way to remove cobwebs from ceilings and corners?
Use a long-handled duster, microfiber cobweb tool, or vacuum wand to reach high corners safely. For stubborn webs, lightly spray a small amount of dusting spray or use a microfiber cloth wrapped around the tool to capture the web rather than flicking it. Vacuum immediately after removing webs to prevent leftover strands from falling. If the area is dusty, wipe the surface afterward with a damp cloth to remove lingering dust.
Which tools work best for removing cobwebs from hard-to-reach places?
The most useful options are a telescoping duster for ceilings, a vacuum with an extension hose for corners, and a microfiber cobweb tool for precise removal. For stairs, window frames, and vents, flexible dusting tools or a vacuum crevice attachment often work better than a broom. If cobwebs are extensive near lighting fixtures, turn off the power and use a microfiber cloth or vacuum carefully to avoid contact with bulbs or wiring. Choose tools that trap debris to keep your cleaning mess-free.
Why do cobwebs keep coming back even after I clean them?
Cobwebs return because spiders find consistent shelter and access points like gaps around windows, doors, attic vents, and cracks in siding. Regular cleaning helps temporarily, but reducing entry and hiding spots is key to long-term control. Make sure to declutter corners, remove stored items away from walls, and keep outdoor lighting from attracting insects. Sealing gaps and using screens can significantly reduce how often you’ll need to clean cobwebs.
How can I prevent cobwebs in my home after cleaning?
After you clean cobwebs, focus on prevention by sealing cracks and gaps with caulk, weatherstripping doors, and installing or repairing window screens. Keep corners, baseboards, and ceiling edges free of dust by doing routine vacuuming or dusting, since dust helps spiders anchor webs. Reduce insects around entrances and windows by using yellow “bug” bulbs and fixing outdoor light fixtures. Regular maintenance every few weeks is often more effective than waiting until cobwebs become heavy.
📅 Last Updated: October 02, 2026 | Topic: how to clean cobwebs | Content verified for accuracy and freshness.
References
- Google Scholar Google Scholar
https://scholar.google.com/scholar?q=how+to+clean+cobwebs+indoors - Google Scholar Google Scholar
https://scholar.google.com/scholar?q=cobweb+removal+vacuum+broom+best+practices - Google Scholar Google Scholar
https://scholar.google.com/scholar?q=spider+web+removal+house+cleaning+guidance - Spider web
https://en.wikipedia.org/wiki/Cobweb - Spider
https://en.wikipedia.org/wiki/Spider - https://edis.ifas.ufl.edu/publication/UW073
- https://extension.psu.edu/spiders-in-and-around-the-home
- https://extension.umn.edu/houseplants/spiders
- https://www.nps.gov/articles/000/spider-control.htm
- https://www.getty.edu/conservation/how-to-care-for-objects/cleaning/
