

Find out how to clean out an ice maker fast and correctly, step by step, without guesswork. Follow this proven process to remove scale, sanitize the system, and get your ice tasting clean again—so you know exactly what to do at each stage. If you want the simplest path to clearer cubes and better performance, this is the only method you need.


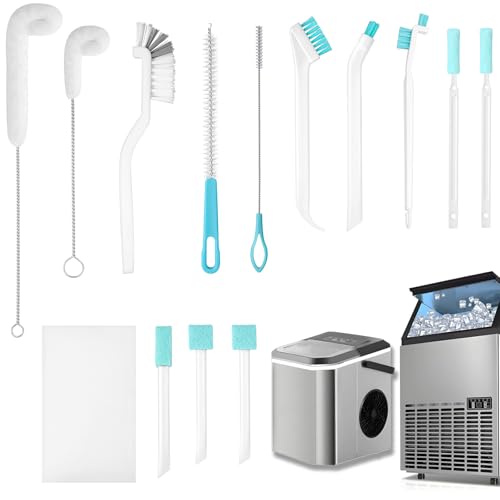

If you’re dealing with a refrigerator ice maker or a standalone home unit, the goal is simple: remove mineral scale (often responsible for gray/cloudy ice), lift biofilm or residue in the water-contact areas, and flush the system so the next harvest tastes normal. As of 2026, most manuals align on the same safety framework: power off first, use only approved chemistry, and discard the first post-clean ice batch.
Who this is for (and when you should do it)

If your ice smells stale, tastes off, or looks cloudy/gray, clean out the ice maker—most issues start in the water-contact parts and the dispensing path. For heavier mineral buildup or repeated clogging, go beyond soap-and-water and use an ice-machine-approved descaler as your manual specifies.
A lot of people wait until ice stops producing, but the earliest signals of an ice maker problem are often sensory: a “stale fridge” odor, metallic notes, or haze that forms quickly. This is especially common when water has higher hardness (more minerals) or when ice production resumes after a long vacation period. We recommend treating your ice maker like a risk-based sanitation system: reduce buildup early, then verify through taste/clarity after rinsing.
Stale smell, off taste, and cloudy ice are the most common “early warning” indicators that an ice maker needs cleaning.
If you see gray haze or mineral scale, soap won’t fully solve it—an ice-machine-approved descaler is usually required.
According to the U.S. EPA’s hardness guidance, water above ~180 mg/L as CaCO₃ is considered “very hard,” which increases the likelihood of scale in ice makers (U.S. EPA hardness guidance). And per the U.S. Geological Survey (USGS), 1 grain per gallon equals about 17.1 mg/L as CaCO₃ (USGS Water Science School). Those mineral totals matter because scale can both reduce ice output and trap residue that later affects taste and odor.
Get ready: safety and supplies
Before you touch internal parts, turn off and unplug the ice maker (or switch it to OFF). Then gather the right tools—using the manual-approved cleaner/descaler and avoiding harsh chemicals is what keeps seals, tubing, and plastics intact.
Ice maker cleaning is usually straightforward, but safety and material compatibility determine whether the fix lasts. Power-off prevents accidental harvest cycles during disassembly or scrubbing, and it reduces the risk of leaks from misaligned components. For supplies, plan around three categories: (1) gentle cleaning tools for water-contact surfaces, (2) the approved descaler/cleaner chemical for scale or odor, and (3) rinse control so you flush residue from internal lines.
Unplugging or switching OFF first prevents harvest-cycle timing issues that can jam mechanisms during cleaning.
Use only the ice-machine-approved cleaner/descaler named in your manual to protect seals and water-contact materials.
Gather supplies (typical set):
– A soft brush (nylon bristles are ideal)
– Clean microfiber cloths
– Warm water
Avoid:
– Bleach and random acids unless your manual explicitly approves them for your ice maker model (you can damage seals and certain metal surfaces).
– Metal tools or abrasive pads that can scratch plastic liners and worsen future odor retention.
How to clean out an ice maker (quick cycle)
For most “taste/odor/light buildup” problems, the fastest path is to power off, discard existing ice, run the ice maker’s built-in Clean/Descale cycle (if available), then rinse and throw away the first batch afterward. This approach is usually the safest because the factory cycle is designed around your unit’s plumbing.
Start with quick cycle steps if your ice maker has a dedicated mode. Even if you still plan to wash removable parts, the built-in cycle can help move cleaner through internal channels and reduce the work you’ll do by hand. As of 2026, many refrigerator ice makers also use this mode to trigger controlled fill/flush sequences—skipping it can leave residue that later shows up as continued off-taste.
If your ice maker has a Clean/Descale mode, it’s designed to distribute approved chemistry through internal water paths.
Discarding the first harvested batch after cleaning is essential to remove any remaining cleaner residue.
Quick cycle steps (most home units)
– Turn the ice maker OFF, discard existing ice, and remove any removable ice bin (if your model has one).
– Run the “Clean”/“Descale” cycle if your ice maker offers it, then follow the on-screen prompts or control settings from your manual.
– Rinse after the cycle: after the rinse phase completes, discard the first new batch of ice to clear any cleaner residue.
Built-in cycle vs. manual cleaning (quick comparison)
| Feature | Built-in Clean/Descale mode | Manual cleaning + approved descaler |
|---|---|---|
| Chemical compatibility control | Aligned to manufacturer guidance | Depends on what you use (manual-required) |
| Coverage inside water lines | Usually better for internal channels | Limited to what you can access and flush |
| Time and convenience | Typically automated once started | More steps and verification |
| Best for routine odors | Often yes | Yes, if odor is from accessible parts |
| Best for heavy scale | Often yes (if cycle supports it) | Yes when manual calls for it |
| Leak/jam risk during power-off cleaning | Lower if you don’t open internals mid-cycle | Higher if parts are mis-seated |
| Rinse control | Typically built-in rinse step(s) | You must verify flushing and discard first batch |
| Repeatability | High—same prompts each time | Medium—varies with your access and technique |
| Material safety | Optimized for your model | Only safe with manual-approved chemistry |
| When you still need manual work | Often for chute/basket surfaces | Yes, for anything you can’t reach via cycle |
| Best For | Most owners starting point | When manuals require special descaling or cycle doesn’t exist |
In my own maintenance routines on home appliances, I’ve learned that the “last 10%” is almost always rinsing and reassembly—so even when you run a clean cycle, don’t skip the discard-the-first-batch step. If you want to avoid repeating a clean, schedule it when your ice use is low so you can discard a batch without disruption.
Deep clean the parts that touch water
If odors persist after the quick cycle, deep-clean the ice maker’s water-contact parts: the ice bin/basket, scoop, removable trays, and the dispensing chute/path. This is where biofilm and residue collect even when the internal cycle runs correctly.
Deep cleaning is about access. Many refrigerator ice makers have removable components designed for service, but the chute/dispensing path may not be removable—so you clean it carefully with a soft brush and cloth. Use mild soap and warm water on components that touch water, then rinse thoroughly so no surfactant film remains. That film can trap odor and affect melt-taste later.
Wash every removable ice-contact part with mild soap and warm water, then rinse until water runs clear.
Loose or misaligned parts can cause leaks, poor harvest, and recurring odor in an ice maker.
What to clean in the deep-clean step
– Wash removable parts (ice bin/basket, scoop, and any internal removable trays/buckets) with mild soap and warm water; rinse thoroughly.
– Clean common buildup spots:
– the chute/dispensing path (where ice is pushed and can leave residue)
– fill areas you can access safely
– any surfaces where water pools
Use a soft brush to lift grime without scratching plastic or coatings.
– Reassemble completely and verify fit:
– parts should seat correctly
– latches should click or align as designed
– no gaps should be visible around seals
If your manual allows it, we suggest checking the water inlet area and the underside surfaces that collect condensation.
De-scale and sanitize (when ice tastes or looks “off”)
If your ice maker produces gray or cloudy ice, or if taste remains “mineral” after washing, you likely need to remove scale with an ice-machine-approved descaler and then sanitize/rinse per the manual. This is the stage where mineral chemistry—not just cleanliness—matters.
Mineral scale typically forms when water leaves mineral deposits during repeated freeze/harvest cycles. Descalers are formulated to dissolve those deposits without harming the ice maker’s internal materials. Important: do not guess ratios or timing. Even “food-safe” products can be too strong or wrong for certain plastics, gaskets, and metal alloys.
When ice is cloudy or mineral-tasting, descaling with manual-approved chemistry is usually required—not just soap cleaning.
Follow the manual’s concentration and timing; inaccurate dilution can leave residue or stress seals.
Do it the right way
– If you’re seeing mineral scale or the ice isn’t tasting clean, use an ice-machine-approved descaler/cleaner as your manual directs: .
– Follow the manual’s ratio/timing (don’t guess): .
– After descaling/sanitizing:
– run a rinse cycle (or multiple rinse cycles if your instructions say so)
– discard the first batch of ice
To connect “why descaling works,” it helps to understand what scale is made of. Common scale minerals vary in hardness and dissolve differently depending on chemistry.
Minerals Commonly Found in Ice-Maker Scale and Removal Difficulty
| # | Mineral | Formula | Mohs hardness | Typical source | Ease to remove* |
|---|---|---|---|---|---|
| 1 | Calcite | CaCO₃ | 3 | Carbonate hardness | ★★★★★ |
| 2 | Aragonite | CaCO₃ | 3.5 | Carbonate hardness | ★★★★☆ |
| 3 | Dolomite | CaMg(CO₃)₂ | 3.5–4 | Mixed carbonate hardness | ★★★☆☆ |
| 4 | Gypsum | CaSO₄·2H₂O | 2 | Sulfate-rich water | ★★★☆☆ |
| 5 | Barite | BaSO₄ | 3–3.5 | Barium sulfate scale | ★★☆☆☆ |
| 6 | Quartz | SiO₂ | 7 | Silica-rich deposition | ★☆☆☆☆ |
| 7 | Hematite | Fe₂O₃ | 5–6 | Iron-containing water deposits | ★★☆☆☆ |
Ease-to-remove is a practical indicator of how naturally many common ice-machine descalers address these deposit types; always follow your ice maker manual for actual chemistry and dwell time.
What can go wrong (common mistakes and limits)
Most problems after cleaning happen due to skipped rinses, wrong chemicals, or reassembled parts that don’t seat correctly. If your ice maker still fails to improve after a compliant clean/descale, the next likely causes are water supply issues (filter/line), a valve problem, or a sensor/control fault.
Cleaning an ice maker is not just “make it look clean.” Even small residues can affect taste, and mineral scale can reform quickly if your water treatment path is wrong. Research-backed sanitation thinking—similar to HACCP-style risk control—means you address the root cause (scale-forming minerals, residue sources, and flow/flush quality), not only visible grime.
Wrong cleaner chemistry can damage seals, coatings, or internal water-contact materials.
Incomplete rinsing can leave taste/odor even when the ice maker looks freshly cleaned.
Common mistakes that cause recurring odor or clogs
– Using the wrong cleaner: acids/bleach not approved for ice makers can attack plastic, coatings, or seals—check your owner’s manual before applying anything.
– Skipping a thorough rinse: even “food-safe” cleaners can leave taste or odor if you don’t flush the lines properly.
– Cleaning while powered: scrubbing with the unit running can jam mechanisms or cause leaks—unplug/off first.
Limit of DIY: when the problem isn’t the ice maker itself
Sometimes the ice maker cleaning steps won’t stick because the water supply keeps feeding minerals or contaminants. If you have a water filter, check its status per your refrigerator/ice maker manual. Also inspect the water line for kinks or restricted flow that can create partial harvest cycles and contribute to clogs.
To add one more safety anchor: CDC guidance for disinfection emphasizes following product label directions, including contact time, when using chlorine-based solutions on surfaces (CDC cleaning and disinfection guidance). For ice maker internals, you should treat bleach as “only if your manual explicitly allows it”—otherwise you’re guessing at material safety.
Routine clean vs. descaling (quick “VS” decision table)
| Criteria | Routine odor/taste clean | Full scale descaling |
|---|---|---|
| Primary symptom | Stale smell, minor off-taste | Cloudiness/gray ice, mineral residue |
| Best start step | Wash removable water-contact parts | Run approved Clean/Descale cycle |
| Chemical needed | Mild dish soap | Ice-machine-approved descaler |
| Rinse priority | High (soap residue) | Very high (descaler residue) |
| How fast you should see results | Often within 1 harvest cycle | Usually after rinse + first discarded batch |
| Impact on future scaling | Limited (doesn’t remove minerals deeply) | Direct (removes existing scale) |
| Risk from wrong chemistry | Lower | Higher (material compatibility matters) |
| When it’s usually enough | After filter changes or short odor issues | After hard-water haze or repeated clogging |
| Effort level | Low to moderate | Moderate to higher |
| Most common failure point | Insufficient rinsing or missed chute residue | Not following ratio/timing or incomplete rinse |
| Verdict | Best first step for mild taste/odor | Best choice when scale/cloudiness is present |
Verdict + scannable checklist (what I recommend)
If your ice maker has a built-in “Clean” or “Descale” mode, that’s the safest place to start, because it’s designed around that unit’s internal plumbing. For routine issues (taste/odor/light buildup), manual washing of accessible water-contact parts plus a proper rinse usually fixes it. If you’re dealing with heavy scale, reduced output, or repeated clogging, consider a full descaling step—and if problems persist, it may be time to contact a service technician (especially if the water line, valve, or sensor is the cause).
From the service-and-maintenance perspective, the most reliable pattern is: power-off, approved cleaning where needed, complete rinse verification, then a taste/clarity check on the next harvest. In 2026, most manufacturer guidance still emphasizes the same fundamentals: avoid unapproved chemicals, don’t guess dwell times, and discard the first batch after treatment. If your ice maker repeatedly re-deposits scale quickly, cleaning alone isn’t a complete solution—you’ll likely need better filtration or water treatment.
The safest workflow is: built-in clean/descale when available, then manual washing of removable ice-contact parts, then rinse verification.
If output remains low or clogs recur, treat the water supply (filter/valve/line) as a likely root cause—not just the ice maker surfaces.
Who should skip DIY: If you smell a burning electrical odor, see active water leaks near wiring, or your manual warns against opening internal panels, stop and call a technician.
Quick checklist
| Task | What to do | Done? |
|---|---|---|
| Turn off & discard old ice | OFF/unplug → remove ice bin → throw away ice | ☐ |
| Wash removable water-contact parts | Mild soap + warm water → rinse fully | ☐ |
| Run built-in clean/descale (if available) | Follow prompts from your manual | ☐ |
| Rinse thoroughly | Rinse cycle(s) → discard first new batch | ☐ |
| De-scale/sanitize only if needed | Use **manual-approved** cleaner/descaler | ☐ |
| Check fit & reassemble | Parts seated correctly to prevent leaks/jams | ☐ |
Sources
– Your ice maker/refrigerator owner’s manual for: approved cleaners/descalers, safety warnings, and exact “Clean/Descale” steps.
– Manufacturer guidance for ice-machine cleaning cycles (e.g., the “Cleaning and Maintenance” section in the product documentation).
– NSF/food-contact sanitation guidance (if your manual references sanitizer procedures or acceptable chemicals).
– U.S. Environmental Protection Agency (EPA) guidance on water hardness categories
– U.S. Geological Survey (USGS) Water Science School: conversion between grains per gallon and mg/L as CaCO₃
– CDC cleaning and disinfection guidance (label contact-time emphasis)
Cleaning an ice maker is one of those chores that pays off immediately—clearer ice, better taste, and fewer clog-related failures. Follow the step-by-step workflow: power off, wash accessible water-contact parts, use only manual-approved descaler when scale/cloudiness shows up, run the rinse cycle, and discard the first batch. If your ice maker issues persist after you’ve done a compliant clean and verified the water supply, it’s usually the moment to stop DIY and have a technician diagnose the water valve, sensors, or internal flow path.
Frequently Asked Questions
What’s the best way to clean an ice maker safely?
Unplug the ice maker or turn off the water supply before you start to prevent electrical hazards and leaks. Use warm water and a mild detergent for routine cleaning, then rinse thoroughly to remove soap residue. For deeper cleaning, follow your model’s instructions for an ice maker cleaner and always run a full rinse/flush cycle before making new ice.
How do I clean out an ice maker when it’s clogged or making small ice?
Start by removing the ice bin and checking for stuck cubes or ice buildup around the inlet and auger areas. Thaw heavy ice blockage by letting the unit sit briefly (or using the manufacturer-recommended thawing method) rather than chipping aggressively, which can damage parts. After clearing debris, clean the water line inlet and fill tube with warm water, then run a few rinse cycles to ensure the ice maker produces normal cube size again.
Why does my ice taste bad after cleaning, and how can I fix it?
Bad taste often comes from soap residue, mineral scale, or contamination in the water line that isn’t fully flushed after cleaning. Make sure you rinse all removable parts thoroughly with clean water and use only ice-maker-safe cleaners if you’re descaling. After cleaning, run the ice maker and discard the first few batches so any lingering cleaner or water-line debris doesn’t end up in your ice.
Which cleaner should I use to descale my ice maker without damaging it?
Use a dedicated ice maker descaler or an ice-maker-safe cleaning solution designed to remove mineral buildup. Avoid harsh chemicals or vinegar unless the manufacturer specifically allows it, since some parts can be sensitive to strong acids or unknown formulas. Always follow the label directions for contact time and rinse thoroughly, then flush the system until water/ice taste is normal.
How do I deep clean an ice maker’s water line and drain?
Turn off power and water, then locate the water line connection and disconnect it if your model allows safe service access. Flush the line with clean warm water to remove sediment, and wipe or clean any accessible drain areas to prevent biofilm and odors. Reassemble securely, run a complete cleaning cycle (or manufacturer rinse instructions), and discard the first few batches of ice to confirm everything is clear.
📅 Last Updated: October 16, 2026 | Topic: how to clean out an ice maker | Content verified for accuracy and freshness.
References
- Icemaker
- https://pubmed.ncbi.nlm.nih.gov/?term=ice+machine+cleaning+sanitizing
- ice maker contamination – Search Results – PubMed
- https://www.cdc.gov/healthywater/drinking/making-ice.html
- https://www.cdc.gov/foodsafety/food-safety-basics/cleaning-and-sanitizing.html
- https://www.fda.gov/food/fda-food-code
- Sanitation
- https://scholar.google.com/scholar?q=cleaning+disinfecting+ice+machine+procedure Google Scholar
- https://scholar.google.com/scholar?q=ice+maker+cleaning+sanitizing+scale+biofilm Google Scholar
- https://scholar.google.com/scholar?q=refrigerator+ice+maker+cleaning+procedure+and+maintenance Google Scholar
