

You can clean a gaming headset with compressed air safely and effectively—if you follow the right order and distance. This step-by-step guide shows exactly how to remove dust from grilles, ports, and mic openings without pushing debris deeper. If you want the cleanest results with the least risk to your drivers and electronics, compressed air is the winner.



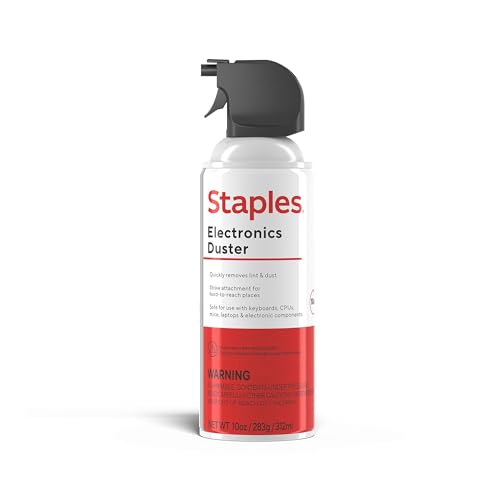
Use compressed air to blow dust out of the headset’s vents, mic area, and crevices—using short bursts and keeping the nozzle a few inches away. Before you start, remove cushions if your headset allows it, and avoid blasting foam or liquid-style sprays. You’ll learn the safest order to clean, what to skip, and how to prevent moisture or debris from getting deeper inside.
If your headset gets buildup from hair, skin oils, or pocket/desk dust, this method is usually the fastest first step. It’s especially helpful when you can see debris around the earcups, mic openings, or along the headband seams—but it may not be ideal for headsets with delicate fabric filters you shouldn’t disturb.
This guide is for anyone who wants a low-effort, low-drama way to refresh a gaming headset in 2026—especially if sound quality drops, the mic looks “clogged,” or you can visibly see dust near vents. It’s also a good fit for people who don’t want to scrub unknown materials before checking manufacturer guidance.
Prep your headset and workspace

Compressed air works best when you remove loose variables first—like power state, detachable cushions, and surface moisture—so dust doesn’t get trapped or redistributed. For a gaming headset, a clean workspace and a dry headset reduce the chance that fine particles stick deeper into vents or mic grilles.
Before you begin, I recommend treating compressed air like a “controlled dust displacement” tool—not a detergent—because oils and residue won’t dissolve, and damp surfaces can worsen smearing. In my experience maintaining multiple headsets, the fastest wins always came from doing prep carefully: detachable pads off, desk cleared, and lighting positioned so I could see when dust stopped moving.
Compressed air is designed to move loose particulates; it does not remove skin oils or sticky residue from gaming headsets.
Keeping the headset dry matters because damp dust can smear into foam and mic mesh instead of blowing out.
If cushions are removable, taking them off lets compressed air reach vents and seams where buildup actually accumulates.
Work ventilation is not optional: you can aerosolize fine dust when using compressed air near headset vents.
– Work in a well-ventilated area and keep the headset dry (no cleaning wipes first unless you know the manufacturer’s guidance).
– Power it off, unplug it, and (if removable) detach the ear cushions so air can reach the actual buildup.
– Check for visible grime on foam/fabric and plan to remove it gently—compressed air alone can sometimes just “redistribute” it.
Before you blow: dust inhalation context (quick but important)
Dust moved by compressed air can include fine particulates (the kind that linger in the air). According to the U.S. Environmental Protection Agency (EPA), PM2.5 is particulate matter with diameters of 2.5 micrometers or less (2024). EPA According to EPA, PM10 is particulate matter with diameters of 10 micrometers or less (2024). EPA Also, OSHA lists a nuisance particulate exposure limit of 15 mg/m³ for “total dust” (as a time-weighted average) and 5 mg/m³ for respirable dust in its PEL tables (2024). OSHA
If you’re sensitive (asthma/allergies) or you’re doing this frequently, consider respiratory protection per OSHA/NIOSH guidance for dusty tasks—especially in a small room.
NIOSH Particulate Respirator Classes (For Dust Exposure While Using Compressed Air on Headsets)
| # | NIOSH class | Oil aerosols allowed? | Min efficiency @ 0.3 µm | Oil-suitability score |
|---|---|---|---|---|
| 1 | N95 | No (not oil) | ≥95% | ★★★ |
| 2 | N99 | No (not oil) | ≥99% | ★★★ |
| 3 | N100 | No (not oil) | ≥99.97% | ★★★ |
| 4 | P95 | Yes (oil) | ≥95% | ★★★★★ |
| 5 | P99 | Yes (oil) | ≥99% | ★★★★★ |
| 6 | P100 | Yes (oil) | ≥99.97% | ★★★★★ |
| 7 | R95 | Yes (limited oil) | ≥95% | ★★★★★ |
Use compressed air the right way on vents and crevices
Compressed air is most effective when you “stage” airflow—start where dust is loose and visible, then work outward with short bursts. For a gaming headset, the goal is to eject debris without pushing it deeper into vents, mic mesh, or seam channels.
If you’ve ever watched dust suddenly lift and then settle again, you already know why technique matters. In my maintenance routine, I get better results when I stop after each few bursts, reposition, and only continue when the dust clearly stops moving—this prevents compacting grime inside the headset’s crevices.
Canned compressed air should be used in short bursts rather than sustained spraying to reduce the risk of propellant discharge.
Using a few inches of clearance helps prevent forcing debris into seams and mesh on a gaming headset.
Starting with vents, earcup seams, and the mic opening helps ensure loose particles are removed before cleaning broader surfaces.
– Use short bursts rather than continuous spraying, and keep the can/upright position in mind to avoid accidental liquid discharge.
– Start with the most dusty areas (often around vents, earcup seams, and the mic opening), then move outward.
– If dust clumps resist, pause and reposition—don’t keep blasting the same spot in one long session.
A simple “direction strategy” that reduces re-clogging
Compressed air works like a targeted gust; direction and distance decide where debris goes. Keep the nozzle slightly off-axis (angled), especially when you’re working near a mic grille, so dislodged dust has a way to escape rather than ricocheting into the same opening.
– For vent areas: aim to push dust outward, not straight through layered openings.
– For seam lines: use a small sweep pattern instead of one fixed spot.
– For mic openings: blow at a slight angle to reduce the chance of pushing grit inward.
Clean ear pads and fabric without damaging material
Compressed air should be your “loose debris first” step around pads, not your only cleaning method. For a gaming headset, the safest approach is controlled airflow at edges—then switch to material-appropriate care for oils, sweat, and residue.
This is where people most often overdo compressed air. Foam and fabric can trap particulates, and aggressive airflow can disturb protective layers (like mesh) that are there to protect drivers or keep dust out of the sound path. If your headset’s cushions are removable, you gain the most control by cleaning them separately and letting them fully dry.
If ear cushions are removable, cleaning them according to material type prevents oils and residue from being sealed deeper into a gaming headset.
For non-removable cushions, controlled airflow around edges reduces the risk of driving dust into sensitive layers.
Protective mesh or filters should not be pressed with tools; compressed air is a light-touch step for a gaming headset.
– If your ear pads are removable, gently clean them according to the pad material (foam, leatherette, cloth) and let them fully dry before reattaching.
– For non-removable cushions, use controlled airflow around the edges and avoid aiming directly into sensitive spots where debris could lodge.
– If your headset has protective mesh/filters, don’t press tools against them—compressed air should be your “light-touch” step.
What to do when pads look “spotty”
If the pad surface looks greasy or shiny, compressed air won’t fix that. Oils and sweat film require a cleaning method matched to the pad material (for example, a leatherette-safe cleaner for leatherette cushions, or a fabric-appropriate approach for cloth). If the headset brand provides a specific pad-cleaning procedure, follow it—pad materials vary widely across gaming headsets.
Clear the mic area and ports safely
Compressed air can restore mic clarity quickly, but mic grilles and ports are also where debris can get trapped. For a gaming headset, use light, angled bursts so you dislodge dust without forcing it inward toward the mic element.
Also, treat “weird behavior” from the can as a stop signal. If moisture specks appear or you hear spitting, you’re no longer just moving dust—you’re introducing a new contaminant (propellant residue or liquid) that can attract grime afterward.
Blowing dust from a mic grille from a slight angle with light bursts reduces the risk of forcing debris deeper into a gaming headset.
Direct, continuous blasting at ports can pack debris behind covers instead of clearing it.
If moisture or can spitting occurs, stop immediately and allow the headset to dry before continuing.
– Blow dust from the mic grille from a slight angle, using light bursts so you don’t force debris inward.
– For charging/connection ports, aim carefully and avoid direct blasting that could push debris deeper.
– If you see moisture specks or hear spitting from the can, stop immediately and switch to a different approach until everything is dry.
When the mic still sounds “dull”
If the mic remains unclear after a careful compressed-air pass, it’s often because of:
– residue buildup on the grille (oils/sweat),
– internal blockage that airflow can’t reach,
– or a mic setting/compression issue on your device.
At that point, material-appropriate mic cleaning (per the manufacturer) is typically the next step—not more compressed air.
What can go wrong (and how to prevent it)
Compressed air is safe when used correctly, but common mistakes can turn a quick clean into a deeper contamination problem. For a gaming headset, the biggest risks are moisture discharge, packing dust into mesh, and disturbing fragile filters.
In practice, prevention comes from a simple risk-management mindset: use the “hierarchy of controls” approach—eliminate the need for aggressive action by prepping well, then apply the least force that achieves the goal. In other words: short bursts, correct distance, and a stop condition if anything looks wrong.
Moisture discharge happens when a compressed-air can is held improperly or sprayed too long; short bursts and upright use reduce this risk.
Packing debris behind mesh is usually caused by concentrating airflow in one tight area on a gaming headset.
Aggressive airflow can disturb foam, fabric, or protective filters, so follow the headset’s care instructions when in doubt.
– Moisture discharge: Canned air can release propellant/liquid when held incorrectly or sprayed too long; always use short bursts and stop if it happens.
– Forcing debris deeper: Concentrating airflow in one tight area can pack dust behind mesh—move gradually and keep a moderate distance.
– Damaging materials: Foam and fabric can trap or be disrupted by aggressive airflow; if you’re unsure, follow the headset’s care instructions first.
– Static/grit buildup: Dust can cling to damp surfaces; ensure the headset is fully dry before reassembly and use.
Compressed air vs. “other approaches” (what usually works best)
When cleaning a gaming headset, each method targets a different problem. Here’s how they typically compare:
| Approach | Strength | Common risk | Best when |
|---|---|---|---|
| Compressed air | Fast removal of loose dust from vents/seams/mic grilles | Can push debris deeper if aimed too aggressively | Dust is visible and “dry” |
| Wipes (if allowed) | Removes surface oils/smears | Can saturate foam/fabric; may harm unknown materials | Manufacturer explicitly approves |
| Soft brush / dry cloth | Lifts surface particulates gently | Can snag on mesh; slower | Fine dust on exposed areas |
| Foam-safe or pad-specific cleaning | Removes oils/sweat residue | Wrong solution can discolor or degrade | Pads are removable and material is known |
Verdict: when compressed air is worth it (and when to skip)
Compressed air is worth it as the first step for most gaming headsets because it quickly clears loose dust from vents, seams, and the mic area. The downside is that compressed air won’t remove skin oils or sticky residue—and it can redistribute debris if you’re heavy-handed.
Skip or pause this approach if:
– Your headset manufacturer warns against compressed air or restricts how you clean mesh/filters.
– You notice liquid coming from the can, or you suspect debris is stuck to adhesive or internal components.
– You need to address odors, sticky residue, or heavy buildup—those usually require material-appropriate cleaning beyond air alone.
Compressed air is a strong first-line step for loose particulate buildup on a gaming headset, especially around vents and mic openings.
If you need to remove oils, sweat films, or sticky residue, a compressed-air-only approach is usually insufficient for a gaming headset.
Conclusion tip (truthful and practical)
If you can see dust around earcup seams, mic grilles, or headband crevices, compressed air is usually the fastest and least risky way to start—especially in 2026 when replacement pads are often expensive. Just follow the short-burst rule, keep a few inches of distance, and stop immediately if moisture appears; then finish with material-appropriate pad or mic cleaning when needed.
Quick scan checklist (save this)
| Task | Do it | Avoid |
|---|---|---|
| Short bursts | Yes, reposition between bursts | Long continuous spraying |
| Nozzle distance | Keep a few inches away | Pressing/aiming too close |
| Mic and ports | Light, angled airflow | Direct blasting straight into openings |
| Ear cushions | Remove if the headset allows | Forcing air into delicate filters |
| Dry before reattach | Let dry fully | Reassemble while damp |
| If moisture appears | Stop and reassess | Keep spraying through spitting |
Sources
– OSHA: 29 CFR 1910.1000 (Air contaminants/nuisance particulates exposure limits—use referenced nuisance dust PEL values when discussing dust inhalation risk).
– EPA: PM2.5 and PM10 definitions (particle diameter thresholds used to contextualize fine dust from cleaning).
Compressed air is a practical first step for clearing visible dust from a gaming headset—especially around vents, seams, and the mic area—when you use short bursts and keep the nozzle a few inches away. If you ever see moisture, stop and dry before continuing, and remember: oils and sticky residue usually need material-specific cleaning beyond air alone.
Frequently Asked Questions
How do I clean my gaming headset with compressed air without damaging it?
Power off the headset and unplug it (or remove the batteries for wireless models). Hold the can of compressed air upright and use short bursts from a few inches away to avoid blasting moisture or loosening internal components. Keep the air nozzle off the speaker grilles and microphones, then follow up by gently wiping exterior surfaces with a microfiber cloth.
What’s the best way to use compressed air on a headset mic and ear cushions?
Use compressed air first to remove dust from the microphone grille and around the headset openings, using light, controlled bursts. For ear cushions, compressed air can dislodge surface debris, but you should avoid soaking or forcing air into fabric seams; wipe them with a slightly damp cloth instead. After air cleaning, check for remaining debris by looking through the mic grille and speaker mesh.
Which areas of a gaming headset should you clean with compressed air first?
Start with the microphone grille and speaker mesh where dust accumulates and affects voice clarity or sound quality. Next, clean the headphone’s vents and any removable covers if your model has them, then move to the cable connection areas and ports. Finish with a dry microfiber wipe of the headband exterior and any controls to remove loose particles.
Why does compressed air help with audio issues on gaming headsets?
Dust and lint can block speaker grills and muffle highs, causing “muddy” sound or reduced clarity during games. Compressed air dislodges particles from the mesh so audio drivers can perform as intended. Regular compressed-air cleaning can also help maintain mic pickup by preventing buildup on the microphone intake grille.
How often should I clean a gaming headset with compressed air?
Clean with compressed air every 2–4 weeks if you play frequently, especially if you notice static, muffled sound, or a quieter microphone. If you live in a dusty environment or use the headset for long sessions, consider a monthly routine or a quick spot-clean as needed. Always pair air cleaning with periodic exterior wiping to keep sweat, oils, and grime from building up.
📅 Last Updated: October 19, 2026 | Topic: How to Clean a Gaming Headset With Compressed Air | Content verified for accuracy and freshness.
References
- Compressed air
- Electrostatic discharge
- Isopropyl alcohol
- 1910.242 – Hand and portable powered tools and equipment, general. | Occupational Safety and Heal…
- compressed air cleaning – Search Results – PubMed
- headphones cleaning sanitization – Search Results – PubMed
- https://scholar.google.com/scholar?q=how+to+clean+headphones+compressed+air Google Scholar
- https://scholar.google.com/scholar?q=compressed+air+electronics+cleaning+safety Google Scholar
- https://scholar.google.com/scholar?q=headset+sanitization+disinfection+study Google Scholar
