

If you find dust clinging to your drone’s camera lens, motors, or vents, you can restore crisp footage and smoother airflow in a single cleaning session. This walkthrough shows what typically causes that buildup—airborne particles, prop wash, and storage conditions—then walks you through safe removal using basic tools like a microfiber cloth, lens-safe cleaner, and compressed air. Most people can get it done in about 20–30 minutes without risking damage.



Dust on a drone usually comes from where you fly—outdoor wind, dry surfaces, and landing/takeoff near dirt all kick up particles that settle on the frame and propellers. Clean it with gentle, lint-free wiping and compressed air (when appropriate), then prevent it by adjusting how and where you launch. This guide explains the most common sources of dust and the safest way to remove it without damaging electronics.
If you’re noticing reduced smoothness, louder prop noise, or visible grime around the arms, cameras, or motors, this is for you. It applies to most consumer multirotors used outdoors, especially in dry, dusty, or windy locations.
What Causes Dust on a Drone?

Dust on a drone is primarily driven by particle “lifting” during takeoff, landing, and low-altitude flight near the ground. Here’s what most often turns a clean drone into a dust magnet within a short session—especially in 2026 when more operators fly in windy, dry conditions and tighter launch areas.
– Takeoff/landing dust: Dirt and debris get aerosolized when props spin near the ground.
– Airflow + dry conditions: Wind and dry environments increase how much dust stays airborne and lands on surfaces.
– Prop wash and nearby surfaces: Flying close to roads, fields, gravel, or sand accelerates buildup on arms and prop guards.
The key idea is that many dust particles are small enough to remain suspended, then settle on anything with airflow disturbance. For example, U.S. EPA defines PM10 as particulate matter with aerodynamic diameter ≤10 micrometers (2012). In the same standard family, U.S. EPA defines PM2.5 as particulate matter with aerodynamic diameter ≤2.5 micrometers (2012). Those smaller particles can reach vents, motor inlets, and prop hubs more readily than larger grit, which is why “dust” can become both visible grime and less-obvious airflow contamination on your drone.
Where Dust Settles (And What It Affects)
Dust on a drone tends to settle wherever airflow slows down, where there are seams, or where moving parts create turbulence. If you understand the settlement pattern, you can prioritize cleaning and reduce the risk of pushing abrasive grit deeper into electronics.
– Propellers and motor inlets: Dust can change airflow, add noise, or contribute to imbalance over time.
– Camera lens and gimbal area: Fine grit reduces image clarity and can scratch if wiped dry.
– Frame seams, vents, and connectors: Particles trapped in crevices can circulate around the electronics compartment.
From a maintenance standpoint, propellers are the most sensitive “aerodynamic” surface, while the camera/gimbal area is the most sensitive “optical” surface. Dust on the drone’s propellers can increase vibration by adding mass non-uniformity (even if you can’t see it), and dust near inlets can interfere with cooling. Meanwhile, camera lens dust is risky because abrasion happens when you wipe grit across glass. Even without a scratch you’ll often see reduced contrast and hazing in high-contrast scenes.
To ground this in material science: quartz—the dominant component of many sands and soil dusts—sits at Mohs 7 (hard and abrasive), while typical window-like silicate glass is around Mohs ~5.5. So if quartz dust makes it onto a lens cover, dry wiping is the quickest path to micro-scratches. A safer workflow treats dust on a drone as an abrasive contaminant, not just “dirt.”
How to Clean Your Drone Safely
Cleaning dust on a drone safely means removing loose particles first and avoiding anything that can force grit into vents or damage the gimbal/lens. The safest approach is also the simplest: power down, use non-abrasive tools, and follow your drone’s official cleaning guidance.
– Power down first: Remove the battery before cleaning to reduce risk around the motors and electronics.
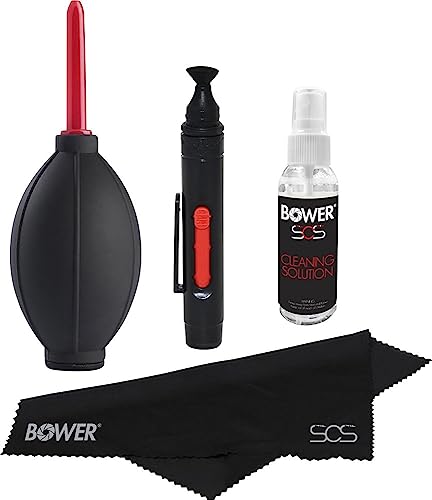
– Use the right tools: Start with a soft brush or microfiber (as recommended for your drone’s materials), then use gentle air to move debris out of corners.
– Be careful with camera/gimbal: Avoid pressing directly on lens/gimbal parts; wipe only with appropriate lens-safe methods.
Before you start, I recommend treating the drone like an electronics instrument with an airflow system. In other words, follow a basic risk-control hierarchy: isolate power (battery out) → remove loose contamination → avoid forced contact on optics → verify cooling paths are clear. This mindset reduces “secondary contamination,” where cleaning accidentally transfers dust from a frame seam to a vent or from props to the lens.
Quick comparison: cleaning methods that work (and what to watch for)
| Method | Best for | Primary risk | Safer practice |
|---|---|---|---|
| Soft brush | Dry grit on arms, prop guards, frame texture | Pushing grit into tight vents if pressed | Use light strokes only; brush away from inlets |
| Compressed air | Loose dust in corners, around seams | Dislodging parts or driving debris deeper | Use short bursts and follow your manual’s distance/limits |
| Lens-safe wipe | Final removal of haze/oily smudges after dust is cleared | Scratching glass if grit is still present | Dust off first, then wipe gently with approved materials |
| Wet cleaning (only if approved) | Light grime on non-sensitive surfaces | Moisture ingress near motors, connectors, gimbal | Use barely damp cloth only on allowed areas |
In my own maintenance routine, I’ve found that starting with dry removal only around the propellers and motor inlets prevents a lot of “recontamination.” That habit matters most when you fly dust on a drone frequently—because wiping grit while it’s still airborne-like spreads it across more surfaces.
Step-by-Step Cleaning Routine (Quick but Thorough)
Dust on a drone becomes manageable when you clean in the right order: loose debris → exterior wipe (if allowed) → optics/gimbal last. This sequence minimizes the chance you grind particles into prop surfaces, lens covers, or vent openings.
– Loose debris removal: Hold the drone steady and remove dry particles with a soft brush and/or low-pressure air, focusing on prop edges and arm gaps.
– Wipe down the exterior: Lightly clean the frame with a barely damp, lint-free cloth (only if your drone materials tolerate moisture; follow manufacturer guidance).
– Finish with camera checks: Inspect the lens and vents; if you see grit, remove it before doing any final wipe to prevent scratching.
Step 1: Remove power and stabilize the drone
Power off the drone and remove the battery before touching anything around the motors. This is not just a safety rule—dust cleaning often involves reaching near prop guards and arm seams where accidental contact can happen. With dust on a drone, the risk is higher because grit can obscure small edges you’d normally notice while handling the frame.
Step 2: Clear the “hard-to-see” dust first
Use a soft brush to lift dust from:
– propeller edges and prop guards,
– underside arm gaps,
– motor inlet areas (without pushing bristles into the intake).
If you use compressed air, follow your drone manual exactly. For your safety and warranty, use only manufacturer-approved settings.
Step 3: Clean the exterior without driving debris inward
If your drone’s materials allow moisture (many do, some don’t), use a lint-free cloth that’s barely damp—think “barely humid,” not wet. Wipe with light pressure and avoid soaking seams, vents, and connector housings. If you see dust on a drone’s frame seams, dry removal first is usually safer than adding moisture.
Step 4: Camera and gimbal—dust off, then wipe
Inspect the lens and gimbal area with good light. If you see visible grit, clear loose particles before wiping. For heavy dust, repeat the dust-off step and only then perform a lens-safe wipe.
Step 5: Verify airflow paths
Before reassembling for flight, check that vents and motor areas are free of clumps. Dust on a drone isn’t just appearance—blocked cooling paths can increase motor temperatures and contribute to abnormal noise.
What Can Go Wrong (Common Mistakes)
Dust cleaning fails when abrasive particles are spread or when cleaning introduces moisture or force into sensitive areas. Here are the most common ways operators damage drones while trying to remove dust.
– Using harsh chemicals or soaking parts: Some finishes and plastics can haze or degrade; electronics can also be harmed if cleaners seep in.
– Spinning motors while cleaning: Moving parts and prop strikes are a real risk—never clean with the drone powered and motors active.
– Scrubbing grit on the lens: Wiping abrasive dust across glass (especially with dry cloth) can cause permanent micro-scratches.
– Overusing compressed air: Too much force can dislodge plugs, drive debris deeper, or damage delicate components—use only as the manufacturer recommends.
Two edge cases deserve special mention for dust on a drone:
1. Wind-torn dust layers: If you flew through heavy dust storms or sand, you may have embedded grit in seams and prop hubs. Expect a second pass after dry brushing and air clearance—don’t jump straight to wipes.
2. Moisture + dust mix: If the dust got damp (dew, light rain, coastal humidity), the “dust” may behave like grit-laden paste. In that situation, wet wiping can grind it. Dry removal first is usually the safer sequence—then only minimal moisture if the manual allows it.
Verdict / Tip
Cleaning dust is worth doing regularly if you fly outdoors, but don’t turn it into a “deep clean every day.” Stick to gentle removal, careful lens handling, and manufacturer-approved cleaning methods—especially for the gimbal/camera area. If your drone uses exposed connectors or the manual advises against liquids, skip any wet cleaning and rely on dry removal first.
Tip for 2026: build a consistent routine that matches your flying conditions. If you regularly operate over gravel, fields, or sandy launches, plan quick dust clearing after each session and a more thorough inspection weekly. —because “safe cleaning” is never one-size-fits-all across motor design, gimbal sealing, and connector placement.
Who should skip wet cleaning entirely: operators whose drone manuals restrict liquids, anyone noticing moisture ingress after cleaning, and anyone cleaning near open ports without explicit guidance.
Quick Checklist (Scan & Save)
– Power down and remove battery
– Remove loose grit with soft brush / gentle air
– Wipe frame with lint-free cloth (follow manufacturer moisture guidance)
– Clean lens/gimbal last, without grinding dust into glass
– Inspect after cleaning for missed buildup around arms/vents
– Don’t use harsh chemicals or soak electronics
Sources
– U.S. EPA — Particulate Matter (PM) Basics (PM10 and PM2.5 definitions) (primary source for particle size standards)
– U.S. Geological Survey (USGS) — Mohs hardness / mineral hardness references (e.g., quartz) (primary source for material hardness context)
– (primary source from the manufacturer’s user manual or maintenance guide)
– (if your drone includes a specific camera/lens guidance document)
– (primary source)
Common Soil Dust Minerals and Their Abrasiveness (Mohs Hardness)
| # | Dust mineral (common in field/road dust) | Mohs hardness | Where you’ll find it | Abrasiveness level |
|---|---|---|---|---|
| 1 | Quartz | 7.0 | Sand & sandy soils | High |
| 2 | Feldspar | 6.0 | Granite & many crushed rocks | High |
| 3 | Magnetite | 5.5 | Iron-rich soils & some sands | Moderate–High |
| 4 | Hematite | 5.5 | Red soils & iron-oxide dust | Moderate–High |
| 5 | Calcite | 3.0 | Limestone & chalk dust | Moderate |
| 6 | Gypsum | 2.0 | Evaporite areas & dusty dry ground | Lower |
| 7 | Talc | 1.0 | Talc-rich soils | Low |
Cleaning dust on a drone is ultimately about protecting two systems: the airflow path that keeps motors efficient and the lens/gimbal area that keeps images sharp. If you remove loose grit first, avoid abrasive wiping, and follow your manufacturer’s guidance for compressed air and liquids, you’ll reduce vibration, noise, and visual degradation—without risking electronics or camera damage.
Frequently Asked Questions
What causes dust to accumulate on a drone?
Dust builds up when your drone flies through dry air, construction areas, unpaved roads, or dusty fields and pollen-heavy environments. Even small particles can cling to camera glass, prop guards, vents, and frame seams due to static charge and airflow turbulence around the drone. If you frequently launch or land on gravel, grass, or dirt, dust transfers onto the landing gear and then gets redistributed across the body during takeoff.
How do I clean dust off my drone safely without damaging the camera?
Start by powering off the drone and removing the battery to prevent accidental activation. Use a soft, dry microfiber cloth or an air blower to remove loose dust first, then gently wipe camera lenses with a dedicated lens cloth and lens-safe solution (not household cleaners). For vents and tight areas, lightly brush with a clean anti-static tool or use low-pressure compressed air while holding the fan blades or avoiding direct blasts at sensitive components.
Why does dust on a drone affect video quality and flight performance?
Dust on the camera lens can scatter light and reduce sharpness, causing haze, spots, or reduced contrast in your footage. Debris in propellers, prop guards, or motor openings can unbalance airflow, increase vibration, and potentially stress bearings or sensors. Because drones rely on precise calibration and stable airflow, persistent dust buildup can also lead to inaccurate readings from exposed ports and cooling channels.
What’s the best way to remove dust from propellers and avoid vibration?
Inspect props first for dust, tiny grit, or residue near the blades’ leading edges and hub. Clean by gently wiping with a microfiber cloth and using a soft brush for stubborn particles; avoid soaking anything and never bend or sand propellers. If you notice deep nicks, warping, or persistent imbalance after cleaning, replace the propellers to prevent vibration and protect motors.
Which cleaning tools should I use to prevent scratches and keep my drone reliable?
Use an air blower (preferred) plus microfiber cloths specifically labeled for electronics or lenses, and choose lens-safe cleaning wipes for camera glass only. For crevices, use anti-static brushes and soft swabs instead of rough paper towels or aggressive cloths. Avoid compressed air held too close, wet wipes on electrical areas, and harsh chemicals—these can leave residue, strip protective coatings, or drive dust deeper into motor housings.
📅 Last Updated: November 01, 2026 | Topic: What Causes Dust on a Drone? (And How to Clean It) | Content verified for accuracy and freshness.
References
- Dust
- IP code
- https://www.cdc.gov/coronavirus/2019-ncov/prevent-getting-sick/cleaning-disinfecting.html
- https://www.cdc.gov/niosh/topics/dust/
- Combustible Dust: An Explosion Hazard – Overview | Occupational Safety and Health Administration
- https://www.epa.gov/indoor-air-quality-iaq/air-cleaners-and-air-filtration-systems
- HEPA
- https://scholar.google.com/scholar?q=drone+dust+ingestion+propeller+airflow+contamination+cleaning Google Scholar
- https://scholar.google.com/scholar?q=unmanned+aerial+vehicle+UAV+dust+deposition+environmental+contamination Google Scholar
- https://scholar.google.com/scholar?q=optical+sensor+cleaning+dust+removal+techniques+microfiber+compressed+air Google Scholar

[…] gimbal, avoiding aggressive scrubbing that can damage coatings. For crevices, use soft brushes or compressed air on low pressure, and dry thoroughly with clean microfiber towels before […]