

A clogged faucet aerator can cause weak flow, sputtering, or uneven spray, and many people only rinse the outside without removing the parts that actually collect scale and sediment. With the right tools and a few minutes of careful disassembly, you can restore smooth water flow by cleaning the aerator thoroughly. You will need a soft cloth, white vinegar (or a descaling solution), and a toothbrush or small brush to reach the tiny openings.



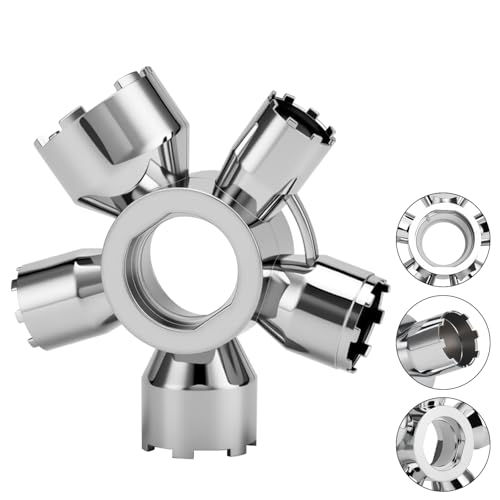
If your faucet flow looks weak or spluttery, the fix is usually to remove the aerator and clean out mineral buildup. Unscrew the aerator, soak it in vinegar to dissolve the deposits, then rinse and reattach it to restore normal water flow.
This is for homeowners and renters who want a quick, tool-light maintenance step—especially if you have hard water, visible white specks, or uneven spray.
Tools and supplies to gather first

For most faucet aerator cleanups, you can get a strong result with a mild acid (like vinegar) and gentle scrubbing—no specialized equipment required. The goal is to dissolve calcium/mineral scale without damaging the aerator’s screen, plastic flow restrictor, or rubber gaskets.
Gather these items before you start your faucet aerator work:
– White vinegar (or a mild descaler that’s safe for your fixture finish)
– A soft toothbrush or small brush, plus a rag or towel
– Optional: adjustable wrench or pliers (use a cloth to protect the finish)
A quick reality check: if your aerator is clogged by scale, vinegar (acetic acid) is typically effective; if it’s clogged by debris (sand, grit, or sediment), rinsing and brushing usually solve it even if you skip a long soak. According to U.S. EPA guidance, higher water hardness correlates with more scale buildup, which is why aerators on hard-water plumbing tend to need more frequent cleaning.
Remove the aerator from your faucet
Removing the aerator is usually the fastest way to confirm the cause of weak flow—once it’s off, you can see the mineral-lime buildup directly. For faucet aerators, most are designed to be hand-removable, with only light torque needed.
– Wrap a cloth around the aerator to prevent scratches, then unscrew it by hand first (most come off easily).
– If it won’t budge, use gentle leverage with pliers/wrench through a protective cloth.
– Take a quick note of the parts’ order (screens/gaskets) so you can reassemble correctly.
What you’re actually looking for when you remove the faucet aerator
When the aerator comes off, you’ll often see one or more of these:
– A fine mesh screen with clogged micro-holes
– A rubber or silicone gasket (to prevent leaks)
– A plastic or metal flow restrictor (the “sprayer core” in many designs)
If the aerator is stuck, don’t force it—damaged threads are more expensive than cleaning. Also, if you’re cleaning a pull-down kitchen spray head, check whether the aerator is integrated into a removable nozzle insert (some “aerators” aren’t a separate piece and instead come out as a cartridge).
Soak and clean the aerator parts
Soaking softens the mineral scale that blocks water passages, making the final brush-cleaning step much easier. For faucet aerators in hard-water conditions, a vinegar soak is often enough to dissolve the white, chalky deposits that reduce flow.
– Disassemble the aerator as far as it allows (some pieces come out, others stay captured).
– Soak the parts in white vinegar until bubbling slows and the mineral deposits look loosened ().
– After soaking, rinse thoroughly to remove loosened grit before you scrub.
How hard water level affects what you’ll see (and why soak time changes)
Mineral “scale” forms faster as hardness increases. Hardness is commonly measured in grains per gallon (gpg), and a standard conversion is useful when you read your water report.
Hard-Water Hardness Conversion for Aerator Scale Risk
| # | Water hardness (gpg) | As CaCO₃ (mg/L) | Expected aerator scale |
|---|---|---|---|
| 1 | 0.5 | 8.55 | Low |
| 2 | 1.0 | 17.1 | Low to moderate |
| 3 | 2.0 | 34.2 | Moderate |
| 4 | 3.5 | 59.85 | Hard boundary |
| 5 | 5.0 | 85.5 | High |
| 6 | 7.0 | 119.7 | Very high |
| 7 | 10.0 | 171.0 | Extreme |
The mg/L values above use the conversion that 1 gpg equals 17.1 mg/L as CaCO₃, so you can compare your water report directly. According to USGS Water Science School, 1 grain per gallon (gpg) is equivalent to 17.1 mg/L (as CaCO₃). And according to U.S. EPA hardness guidance, hardness is often described in categories such as soft (<1 gpg), moderately hard (1–3.5 gpg), hard (3.5–7 gpg), and very hard (>7 gpg). Those categories are a practical proxy for how quickly a faucet aerator accumulates scale.
Vinegar vs other descalers (what to choose)
If you’re deciding between vinegar and a commercial descaler, the selection should be based on compatibility with the fixture finish and the aerator’s gasket materials.
| Method | Best for | Pros | Watch-outs |
|---|---|---|---|
| White vinegar (acetic acid) | Calcium/lime scale | Generally gentle; works well for typical mineral “white specks” | Soak time may need to be longer for heavy buildup |
| Citric-acid descaler | Scale + soap scum | Often effective with shorter dwell times than vinegar | Confirm it’s safe for plastics/rubbers on your aerator |
| Strong commercial “lime remover” | Severe mineral blockages | Can dissolve stubborn deposits faster | May harm rubber/plastic components and some finishes if misused |
As of 2026, many plumbing fixture manufacturers still recommend staying within mild, compatible cleaners for aerators and gaskets. If you can’t find the manufacturer’s cleaning guidance, vinegar is usually the safest starting point for DIY faucet aerator maintenance. For composition context, distilled white vinegar is commonly around 5% acetic acid by weight. According to U.S. National Library of Medicine resources describing vinegar composition, vinegar typically contains ~5% acetic acid (with the exact percentage varying by product).
Scrub, rinse, and reassemble for smooth flow
Scrubbing clears the remaining mineral film from the aerator’s tiny holes so water can pass evenly again. After your vinegar soak, the faucet aerator should look cleaner, but you’ll still need a soft brush to get the microscopic openings open.
– Use a soft brush or toothbrush to clean the small holes and screen—don’t use sharp metal tools that can damage the mesh.
– Rinse again, then check that the holes are clear and the screen sits flat.
– Reinstall the aerator snugly (don’t over-tighten, especially if you have plastic parts).
Reassembly order is what prevents leaks and recurring weak flow
A faucet aerator works like a small filtration “stack.” If the screens or gaskets go back in the wrong order, you may get:
– Restricted flow (holes misaligned)
– Dripping or leakage at the spout
– Uneven spray pattern (the screen sits crooked)
When you’re reattaching the aerator, turn it by hand until it bottoms out, then stop. Over-tightening can deform gaskets and damage threads—especially on plastic components.
A fast functional check
Once reinstalled, run the water for 15–30 seconds. If the stream improves but still sputters, it often means there’s debris still lodged in the small passages. Turn off the water, remove the aerator again, and rinse more thoroughly—especially around the inlet side where grit can remain.
What can go wrong (and how to avoid it)
Most issues during faucet aerator cleaning happen from force, missing small parts, or using chemicals that don’t match the aerator materials. If you avoid these pitfalls, the job is typically low-risk and repeatable.
– Stripping threads: over-tightening or using bare pliers can damage the aerator or faucet housing—protect surfaces with a cloth.
– Losing small parts: if your aerator has gaskets or screens, mix-ups can cause leaks or poor flow.
– Using the wrong cleaner: harsh chemicals may damage rubber/plastic components or finishes—stick to vinegar or a product labeled compatible with plumbing fixtures.
Edge cases where cleaning may not be the full fix
A clogged aerator is a common culprit, but weak flow can also come from other parts of the plumbing system. If the aerator is clean and water still runs poorly, check for:
– A partially closed shutoff valve under the sink
– A failing cartridge in the faucet body (often affects pressure and temperature control)
– Sediment in the supply line
– Water heater or pressure regulator issues (especially for whole-home symptoms)
If only one faucet is affected, the aerator is usually the most likely choke point—because the symptom is localized at the point of use.
Verdict / tip: worth doing yourself—if you take it gently
Cleaning the aerator is one of the easiest ways to improve faucet flow without replacing anything, but results depend on how badly the passages are clogged. In my view, it’s a smart first step for most renters and homeowners because it’s fast, doesn’t require plumbing tools, and focuses on the component that creates the flow pattern.
That said, skip DIY and consider professional help if the aerator won’t come off safely, if you see damaged threads, or if you’re unsure whether your faucet finish/material can handle a soak. If the faucet is older and the aerator seems fused in place, forcing removal can turn a simple clean into a repair job.
Quick checklist (scan before you start)
– [ ] Unscrew aerator (cloth protection; avoid over-tightening)
– [ ] Separate removable screens/gaskets
– [ ] Soak in white vinegar until deposits loosen (typical: 30–60 minutes moderate; up to 2–4 hours heavy)
– [ ] Brush out tiny holes; rinse thoroughly
– [ ] Reassemble in correct order; reinstall snugly
– [ ] Run water and confirm flow improves
When you clean the aerator, you’re usually clearing the exact spot where minerals and debris choke off the flow. Try this routine when flow slows or spray turns uneven, and if the aerator won’t come off without forcing it, stop and get help to avoid damaging the faucet threads.
Frequently Asked Questions
How do I clean a clogged faucet aerator without removing it?
First, turn off the water and run the faucet to relieve pressure. If the aerator is accessible, unscrew the aerator by hand or with rubber gloves to improve grip, then rinse under warm water. For quick unclogging, soak the aerator screen in a bowl of white vinegar for 15–30 minutes, then scrub gently with a soft toothbrush and reinstall. Turn the water on briefly to flush any loosened debris before fully reattaching.
What is the best way to remove hard water buildup from a faucet aerator?
Hard water deposits are often mineral scale, so soaking is usually the most effective method. Remove the aerator and soak it in white vinegar (or a 50/50 vinegar-water solution) for 30–60 minutes, depending on how severe the buildup is. After soaking, use a toothbrush to clean the mesh and check valves, then rinse thoroughly to prevent lingering vinegar taste or odor. Reassemble and run the faucet for 20–30 seconds to ensure smooth flow.
Why is my faucet aerator reducing water pressure, and how can I fix it?
Reduced water pressure usually happens because the aerator screen is clogged with sediment, mineral scale, or debris buildup. Cleaning the aerator restores the correct spray pattern and improves flow by removing obstructions from the mesh. If cleaning doesn’t help, check for a damaged washer or an obstructed internal restrictor and replace worn parts. Also confirm the supply valves are fully open before concluding the issue is only the aerator.
Which tools should I use to clean a faucet aerator safely?
In most cases, you only need rubber gloves for grip, a soft toothbrush, and white vinegar for soaking. For stubborn aerators, use a wrench with a protective cloth or tape to avoid scratching chrome or finish surfaces. If there’s visible mineral buildup, a small pin or toothpick can help dislodge sediment from small holes, but avoid piercing the mesh. Always rinse well and dry before reinstalling to keep the faucet aerator functioning properly.
How often should I clean the aerator on my faucet?
If you have hard water or notice spluttering, reduced flow, or uneven spray, clean the faucet aerator every 1–3 months. In areas with softer water, every 6 months is often sufficient to prevent mineral scale buildup in the aerator screen. Regular maintenance helps maintain consistent water pressure, improves water efficiency, and reduces the chance of long-term clogging. Keeping an eye on the spray pattern makes it easier to time cleaning before the aerator becomes fully blocked.
📅 Last Updated: November 08, 2026 | Topic: How to Clean the Aerator on a Faucet | Content verified for accuracy and freshness.
References
- Tap (valve)
- Aerator
- Basic Information about Lead in Drinking Water | US EPA
- https://www.cdc.gov/nceh/lead/prevention/water.htm
- Lead and Copper Rule | US EPA
- Lead in Drinking Water
- https://www.mass.gov/info-details/lead-and-drinking-water
- https://scholar.google.com/scholar?q=how+to+clean+faucet+aerator Google Scholar
- https://scholar.google.com/scholar?q=cleaning+faucet+aerator+descaling+vinegar Google Scholar
- https://scholar.google.com/scholar?q=lead+in+drinking+water+aerator+cleaning Google Scholar

[…] mild. Escalate only if mineral buildup is clearly the problem and the finish allows […]