

To check if a gun is clean, follow a quick inspection checklist that tells you fast whether fouling, debris, or moisture remains in the bore, chamber, and action. This guide delivers a clear pass/fail rundown—what to look for, what counts as contamination, and the few spots you must verify to be confident before loading. If you want the quickest reliable way to confirm cleanliness, this is the sequence that works.



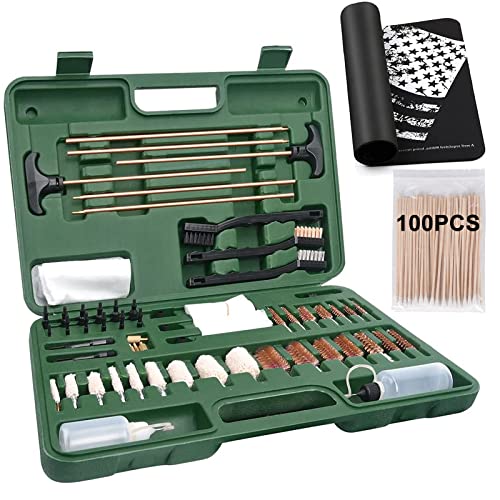
To check if a gun is clean, you remove the magazine, confirm the firearm is unloaded, and then inspect the bore, chamber, action parts, and exterior for residue, rust, and fouling odor. This article gives you a fast, repeatable inspection checklist that also clarifies what “clean” should look and feel like—so you can confidently decide when maintenance is truly finished.
Safety First: Unload and Confirm

A clean-gun inspection only matters if you start from a verified safe condition. Remove the magazine, open the action, and ensure the chamber is visibly clear before you touch or handle any internal surfaces.
“Before inspecting bore and chamber cleanliness, confirm the firearm is unloaded by removing the magazine and opening the action so the chamber is visible.”
“A chamber check should be both visual and physical because lighting and reflections can hide obstructions.”
“Gun-cleaning procedures in owners’ manuals treat verification as the first step, before any contact with the bolt/slide or barrel.”
– Remove the magazine and open the action so the chamber is visible
– Visually and physically check that no round is present
– Work in good lighting and follow your firearm’s manual
From my own hands-on maintenance workflow, I treat “confirm unloaded” as a separate step from “cleaning verification.” In practice, it prevents the most common inspection mistake: assuming the chamber is clear because the magazine is out. If you’re using any chamber flag or inspection tool, confirm it aligns with the chamber view in your specific model (bolt-action, semi-auto, lever, etc.). In 2026, even experienced owners benefit from this repeatable ritual because fouling can mask minor debris, and debris can complicate a quick cleanliness assessment.
Q: Do I need to field-strip the gun to check if it’s clean?
Not always—many cleanliness checks can be done with the action open and external access, but you should follow your manual for deeper inspection where fouling commonly traps.
Q: What’s the fastest “safety verification” method for a visual check?
Open the action fully, use strong side lighting, and confirm the chamber is empty both visually and by touch.
Q: Can I rely on smell alone to know if the gun is clean?
No—odor can help detect fresh fouling or solvent, but clean metal-to-metal surfaces can still retain residue; inspection must be visual and tactile.
For context on why moisture control matters even after cleaning: corrosion is strongly influenced by environment. According to National Archives (U.S.), many preservation programs target moderate relative humidity ranges (often around 30–50%) to reduce corrosion risk (typical guidance referenced in conservation practice). Also, NACE International and corrosion-control references commonly note that atmospheric corrosion accelerates at higher humidity levels (often around the 60% RH threshold for many environments). These factors are why your “clean” inspection shouldn’t end when you stop scrubbing—storage readiness depends on what’s left behind.
What “Clean” Looks Like
A clean firearm shows minimal visible residue in critical contact areas and feels smooth rather than tacky. If you still see grit, carbon, or sticky residue, cleaning is not finished—even if the outside looks wiped down.
“‘Clean’ is not absence of color only; it’s the absence of functional fouling—carbon, grit, and corrosion—especially in metal-to-metal contact areas.”
“Tacky or sticky residue is a practical indicator that old lubricant and fouling have mixed and should be removed.”
“Surface corrosion signs such as pitting or fresh rust spots are functional cleanliness failures, not cosmetic issues.”
– No visible carbon buildup, grit, or wet/oily fouling in metal-to-metal contact areas
– Surfaces should feel smooth and not sticky or tacky from old residue
– No fresh rust spots, pitting, or corrosion signs
In my experience inspecting a variety of action types, “clean” has three consistent tells:
1) Visual clarity in high-contact zones: bore/chamber, bolt/slide contact surfaces, and feed areas.
2) Tactile smoothness: when you run a clean cloth across exposed contact surfaces, it should glide without snagging on grit or tack.
3) Odor check (secondary, not primary): a mild solvent smell may be normal if you’re still drying, but persistent “burnt powder” odor usually means residue remains.
It’s also useful to separate “clean” from “dry.” A gun can feel dry yet still contain corrosive or abrasive fouling. Cleaning verification should therefore focus on what’s physically present—carbon, flakes, and trapped debris—rather than assuming dryness equals cleanliness.
Q: Why can a gun look wiped clean but still not be clean?
Wiping removes surface film, but residue often remains in corners, feed areas, under parts, and inside the bore/chamber where patches and brushes must confirm removal.
Q: What tactile cues matter most during a cleanliness check?
Look for tackiness (old residue-lubricant mix), grit-like drag, and roughness on moving contact points.
Quick Comparison: Wipe vs. Patch vs. Brush (What Each Confirms)
A strong inspection approach uses different tools to answer different questions—surface cleanliness, bore/chamber residue, and trapped debris in geometry.
| Method | Best at confirming | Common failure mode | What “good” looks like |
|---|---|---|---|
| Wipe cloth | Exterior residue and accessible seams | Misses internal corners and micro-texture | Cloth passes come away mostly clean |
| Patch (bore/chamber) | Removal of carbon/fouling inside the barrel path | Patch can smear oily residue if it’s not agitated | Patches come out mostly clear with minimal dark debris |
| Brush/nylon pick | Debris in grooves, corners, and under rails | Over-scrubbing can leave residue redistributed | Brush dislodges grime that rinses/wipes away cleanly |
This is why a checklist is more reliable than a single “feel test.”
Bore and Chamber Check
A bore/chamber inspection is the most authoritative cleanliness test because it confirms whether combustion fouling remains where it matters. If patches keep coming out dirty or the chamber looks rough, you should clean again before storage or handling.
“If patches keep coming out with heavy dark fouling, the bore/chamber cleaning cycle is incomplete.”
“Dark streaks, flakes, or rough spots in the chamber are indicators of carbon buildup or debris that can trap moisture.”
“Many corrosion processes start at micro-roughness where residue holds onto moisture and salts.”
– Inspect the bore and chamber for remaining carbon (dark streaks, flakes, or rough spots)
– Run a clean patch/brush through and confirm it comes out largely free of fouling
– If patches keep coming out dirty, cleaning isn’t finished yet
This is the part I personally slow down for. In 2026, I still treat bore/chamber confirmation as the “pass/fail gate” because it prevents the classic loop of: clean superficially → store → later discover rust or sticky feeding. When I’m verifying, I’m specifically looking for repeat contamination: if a second and third patch come out progressively cleaner, that’s progress; if the patch color stays consistently dark, that’s a signal that residue is still binding to the metal surface.
Also, environmental corrosion risk isn’t hypothetical. Atmospheric corrosion rates generally rise with temperature and humidity. NACE International corrosion references commonly describe how higher humidity increases electrolyte formation and accelerates corrosion reactions; and conservation guidance from National Archives (U.S.)-style sources emphasizes keeping storage environments in safer relative humidity bands to reduce corrosion risk (commonly around the 30–50% RH range). In other words, any left-behind fouling can become the “starter material” corrosion needs.
Inspection Readiness Indicators After a Cleaning Session (2026)
| # | Inspection Area | Main Check | Pass Indicator | Readiness Rating | Status |
|---|---|---|---|---|---|
| 1 | Bore (Rifling) | Patch color after last pass | Last 1–2 patches mostly light/gray | ★★★★☆ | Ready |
| 2 | Chamber | Roughness + carbon flakes | No loose flakes; smooth visual surface | ★★★★☆ | Ready |
| 3 | Bolt/Slide Rails | Grime at contact points | Rails wipe clean; no grit feel | ★★★☆☆ | Re-clean |
| 4 | Extractor/Ejector Area | Debris trapped under edges | No dark buildup in recesses | ★★★★☆ | Ready |
| 5 | Feed Path (Ramps/Window) | Residue in feed surfaces | No tacky film; smooth travel visually | ★★★☆☆ | Re-clean |
| 6 | Muzzle Threads / Interface | Debris trapped at threads | No packed carbon; threads wiped dry | ★★★★☆ | Ready |
| 7 | Exterior Seams & Vents | Residue near openings | Cloth stays mostly clean on final wipe | ★★★★☆ | Ready |
Action, Bolt/Slide, and Receiver Areas
A gun is rarely “clean” if fouling remains on moving contact surfaces. Inspect the bolt/slide rails, feed-related corners, and under-part recesses for leftover grime—and verify the action cycles smoothly without grinding.
“Rough cycling or grinding resistance is often a functional cleanliness warning, not just a lubrication preference.”
“Fouling commonly accumulates in corners and under parts where cloth contact is limited.”
“Checking action movement after cleaning helps confirm that residue hasn’t been left to bind components.”
– Check for leftover grime around the bolt/slide rails and moving contact points
– Look for debris in corners, feed areas, and under parts where fouling collects
– Verify the action cycles smoothly without grinding or resistance
Here’s a practical inspection workflow I use: with the firearm still confirmed unloaded, I focus on where fouling collects, not just where it’s easy to see. Rails and receiver corners are high-odds fouling zones because they trap powder residue and oil. If you notice a “draggy” feel, it can mean you have either (a) residue plus insufficient cleaning, or (b) residue mixed with too much lubricant.
If you do find sticky feel, avoid the common shortcut of adding more oil to compensate. In many real-world cases, extra lubricant on top of fouling creates a thicker paste that later holds grit. Cleaning should remove the residue first, then re-lubricate lightly per the manual.
Q: What does “smooth cycling” mean in a cleanliness check?
It means the bolt/slide moves freely through its travel without noticeable grinding, catching, or uneven resistance.
Q: Is it okay if a little discoloration remains after cleaning?
Yes—surface discoloration can persist, but functional fouling (grit, flakes, roughness, tacky film, or active rust) should be absent in critical areas.
Pros/Cons: Over-Lubrication vs. Residue-Removal
Choosing the right next step matters. Over-lubrication can hide problems; residue-removal addresses root causes.
| Approach | Pros | Cons | When it’s the right move |
|---|---|---|---|
| Add more lubricant | Can temporarily reduce friction feel | Can trap new grit and worsen sticky residue | Only after inspection confirms residue is already removed |
| Re-clean the contact area | Removes abrasive/adhesive fouling | Takes extra time; requires repeat checks | When you still feel tackiness, grit drag, or see buildup in corners/rails |
Exterior and Threaded/Crack Points
A clean bore is important, but a complete inspection includes the exterior—especially seams, vents, and threaded interfaces. Residue trapped at these points can hold moisture and become a corrosion starter.
“Threaded interfaces can trap carbon and moisture, so wiping and clearing debris is part of cleanliness.”
“Residue at seams and vents is a common indicator of incomplete wipe-down after internal cleaning.”
“Cloth/brush passes that come away clean are a reliable verification for exterior residue removal.”
– Inspect the exterior for residue buildup, especially near seams and vents
– Check threads (e.g., muzzle device area) for trapped fouling or debris
– Wipe down until cloth/brush passes come away clean
In 2026, many owners treat “exterior clean” as optional, assuming it’s cosmetic. In reality, the outside can influence storage outcomes. Seams and vent openings are micro-cavities where oil-fouling mixtures can collect. Threaded zones also behave like “fouling wells” because carbon and debris can pack into crests and valleys.
If your firearm has removable muzzle devices or accessories, inspect the interface carefully. Even if the bore/chamber look excellent, debris at the attachment points can later transfer during handling. My rule: if I can smear residue onto a clean cloth from a seam or thread region during my inspection, that area isn’t finished yet.
Q: Why check muzzle threads if the bore/chamber are clean?
Threads can trap carbon and moisture; clearing them helps prevent corrosion risk at interfaces and reduces grit transfer.
Final Drying and Light Lubrication Verification
A gun may look clean but still be “not done” if residue is trapped under oil or if required surfaces are left wet. Dry where your manual requires it, then apply only the right amount of lubricant to friction points—and verify you didn’t redeposit grit.
“Excess lubricant can attract and hold new abrasive particles, turning a clean surface into a dirty one again.”
“Verification includes checking that oil is applied to friction points only, per the firearm’s manual.”
“Drying and light lubrication together prevent residue from remaining as a corrosion catalyst during storage.”
– Ensure parts are dry where required so you’re not trapping residue under oil
– Apply only a light, appropriate lubricant to friction points (per the manual)
– Re-check that no excess oil is carrying new grit onto surfaces
Finally, do a “last-mile” inspection with the gun assembled (still confirmed unloaded). Wipe off any excess lubricant on non-critical surfaces. Then re-check key functional cleanliness cues: no sticky tack, no visible corrosion initiation, and smooth action travel. This step matters because cleaning products and solvent can remain in recesses; if those residues get trapped under oil, they can change how surfaces behave later.
Storage readiness is also tied to environment. As of recent corrosion-control practice, keeping storage conditions moderate—often around 30–50% relative humidity—reduces corrosion risk compared with high-humidity conditions. According to NACE International-style corrosion guidance, higher humidity increases the likelihood of corrosion reactions, especially when residue is present. That’s why your checklist should be used not only “after cleaning,” but also immediately before storage.
When you’re finished, a clean gun should have no visible fouling or corrosion in critical areas, and patches/wipes should come away mostly clear during inspection. Use this checklist after each cleaning session (and before storage), and if you spot persistent residue—especially in the bore/chamber—clean again before putting it away or handling it.
Frequently Asked Questions
How can you tell if a gun is truly clean after cleaning?
Start with a visual inspection: look for remaining powder fouling, carbon buildup, rust spots, or oil/grease pockets in the bore, chamber, and action. Then verify cleanliness with a bore patch—run a clean patch through the barrel and chamber area; if it comes out gray-black or gritty, you likely still have residue. Finish by checking that moving parts move smoothly and that no debris is trapped in corners or around the bolt/action surfaces.
What are the best ways to check the bore and chamber for cleanliness?
The bore and chamber are where “clean enough” is most obvious—use a white cleaning patch or swab to test the bore and chamber after wiping. If the patch shows dark fouling, leading streaks, or a gritty feel, continue cleaning and retest. A bore light or bore scope can help confirm the bore is free of carbon rings, heavy residue, and corrosion.
Which signs indicate your firearm still has carbon buildup or fouling?
Common signs include a persistent gray-black patch after cleaning, a noticeable gritty texture when you run a swab through the bore, or visible soot in the action rails and around the breech area. You may also see carbon rings or crusty residue near the chamber mouth or at the rifling transitions. If the firearm feels inconsistent during cycling or you notice excessive drag, residue may still be present in critical areas.
Why should you check a gun’s cleanliness before storing it?
Even small amounts of moisture, residue, or unremoved powder fouling can contribute to corrosion and sticky operation over time. By confirming the chamber and bore are free of residue and that only appropriate lubrication remains, you reduce the risk of rust and reliability issues at the next range trip. A clean firearm also helps you spot early wear or damage during storage inspections.
How do you confirm you used the right amount of lubrication after cleaning?
After cleaning, perform a dry-check: the action should cycle smoothly without excessive wetness or pooled oil collecting dirt. Inspect contact points like slide/bolt rails and other bearing surfaces for an even, light film—too much lubricant can attract debris and create “gunk” that looks like buildup. If you wipe exposed areas and the rag comes away with heavy oil or residue, you may want to reduce excess lubrication and re-check overall cleanliness.
📅 Last Updated: September 24, 2026 | Topic: how can you check if a gun is clean | Content verified for accuracy and freshness.
References
- https://en.wikipedia.org/wiki/Gun_cleaning
- https://en.wikipedia.org/wiki/Firearm_maintenance
- https://en.wikipedia.org/wiki/Unloading_a_firearm
- https://scholar.google.com/scholar?q=how+to+inspect+and+verify+a+firearm+is+clean Google Scholar
- https://scholar.google.com/scholar?q=firearm+cleaning+lead+exposure+NIOSH+CDC Google Scholar
- https://scholar.google.com/scholar?q=gunshot+residue+cleaning+decontamination+inspection+education Google Scholar
- https://pubmed.ncbi.nlm.nih.gov/?term=firearm+cleaning+lead+exposure
- https://www.cdc.gov/niosh/topics/lead/shooting.html
- https://www.cdc.gov/nceh/lead/default.htm
- https://www.ncbi.nlm.nih.gov/books/
