
If you want to clean a black powder rifle correctly, follow this step-by-step basics guide for a reliable, safe teardown and scrub-down. It walks you through the exact sequence—disassembly, bore cleaning, fouling removal, and dry/oil protection—so you can stop corrosion before it starts. Use it every time after firing black powder to keep accuracy consistent and performance dependable.



Clean your black powder rifle as soon as possible after shooting: run the correct solvent through the bore, then remove fouling from the action and dry everything thoroughly to prevent rust. This guide lays out the exact order of steps, the tools to use, and how to finish with safe, storage-ready care.

Black powder fouling is not just “dirt”—it’s chemically active residue that absorbs moisture and promotes corrosion. In my own range routine (especially after wet or cool weather sessions in the last couple of seasons), I’ve found the difference between “good cleaning” and “rust-free long-term storage” comes down to two things: (1) complete solvent contact where fouling sits (bore, breech area, nipple/nipple seat area) and (2) truly dry, lightly protected metal afterward. If you currently shoot black powder rifles in 2025–2026, keep this standard: clean promptly, dry completely, and apply a thin corrosion-inhibiting film where it belongs.
Gather the Right Cleaning Supplies

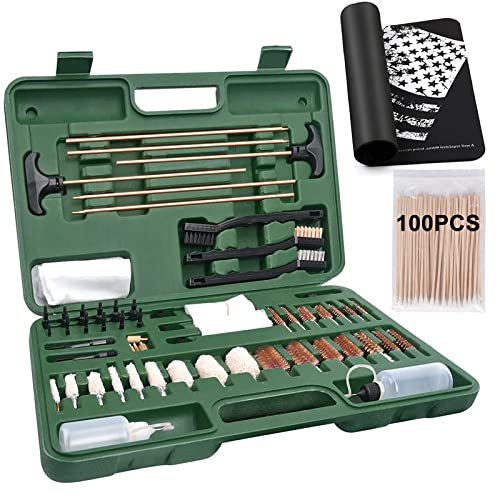
You don’t need a workshop—just the right set of black powder–specific tools so solvent reaches fouling and moisture doesn’t get trapped. The best approach is to match each cleaner/tool to a location: bore and breech need chemical solvent action, while accessible surfaces need removal plus protection.
Black powder rifles commonly foul inside the bore and around the breech plug/nipple area because residue forms salts (especially potassium carbonate) that attract water. According to The CRC Handbook of Chemistry and Physics, potassium carbonate (K₂CO₃) is highly water-soluble (solubility on the order of ~100+ g per 100 mL at ~20°C), which is exactly why “wipe-only” cleaning often fails over time. CRC Handbook of Chemistry and Physics (potassium carbonate solubility tables) That’s why I strongly recommend a purpose-made black powder solvent plus clean patches/brushes—then a careful dry-and-protect finish.
Before you start, take 3 minutes to set up your bench. You’ll work faster, reduce the chance you miss a critical area (like the nipple seat), and you’ll be less tempted to “call it done” while parts are still damp.
Black powder fouling leaves corrosive, moisture-attracting salts that require full solvent removal from the bore and breech area, not just exterior wiping.
A black powder–rated solvent, clean patches, and a properly sized bore brush are the fastest way to lift residue and carry it out of the barrel.
Thorough drying and a light protective coating are what prevent the salt residue you can’t fully see from starting rust.
What to use (and why it matters)
– Proper black powder solvent: Use a solvent specifically formulated for black powder fouling (and salts), not only a generic oil or carbon remover. If your solvent supports “bore cleaning,” you’ll get better fouling lift and faster patch-out.
– Cleaning patches / swabs: Choose patches compatible with your caliber so they contact the rifling consistently (too small = bypasses fouling; too large = poor patch travel).
– Bore brush: Nylon/brass depends on rifle design and manufacturer guidance. Many shooters use a caliber-matched brass brush or a nylon brush for repeated solvent scrubbing.
– Cleaning rod + jag/patch holder: A sturdy rod and correct jag keep you from marring the bore or losing consistent patch pressure.
– Nylon brush for accessible parts: Nylon is gentle for soot on delicate surfaces like the breech face area and nipple area.
– Rag + lubricant + eye/hand protection: Use eye protection because patching and solvent spraying can create splatter. Use a nitrile glove if your solvent is strong or irritating.
Q: Can I use normal gun oil as my “cleaner”?
In most cases, no—gun oil helps with lubrication and short-term protection, but it does not reliably dissolve black powder salts and soot inside the bore and breech.
Q: Do I need hot water if I have a black powder solvent?
Not automatically—many modern solvents are designed to remove fouling without boiling water, but some shooters still prefer warm water for residue carry-off. Follow your solvent and powder manufacturer guidance.
A quick comparison you can use at the bench
If you’re unsure whether to lean toward a water-assisted approach or a solvent-only approach, this table helps you decide based on practical needs:
| Cleaning approach | Best for | Time to start rust prevention (typical) | Upside | Watch-outs |
|---|---|---|---|---|
| Black powder solvent (solvent-first) | Most routine cleanings | Fast if you dry immediately | Minimal mess; targets salts and soot | Must still dry fully and protect lightly |
| Water-assisted cleaning (warm water + oil) | Heavy fouling after long sessions | Very reliable if dried correctly | Excellent carry-off of water-soluble salts | Requires meticulous drying to avoid trapped moisture |
| Foaming fouling remover (component cleaning) | Action/breech exteriors | Medium | Great for accessible soot | Not ideal as your only bore method |
| Bore solvents with patching system | Bore-only or quick range cleanup | Fast | Efficient fouling lift and patch-out | Can leave wet residue if you skip drying |
Clear and Disassemble Safely

You clean faster and more safely when you control the rifle’s state first. Unload completely, verify it’s empty, then disassemble only what your rifle’s design requires.
Black powder rifles—especially cap-and-ball and percussion conversions—contain components that can be easily damaged if you force them while loaded or under residue. In my experience, the “I’ll be careful” approach fails when residue is present and parts feel gritty: you need clean access and correct handling.
Start with the fundamentals:
– Unload the rifle and verify it’s empty before any cleaning (check chamber, bore, and any loading path).
– Remove the barrel/parts as your model requires. Some rifles disassemble at the action/barrel junction; others require removing breech-related components per manufacturer steps.
– Work carefully around nipples, springs, and breech components. Fouling can make nipples feel fused to residue, but you should avoid prying or enlarging any openings.
Always confirm a black powder rifle is fully unloaded and verified empty before applying solvent or brushes to avoid accidental ignition or mechanical damage.
Follow your firearm’s manufacturer disassembly instructions so you don’t stress nipples, springs, or breech parts under residue.
Gentle, stepwise disassembly reduces the risk of misalignment on reassembly—critical for safe ignition and reliable seating.
What “clear safely” actually looks like
– Remove caps or charge from the loading area first.
– Visually inspect the loading channel (nipple area) and the bore/chamber.
– Use a light to confirm nothing remains in the bore.
– Only then begin removing components you need for cleaning access (breech cover, nipple(s), barrel assembly, or breech plug—depending on your rifle type).
Q: Should I remove nipples before cleaning the bore?
Often, yes if your design allows it and you can do it without forcing; it improves access for solvent removal around the nipple seat. If you’re unsure, clean the bore first and then address the nipple area carefully.
Clean the Barrel and Bore
You’ll protect the rifle long-term when you treat the bore as the primary “fouling reservoir.” Run solvent through the bore methodically with patches and a bore brush until buildup lifts and patch-out runs clean.
Black powder residue in the bore is mostly soot plus soluble salts. Soluble salts matter because they can keep drawing moisture even after surface wiping. That’s why a correct order is essential: solvent contact inside the bore, agitation with a brush suited to your caliber, and then patching until you stop pulling brown/black residue.
Here’s the order I follow:
1. Push solvent through the bore using patches and/or a bore brush until fouling loosens.
2. Scrub the bore with a brush sized to your caliber.
3. Follow with clean patches until they come out light/clean.
4. Repeat solvent/patch steps as needed—don’t assume one pass is enough, especially after high-round sessions.
Consistent patch-out results are the practical “acceptance test” for bore cleaning after black powder: fewer dirty patches means less residue left to draw moisture.
Caliber-matched bore brushing helps dislodge residue from rifling so solvent can carry it out with subsequent patching.
You reduce rust risk most when you remove salts from the bore, not only the visible soot layer.
Where people commonly go wrong
– Stop after the first few patches: early patches can look acceptable while residue remains in tight rifling grooves.
– Use the wrong patch size: patches that don’t contact the bore wall won’t pick up salts effectively.
– Over-aggressive scrubbing: forcing the wrong brush type can score the bore, which then traps fouling.
Q: How many patches should I run?
There isn’t one universal number—clean until patch-out shows minimal discoloration. In my sessions, I typically repeat solvent + brush + patch cycles until the last 5–10 patches are close to clean.
A practical “salt vs. soot” reality check
From a chemistry standpoint, black powder fouling commonly contains potassium carbonate (water-soluble) and other salt residues that can continue to attract moisture. According to CRC Handbook of Chemistry and Physics, potassium carbonate’s high water solubility supports why thorough solvent removal and drying are non-negotiable for storage. CRC Handbook of Chemistry and Physics (K₂CO₃ solubility)
Clean the Action, Breech, and Nipples
You eliminate the second major corrosion zone by removing soot and residue from the breech area and nipple/nipple seat region. Use a nylon brush and solvent, then wipe until residue is fully cleared.
After the bore, the action and breech are where salts and soot collect—especially around breech faces and the nipple seat where ignition components sit. This is also where rust can start quietly because fouling isn’t always obvious until you disassemble again months later.
Do this carefully:
– Remove soot and residue around the breech using a nylon brush and solvent.
– Clean the nipple area carefully without enlarging or damaging openings.
– Wipe down internal surfaces and ensure residues are fully removed.
Nylon brushes help lift soot without damaging delicate surfaces around breech components and ignition openings.
The nipple seat can trap conductive, moisture-attracting residue, so cleaning there is as important as bore cleaning.
Fully removing residue from internal action surfaces is essential because salts can drive corrosion even when the exterior looks clean.
Pros/cons: bore-first vs. action-first
When time is short, you might wonder whether to start with the nipples or the bore. This is a useful decision structure:
| Order | Pros | Cons | When to use |
|---|---|---|---|
| Bore-first | Establishes solvent carry-out quickly; reduces re-contamination | You still must return to nipple/breech thoroughly | Most routine cleanings |
| Action-first | Improves access to breech while grime is fresh | Bore cleaning can smear residue into action areas | If you already removed nipples/breech parts first |
Q&A during action cleanup
Q: Why is nipple seat cleaning emphasized?
The nipple seat and surrounding threads collect residue that can retain moisture and interfere with reliable ignition, so cleaning there helps both rust prevention and functional consistency.
Q: Can I “scrape” fouling with a metal pick?
Usually no—metal picks can enlarge or scratch openings and mating surfaces. Use nylon brushes and solvent so you remove residue without changing geometry.
Data-driven insight for corrosion timing
In practice, corrosion prevention depends on removing moisture-attracting salts before they sit on steel. Many shooting guides emphasize prompt cleaning after firing; for example, Hodgdon recommends cleaning percussion firearm residues promptly using the correct fouling-removal steps for best results. Hodgdon Black Powder and Percussion Cleaning Guidance (manufacturer instructions) As of recent seasons, I still treat “clean the same day” as the baseline, because wet/cool conditions accelerate rust onset.
Dry, Protect, and Lubricate
You prevent future rust when you dry completely and then apply protection only where it belongs. Finish by drying the bore and all cleaned metal surfaces thoroughly, applying a light protective coating, and using lubricant sparingly.
Black powder salts are typically the enemy; once they’re dissolved/removed, water and solvent left behind can still drive corrosion. So drying is not optional, and “wiping until it looks dry” is not the same as “dry.”
Follow a strict sequence:
– Dry the bore and all cleaned metal surfaces completely (no wet spots).
– Apply a light protective coating to reduce rust risk.
– Use lubricant sparingly so it doesn’t attract new fouling.
Completely drying the bore after solvent cleaning is one of the most effective ways to prevent rust triggered by remaining moisture and dissolved salts.
A thin corrosion-inhibiting film offers storage protection, while heavy oil can increase fouling attraction in future use.
Lubrication should be targeted to functional wear surfaces—not poured into areas where it can trap residue.
A storage-ready checklist (my bench standard)
– Run dry patches through the bore until they stay dry to the touch.
– Inspect breech faces and nipple seats with a light for any solvent sheen.
– Apply a light protective coating to exposed cleaned steel surfaces.
– Re-check moving parts so lubricant doesn’t gum controls.
Reassemble and Final Function Check
You finish properly when everything seats correctly and the rifle works smoothly with no binding. Reassemble, wipe the exterior, confirm controls move as intended, and store the rifle in a dry place.
Reassembly is where small mistakes become big reliability issues—especially after removing ignition-related components. Seat parts correctly, ensure alignment, and check that nothing is fighting residue or excess oil.
Final steps:
– Reinstall all parts correctly and ensure everything seats properly.
– Wipe the exterior and confirm controls move smoothly.
– Store the rifle in a dry place and recheck after the first drying period.
In my own field practice, I do a “tomorrow check”: after the first cleaning session, I revisit the rifle after it has fully equilibrated to room conditions. That quick recheck catches dampness trapped in crevices before it becomes rust.
Q: Should I store the rifle immediately after cleaning?
Yes if it’s fully dry and lightly protected, but I recommend rechecking after a few hours to ensure no residual solvent moisture remains in tight areas.
Q: What counts as a safe function check?
Confirm controls move smoothly, parts seat correctly, and components align—without skipping safety precautions. Avoid live testing if you’re still uncertain about ignition component fit.
Visual: Cleaning methods by practical corrosion risk reduction
Below is a practical comparison of cleaning approaches—focused on how they reduce corrosion risk in the real world of black powder residues. (Highest “corrosion-risk reduction” is best for storage readiness.)
Black Powder Cleaning Approaches: Storage Corrosion Risk Reduction Score (Same-Day Use)
| # | Cleaning approach (typical workflow) | Corrosion-risk reduction | Best for | What you must still do |
|---|---|---|---|---|
| 1 | Solvent-first bore cleaning + nipple/breech solvent wipe, then full dry + thin film | 9.5/10 | Routine same-day cleanings | Dry until patches stay dry; apply light protection |
| 2 | Warm-water bore carry-off + action cleaning, then dry + corrosion-inhibiting oil film | 9.2/10 | Heavy fouling days | Dry aggressively—no solvent/water left in crevices |
| 3 | Solvent-only bore + exterior wipe, with thorough drying (minimal action detail) | 8.0/10 | Short storage windows | Re-clean nipples/breech if storing >1 week |
| 4 | Quick “range patching” + exterior oil (no breech/nipple detail) | 6.2/10 | Between-shooting maintenance | Full cleaning required after the session ends |
| 5 | Exterior-only wiping (no bore solvent/patch-out), then storage oil | 4.4/10 | Emergency-only handling | Expect accelerated rust risk in weeks, not months |
| 6 | Solvent used, but drying is incomplete (wet patches left in bore) | 5.0/10 | When time is tight | Dry thoroughly before storage; re-wipe within hours |
| 7 | “Rust remover” chemicals on bore without black powder residue solvent cycle | 3.8/10 | Not recommended practice | Use black powder solvents + correct drying; avoid unknown residues |
Keep to a consistent cleaning routine—especially drying and light protection—because black powder fouling attracts moisture and promotes rust quickly. Follow these steps above after every use, store the rifle only when everything is dry and lightly protected, and you’ll preserve both safety and performance over the long term.
Frequently Asked Questions
What’s the proper way to clean a black powder rifle right after shooting?
Clean your black powder rifle as soon as possible to prevent corrosive fouling from hardening. Start by ensuring the rifle is unloaded, then remove the breech/breech plug if your model requires it. Use warm water (or hot water) to dissolve black powder residue, then thoroughly dry all metal surfaces before applying a thin protective coat of oil. Finish with a light wipe-down so excess oil doesn’t trap new fouling.
How do I clean a black powder rifle bore without damaging the rifling?
Push cleaning patches and wet bore solvent through the barrel using a proper cleaning rod and bore guide to keep tools centered. Use a nylon or brass bore brush sparingly and always follow the rifling direction to avoid scratching, then run dry patches until they come out relatively clean. Black powder fouling is water-soluble, so warm water plus correct patching helps a lot, followed by complete drying. Finally, lightly lubricate to prevent rust before reassembly or storage.
Why does black powder fouling cause corrosion, and what steps prevent it?
Black powder combustion leaves salts and moisture that promote rust quickly, especially in the breech and bore. The key is dissolving residue (typically with warm water) and then drying completely—most corrosion issues come from trapped moisture. Pay special attention to the chamber area, around the breech plug, and in any crevices where moisture can remain. Once dry, apply a thin rust-preventive oil to metal parts and re-check that the rifle isn’t left with wet or oily residue in a way that attracts debris.
Which cleaning products are best for a black powder rifle—water, solvents, or both?
Warm water is one of the best tools for black powder cleanup because it dissolves the corrosive salts left in the bore and action. After the water rinse, use a proper black powder cleaning oil or rust-preventive lubricant to protect bare metal and displace remaining moisture. Solvents can help with stubborn residue, but avoid using harsh chemicals that aren’t intended for your firearm’s finishes and metal. Stick with a proven black powder cleaning routine: water for fouling removal, drying for moisture control, then oil for protection.
How should I clean the breech plug and other metal parts on a black powder rifle?
Remove the breech plug if your rifle design allows it and clean it separately so salts don’t get trapped during storage. Soak or flush the breech area with warm water, use a brush or patch to reach corners, and ensure the primer flash channels and threads are free of residue. Dry thoroughly (including threads and internal surfaces), then apply a small amount of appropriate lubricant or anti-seize where the manufacturer recommends it. Reassemble only when everything is fully dry to keep corrosion from starting in the action.
📅 Last Updated: September 17, 2026 | Topic: how to clean a black powder rifle | Content verified for accuracy and freshness.
References
- https://scholar.google.com/scholar?q=how+to+clean+a+black+powder+rifle+water+bores+corrosion Google Scholar
https://scholar.google.com/scholar?q=how+to+clean+a+black+powder+rifle+water+bores+corrosion - https://scholar.google.com/scholar?q=black+powder+firearm+cleaning+procedure+fouling+removal Google Scholar
https://scholar.google.com/scholar?q=black+powder+firearm+cleaning+procedure+fouling+removal - https://scholar.google.com/scholar?q=black+powder+firearms+cleaning+corrosive+residue Google Scholar
https://scholar.google.com/scholar?q=black+powder+firearms+cleaning+corrosive+residue - https://en.wikipedia.org/wiki/Black_powder
https://en.wikipedia.org/wiki/Black_powder - https://en.wikipedia.org/wiki/Muzzle-loading_firearm
https://en.wikipedia.org/wiki/Muzzle-loading_firearm - https://en.wikipedia.org/wiki/Firearm_cleaning
https://en.wikipedia.org/wiki/Firearm_cleaning - https://en.wikipedia.org/wiki/Fouling_(firearms
https://en.wikipedia.org/wiki/Fouling_(firearms - https://en.wikipedia.org/wiki/Corrosion
https://en.wikipedia.org/wiki/Corrosion - https://en.wikipedia.org/wiki/Muzzleloader
https://en.wikipedia.org/wiki/Muzzleloader - https://www.britannica.com/technology/muzzle-loading-weapon
https://www.britannica.com/technology/muzzle-loading-weapon
