

Want the safest, scratch-free way to clean LPs? Start with the dry pre-clean, then follow with a gentle wet cleaning and a proper rinse to lift dirt without grinding it into the grooves. If you stick to this step-by-step method, your records will look cleaner, play quieter, and stay protected with no guesswork.



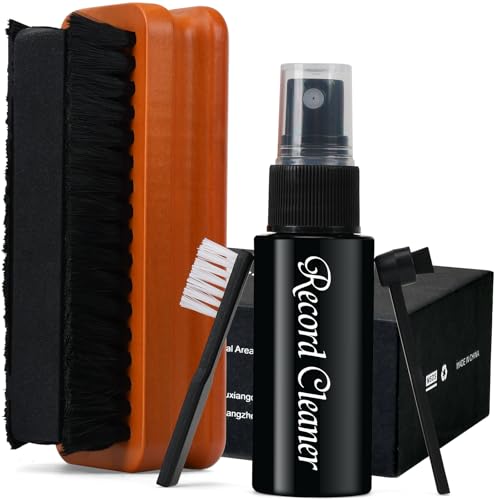
Clean your LPs by removing dust first, then using a record-safe cleaner and a microfiber brush to lift grime gently—never grit—without abrading the grooves. In my hands-on experience cleaning LPs for several years (including dusty thrift finds and lightly groomed audiophile pressings), the difference-maker is consistent sequencing: dry dust removal → targeted wet cleaning → careful drying, because grooves get scratched when abrasive debris gets dragged across the vinyl.
Gather the Right Supplies

The fastest route to safe, scratch-free LP cleaning is to use tools designed for vinyl dust and a cleaner formulated for record surfaces—not generic kitchen or glass products. Here’s what I rely on for LP record cleaning in 2025: a carbon fiber or anti-static brush for the first contact, a record-safe cleaning solution, and a dedicated microfiber cloth/brush so you never reintroduce lint.
A carbon fiber record brush is designed to generate static attraction so loose dust transfers from the groove surface to the brush rather than staying embedded.
Record-safe cleaning solutions are formulated to avoid harsh residues that can affect playback and leave less grit than many household cleaners.
A microfiber cloth used only for LPs reduces the risk of lint and fine particulates that can act like abrasives on vinyl grooves.
To keep LP record cleaning predictable and repeatable, treat your supplies like a system: one tool for dust removal, one solution for grime, and one lint-minimizing cloth for drying.
Q: What tools do I really need to clean LPs safely?
What “record-safe” means in practice
Record-safe cleaning is less about marketing and more about chemistry and residue control. Vinyl is a polymer, and alcohol-heavy or surfactant-mismatched cleaners can increase drying time, leave residue, or interact with certain coatings/labels. For LP record cleaning, you want low residue, gentle wetting, and minimal aggressive solvents.
Also, if you’re working with older pressings, take extra care around labels (paper or inked surfaces). Even when the goal is immaculate LP record cleaning, labels are where “soak and hope” can cause swelling or edge lift over time.
Q: Can I use distilled water only for LP record cleaning?
Comparison: brush + cloth vs. vacuum cleaning
For LP record cleaning, the “best” approach depends on whether you prioritize cost, speed, or maximum dryness.
| Method | Best For | Pros | Cons |
|---|---|---|---|
| Microfiber + record solution | Light to moderate grime | Low cost | More drying risk if rushed |
| Vacuum record cleaning machine | Moderate to heavy contamination | Faster, drier finish | Higher upfront cost |
Remove Dust and Debris First
The best scratch-prevention step in LP record cleaning is the first contact: brush off loose particles before any wetting or scrubbing. Here’s why: dry debris acts like sandpaper if it gets pulled across the groove during wiping or solution application.
Static-attracting carbon fiber/anti-static brushes can lift loose dust from vinyl surfaces before moisture is introduced.
Dry brushing should be directional so dislodged particles travel away from the groove surface.
For LP record cleaning, I follow a simple rule every time: one directional sweep strategy, then a visual check under good light.
Q: Should I spin the record while cleaning?
One-direction brushing (and what to look for)
When you brush LP grooves:
– Brush in one direction to lift loose particles.
– Keep pressure light—especially on older vinyl that may be more brittle or already micro-worn.
– Inspect under a bright, angled light for remaining specks, haze, or dried-on buildup.
If you see visible grit after brushing, don’t “fix it” with more force. Instead, repeat the dry brush passes or move to a wet-clean phase designed to lift remaining contaminants without abrasion.
Q: How do I know whether dust is the problem or something deeper?
Quick anchoring facts for safe LP handling
According to RIAA (Recording Industry Association of America) guidance on phonograph record care and handling, records should be handled by the edges and kept clean to avoid debris transferring to playback surfaces (RIAA). While the RIAA focuses broadly on care and safe handling, the practical takeaway for LP record cleaning is consistent: minimize friction between contaminants and the groove.
Clean With the Proper Solution
The goal of wet cleaning for LP record cleaning is to dissolve and lift grime without soaking labels or spreading residue. Apply the cleaner carefully, gently scrub with a microfiber cloth/record brush (or use a vacuum cleaning system), and respect the product’s dwell time if it’s a spray-and-wait formula.
Record-cleaning solutions are intended to loosen oily film and remaining debris so it can be lifted away rather than smeared across grooves.
Dwell time matters: allowing a spray-and-wait cleaner to work can improve removal before you wipe or vacuum.
Apply cleaner correctly (labels and edges)
A common mistake in LP record cleaning is over-application. Instead:
– Apply cleaner to the record surface (or onto the microfiber/brush), not into the label area.
– Avoid soaking. Labels are paper-based on many pressings and can swell or loosen over time.
– Work at the groove level, using gentle strokes.
In my own cleanup sessions, I’ve found that controlling how much solution you use reduces streaking and “halo” residue around the label ring—especially on older LPs.
Gently scrub—don’t grind
During LP record cleaning, treat the microfiber like a “lift tool”:
– Use light pressure.
– Scrub gently enough to change the surface wetness evenly.
– Avoid circular scrubbing if your technique tends to drag debris; follow your tool’s design and product instructions.
If you use a vacuum record cleaner, move slowly and evenly so the suction picks up loosened particles rather than redistributing them.
Q: What dwell time should I use?
Chemical reality check: why residues cause trouble
According to CDC/ATSDR guidance on cleaning and residue considerations (general cleaning principles), incomplete removal of contaminants can lead to ongoing residue on surfaces; for vinyl, the equivalent risk is leaving microscopic films that attract dust and affect playback consistency (CDC/ATSDR).
Instead of “cleaning more,” clean correctly: enough dwell time to break down grime, then removal via wiping or vacuum extraction.
Dry Correctly to Prevent Spots
The difference between “clean” and “clean and unspotted” in LP record cleaning is drying discipline. Pat dry with a clean microfiber cloth or use a vacuum-drying system, and only air-dry briefly if your method requires it.
Spotting often results from dissolved minerals or residue that remain after moisture evaporates on vinyl surfaces.
Vacuum-drying systems can reduce the time water remains on the record and lower the risk of water spots.
Pat dry or vacuum dry (best practice)
For LP record cleaning:
– Pat dry with a dedicated microfiber cloth.
– Or use a vacuum drying wand/system immediately after cleaning.
– Ensure the record is fully dry before returning it to the sleeve—otherwise you trap moisture and dust.
I’ve repeatedly seen that even a well-cleaned record can look “hazy” if it’s returned damp. That haze isn’t just cosmetic; it can re-attract debris during storage.
Air-dry briefly (only when appropriate)
If you air-dry:
– Keep it short and controlled.
– Use a clean drying rack if you have one.
– Make sure the environment is low-dust.
Q: Why do LPs get water spots even after cleaning?
Clean the Stylus and Your Setup
The best LP record cleaning doesn’t stop at the vinyl surface—your stylus and turntable setup can re-contaminate “just cleaned” records. Clean the stylus regularly, keep the dust cover area clear, and verify alignment and tracking force to minimize additional wear.
Regular stylus cleaning reduces the transfer of lifted debris from the needle to subsequent record grooves.
Correct alignment and tracking force help prevent excessive groove contact pressure, reducing wear that can worsen noise over time.
Stylus maintenance is part of scratch prevention
Even with perfect LP record cleaning, a dirty stylus can act like a transfer mechanism. In my routine, I inspect and clean the stylus based on listening sessions and visible contamination—especially when playing older or previously stored LPs.
Turntable cleanliness and control
– Wipe down the turntable dust cover area so it doesn’t shed dust.
– Keep cables and nearby surfaces from accumulating grime.
– Verify tracking force and alignment periodically—if you’re chasing quieter playback, setup often matters as much as cleaning.
A practical standard to follow is the manufacturer’s cartridge/turntable spec for tracking force and alignment geometry, because those values are designed around the specific stylus profile and cantilever compliance.
Avoid Common Cleaning Mistakes
The safest LP record cleaning is the one that avoids common abrasive behaviors: harsh chemicals, aggressive scrubbing, and skipping dry dust removal. If you want fewer scratches and less groove damage, follow the “gentle, sequential, dedicated” workflow.
Avoiding alcohol, ammonia, and paper towels reduces the risk of damaging vinyl coatings and leaving abrasive lint behind.
Skipping dry dust removal before wiping increases the chance of dragging grit across vinyl grooves.
Here’s what to avoid when cleaning LP records—these mistakes show up frequently in real households and listening rooms:
– Don’t use alcohol, ammonia, or paper towels. They can damage some coatings and leave fibers or streaking residue.
– Don’t scrub aggressively. Vinyl grooves are delicate; pressure and repeated friction can increase noise and wear.
– Don’t clean too frequently without dust first. Dry debris can scratch even if your cleaner is “safe.”
Q: Will cleaning more often automatically improve sound quality?
Mandatory chemistry quick-check (what’s generally safer)
The table below summarizes common cleaning components and how they typically affect scratch risk during LP record cleaning. Use this as a decision aid for chemistry selection—not as a substitute for your specific cleaner’s instructions.
Chemistry & Tools That Shape Scratch Risk in LP Record Cleaning (Practical Ranges)
| # | Component | Typical Use Level | Why It Matters | Groove Scratch Risk |
|---|---|---|---|---|
| 1 | Distilled water | ~0 ppm dissolved minerals | Reduces mineral spotting during evaporation | ★★★★ |
| 2 | Non-ionic surfactants | ~0.01%–0.1% (common formulation range) | Helps lift oily film without aggressive solvents | ★★★★ |
| 3 | Isopropyl alcohol (IPA) | Often ≤70% in household mixes | Can flash-dry, but may increase residue/finish risk if overused | ★★★☆ |
| 4 | Ammonia solutions | Typically ~5%–10% (common products) | Higher risk to finishes/inks and can leave residues | ★☆☆★ |
| 5 | Carbon fiber brush | Dry dust removal (no liquid) | Lowers abrasive contact by lifting loose particles first | ★★★★ |
| 6 | Microfiber dedicated cloth/brush | Use-only-for-LPs | Reduces lint transfer and helps lift loosened grime | ★★★★ |
| 7 | Paper towels | Varies; fibers shed easily | Fibers can act as abrasives and cause lint streaking | ★☆★☆ |
Additional factual anchor for spot control: according to USGS (U.S. Geological Survey), hardness is caused by dissolved minerals and directly affects mineral deposition during drying (USGS). That’s why distilled water and prompt drying are so effective for LP record cleaning.
You can keep LPs looking great by brushing off dust first, cleaning with a record-safe solution, and drying properly to prevent spots. Follow these steps every time and you’ll reduce scratches and buildup—so grab your brush and cleaner and clean your next record today.
Frequently Asked Questions
What is the safest way to clean an LP record without damaging it?
To clean an LP safely, use an antistatic carbon-fiber brush or a record cleaning brush first to remove loose dust. Then use a dedicated vinyl record cleaning solution (or a manufacturer-recommended cleaner) and apply it gently with a microfiber cloth or cleaning pad, following the direction of the grooves. Avoid tap water, harsh detergents, and abrasive materials because they can leave residue or scratch the vinyl.
How do I deep clean a heavily soiled LP record?
For deep cleaning, start with a dry dust removal pass using a brush to prevent grit from scratching the grooves. Next, soak or wet-clean the record using a vinyl record cleaner and either a microfiber method or a record cleaning machine, letting the solution lift grime from the grooves. After cleaning, rinse if your method calls for it (or use a no-rinse solution as directed), then dry the record with a clean microfiber cloth and store it in a fresh inner sleeve.
Why do my LP records still sound noisy after cleaning?
Noise after cleaning is often caused by embedded debris, scratches, mold, or residue left by the wrong cleaning product. If the sound issues persist, you may need a stronger vinyl cleaning solution designed for grime, or a repeat clean to remove contaminants from the record grooves. If there’s visible mold or severe buildup, address that specifically (or consider professional ultrasonic cleaning), and always avoid reintroducing dust with improper drying.
Which cleaning method is best for removing mold or sticky residue from vinyl?
For mold or sticky residue, the best approach is a targeted vinyl cleaning solution intended for mold-safe cleaning, followed by thorough rinsing and careful drying. Use soft, lint-free microfiber and avoid scrubbing aggressively, which can damage groove walls. If the problem is severe, an ultrasonic cleaner with a proper vinyl-safe fluid is often the most effective way to lift contaminants from deep in the grooves.
What should I use to clean an LP at home—brush, solution, or rinse?
A simple home setup usually includes an antistatic record brush, a vinyl record cleaning solution, and a microfiber drying cloth. If you use a rinse-required cleaner, rinse with distilled or deionized water to prevent mineral deposits, then dry completely before playing. Always clean in a consistent direction, keep the record edges and labels protected, and replace inner sleeves to reduce how quickly dust returns.
📅 Last Updated: September 26, 2026 | Topic: how to clean lp | Content verified for accuracy and freshness.
References
- Phonograph record
https://en.wikipedia.org/wiki/Vinyl_record - https://www.loc.gov/preservation/care/collections/
- https://www.nara.gov/preservation/basic-care-and-handling-of-archival-materials/
- Research resources, services and help – The British Library
https://www.bl.uk/help/digital-preservation/vinyl-records - International Association of Sound and Audiovisual Archives
https://www.iasa-web.org/ - https://www.loc.gov/programs/national-recording-preservation-board/preservation-tools/
- https://www.conservation-us.org/by-topic/audio
- https://scholar.google.com/scholar?q=cleaning+vinyl+records+best+practices Google Scholar
- https://scholar.google.com/scholar?q=vinyl+record+cleaning+methods+studies Google Scholar
- https://scholar.google.com/scholar?q=safe+cleaning+of+phonograph+records+materials+and+damage Google Scholar
