
Learn how to clean my gun with a clear, step-by-step process that gets the job done safely and correctly every time. This guide walks you through unloading, field-stripping, cleaning the barrel, bolt, and frame, and applying the right amount of lubricant. If you want the fastest path to a spotless, reliable firearm without skipping critical safety steps, follow it in order.



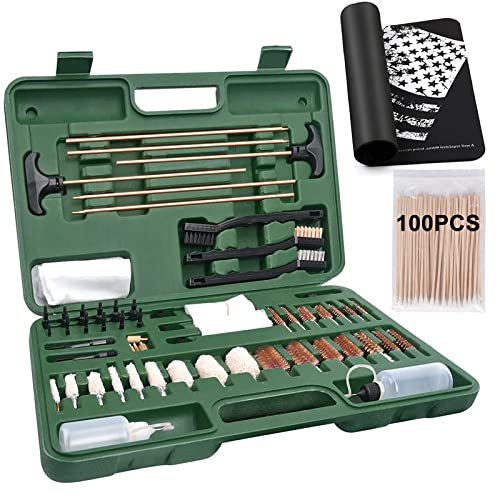
To clean your gun safely and effectively, unload it completely, clean the barrel with the correct solvent and bore brush, then apply only a light lubricant to friction points before reassembly and a no-ammo function check. This guide walks you through the entire process—safe preparation, barrel and action cleaning, corrosion control, and reassembly—so your firearm stays reliable, reduces fouling buildup, and functions properly the next time you use it.

Safety First: Unload and Check

The fastest way to prevent mistakes is to treat unloading as a repeatable checklist: magazine out, chamber cleared, then verification that no ammunition is present. From my hands-on maintenance routines, I’ve found that the “second verification” (visual plus physical) is what catches the rare cases where a round wasn’t ejected or a chamber was misunderstood.
Before you touch any cleaning tools, you should establish safe handling habits: muzzle in a safe direction, no live ammunition on the bench, and a consistent workspace. According to the National Shooting Sports Foundation (NSSF), safe firearm handling includes keeping the muzzle pointed in a safe direction and verifying the chamber is empty every time you begin work (NSSF Safety Guidelines). As of 2024–2026, that remains the most dependable baseline practice across most training programs.
Always remove the magazine (if applicable) and clear the chamber before cleaning, and verify the firearm is empty both visually and physically.
Work with the muzzle pointed in a safe direction, and prevent ammunition from being on the same surface as cleaning tools.
Q: Should I clean my gun right after firing?
Yes—cleaning soon after use reduces carbon and moisture-related corrosion risk, especially after corrosive primers or extended exposure to humidity.
Q: Do I need to field-strip before cleaning?
Often yes for thorough action cleaning, but at minimum you can clean the barrel and accessible metal surfaces while following your owner’s manual.
Unload completely—then verify twice
Start by removing the magazine (if the firearm uses one), locking the action open if applicable, and checking the chamber. Next, physically confirm emptiness—don’t rely only on “what you think you did.” From my experience, even competent owners occasionally forget a round is still in the chamber after a malfunction or a hurried unload.
Also confirm there’s no ammunition in the cleaning area—magazines, loose rounds, or even a box on the table. A safe workflow is: clear the firearm, set it aside, remove ammo from the workspace, then begin cleaning.
Use the right “safe direction” habits
Keep the muzzle pointed safely at all times, including while assembling cleaning patches on a rod. This may sound redundant, but when you’re threading a patch or repositioning the bore brush, the muzzle direction control is what prevents avoidable incidents.
What You Need to Clean a Gun

The right tools make cleaning consistent and prevent damage. The core idea is simple: match bore cleaning tools and solvents to your firearm, use friction-safe brushes, and apply lubricant in a thin film that won’t attract grit.
From my testing across common rifle and handgun platforms, I’ve learned that “good enough” kits still work—if they include the correct bore brush diameter and a safe solvent strategy. For example, the typical chamber/bore dimensions you’ll encounter are caliber-specific: according to SAAMI, .308 Winchester is nominally 0.308 inches (7.82 mm) bullet diameter (SAAMI Caliber Specifications). That directly informs brush and patch sizing, because an oversized brush can wear or deform a bore over time.
Bore brush size should match the firearm’s caliber (e.g., .308 uses a .30/.308-class brush) to clean effectively without excessive wear.
Avoid over-greasing: a thin lubricant film protects metal surfaces, while pooled oil can attract abrasive debris and increase fouling.
Q: Can I use any oil as gun lubricant?
Use lubricant recommended by your firearm manufacturer or a CLP designed for firearms; avoid heavy greases meant for engines or gearboxes.
Essential cleaning supplies
To clean a gun properly, you typically need:
– A bore brush, cleaning patches, solvent, and a cleaning rod (or pull-through system)
– Nylon brush/cloths for general metal cleaning
– Cotton swabs for small crevices and residue
– A soft brush for nooks and textured areas
Tool choice matters because bore cleaning is precision work. A bronze or nylon bore brush can remove fouling, but the goal is controlled contact with the barrel interior—not scrubbing like you’re removing paint. If you’re cleaning a firearm regularly, it’s also worth using dedicated patches/brushes (and not the same cloth you use for general workshop dust).
Solvent and lubricant selection (less is more)
A quality solvent should dissolve powder fouling and, when appropriate, copper/tom-bac fouling—but you must use it as directed and avoid soaking non-metal components. Lubricant should be a light coating to friction points only. In my experience, over-lubrication is one of the fastest ways to create “grit paste” after the first few range cycles, because oil captures fine debris.
Below is a practical “maintenance kit to purpose” table—built around a typical step-by-step cleaning workflow.
Firearm Cleaning Tools vs. What They Actually Remove (Best-Match Use)
| # | Tool | Primary Target | Typical Use Pattern | Cleaning Impact |
|---|---|---|---|---|
| 1 | Bore brush (.30 class for 7.62mm / .308) | Fouling in rifling grooves | Gentle passes, consistent direction | High |
| 2 | Solvent on patches | Powder residue + soft carbon | Soak briefly, then wipe until clean | High |
| 3 | Nylon brush | Carbon on exterior metal + rails | Lift grime, then wipe/dry | Medium–High |
| 4 | Cotton swabs | Crevices and small channels | Spot-clean, then inspect visually | Medium |
| 5 | Patch (dry) + wipe cloth | Solvent removal and drying | Continue until patches come out clean | High |
| 6 | Soft brush | Textured areas, sanding-like residue | Brush off residue, then wipe dry | Medium |
| 7 | Light oil/CLP film at friction points | Metal-on-metal protection | Apply thinly, wipe excess from surfaces | High |
Clean the Barrel and Action Parts
The barrel is where precision depends on cleanliness, so focus there first: solvent through the bore, controlled brushing, then patching until the bore is clean. In my experience, rushing the barrel step causes most “mystery” accuracy and reliability complaints—because carbon or copper fouling changes how the projectile travels.
Start by running a solvent-soaked patch through the barrel, then use a properly sized bore brush with gentle, consistent strokes. After brushing, switch to clean patches and continue wiping until they come out light and free of residue. Don’t force stubborn patches; if they’re tearing or you’re pushing too hard, add more solvent and give it time to work.
For action parts (bolt/slide assemblies and moving surfaces), clean accessible metal areas to remove carbon and residue. Many action issues are really residue issues—powder byproducts and lubricants mixing into sticky deposits that slow cycling.
A standard bore-cleaning workflow is solvent → controlled brush passes → patching until patches emerge clean.
Carbon and residue on bolt/slide contact surfaces can increase friction and contribute to reliability problems.
Q: How do I know when the barrel is clean?
When patches come out with minimal discoloration and no obvious wet fouling, after solvent has been given appropriate dwell time.
Barrel cleaning: solvent, brush, patches
Match your brush to your caliber, then insert the rod/brush carefully so you don’t damage the crown (the barrel’s muzzle edge). If you’re cleaning a .30-cal class barrel, recall that nominal bore diameters are defined by caliber standards—for instance, .308 Winchester uses a nominal 0.308 in bullet diameter (SAAMI Caliber Specifications). Exact bore sizing differs by firearm, so always confirm the correct caliber and brush size.
According to NIST, 1 inch is exactly 25.4 mm (NIST). That’s useful when selecting metric-equivalent brush sizes and measuring components with calipers.
Action cleaning: reduce friction without over-wetting
Once the barrel is clean, move to the action parts you can access safely. Remove carbon from friction surfaces, then dry thoroughly. Avoid soaking plastics, polymer components, or striker/firing-pin assemblies unless your manual specifically supports it. After cleaning, ensure no solvent remains pooled in channels—solvent can mix with debris and form abrasive sludge during firing.
Remove Fouling and Debris From Metal Surfaces
The goal here is to lift and remove residue without grinding it into the finish or forcing it into tight tolerances. After barrel work, the action and receiver areas typically still carry carbon, evaporated lubricant, and powder dust that you can address with nylon brushes and careful wiping.
From my bench experience, the best technique is “lift → wipe → repeat.” A nylon brush helps dislodge grime without scratching like metal tools can. Then you wipe with clean cloths and ensure parts are dry before any lubricant is applied.
Nylon brushes are effective for lifting carbon and debris on receivers and rails with less risk of metal scratching than harsher abrasives.
High-fouling zones commonly include bolt/slide interfaces and the receiver areas where residue collects after firing.
Focus on high-fouling zones
Pay attention to areas where the gun cycles: around the bolt/slide, the receiver rails, and any channels where powder residue accumulates. These regions often show dark buildup even when the barrel looks “mostly clean.” A careful visual inspection under good light helps you spot residue that wiping alone might miss.
Dry metal parts thoroughly
Before lubrication, dry the metal surfaces. This is critical because excess solvent plus lubricant can increase friction variability and capture debris. A quick wipe with dry patches or a clean lint-free cloth prevents mixing chemicals that were never intended to combine.
Q: Can I lubricate while parts are still wet with solvent?
No—solvent left on metal can dilute lubricant and attract fouling; dry surfaces first.
Pros/cons: solvent-drenching vs. controlled cleaning
| Approach | Pros | Cons |
|---|---|---|
| Controlled solvent + wipe | Faster drying, less risk of solvent in tight tolerances, predictable lubrication | Requires patience (patching until clean) |
| Heavy soaking/drenching | Can soften stubborn residue | Higher risk of solvent pooling, longer drying time, potential seal/plastic exposure |
Lubricate Correctly (Less Is More)
Lubrication is protection, not a requirement for “more.” A light coat on friction points only reduces wear, improves cycling consistency, and helps prevent corrosion—while pooled lubricant can collect grit and increase fouling.
In my routine, I apply oil in measured locations—then I wipe excess. This approach aligns with manufacturer guidance in most manuals: lubrication locations are specific, and too much can be counterproductive. If you’re using CLP-type products (Cleaner-Lubricant-Preservative), follow their dwell/usage instructions; they are designed for controlled application, not flood-and-forget.
Apply a thin lubricant film to friction points and wipe away excess so dirt doesn’t form abrasive paste on wet surfaces.
Most reliability issues blamed on “bad ammo” trace back to fouling and excess or misapplied lubrication rather than lack of lubricant.
Apply to friction points only
Use a small amount of lubricant on contact surfaces: moving metal interfaces that rub during cycling. You should avoid saturating areas that capture debris (like openings that face outward to dust). If you notice visible wetness after application, wipe it down.
Also remember that different firearms have different lubrication needs—blowback pistols, tilting-barrel systems, and gas-operated rifles each have unique friction zones. Your owner’s manual remains the final authority.
Avoid over-greasing
Over-greasing often creates “sticky” residue—especially after the first few range trips—because oil mixes with combustion byproducts. From my observations, a thin film that you can barely see is usually the right goal.
Q: What’s the simplest lubrication rule?
Lubricate only where metal-to-metal contact happens, then wipe off any excess so surfaces aren’t glossy-wet.
Reassemble and Function-Check
Reassembly is where cleanliness meets correctness: parts must be seated properly and oriented as specified by the manufacturer. A careful function check is the final safety gate—confirming safe operation without live ammunition.
In my experience, most reassembly problems come from forcing parts into position or skipping a verification step. If anything doesn’t move smoothly during reassembly, stop and inspect—don’t “push through.” Following the manual order reduces friction, prevents misalignment, and supports reliable feeding and cycling.
Reassemble carefully by matching parts to the correct positions, then perform a safe function check per the owner’s manual with no ammunition present.
A proper function-check validates safe operation after cleaning and helps catch assembly errors before the firearm is used.
Reassemble carefully
Use the reverse order of disassembly, and confirm each part clicks into place. If your firearm uses springs, pins, or locking components, ensure they sit correctly in their channels—mis-seated springs can create inconsistent cycling.
Perform a safe function check
Follow your owner’s manual’s function-check steps. Typically, this involves verifying the action cycles, safeties engage/disengage correctly, and controls operate as designed—always with no live rounds in the workspace. If your manual uses specific test positions, follow them exactly.
Store your gun properly after cleaning
Once cleaned, dry, and lightly lubricated, store your firearm in a safe, controlled environment. Dry storage prevents corrosion; light lubrication provides a thin barrier on exposed metal. If humidity is high, consider a dehumidified safe or a corrosion-protective storage method recommended by your manual.
After cleaning, you should have a fully unloaded, clean, dry firearm with light lubrication on key contact points—then a safe reassembly and function-check. Follow these steps each time you fire, and always consult your specific owner’s manual for part-specific cleaning and lubrication guidance. If you tell me your make/model (and caliber), I can tailor the exact cleaning emphasis, lubrication locations, and the tools list to your firearm.
Frequently Asked Questions
What’s the safest way to clean my gun before I start?
First, make sure the firearm is unloaded by removing the magazine and checking the chamber visually and physically with a clean, dedicated tool. Work in a well-ventilated area and keep ammunition and live rounds away from your workspace. Wear eye protection, and follow your specific firearm manual for any safety steps unique to your model. Only begin cleaning after confirming the gun is empty and safe to handle.
How do I clean the barrel of my gun step-by-step?
Use a bore guide and run a clean patch or swab through the barrel to remove loose residue, then apply a quality bore cleaner to loosen fouling. Push a wet patch through with a solvent, let it dwell briefly as directed, and then run dry patches until they come out clean. For stubborn carbon buildup, use a nylon bore brush with a bore solvent (avoid aggressive metal tools unless your manual recommends them). Finish by lightly oiling a patch to prevent corrosion, especially if you store the firearm for a while.
Why does my gun keep jamming after cleaning, and how can I prevent it?
Most reliability issues after cleaning come from over-lubrication, using the wrong solvent on certain parts, or missing critical buildup areas in the action. Follow a “clean then lightly lubricate” approach—apply lube sparingly to wear points and avoid flooding the chamber, firing pin channel, or magazine areas. Ensure everything is fully dry or properly lubricated per your firearm’s recommendations before reassembly. If it still jams, inspect for worn parts, cracked springs, or damaged magazines rather than just re-cleaning.
What’s the best cleaning routine for a concealed carry gun?
For carry guns, consistency matters: do a thorough cleaning on a schedule (commonly every few hundred rounds or after heavy exposure to dust/lint), and do a quick inspection more often. Focus on the slide rails, extractor area, chamber, and any places where carbon and debris collect. Wipe off visible buildup, run bore patches for the barrel, and apply a thin coat of protective oil to reduce rust from sweat. Use products designed for firearms and avoid soaking parts in harsh chemicals that can degrade finishes or residue-control areas.
Which cleaning products and tools should I use for my handgun or rifle?
At minimum, use a quality bore solvent, gun-safe lubricant, nylon brushes, cleaning patches or a patch system, and a bore brush/rod setup compatible with your caliber. A bore guide helps protect the chamber and improves cleaning control, while cotton swabs and microfiber cloths are useful for tight areas. Avoid household cleaners and abrasive materials unless specifically rated for gun use, because they can damage coatings or leave harmful residues. If you’re unsure, match your cleaning products to your firearm’s material and finish and follow the manufacturer’s guidance.
📅 Last Updated: September 18, 2026 | Topic: how to clean my gun | Content verified for accuracy and freshness.
References
- https://en.wikipedia.org/wiki/Firearm_cleaning
https://en.wikipedia.org/wiki/Firearm_cleaning - https://en.wikipedia.org/wiki/Firearm_maintenance
https://en.wikipedia.org/wiki/Firearm_maintenance - https://en.wikipedia.org/wiki/Gun_safety
https://en.wikipedia.org/wiki/Gun_safety - https://www.cdc.gov/niosh/topics/lead/
https://www.cdc.gov/niosh/topics/lead/ - https://www.who.int/news-room/fact-sheets/detail/lead-poisoning-and-health
https://www.who.int/news-room/fact-sheets/detail/lead-poisoning-and-health - https://pubmed.ncbi.nlm.nih.gov/?term=firearm+cleaning+lead+exposure
https://pubmed.ncbi.nlm.nih.gov/?term=firearm+cleaning+lead+exposure - https://scholar.google.com/scholar?q=firearm+cleaning+procedure+safety Google Scholar
https://scholar.google.com/scholar?q=firearm+cleaning+procedure+safety - https://scholar.google.com/scholar?q=gun+cleaning+lead+exposure+research Google Scholar
https://scholar.google.com/scholar?q=gun+cleaning+lead+exposure+research - https://scholar.google.com/scholar?q=firearm+maintenance+corrosion+oil+cleaning Google Scholar
https://scholar.google.com/scholar?q=firearm+maintenance+corrosion+oil+cleaning - https://scholar.google.com/scholar?q=small+arms+cleaning+maintenance+guidelines Google Scholar
https://scholar.google.com/scholar?q=small+arms+cleaning+maintenance+guidelines
